
Owner's Manual
Page 1
E Owner's Manual Keep This Manual For Future Reference.
E Owner's Manual Keep This Manual For Future Reference.
Owner's Manual
Page 4
... if a foreign object or liquid gets inside a car with liquid or small metal objects on a power cord covered by Yamaha may result. Using the unit in this Owner's Manual or as marked on top of the power cord. If you think internal inspection, maintenance, or repair is a fi... cable plug if it from the AC outlet, and contact your card is compatible. A damaged power cord is a potential electrical shock hazard. 01V96-Owner's Manual Using the unit with wet hands. Cautions • Keep this unit away from the AC outlet. Unstable surfaces, such as near cooking stoves,...
... if a foreign object or liquid gets inside a car with liquid or small metal objects on a power cord covered by Yamaha may result. Using the unit in this Owner's Manual or as marked on top of the power cord. If you think internal inspection, maintenance, or repair is a fi... cable plug if it from the AC outlet, and contact your card is compatible. A damaged power cord is a potential electrical shock hazard. 01V96-Owner's Manual Using the unit with wet hands. Cautions • Keep this unit away from the AC outlet. Unstable surfaces, such as near cooking stoves,...
Owner's Manual
Page 5
... noise into nearby radios and TVs. The rate of components with a dedicated ground connection to a memory card, or another unit by improper use this unit. 01V96-Owner's Manual Blocked ventilation holes are wired as when going on this unit may cause fire or electrical shock. • If you know you turn on...
... noise into nearby radios and TVs. The rate of components with a dedicated ground connection to a memory card, or another unit by improper use this unit. 01V96-Owner's Manual Blocked ventilation holes are wired as when going on this unit may cause fire or electrical shock. • If you know you turn on...
Owner's Manual
Page 6
... Rack Mount Kit • mini YGDAI I/O cards 01V96-Owner's Manual Pro Tools is a trademark or registered trademark of Waves, Inc. Waves is a trademark of Digidesign and/or Avid Technology, Inc. Yamaha is a trademark of Yamaha Corporation. © 2003 Yamaha Corporation. Copyright No part of this unit, its ...software, or this Owner's Manual may be reproduced or distributed in any form or by any means without...
... Rack Mount Kit • mini YGDAI I/O cards 01V96-Owner's Manual Pro Tools is a trademark or registered trademark of Waves, Inc. Waves is a trademark of Digidesign and/or Avid Technology, Inc. Yamaha is a trademark of Yamaha Corporation. © 2003 Yamaha Corporation. Copyright No part of this unit, its ...software, or this Owner's Manual may be reproduced or distributed in any form or by any means without...
Owner's Manual
Page 7
... personal use . The illustrations and LCD screens as shown in the previous sections. About this Owner's Manual vii About this manual discusses a specific section or function of the 01V96. The Table of the commercially available music sequence data and/or digital audio files is... not in square brackets, for your instrument. The Input and Output Channels are enclosed in use . 01V96-Owner's Manual Copying of Contents can select pages. See "Selecting Display Pages" on page 28 for instructional purposes only, and may appear somewhat ...
... personal use . The illustrations and LCD screens as shown in the previous sections. About this Owner's Manual vii About this manual discusses a specific section or function of the 01V96. The Table of the commercially available music sequence data and/or digital audio files is... not in square brackets, for your instrument. The Input and Output Channels are enclosed in use . 01V96-Owner's Manual Copying of Contents can select pages. See "Selecting Display Pages" on page 28 for instructional purposes only, and may appear somewhat ...
Owner's Manual
Page 8
... Outs 109 Aux Out 1-8 109 Setting Aux Out 1-8 from the Display 110 Viewing Aux Out settings 112 Setting Aux Out 1-8 from the Control Surface 113 01V96-Owner's Manual
... Outs 109 Aux Out 1-8 109 Setting Aux Out 1-8 from the Display 110 Viewing Aux Out settings 112 Setting Aux Out 1-8 from the Control Surface 113 01V96-Owner's Manual
Owner's Manual
Page 9
... Remote Function 185 Pro Tools Remote Layer 186 Nuendo Remote Layer 202 Other DAW Remote Layers 202 MIDI Remote Layer 203 Machine Control Function 208 01V96-Owner's Manual
... Remote Function 185 Pro Tools Remote Layer 186 Nuendo Remote Layer 202 Other DAW Remote Layers 202 MIDI Remote Layer 203 Machine Control Function 208 01V96-Owner's Manual
Owner's Manual
Page 10
10 Contents 18 MIDI 211 MIDI & the 01V96 211 MIDI Port Setup 212 Assigning Scenes to Program Changes for Remote Recall 215 Assigning Parameters to Control ... the User Defined Keys 231 Using Operation Lock 233 Cascading Consoles 234 Checking the Battery and the System Version 238 Initializing the 01V96 239 Calibrating the Faders 240 Appendix A: Parameter Lists 241 USER DEFINED KEYS 241 USER DEFINED KEYS Initial Assignments 243 Input Patch... Change Table 292 Initial Parameter to Control Change Table 293 MIDI Data Format 309 Appendix D: Options 323 Index 324 01V96-Owner's Manual
10 Contents 18 MIDI 211 MIDI & the 01V96 211 MIDI Port Setup 212 Assigning Scenes to Program Changes for Remote Recall 215 Assigning Parameters to Control ... the User Defined Keys 231 Using Operation Lock 233 Cascading Consoles 234 Checking the Battery and the System Version 238 Initializing the 01V96 239 Calibrating the Faders 240 Appendix A: Parameter Lists 241 USER DEFINED KEYS 241 USER DEFINED KEYS Initial Assignments 243 Input Patch... Change Table 292 Initial Parameter to Control Change Table 293 MIDI Data Format 309 Appendix D: Options 323 Index 324 01V96-Owner's Manual

Owner's Manual
Page 11
.... This integrated, comprehensive audio system features remote control function for choosing the Yamaha 01V96 Digital Mixing Console. acy multi-track digital recorders. • You can be routed to desired output jacks. 01V96-Owner's Manual The 01V96 covers a broad range of 16 inputs/outputs. • Digital 2TR In...+48 V phantom power and 4 line inputs • 12 analog inserts • Any Bus Outs or Channel Inserts can cascade two 01V96s while remaining in the digital domain. • Input patches enable assignment of input signals to desired signal paths. • Output patches ...
.... This integrated, comprehensive audio system features remote control function for choosing the Yamaha 01V96 Digital Mixing Console. acy multi-track digital recorders. • You can be routed to desired output jacks. 01V96-Owner's Manual The 01V96 covers a broad range of 16 inputs/outputs. • Digital 2TR In...+48 V phantom power and 4 line inputs • 12 analog inserts • Any Bus Outs or Channel Inserts can cascade two 01V96s while remaining in the digital domain. • Input patches enable assignment of input signals to desired signal paths. • Output patches ...
Owner's Manual
Page 12
...; Remote Layer for remote control of Pro Tools, Nuendo, and other DAWs that support the Pro Tools protocol • Control an external recorder via MIDI 01V96-Owner's Manual Group multiple channels and pair channels for computer connection • Scene recall and mix parameter changes via MMC commands. ■ MIDI • Equipped with MIDI...
...; Remote Layer for remote control of Pro Tools, Nuendo, and other DAWs that support the Pro Tools protocol • Control an external recorder via MIDI 01V96-Owner's Manual Group multiple channels and pair channels for computer connection • Scene recall and mix parameter changes via MMC commands. ■ MIDI • Equipped with MIDI...
Owner's Manual
Page 13
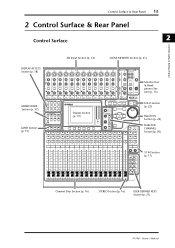
... (p. 22) Data Entry Section (p. 22) SELECTED CHANNEL Section (p. 20) ST IN Section (p. 17) Channel Strip Section (p. 16) STEREO Section (p. 16) USER DEFINED KEYS Section (p. 21) 01V96-Owner's Manual
... (p. 22) Data Entry Section (p. 22) SELECTED CHANNEL Section (p. 20) ST IN Section (p. 17) Channel Strip Section (p. 16) STEREO Section (p. 16) USER DEFINED KEYS Section (p. 21) 01V96-Owner's Manual

Owner's Manual
Page 14
... B is turned off the +48V phantom power feed to INSERT jack To processor's input 1/4" phone plug Sleeve (ground) Tip (return) Sleeve (ground) From processor's output 01V96-Owner's Manual 14 Chapter 2-Control Surface & Rear Panel AD Input Section 1 3 4 5 6 7 1 2 3 4 5 A A A A A B B B B B INPUT (BAL) INSERT OUT IN (UNBAL) INSERT I/O INSERT I/O INSERT I/O INSERT I/O INSERT I/O PAD 20dB 20dB 20dB 20dB...
... B is turned off the +48V phantom power feed to INSERT jack To processor's input 1/4" phone plug Sleeve (ground) Tip (return) Sleeve (ground) From processor's output 01V96-Owner's Manual 14 Chapter 2-Control Surface & Rear Panel AD Input Section 1 3 4 5 6 7 1 2 3 4 5 A A A A A B B B B B INPUT (BAL) INSERT OUT IN (UNBAL) INSERT I/O INSERT I/O INSERT I/O INSERT I/O INSERT I/O PAD 20dB 20dB 20dB 20dB...
Owner's Manual
Page 15
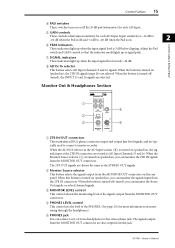
... the 20 dB pad (attenuator) for more information on monitoring through the headphones.) E PHONES jack You can connect a set of stereo headphones to this jack. 01V96-Owner's Manual E GAIN controls These controls adjust input sensitivity for each AD Input. Input sensitivity is -16 dB to -60 dB when the Pad is off, and...
... the 20 dB pad (attenuator) for more information on monitoring through the headphones.) E PHONES jack You can connect a set of stereo headphones to this jack. 01V96-Owner's Manual E GAIN controls These controls adjust input sensitivity for each AD Input. Input sensitivity is -16 dB to -60 dB when the Pad is off, and...
Owner's Manual
Page 16
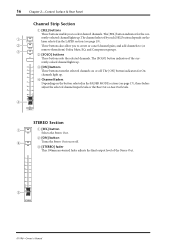
... on or off . rently-soloed channel lights up . The [SOLO] button indicator of the Stereo Out. 0 5 10 15 20 30 40 50 60 70 3 STEREO 01V96-Owner's Manual C [STEREO] fader This 100mm motorized fader adjusts the final output level of the cur- The channel selected by each [SEL] button depends on or...
... on or off . rently-soloed channel lights up . The [SOLO] button indicator of the Stereo Out. 0 5 10 15 20 30 40 50 60 70 3 STEREO 01V96-Owner's Manual C [STEREO] fader This 100mm motorized fader adjusts the final output level of the cur- The channel selected by each [SEL] button depends on or...

Owner's Manual
Page 17
.... E Level controls These controls adjust the ST IN channel levels. The indicators to the right of these buttons switches the Fader mode (see page 34). 01V96-Owner's Manual B [HOME] button This button recalls Meter pages that display Input Channel levels or Output Channel (Bus Out, Aux Out, Stereo Out) levels (see page 33...
.... E Level controls These controls adjust the ST IN channel levels. The indicators to the right of these buttons switches the Fader mode (see page 34). 01V96-Owner's Manual B [HOME] button This button recalls Meter pages that display Input Channel levels or Output Channel (Bus Out, Aux Out, Stereo Out) levels (see page 33...
Owner's Manual
Page 18
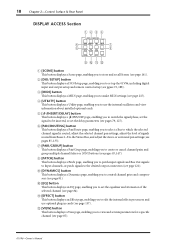
J [EQ] button This button displays an EQ page, enabling you to set up the 01V96, including digital input and output setup and remote control setup (see pgaes 72, 188). F [PAN/ROUTING] button This button displays a Pan/Route page, enabling you ... set the equalizer and attenuator of signals routed from Buses 1-8 to the Stereo Bus, and adjust the stereo or surround pan settings (see page 87). 01V96-Owner's Manual H [PATCH] button This button displays a Patch page, enabling you to patch input signals and Bus Out signals to Input channels, or patch signals to the...
J [EQ] button This button displays an EQ page, enabling you to set up the 01V96, including digital input and output setup and remote control setup (see pgaes 72, 188). F [PAN/ROUTING] button This button displays a Pan/Route page, enabling you ... set the equalizer and attenuator of signals routed from Buses 1-8 to the Stereo Bus, and adjust the stereo or surround pan settings (see page 87). 01V96-Owner's Manual H [PATCH] button This button displays a Patch page, enabling you to patch input signals and Bus Out signals to Input channels, or patch signals to the...
Owner's Manual
Page 19
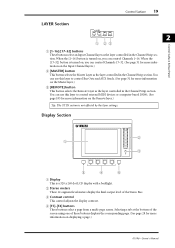
... the Channel Strip section. You can use this layer to control Bus Outs and AUX Sends. (See page 31 for more information on displaying a page.) 01V96-Owner's Manual You can use this layer to control external MIDI devices or computer-based DAWs. (See page 185 for more information on the Input Channel layers...
... the Channel Strip section. You can use this layer to control Bus Outs and AUX Sends. (See page 31 for more information on displaying a page.) 01V96-Owner's Manual You can use this layer to control external MIDI devices or computer-based DAWs. (See page 185 for more information on the Input Channel layers...
Owner's Manual
Page 20
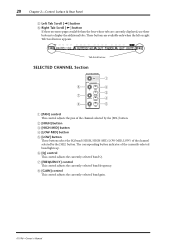
... band (HIGH, HIGH-MID, LOW-MID, LOW) of the channel selected by the [SEL] button. H [GAIN] control This control adjusts the currently-selected band gain. 01V96-Owner's Manual The corresponding button indicator of the channel selected by the [SEL] button. Tab Scroll arrow SELECTED CHANNEL Section 6 7 8 SELECTED CHANNEL PAN EQUALIZER Q HIGH HIGH-MID...
... band (HIGH, HIGH-MID, LOW-MID, LOW) of the channel selected by the [SEL] button. H [GAIN] control This control adjusts the currently-selected band gain. 01V96-Owner's Manual The corresponding button indicator of the channel selected by the [SEL] button. Tab Scroll arrow SELECTED CHANNEL Section 6 7 8 SELECTED CHANNEL PAN EQUALIZER Q HIGH HIGH-MID...
Owner's Manual
Page 21
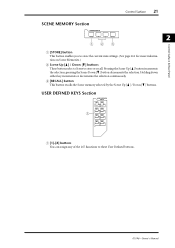
... settings. (See page 161 for more information on Scene Memories.) B Scene Up [ ] / Down [ ] buttons These buttons select a Scene to these User Defined buttons. 01V96-Owner's Manual Holding down either key increments or decrements the selection continuously. pressing the Scene Down [ ] button decrements the selection. Pressing the Scene Up [ ] button increments the...
... settings. (See page 161 for more information on Scene Memories.) B Scene Up [ ] / Down [ ] buttons These buttons select a Scene to these User Defined buttons. 01V96-Owner's Manual Holding down either key increments or decrements the selection continuously. pressing the Scene Down [ ] button decrements the selection. Pressing the Scene Up [ ] button increments the...
Owner's Manual
Page 22
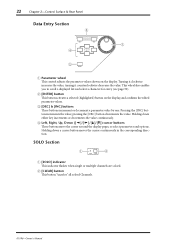
... for entry (see page 30). Holding down a cursor button moves the cursor continuously in the corresponding direction. B [CLEAR] button This button "unsolos" all soloed Channels. 01V96-Owner's Manual Turning it counterclockwise decreases the value. C [DEC] & [INC] buttons These buttons increment or decrement a parameter value by one.
... for entry (see page 30). Holding down a cursor button moves the cursor continuously in the corresponding direction. B [CLEAR] button This button "unsolos" all soloed Channels. 01V96-Owner's Manual Turning it counterclockwise decreases the value. C [DEC] & [INC] buttons These buttons increment or decrement a parameter value by one.

