
Owner's Manual
Page 6
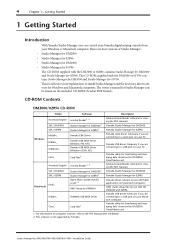
... trademark of Steinberg Media Technologies AG. Waves is a registered trademark of Waves, Inc. Copyright No part of this unit, its software, or this Owner's Manual may be reproduced or distributed in any form or by any means without the prior written authorization of...equipment is a trademark and Tascam and Teac are registered trademarks of their respective holders and are registered trademarks of Yamaha Corporation. © 2003 Yamaha Corporation. Package Contents • 01V96 Digital Mixing Console • CD-ROM • Power cord • This manual • Studio Manager ...
... trademark of Steinberg Media Technologies AG. Waves is a registered trademark of Waves, Inc. Copyright No part of this unit, its software, or this Owner's Manual may be reproduced or distributed in any form or by any means without the prior written authorization of...equipment is a trademark and Tascam and Teac are registered trademarks of their respective holders and are registered trademarks of Yamaha Corporation. © 2003 Yamaha Corporation. Package Contents • 01V96 Digital Mixing Console • CD-ROM • Power cord • This manual • Studio Manager ...

Owner's Manual
Page 11
This integrated, comprehensive audio system features remote control function for choosing the Yamaha 01V96 Digital Mixing Console. Welcome 11 1 Welcome 1 Welcome Thank you to assign functions to control 01V96 internal parameters. • ADAT optical connectors • Expansion slot for optional digital I/O, AD, and DA cards.... Any Bus Outs or Channel Inserts can set levels for Input Channels, Aux send levels, and Bus Outs. • Four selectable software layers determine the function of channel faders. • 320 x 240 dot LCD display • Buttons and controls in the slot ...
This integrated, comprehensive audio system features remote control function for choosing the Yamaha 01V96 Digital Mixing Console. Welcome 11 1 Welcome 1 Welcome Thank you to assign functions to control 01V96 internal parameters. • ADAT optical connectors • Expansion slot for optional digital I/O, AD, and DA cards.... Any Bus Outs or Channel Inserts can set levels for Input Channels, Aux send levels, and Bus Outs. • Four selectable software layers determine the function of channel faders. • 320 x 240 dot LCD display • Buttons and controls in the slot ...
Owner's Manual
Page 12
... Surround channel outputs can be assigned to suit connected devices. ■ Remote Control • Control and manage your 01V96 from your Mac or PC using bundled Studio Manager software. • Remote Layer for remote control of Pro Tools, Nuendo, and other DAWs that support the Pro Tools ...protocol • Control an external recorder via MIDI 01V96-Owner's Manual 12 Chapter 1-Welcome ■ Channel Configuration ...
... Surround channel outputs can be assigned to suit connected devices. ■ Remote Control • Control and manage your 01V96 from your Mac or PC using bundled Studio Manager software. • Remote Layer for remote control of Pro Tools, Nuendo, and other DAWs that support the Pro Tools ...protocol • Control an external recorder via MIDI 01V96-Owner's Manual 12 Chapter 1-Welcome ■ Channel Configuration ...
Owner's Manual
Page 185
...the faders or [ON] buttons to remotely control a connected MIDI device, such as a synthesizer. • User Assignable Layer.......You can combine the 01V96 channels to create a custom layer. (See page 229 for more information on this function.) ■ Machine Control By using Remote layer. There ... remotely control Digidesign Pro Tools. • Nuendo You can remotely control Steinberg Nuendo. • General DAW You can remotely control DAW software that is enabled when you turn on the LAYER [REMOTE] button. The following targets are two types of Remote functions, you must connect ...
...the faders or [ON] buttons to remotely control a connected MIDI device, such as a synthesizer. • User Assignable Layer.......You can combine the 01V96 channels to create a custom layer. (See page 229 for more information on this function.) ■ Machine Control By using Remote layer. There ... remotely control Digidesign Pro Tools. • Nuendo You can remotely control Steinberg Nuendo. • General DAW You can remotely control DAW software that is enabled when you turn on the LAYER [REMOTE] button. The following targets are two types of Remote functions, you must connect ...
Owner's Manual
Page 186
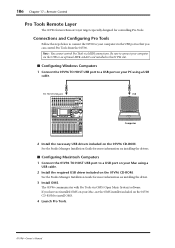
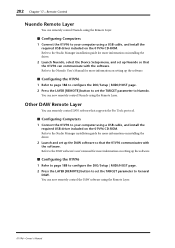
Be sure to connect your computer via OMS (Open Music System) software. See the Studio Manager Installation Guide for controlling Pro Tools. 186 Chapter 17-Remote Control Pro Tools Remote Layer The 01V96 features Remote Layer target especially designed for more information on installing the drivers. ■ Configuring ...control Pro Tools via the USB port so that you have not installed OMS on your Mac, use the OMS installer included on the 01V96 CD-ROM to your Mac using a USB cable. See the Studio Manager Installation Guide for more information on installing the driver. 3 Install ...
Be sure to connect your computer via OMS (Open Music System) software. See the Studio Manager Installation Guide for controlling Pro Tools. 186 Chapter 17-Remote Control Pro Tools Remote Layer The 01V96 features Remote Layer target especially designed for more information on installing the drivers. ■ Configuring ...control Pro Tools via the USB port so that you have not installed OMS on your Mac, use the OMS installer included on the 01V96 CD-ROM to your Mac using a USB cable. See the Studio Manager Installation Guide for more information on installing the driver. 3 Install ...
Owner's Manual
Page 202
...MIDI/HOST page. 2 Press the LAYER [REMOTE] button to Nuendo. You can now remotely control Nuendo using the Remote Layer. 01V96-Owner's Manual Refer to the DAW software's user's manual for more information on installing the driver. 2 Launch Nuendo, select the Device Setup menu, and set the ...TARGET parameter to set up the DAW software so that the 01V96 communicates with the software. Refer to the Studio Manager installation guide for more information on installing the driver. 2 Launch and set the TARGET ...
...MIDI/HOST page. 2 Press the LAYER [REMOTE] button to Nuendo. You can now remotely control Nuendo using the Remote Layer. 01V96-Owner's Manual Refer to the DAW software's user's manual for more information on installing the driver. 2 Launch Nuendo, select the Device Setup menu, and set the ...TARGET parameter to set up the DAW software so that the 01V96 communicates with the software. Refer to the Studio Manager installation guide for more information on installing the driver. 2 Launch and set the TARGET ...
Owner's Manual
Page 211
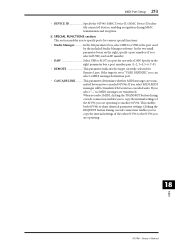
...the assignment of these messages, they overwrite the 01V96 data The 01V96 features the following MIDI messages. MIDI & the 01V96 Using Control Changes, Program Changes, and other MIDI messages enables you must install the appropriate driver software on the computer. When the 01V96 receives these MIDI messages can be slow. This .... • MIDI IN/THRU/OUT ports These ports transmit and receive MIDI data to recall Scenes and edit parameters on the 01V96, and store 01V96 internal data on installing drivers. Each of the USB port as is). • USB port This port is turned on but...
...the assignment of these messages, they overwrite the 01V96 data The 01V96 features the following MIDI messages. MIDI & the 01V96 Using Control Changes, Program Changes, and other MIDI messages enables you must install the appropriate driver software on the computer. When the 01V96 receives these MIDI messages can be slow. This .... • MIDI IN/THRU/OUT ports These ports transmit and receive MIDI data to recall Scenes and edit parameters on the 01V96, and store 01V96 internal data on installing drivers. Each of the USB port as is). • USB port This port is turned on but...
Owner's Manual
Page 213
...pair (1-2, 3-4, 5-6, 7-8). • REMOTE This parameter indicates the target currently selected for use with a DAW. If the target is set to another 01V96. In the two small parameter boxes on the right, specify a port number (if you are transmitted between two cascaded units. If you select "-," ...operating to "USER DEFINED," you are transferred. This enables both 01V96s to the 01V96 you selected USB), and an ID number. • DAW Select USB or SLOT as the port used by the included Studio Manager software. When you select MIDI, clicking the TRANSMIT button during MMC...
...pair (1-2, 3-4, 5-6, 7-8). • REMOTE This parameter indicates the target currently selected for use with a DAW. If the target is set to another 01V96. In the two small parameter boxes on the right, specify a port number (if you are transmitted between two cascaded units. If you select "-," ...operating to "USER DEFINED," you are transferred. This enables both 01V96s to the 01V96 you selected USB), and an ID number. • DAW Select USB or SLOT as the port used by the included Studio Manager software. When you select MIDI, clicking the TRANSMIT button during MMC...
Owner's Manual
Page 215
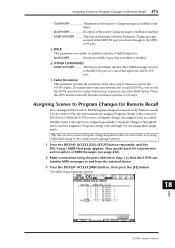
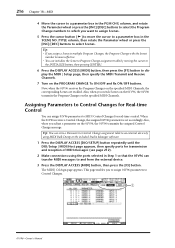
... from a sequencer, select the HIGH button. When the 01V96 receives a Program Change, the assigned Scene is enabled or disabled. Tip: You can store a Scene to Program Change assignment table to an external device by using MIDI Bulk Dump or the included Studio Manager software. 1 Press the DISPLAY ACCESS [DIO/SETUP] button repeatedly...
... from a sequencer, select the HIGH button. When the 01V96 receives a Program Change, the assigned Scene is enabled or disabled. Tip: You can store a Scene to Program Change assignment table to an external device by using MIDI Bulk Dump or the included Studio Manager software. 1 Press the DISPLAY ACCESS [DIO/SETUP] button repeatedly...
Owner's Manual
Page 216
...ACCESS [MIDI] button, then press the [F3] button. The MIDI | Ctl Asgn page appears. Also, when you switch Scenes on the 01V96, the 01V96 transmits the Program Changes on the specified MIDI Channels, the corresponding Scenes are recalled. Also, when you assign a Scene to multiple ... assign 01V96 parameters to MIDI Control Changes for transmission and reception of MIDI messages (see page 212). 2 Make connections using MIDI Bulk Dump or the included Studio Manager software. 1 Press the DISPLAY ACCESS [DIO/SETUP] button repeatedly until the DIO/Setup | MIDI/Host page appears, then...
...ACCESS [MIDI] button, then press the [F3] button. The MIDI | Ctl Asgn page appears. Also, when you switch Scenes on the 01V96, the 01V96 transmits the Program Changes on the specified MIDI Channels, the corresponding Scenes are recalled. Also, when you assign a Scene to multiple ... assign 01V96 parameters to MIDI Control Changes for transmission and reception of MIDI messages (see page 212). 2 Make connections using MIDI Bulk Dump or the included Studio Manager software. 1 Press the DISPLAY ACCESS [DIO/SETUP] button repeatedly until the DIO/Setup | MIDI/Host page appears, then...

Owner's Manual
Page 222
In this way, you use the included Studio Manager software to store 01V96 data to an external device. 1 Press the DISPLAY ACCESS [DIO/SETUP] button repeatedly until the DIO/Setup | MIDI/Host page appears, then specify ports for ... using MIDI Bulk Dump. The MIDI | Bulk page appears. 1 2 3 4 The page includes the following parameters: A CATEGORY section This section enables you want to the sequence software may occasionally drop out during bulk transmission in cascade. 222 Chapter 18-MIDI Transmitting Parameter Settings via MIDI (Bulk Dump) You can back up data...
In this way, you use the included Studio Manager software to store 01V96 data to an external device. 1 Press the DISPLAY ACCESS [DIO/SETUP] button repeatedly until the DIO/Setup | MIDI/Host page appears, then specify ports for ... using MIDI Bulk Dump. The MIDI | Bulk page appears. 1 2 3 4 The page includes the following parameters: A CATEGORY section This section enables you want to the sequence software may occasionally drop out during bulk transmission in cascade. 222 Chapter 18-MIDI Transmitting Parameter Settings via MIDI (Bulk Dump) You can back up data...

Owner's Manual
Page 232
To cancel the assignment, move the cursor to the YES button, then press [ENTER]. The 01V96 displays the User Define Select window, which enables you to assign functions to the selected buttons. 4 .... • You can store User Defined Keys banks to a computer hard disk using MIDI Bulk Dump (see page 222). 01V96-Owner's Manual A function is assigned to the selected User Defined button. When the window closes, the specified function...then press [ENTER]. The items that require numbers (such as a MIDI data filer, by using the included Studio Manager software.
To cancel the assignment, move the cursor to the YES button, then press [ENTER]. The 01V96 displays the User Define Select window, which enables you to assign functions to the selected buttons. 4 .... • You can store User Defined Keys banks to a computer hard disk using MIDI Bulk Dump (see page 222). 01V96-Owner's Manual A function is assigned to the selected User Defined button. When the window closes, the specified function...then press [ENTER]. The items that require numbers (such as a MIDI data filer, by using the included Studio Manager software.
Owner's Manual
Page 238
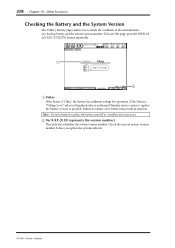
To locate this page, press the DISPLAY ACCESS [UTILITY] button repeatedly. 1 2 A Status If the Status is "Voltage Low!," ask your Yamaha dealer or authorized Yamaha service center to replace a low battery may occur. Failure to replace the battery as soon as a malfunction may result in data loss. If the Status ... the system version number. 238 Chapter 19-Other Functions Checking the Battery and the System Version The Utility | Battery page enables you update the system software. 01V96-Owner's Manual
To locate this page, press the DISPLAY ACCESS [UTILITY] button repeatedly. 1 2 A Status If the Status is "Voltage Low!," ask your Yamaha dealer or authorized Yamaha service center to replace a low battery may occur. Failure to replace the battery as soon as a malfunction may result in data loss. If the Status ... the system version number. 238 Chapter 19-Other Functions Checking the Battery and the System Version The Utility | Battery page enables you update the system software. 01V96-Owner's Manual
Owner's Manual
Page 239
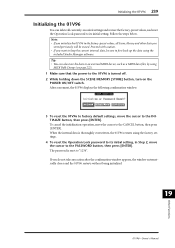
...stored previously will be sure to first back up the data using the included Studio Manager software. After a moment, the 01V96 displays the following confirmation window. 3 To reset the 01V96 to factory default settings, move the cursor to the CANCEL button, then press [ENTER]. The ... To cancel the initialization operation, move the cursor to the INITIALIZE button, then press [ENTER]. When the internal data is thoroughly overwritten, the 01V96 restarts using the factory settings. 4 To reset the Operation Lock password to its initial setting. Note: • If you do not take ...
...stored previously will be sure to first back up the data using the included Studio Manager software. After a moment, the 01V96 displays the following confirmation window. 3 To reset the 01V96 to factory default settings, move the cursor to the CANCEL button, then press [ENTER]. The ... To cancel the initialization operation, move the cursor to the INITIALIZE button, then press [ENTER]. When the internal data is thoroughly overwritten, the 01V96 restarts using the factory settings. 4 To reset the Operation Lock password to its initial setting. Note: • If you do not take ...

Studio Manager Installation Guide
Page 2
... Site Information about Studio Manager, related products, and other trademarks are the property of their respective holders and are the exclusive copyrights of Yamaha Corporation. • Use of the software and this manual is expressly forbidden without the prior written authorization of this owner's manual are registered trademarks of Toshiba America, Inc... the commercially available music sequence data and/or digital audio files is a trademark of Microsoft Corporation. Microsoft and Windows are for DM2000/DM1000/02R96/01V96-Installation Guide
... Site Information about Studio Manager, related products, and other trademarks are the property of their respective holders and are the exclusive copyrights of Yamaha Corporation. • Use of the software and this manual is expressly forbidden without the prior written authorization of this owner's manual are registered trademarks of Toshiba America, Inc... the commercially available music sequence data and/or digital audio files is a trademark of Microsoft Corporation. Microsoft and Windows are for DM2000/DM1000/02R96/01V96-Installation Guide
Studio Manager Installation Guide
Page 4
... Manager for 02R961 Open Music System (OMS) 2.3.81, 2 OMS Setup for YAMAHA USBdrv_ YAMAHA USB MIDI Driver Card_ Card Filer1 Adobe Acrobat Reader software for DM2000/DM1000/02R96/01V96-Installation Guide Yamaha Studio Manager for DM2000 Yamaha Studio Manager for 02R96 Opcode driver software for 01V96. For information on the DM2000's SmartMedia card. 1. Necessary if you are four...
... Manager for 02R961 Open Music System (OMS) 2.3.81, 2 OMS Setup for YAMAHA USBdrv_ YAMAHA USB MIDI Driver Card_ Card Filer1 Adobe Acrobat Reader software for DM2000/DM1000/02R96/01V96-Installation Guide Yamaha Studio Manager for DM2000 Yamaha Studio Manager for 02R96 Opcode driver software for 01V96. For information on the DM2000's SmartMedia card. 1. Necessary if you are four...
Studio Manager Installation Guide
Page 5
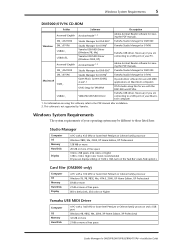
... Driver Computer OS Memory Hard Disk A PC with MIDI applications on your PC. Yamaha USB driver. OMS studio setup files for 01V96 Yamaha USB driver. Adobe Acrobat Reader software for viewing the PDF manuals. This software is not supported by Yamaha. Windows System Requirements The system requirements of free space Studio Manager for use with...
... Driver Computer OS Memory Hard Disk A PC with MIDI applications on your PC. Yamaha USB driver. OMS studio setup files for 01V96 Yamaha USB driver. Adobe Acrobat Reader software for viewing the PDF manuals. This software is not supported by Yamaha. Windows System Requirements The system requirements of free space Studio Manager for use with...
Studio Manager Installation Guide
Page 6
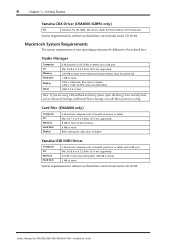
...Hard Disk A Macintosh computer with a PowerPC processor or better and a USB port Mac OS 8.6 to those listed here. Studio Manager for software not listed here can be found on the CD-ROM. Studio Manager Computer OS Memory Hard Disk Display Other A Macintosh G3/233 MHz ...) 7 MB or more System requirements for DM2000/DM1000/02R96/01V96-Installation Guide 6 Chapter 1-Getting Started Yamaha CBX Driver (DM2000/02R96 only) OS Windows 95, 98, 98SE, Me, NT4.0, 2000, XP Home Edition, XP Professional System requirements for software not listed here can be found on the CD-ROM. ...
...Hard Disk A Macintosh computer with a PowerPC processor or better and a USB port Mac OS 8.6 to those listed here. Studio Manager for software not listed here can be found on the CD-ROM. Studio Manager Computer OS Memory Hard Disk Display Other A Macintosh G3/233 MHz ...) 7 MB or more System requirements for DM2000/DM1000/02R96/01V96-Installation Guide 6 Chapter 1-Getting Started Yamaha CBX Driver (DM2000/02R96 only) OS Windows 95, 98, 98SE, Me, NT4.0, 2000, XP Home Edition, XP Professional System requirements for software not listed here can be found on the CD-ROM. ...
Studio Manager Installation Guide
Page 8
... 2000-page 13 • Windows XP-page 14 Studio Manager for DM2000/DM1000/02R96/01V96-Installation Guide USB MIDI Driver If you are connecting your Yamaha mixing console to install the Yamaha USB driver. If you already have this software installed, skip this section. 8 Chapter 2-Windows Installation 2 Windows Installation Acrobat Reader To view the...
... 2000-page 13 • Windows XP-page 14 Studio Manager for DM2000/DM1000/02R96/01V96-Installation Guide USB MIDI Driver If you are connecting your Yamaha mixing console to install the Yamaha USB driver. If you already have this software installed, skip this section. 8 Chapter 2-Windows Installation 2 Windows Installation Acrobat Reader To view the...

Studio Manager Installation Guide
Page 14
... 3 Go to System Hardware->Driver signatures->Driver signature options, select "Ignore-Install software without asking for DM2000/DM1000/02R96/01V96-Installation Guide 14 Chapter 2-Windows Installation Windows XP 1 Start your computer and Windows..., and then insert the included CD-ROM into your computer. If the Control Panel window appears as shown below, click "Switch to Classic View" on your Yamaha mixing console. The Found New Hardware Wizard appears. 7 Select "Install software...
... 3 Go to System Hardware->Driver signatures->Driver signature options, select "Ignore-Install software without asking for DM2000/DM1000/02R96/01V96-Installation Guide 14 Chapter 2-Windows Installation Windows XP 1 Start your computer and Windows..., and then insert the included CD-ROM into your computer. If the Control Panel window appears as shown below, click "Switch to Classic View" on your Yamaha mixing console. The Found New Hardware Wizard appears. 7 Select "Install software...
