
Owner's Manual
Page 1
Owner's Manual Keep This Manual For Future Reference. E
Owner's Manual Keep This Manual For Future Reference. E
Owner's Manual
Page 2
... over de verwijdering van de batterij op het moment dat u het apparaat ann het einde van de levensduur afdankt of de volgende Yamaha Service Afdeiing: Yamaha Music Nederland Service Afdeiing Kanaalweg 18-G, 3526 KL UTRECHT Tel. 030-2828425 ● Gooi de batterij niet weg, maar lever hem... in the plug which is marked by the letter E or by Yamaha Corporation of this product in a residential environment will not occur in this manual, meets FCC requirements. This equipment generates/uses radio frequencies and, if not installed and used . If this...
... over de verwijdering van de batterij op het moment dat u het apparaat ann het einde van de levensduur afdankt of de volgende Yamaha Service Afdeiing: Yamaha Music Nederland Service Afdeiing Kanaalweg 18-G, 3526 KL UTRECHT Tel. 030-2828425 ● Gooi de batterij niet weg, maar lever hem... in the plug which is marked by the letter E or by Yamaha Corporation of this product in a residential environment will not occur in this manual, meets FCC requirements. This equipment generates/uses radio frequencies and, if not installed and used . If this...
Owner's Manual
Page 4
A damaged power cord is a potential electrical shock hazard. 01V96-Owner's Manual You could receive an electrical shock. Using other types may cause ...damaged power cord is a fire and electrical shock hazard. • If you notice any cards, check the Yamaha web site to if your dealer. • Do not modify the unit. Doing so is a fire and... dealer for repair. Locations exposed to excessive heat, such as marked on a power cord covered by Yamaha may be careful not to place heavy objects on the unit. iv Important Information Important Information Warnings •...
A damaged power cord is a potential electrical shock hazard. 01V96-Owner's Manual You could receive an electrical shock. Using other types may cause ...damaged power cord is a fire and electrical shock hazard. • If you notice any cards, check the Yamaha web site to if your dealer. • Do not modify the unit. Doing so is a fire and... dealer for repair. Locations exposed to excessive heat, such as marked on a power cord covered by Yamaha may be careful not to place heavy objects on the unit. iv Important Information Important Information Warnings •...
Owner's Manual
Page 5
.... Blocked ventilation holes are wired as possible about replacing defective components. • Using a mobile telephone near the unit may cause interference on this unit. 01V96-Owner's Manual Leaving it connected is a problem, relocate the affected equipment. Consult your dealer about replacing the internal data backup battery. In this case use this unit...
.... Blocked ventilation holes are wired as possible about replacing defective components. • Using a mobile telephone near the unit may cause interference on this unit. 01V96-Owner's Manual Leaving it connected is a problem, relocate the affected equipment. Consult your dealer about replacing the internal data backup battery. In this case use this unit...
Owner's Manual
Page 6
...; Studio Manager Installation Guide Optional Extras • RK1 Rack Mount Kit • mini YGDAI I/O cards 01V96-Owner's Manual Apple, Mac, and Power Macintosh are registered trademarks of Alesis Corporation. Yamaha is a trademark or registered trademark of Digidesign and/or Avid Technology, Inc. vi Important Information Trademarks ADAT MultiChannel Optical Digital Interface is a trademark...
...; Studio Manager Installation Guide Optional Extras • RK1 Rack Mount Kit • mini YGDAI I/O cards 01V96-Owner's Manual Apple, Mac, and Power Macintosh are registered trademarks of Alesis Corporation. Yamaha is a trademark or registered trademark of Digidesign and/or Avid Technology, Inc. vi Important Information Trademarks ADAT MultiChannel Optical Digital Interface is a trademark...
Owner's Manual
Page 7
...not emphasized, for example, "move the cursor to familiarize yourself with the warnings and cautions listed in this Manual The 01V96 features two types of the 01V96. References to output. The Input and Output Channels are for example, "press the [ENTER] button." ... purposes only, and may appear somewhat different from those on all the ways in use . 01V96-Owner's Manual About this Owner's Manual vii About this Owner's Manual This Owner's Manual explains how to simplify explanations, the procedures reference only the [DISPLAY] button method. Where possible...
...not emphasized, for example, "move the cursor to familiarize yourself with the warnings and cautions listed in this Manual The 01V96 features two types of the 01V96. References to output. The Input and Output Channels are for example, "press the [ENTER] button." ... purposes only, and may appear somewhat different from those on all the ways in use . 01V96-Owner's Manual About this Owner's Manual vii About this Owner's Manual This Owner's Manual explains how to simplify explanations, the procedures reference only the [DISPLAY] button method. Where possible...
Owner's Manual
Page 8
... Outs 109 Aux Out 1-8 109 Setting Aux Out 1-8 from the Display 110 Viewing Aux Out settings 112 Setting Aux Out 1-8 from the Control Surface 113 01V96-Owner's Manual
... Outs 109 Aux Out 1-8 109 Setting Aux Out 1-8 from the Display 110 Viewing Aux Out settings 112 Setting Aux Out 1-8 from the Control Surface 113 01V96-Owner's Manual
Owner's Manual
Page 9
... Remote Function 185 Pro Tools Remote Layer 186 Nuendo Remote Layer 202 Other DAW Remote Layers 202 MIDI Remote Layer 203 Machine Control Function 208 01V96-Owner's Manual
... Remote Function 185 Pro Tools Remote Layer 186 Nuendo Remote Layer 202 Other DAW Remote Layers 202 MIDI Remote Layer 203 Machine Control Function 208 01V96-Owner's Manual
Owner's Manual
Page 10
10 Contents 18 MIDI 211 MIDI & the 01V96 211 MIDI Port Setup 212 Assigning Scenes to Program Changes for Remote Recall 215 Assigning Parameters to Control ... the User Defined Keys 231 Using Operation Lock 233 Cascading Consoles 234 Checking the Battery and the System Version 238 Initializing the 01V96 239 Calibrating the Faders 240 Appendix A: Parameter Lists 241 USER DEFINED KEYS 241 USER DEFINED KEYS Initial Assignments 243 Input Patch... Change Table 292 Initial Parameter to Control Change Table 293 MIDI Data Format 309 Appendix D: Options 323 Index 324 01V96-Owner's Manual
10 Contents 18 MIDI 211 MIDI & the 01V96 211 MIDI Port Setup 212 Assigning Scenes to Program Changes for Remote Recall 215 Assigning Parameters to Control ... the User Defined Keys 231 Using Operation Lock 233 Cascading Consoles 234 Checking the Battery and the System Version 238 Initializing the 01V96 239 Calibrating the Faders 240 Appendix A: Parameter Lists 241 USER DEFINED KEYS 241 USER DEFINED KEYS Initial Assignments 243 Input Patch... Change Table 292 Initial Parameter to Control Change Table 293 MIDI Data Format 309 Appendix D: Options 323 Index 324 01V96-Owner's Manual

Owner's Manual
Page 11
...01V96...-track recording, 2-channel mixdown, and cutting-edge surround sound production. The 01V96 offers the following features: ■ Hardware Features • 100-mm motorized.... Welcome 11 1 Welcome 1 Welcome Thank you to assign functions to control 01V96 internal parameters. • ADAT optical connectors • Expansion slot for optional ... inserts • Any Bus Outs or Channel Inserts can cascade two 01V96s while remaining in the digital domain. • Input patches enable assignment... choosing the Yamaha 01V96 Digital Mixing Console. acy multi-track digital recorders. •...
...01V96...-track recording, 2-channel mixdown, and cutting-edge surround sound production. The 01V96 offers the following features: ■ Hardware Features • 100-mm motorized.... Welcome 11 1 Welcome 1 Welcome Thank you to assign functions to control 01V96 internal parameters. • ADAT optical connectors • Expansion slot for optional ... inserts • Any Bus Outs or Channel Inserts can cascade two 01V96s while remaining in the digital domain. • Input patches enable assignment... choosing the Yamaha 01V96 Digital Mixing Console. acy multi-track digital recorders. •...
Owner's Manual
Page 12
Group multiple channels and pair channels for computer connection • Scene recall and mix parameter changes via MIDI 01V96-Owner's Manual Bus Outs 1-8 can be routed to Stereo Buses for use as Group Buses. • Channel library for storing and recalling the ...and 6.1 channel surround sound production • Surround channel outputs can be assigned to suit connected devices. ■ Remote Control • Control and manage your 01V96 from your Mac or PC using bundled Studio Manager software. • Remote Layer for remote control of Pro Tools, Nuendo, and other DAWs that support...
Group multiple channels and pair channels for computer connection • Scene recall and mix parameter changes via MIDI 01V96-Owner's Manual Bus Outs 1-8 can be routed to Stereo Buses for use as Group Buses. • Channel library for storing and recalling the ...and 6.1 channel surround sound production • Surround channel outputs can be assigned to suit connected devices. ■ Remote Control • Control and manage your 01V96 from your Mac or PC using bundled Studio Manager software. • Remote Layer for remote control of Pro Tools, Nuendo, and other DAWs that support...
Owner's Manual
Page 13
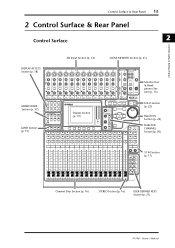
... (p. 22) Data Entry Section (p. 22) SELECTED CHANNEL Section (p. 20) ST IN Section (p. 17) Channel Strip Section (p. 16) STEREO Section (p. 16) USER DEFINED KEYS Section (p. 21) 01V96-Owner's Manual
... (p. 22) Data Entry Section (p. 22) SELECTED CHANNEL Section (p. 20) ST IN Section (p. 17) Channel Strip Section (p. 16) STEREO Section (p. 16) USER DEFINED KEYS Section (p. 21) 01V96-Owner's Manual

Owner's Manual
Page 14
.... The nominal signal level ranges from -26 dB to INSERT jack To processor's input 1/4" phone plug Sleeve (ground) Tip (return) Sleeve (ground) From processor's output 01V96-Owner's Manual Use a split cable to insert an external effects processor to AD input channels. 1/4" phone plug Tip (send) Tip (send) Ring (return) 1/4" phone plug Sleeve...
.... The nominal signal level ranges from -26 dB to INSERT jack To processor's input 1/4" phone plug Sleeve (ground) Tip (return) Sleeve (ground) From processor's output 01V96-Owner's Manual Use a split cable to insert an external effects processor to AD input channels. 1/4" phone plug Tip (send) Tip (send) Ring (return) 1/4" phone plug Sleeve...
Owner's Manual
Page 15
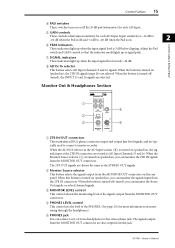
... on (pushed in ), you can connect a set of the signals output from the MONITOR OUT connectors on or off , and +4 dB to this jack. 01V96-Owner's Manual When the button is turned off (raised), you can monitor the signals input from the 2TR IN connectors. When the button is turned on . 2 Control...
... on (pushed in ), you can connect a set of the signals output from the MONITOR OUT connectors on or off , and +4 dB to this jack. 01V96-Owner's Manual When the button is turned off (raised), you can monitor the signals input from the 2TR IN connectors. When the button is turned on . 2 Control...
Owner's Manual
Page 16
... Turns the Stereo Out on or off . The [SOLO] button indicator of the Stereo Out. 0 5 10 15 20 30 40 50 60 70 3 STEREO 01V96-Owner's Manual 16 Chapter 2-Control Surface & Rear Panel Channel Strip Section A [SEL] buttons These buttons enable you to create or cancel channel pairs, and add channels to...
... Turns the Stereo Out on or off . The [SOLO] button indicator of the Stereo Out. 0 5 10 15 20 30 40 50 60 70 3 STEREO 01V96-Owner's Manual 16 Chapter 2-Control Surface & Rear Panel Channel Strip Section A [SEL] buttons These buttons enable you to create or cancel channel pairs, and add channels to...

Owner's Manual
Page 17
.... B [SEL] buttons These buttons select the ST IN channel you wish to control. Pressing one of these buttons switches the Fader mode (see page 34). 01V96-Owner's Manual FADER MODE Section 1 2 FADER MODE AUX 1 AUX 2 AUX 3 AUX 4 AUX 5 AUX 6 AUX 7 AUX 8 HOME (METER) A [AUX 1]-[AUX 8] buttons These buttons enable you to select...
.... B [SEL] buttons These buttons select the ST IN channel you wish to control. Pressing one of these buttons switches the Fader mode (see page 34). 01V96-Owner's Manual FADER MODE Section 1 2 FADER MODE AUX 1 AUX 2 AUX 3 AUX 4 AUX 5 AUX 6 AUX 7 AUX 8 HOME (METER) A [AUX 1]-[AUX 8] buttons These buttons enable you to select...
Owner's Manual
Page 18
...[ /INSERT/DELAY] button This button displays a /INS/DLY page, enabling you to switch the signal phase, set the signal to set up the 01V96, including digital input and output setup and remote control setup (see pgaes 72, 188). F [PAN/ROUTING] button This button displays a Pan/Route...I [DYNAMICS] button This button displays a Dynamics page, enabling you to view and set mix parameters for a specific channel (see page 87). 01V96-Owner's Manual L [VIEW] button This button displays a View page, enabling you to control channel gates and compressors (see page 81). C [MIDI] button This ...
...[ /INSERT/DELAY] button This button displays a /INS/DLY page, enabling you to switch the signal phase, set the signal to set up the 01V96, including digital input and output setup and remote control setup (see pgaes 72, 188). F [PAN/ROUTING] button This button displays a Pan/Route...I [DYNAMICS] button This button displays a Dynamics page, enabling you to view and set mix parameters for a specific channel (see page 87). 01V96-Owner's Manual L [VIEW] button This button displays a View page, enabling you to control channel gates and compressors (see page 81). C [MIDI] button This ...
Owner's Manual
Page 19
... turned on, you can use this layer to control external MIDI devices or computer-based DAWs. (See page 185 for more information on displaying a page.) 01V96-Owner's Manual You can control Channels 17-32. (See page 31 for more information on the Master layer.) C [REMOTE] button This button selects the Remote Layer...
... turned on, you can use this layer to control external MIDI devices or computer-based DAWs. (See page 185 for more information on displaying a page.) 01V96-Owner's Manual You can control Channels 17-32. (See page 31 for more information on the Master layer.) C [REMOTE] button This button selects the Remote Layer...
Owner's Manual
Page 20
... selected by the [SEL] button. G [FREQUENCY] control This control adjusts the currently-selected band frequency. H [GAIN] control This control adjusts the currently-selected band gain. 01V96-Owner's Manual F [Q] control This control adjusts the currently-selected band Q. B [HIGH] button C [HIGH-MID] button D [LOW-MID] button E [LOW] button These buttons select the EQ band...
... selected by the [SEL] button. G [FREQUENCY] control This control adjusts the currently-selected band frequency. H [GAIN] control This control adjusts the currently-selected band gain. 01V96-Owner's Manual F [Q] control This control adjusts the currently-selected band Q. B [HIGH] button C [HIGH-MID] button D [LOW-MID] button E [LOW] button These buttons select the EQ band...
Owner's Manual
Page 21
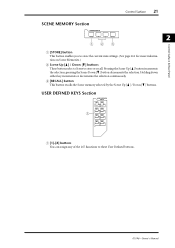
... settings. (See page 161 for more information on Scene Memories.) B Scene Up [ ] / Down [ ] buttons These buttons select a Scene to these User Defined buttons. 01V96-Owner's Manual
... settings. (See page 161 for more information on Scene Memories.) B Scene Up [ ] / Down [ ] buttons These buttons select a Scene to these User Defined buttons. 01V96-Owner's Manual

