User Manual
Page 5
... Control Key Index 7 Replacing the Remote Control Battery 8 Adjusting the Viewing Angle 9 Setting up the Optional Wall Mount 9 Built-in Speakers 10 Connecting the AC Power Adapter 10 Turning On the LCD Display 10 Adjusting Settings Controlling the OSD 11 Setting the Main Display Mode 12 Setting the Picture-in-Picture Display...
... Control Key Index 7 Replacing the Remote Control Battery 8 Adjusting the Viewing Angle 9 Setting up the Optional Wall Mount 9 Built-in Speakers 10 Connecting the AC Power Adapter 10 Turning On the LCD Display 10 Adjusting Settings Controlling the OSD 11 Setting the Main Display Mode 12 Setting the Picture-in-Picture Display...
User Manual
Page 7
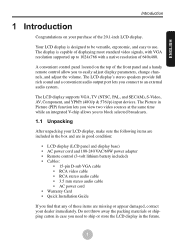
...you connect to ship or store the LCD display in good condition: • LCD display (LCD panel and display base) • AC power cord and 100-240 VAC/60W power adapter • Remote control (3-volt lithium battery included) • Cables: • 15-pin D-sub VGA cable • RCA video ...cable • RCA stereo audio cable • 3.5 mm stereo audio cable • AC power cord • Warranty Card • Quick Installation ...
...you connect to ship or store the LCD display in good condition: • LCD display (LCD panel and display base) • AC power cord and 100-240 VAC/60W power adapter • Remote control (3-volt lithium battery included) • Cables: • 15-pin D-sub VGA cable • RCA video ...cable • RCA stereo audio cable • 3.5 mm stereo audio cable • AC power cord • Warranty Card • Quick Installation ...
User Manual
Page 16
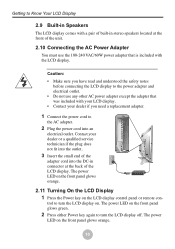
trol to turn the LCD display off. Caution: • Make sure you need a replacement adapter. 1 Connect the power cord to the AC adapter. 2 Plug the power cord into the DC-in stereo speakers located at the back of the LCD display. The power LED on the LCD display ... your dealer if you have read and understood the safety notes before connecting the LCD display to the power adapter and electrical outlet. • Do not use any other AC power adapter except the adapter that is included with the LCD display. The power LED on the front panel glows green. 2 Press either Power...
trol to turn the LCD display off. Caution: • Make sure you need a replacement adapter. 1 Connect the power cord to the AC adapter. 2 Plug the power cord into the DC-in stereo speakers located at the back of the LCD display. The power LED on the LCD display ... your dealer if you have read and understood the safety notes before connecting the LCD display to the power adapter and electrical outlet. • Do not use any other AC power adapter except the adapter that is included with the LCD display. The power LED on the front panel glows green. 2 Press either Power...
User Manual
Page 28
... control to "Adjusting the Display" on page 19. A1: The LCD display supports VGA (640x480) video mode. A2: Adjust the brightness. A1: Check the AC power adapter to make sure they are adjusted to "Adjusting Volume" on page 15 Q: Why is there no picture at the rear of the cables required for...
... control to "Adjusting the Display" on page 19. A1: The LCD display supports VGA (640x480) video mode. A2: Adjust the brightness. A1: Check the AC power adapter to make sure they are adjusted to "Adjusting Volume" on page 15 Q: Why is there no picture at the rear of the cables required for...
User Manual
Page 30
...main display mode, 12 picture-in-picture mode, 13 B Brightness definition of, 14 C Cables 15-pin D-sub VGA cable, 4 3.5 mm stereo audio cable, 4 AC power cord, 4 RCA stereo audio cable, 4 RCA video cable, 4 Cables, 4 Closed captioning, 17 Color definition of, 14 Components front view, 2 rear view...screen display adjusting settings, 11 menus, 11 OSD, 11 using the control panel, 11 using the remote control, 11 P Power adapter connecting to LCD TV, 10 replacement adapter, 10 safety notes, 10 troubleshooting, 22 Q Quick channels assigning, 16 deleting, 16 R Ratings setting channel ratings, 17 Recall...
...main display mode, 12 picture-in-picture mode, 13 B Brightness definition of, 14 C Cables 15-pin D-sub VGA cable, 4 3.5 mm stereo audio cable, 4 AC power cord, 4 RCA stereo audio cable, 4 RCA video cable, 4 Cables, 4 Closed captioning, 17 Color definition of, 14 Components front view, 2 rear view...screen display adjusting settings, 11 menus, 11 OSD, 11 using the control panel, 11 using the remote control, 11 P Power adapter connecting to LCD TV, 10 replacement adapter, 10 safety notes, 10 troubleshooting, 22 Q Quick channels assigning, 16 deleting, 16 R Ratings setting channel ratings, 17 Recall...
