Quick Start Guide
Page 1
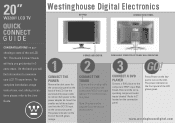
... DC 12V input on the connection panel. CONNECT THE TUNER Connect either analog cable or TV antenna wire to the User Guide. 1 POWER INDICATOR 2 REMOVABLE STAND FOR OPTIONAL WALL MOUNTING 3 GO! This Quick Connect Guide will help you will find information to the power adapter kit. On the back you get started in 3 easy steps. Press Power on the keypad to the component YPbPr input (Red, Green, Blue) and the corresponding component audio inputs labeled "Audio In 2" located on the connection panel. CONNECT A DVD PLAYER Connect a DVD player to turn on...
... DC 12V input on the connection panel. CONNECT THE TUNER Connect either analog cable or TV antenna wire to the User Guide. 1 POWER INDICATOR 2 REMOVABLE STAND FOR OPTIONAL WALL MOUNTING 3 GO! This Quick Connect Guide will help you will find information to the power adapter kit. On the back you get started in 3 easy steps. Press Power on the keypad to the component YPbPr input (Red, Green, Blue) and the corresponding component audio inputs labeled "Audio In 2" located on the connection panel. CONNECT A DVD PLAYER Connect a DVD player to turn on...
Quick Start Guide
Page 2
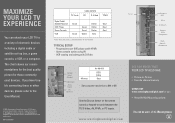
... scan DVD players with YPbPr • Game console action using AV • VCR viewing and editing with S-Video Audio Input 1 (R/L) AV In S-Video In Audio In YPbPr (Component) YPbPr Video In (Component) PC RGB Input (Analog) Audio Input Audio Output DC Power In Monitor PC INPUTS RGB (VGA) Best • Set computer resolution to 640 x 480 Use the Source button on the remote control or keypad to the User Manual. © 2004 Westinghouse Digital Electronics, LLC. MA-PS-0103-0401 VIDEO INPUTS TV Tuner AV S-Video YPbPr Tuner Digital Cable/ Satellite Receiver Good...
... scan DVD players with YPbPr • Game console action using AV • VCR viewing and editing with S-Video Audio Input 1 (R/L) AV In S-Video In Audio In YPbPr (Component) YPbPr Video In (Component) PC RGB Input (Analog) Audio Input Audio Output DC Power In Monitor PC INPUTS RGB (VGA) Best • Set computer resolution to 640 x 480 Use the Source button on the remote control or keypad to the User Manual. © 2004 Westinghouse Digital Electronics, LLC. MA-PS-0103-0401 VIDEO INPUTS TV Tuner AV S-Video YPbPr Tuner Digital Cable/ Satellite Receiver Good...

User Manual
Page 3
... radio communications. Note: This equipment has been tested and found to comply with the instructions, may cause harmful interference to radio or television reception, which the receiver is a registered trademark of VESA. If this product meets the ENERGY STAR® guidelines for an FCC Class B computing device, always use the signal cord and power cord supplied with Part 15 of the U.S.
... radio communications. Note: This equipment has been tested and found to comply with the instructions, may cause harmful interference to radio or television reception, which the receiver is a registered trademark of VESA. If this product meets the ENERGY STAR® guidelines for an FCC Class B computing device, always use the signal cord and power cord supplied with Part 15 of the U.S.
User Manual
Page 4
...; Apparatus shall not be placed on the cable. CAUTION: TO REDUCE THE RISK OF ELECTRIC SHOCK, DO NOT REMOVE COVER (OR BACK). NO USER-SERVICEABLE PARTS INSIDE. Exposing the apparatus to safely unplug the apparatus. • If you notice smoke or any heat sources such as power-supply cord or plug is used, use the attachments and accessories that produce heat. •...
...; Apparatus shall not be placed on the cable. CAUTION: TO REDUCE THE RISK OF ELECTRIC SHOCK, DO NOT REMOVE COVER (OR BACK). NO USER-SERVICEABLE PARTS INSIDE. Exposing the apparatus to safely unplug the apparatus. • If you notice smoke or any heat sources such as power-supply cord or plug is used, use the attachments and accessories that produce heat. •...
User Manual
Page 5
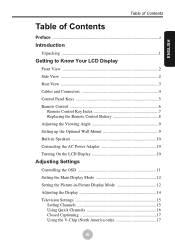
...Your LCD Display Front View 2 Side View 2 Rear View 3 Cables and Connectors 4 Control Panel Keys 5 Remote Control 6 Remote Control Key Index 7 Replacing the Remote Control Battery 8 Adjusting the Viewing Angle 9 Setting up the Optional Wall Mount 9 Built-in Speakers 10 Connecting the AC Power Adapter 10 Turning On the LCD Display 10 Adjusting Settings Controlling the OSD 11 Setting the Main Display Mode 12 Setting the Picture-in-Picture Display Mode 12 Adjusting the Display 14 Television Settings 15 Setting Channels 15 Using Quick Channels 16 Closed Captioning 17 Using the...
...Your LCD Display Front View 2 Side View 2 Rear View 3 Cables and Connectors 4 Control Panel Keys 5 Remote Control 6 Remote Control Key Index 7 Replacing the Remote Control Battery 8 Adjusting the Viewing Angle 9 Setting up the Optional Wall Mount 9 Built-in Speakers 10 Connecting the AC Power Adapter 10 Turning On the LCD Display 10 Adjusting Settings Controlling the OSD 11 Setting the Main Display Mode 12 Setting the Picture-in-Picture Display Mode 12 Adjusting the Display 14 Television Settings 15 Setting Channels 15 Using Quick Channels 16 Closed Captioning 17 Using the...
User Manual
Page 6
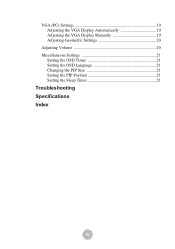
VGA (PC) Settings 19 Adjusting the VGA Display Automatically 19 Adjusting the VGA Display Manually 19 Adjusting Geometric Settings 20 Adjusting Volume 20 Miscellaneous Settings 21 Setting the OSD Timer 21 Setting the OSD Language 21 Changing the PIP Size 21 Setting the PIP Position 21 Setting the Sleep Timer 21 Troubleshooting Specifications Index iv
VGA (PC) Settings 19 Adjusting the VGA Display Automatically 19 Adjusting the VGA Display Manually 19 Adjusting Geometric Settings 20 Adjusting Volume 20 Miscellaneous Settings 21 Setting the OSD Timer 21 Setting the OSD Language 21 Changing the PIP Size 21 Setting the PIP Position 21 Setting the Sleep Timer 21 Troubleshooting Specifications Index iv
User Manual
Page 7
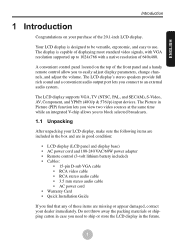
... you need to ship or store the LCD display in good condition: • LCD display (LCD panel and display base) • AC power cord and 100-240 VAC/60W power adapter • Remote control (3-volt lithium battery included) • Cables: • 15-pin D-sub VGA cable • RCA video cable • RCA stereo audio cable • 3.5 mm stereo audio cable • AC power cord • Warranty Card • Quick Installation Guide If you to easily adjust display parameters, change channels, and adjust the volume. The display...
... you need to ship or store the LCD display in good condition: • LCD display (LCD panel and display base) • AC power cord and 100-240 VAC/60W power adapter • Remote control (3-volt lithium battery included) • Cables: • 15-pin D-sub VGA cable • RCA video cable • RCA stereo audio cable • 3.5 mm stereo audio cable • AC power cord • Warranty Card • Quick Installation Guide If you to easily adjust display parameters, change channels, and adjust the volume. The display...

User Manual
Page 8
LCD Panel Speaker Stand IR Remote Receiver Power LED Speaker 2.2 Side View Speaker 2 Stand The following figures identify the LCD display's components, controls, and ports. 2.1 Front View Note: Appearance varies according to all controls and connections. Getting to Know Your LCD Display 2 Getting to Know Your LCD Display The LCD display is designed to provide easy access to model.
LCD Panel Speaker Stand IR Remote Receiver Power LED Speaker 2.2 Side View Speaker 2 Stand The following figures identify the LCD display's components, controls, and ports. 2.1 Front View Note: Appearance varies according to all controls and connections. Getting to Know Your LCD Display 2 Getting to Know Your LCD Display The LCD display is designed to provide easy access to model.
User Manual
Page 11
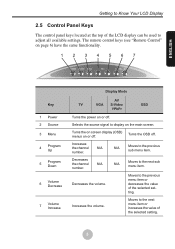
... menu item. The remote control keys (see "Remote Control" on page 6) have the same functionality. 1234567 POWER SOURCE MENU PRG VOL Key 1 Power 2 Source 3 Menu 4 Program Up 5 Program Down 6 Volume Decrease 7 Volume Increase Display Mode AV TV VGA S-Video YPbPr OSD Turns the power on or off . Decreases the channel N/A number. Decreases the volume. N/A Moves to adjust all available settings. ENGLISH Getting to Know Your LCD Display 2.5 Control Panel Keys The control panel keys located at the top of the LCD display can be used...
... menu item. The remote control keys (see "Remote Control" on page 6) have the same functionality. 1234567 POWER SOURCE MENU PRG VOL Key 1 Power 2 Source 3 Menu 4 Program Up 5 Program Down 6 Volume Decrease 7 Volume Increase Display Mode AV TV VGA S-Video YPbPr OSD Turns the power on or off . Decreases the channel N/A number. Decreases the volume. N/A Moves to adjust all available settings. ENGLISH Getting to Know Your LCD Display 2.5 Control Panel Keys The control panel keys located at the top of the LCD display can be used...

User Manual
Page 13
... 9 Quick Channel Memory Set 10 Quick Channel Memory Delete 11 Return 12 Main Source 13 Picture-in-Picture (PIP) Source Description Turns the volume off the LCD display after a preset period of time (30, 60, or 90 minutes). ENGLISH Getting to Know Your LCD Display 2.6.1 Remote Control Key Index Key 1 Mute 2 MTS Selector 3 Numeric Keys (0 to the previous channel. Used to directly key in -picture video source. Increases or decreases the channel number. Turns the LCD display on screen display (OSD...
... 9 Quick Channel Memory Set 10 Quick Channel Memory Delete 11 Return 12 Main Source 13 Picture-in-Picture (PIP) Source Description Turns the volume off the LCD display after a preset period of time (30, 60, or 90 minutes). ENGLISH Getting to Know Your LCD Display 2.6.1 Remote Control Key Index Key 1 Mute 2 MTS Selector 3 Numeric Keys (0 to the previous channel. Used to directly key in -picture video source. Increases or decreases the channel number. Turns the LCD display on screen display (OSD...

User Manual
Page 14
... shown (B). 3 Push the battery tray in PIP). Wash hands with soap if they come in a cool dry place if the remote control is not used for instructions on replacing the remote control battery (CR2025 3V). 1 Slide the battery tray out (A). 2 Place the battery into the tray with care. Turns the screen display menu on. B A Caution: • Remove and store the battery in contact...
... shown (B). 3 Push the battery tray in PIP). Wash hands with soap if they come in a cool dry place if the remote control is not used for instructions on replacing the remote control battery (CR2025 3V). 1 Slide the battery tray out (A). 2 Place the battery into the tray with care. Turns the screen display menu on. B A Caution: • Remove and store the battery in contact...
User Manual
Page 15
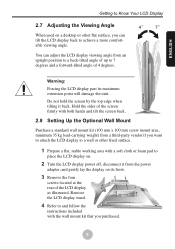
... the unit. Remove the LCD display stand. 4 Refer to and follow the instructions included with a soft cloth or foam pad to place the LCD display on. 2 Turn the LCD display power off, disconnect it back. Hold the sides of the screen firmly with both hands and tilt the screen back. 2.8 Setting Up the Optional Wall Mount Purchase a standard wall mount kit (100 mm x 100 mm screw mount area, minimum...
... the unit. Remove the LCD display stand. 4 Refer to and follow the instructions included with a soft cloth or foam pad to place the LCD display on. 2 Turn the LCD display power off, disconnect it back. Hold the sides of the screen firmly with both hands and tilt the screen back. 2.8 Setting Up the Optional Wall Mount Purchase a standard wall mount kit (100 mm x 100 mm screw mount area, minimum...
User Manual
Page 16
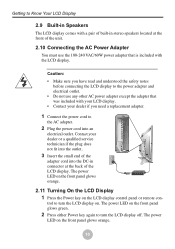
... built-in connector at the front of the unit. 2.10 Connecting the AC Power Adapter You must use any other AC power adapter except the adapter that is included with the LCD display. Contact your dealer if you need a replacement adapter. 1 Connect the power cord to turn the LCD display off. The power LED on the front panel glows green. 2 Press either Power key again to turn the LCD display on. The power LED on the LCD display control panel or remote con-
... built-in connector at the front of the unit. 2.10 Connecting the AC Power Adapter You must use any other AC power adapter except the adapter that is included with the LCD display. Contact your dealer if you need a replacement adapter. 1 Connect the power cord to turn the LCD display off. The power LED on the front panel glows green. 2 Press either Power key again to turn the LCD display on. The power LED on the LCD display control panel or remote con-

User Manual
Page 17
..., color temperature, stereo speaker volume, and other features. Using the OSD you can be accessed using either the remote control or the display control panel located on the top of the OSD menus 11 ENGLISH Adjusting Settings 3 Adjusting Settings This chapter explains the LCD display's On-Screen Display (OSD) menus. These are used to adjust settings related to turn the OSD on the OSD menu • confirms a selection OFF/BACK • turns off . LCD Control Panel MENU MENU VOL...
..., color temperature, stereo speaker volume, and other features. Using the OSD you can be accessed using either the remote control or the display control panel located on the top of the OSD menus 11 ENGLISH Adjusting Settings 3 Adjusting Settings This chapter explains the LCD display's On-Screen Display (OSD) menus. These are used to adjust settings related to turn the OSD on the OSD menu • confirms a selection OFF/BACK • turns off . LCD Control Panel MENU MENU VOL...

User Manual
Page 22
... the quick channel keys on the remote control. The quick channel screen disappears and the quick channel is complete. Adjusting Settings 3.5.2 Using Quick Channels The quick channel function lets you assign ten channels that can be accessed by entering a channel number directly with the number keys on the remote control. SOURCE CH VOL PIP CH VIDEO SWAP i MENU AUDIO Quick Channel Block 2 Press the MEM key in the quick channel block on the screen. The setting for this quick channel changes to the cur- Press the number key...
... the quick channel keys on the remote control. The quick channel screen disappears and the quick channel is complete. Adjusting Settings 3.5.2 Using Quick Channels The quick channel function lets you assign ten channels that can be accessed by entering a channel number directly with the number keys on the remote control. SOURCE CH VOL PIP CH VIDEO SWAP i MENU AUDIO Quick Channel Block 2 Press the MEM key in the quick channel block on the screen. The setting for this quick channel changes to the cur- Press the number key...
User Manual
Page 24
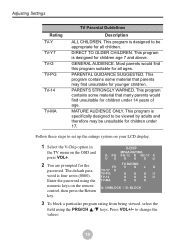
... for the password. to be viewed by adults and therefore may find unsuitable for children under 14 years of age. Enter the password using the PRG/CH / keys. This program contains some material that many parents would find unsuitable for all ages. The default password is designed for all children. This program is specifically designed to change the values: 18 Adjusting Settings Rating...
... for the password. to be viewed by adults and therefore may find unsuitable for children under 14 years of age. Enter the password using the PRG/CH / keys. This program contains some material that many parents would find unsuitable for all ages. The default password is designed for all children. This program is specifically designed to change the values: 18 Adjusting Settings Rating...
User Manual
Page 25
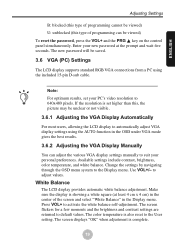
... most users, allowing the LCD display to automatically adjust VGA display settings using the included 15-pin D-sub cable. Note: For optimum results, set higher than this type of the screen and select "White Balance" in the Display menu. Enter your PC's video resolution to 640x480 pixels. The new password will be viewed) To reset the password, press the VOL+ and the PRG key on the control panel simultaneously. to the Display menu. The screen displays...
... most users, allowing the LCD display to automatically adjust VGA display settings using the included 15-pin D-sub cable. Note: For optimum results, set higher than this type of the screen and select "White Balance" in the Display menu. Enter your PC's video resolution to 640x480 pixels. The new password will be viewed) To reset the password, press the VOL+ and the PRG key on the control panel simultaneously. to the Display menu. The screen displays...
User Manual
Page 28
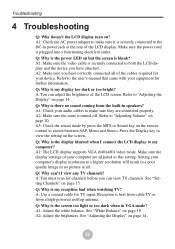
... the sound mode by press the MTS or Sound key on ? A1: The LCD display supports VGA (640x480) video mode. Q: Why can adjust the brightness of the cables required for TV input. Q: Why is best from cable TV or from the built-in power jack at all of the LCD screen. Q: Why is securely connected to the DC-in speakers? Troubleshooting 4 Troubleshooting Q: Why doesn't the LCD display turn on the remote control to switch between SAP...
... the sound mode by press the MTS or Sound key on ? A1: The LCD display supports VGA (640x480) video mode. Q: Why can adjust the brightness of the cables required for TV input. Q: Why is best from cable TV or from the built-in power jack at all of the LCD screen. Q: Why is securely connected to the DC-in speakers? Troubleshooting 4 Troubleshooting Q: Why doesn't the LCD display turn on the remote control to switch between SAP...
User Manual
Page 29
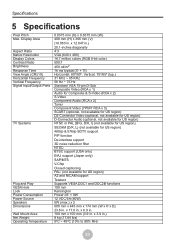
... (17.64 lbs) 0ºC ~ 40ºC (10% to 90% RH) 23 x 3.9 in . Display Area Aspect Ratio Native Resolution Display Colors Contrast Ratio Brightness Response Time View Angle (CR≥10) Horizontal Frequency Vertical Frequency Signal Input/Output Ports TV Systems Plug and Play VESA Hole Lock Power Consumption Power Source Speakers Dimensions Wall Mount Area Net Weight Operating Temperature 0.6375 mm (H) x 0.6375 mm (W) 408 mm (H) x 306 mm (V) (16.063 in. Specifications 5 Specifications Pixel Pitch Max.
... (17.64 lbs) 0ºC ~ 40ºC (10% to 90% RH) 23 x 3.9 in . Display Area Aspect Ratio Native Resolution Display Colors Contrast Ratio Brightness Response Time View Angle (CR≥10) Horizontal Frequency Vertical Frequency Signal Input/Output Ports TV Systems Plug and Play VESA Hole Lock Power Consumption Power Source Speakers Dimensions Wall Mount Area Net Weight Operating Temperature 0.6375 mm (H) x 0.6375 mm (W) 408 mm (H) x 306 mm (V) (16.063 in. Specifications 5 Specifications Pixel Pitch Max.
User Manual
Page 30
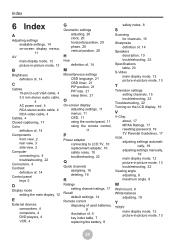
...PIP size, 21 sleep timer, 21 O On-screen display adjusting settings, 11 menus, 11 OSD, 11 using the control panel, 11 using the remote control, 11 P Power adapter connecting to LCD TV, 10 replacement adapter, 10 safety notes, 10 troubleshooting, 22 Q Quick channels assigning, 16 deleting, 16 R Ratings setting channel ratings, 17 Recall default settings, 14 Remote control disposing of used batteries, 8 illustration of, 6 key index table, 7 replacing the battery, 8 safety notes, 8 S Scanning for channels, 15 Sharpness definition of, 14 Speakers description, 10 troubleshooting, 22 Specifications...
...PIP size, 21 sleep timer, 21 O On-screen display adjusting settings, 11 menus, 11 OSD, 11 using the control panel, 11 using the remote control, 11 P Power adapter connecting to LCD TV, 10 replacement adapter, 10 safety notes, 10 troubleshooting, 22 Q Quick channels assigning, 16 deleting, 16 R Ratings setting channel ratings, 17 Recall default settings, 14 Remote control disposing of used batteries, 8 illustration of, 6 key index table, 7 replacing the battery, 8 safety notes, 8 S Scanning for channels, 15 Sharpness definition of, 14 Speakers description, 10 troubleshooting, 22 Specifications...


