Quick Start Guide
Page 2
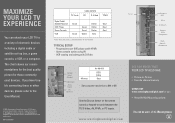
...Monitor PC INPUTS RGB (VGA) Best • Set computer resolution to 640 x 480 Use the Source button on the remote control or keypad to a variety of Westinghouse Electric Corporation and are used devices. MAXIMIZE YOUR LCD TV EXPERIENCE You can be sure... If you have trouble connecting ... The audio input is shared between the TV, S-Video, AV, YPbPr, or PC inputs. Specifications subject to the User Manual. © 2004 Westinghouse Digital Electronics, LLC. www.westinghousedigital.com DID YOU KNOW THAT YOUR LCD TV ALSO HAS: • Picture-in-Picture • Favorite channel memory ...
...Monitor PC INPUTS RGB (VGA) Best • Set computer resolution to 640 x 480 Use the Source button on the remote control or keypad to a variety of Westinghouse Electric Corporation and are used devices. MAXIMIZE YOUR LCD TV EXPERIENCE You can be sure... If you have trouble connecting ... The audio input is shared between the TV, S-Video, AV, YPbPr, or PC inputs. Specifications subject to the User Manual. © 2004 Westinghouse Digital Electronics, LLC. www.westinghousedigital.com DID YOU KNOW THAT YOUR LCD TV ALSO HAS: • Picture-in-Picture • Favorite channel memory ...
User Manual
Page 5
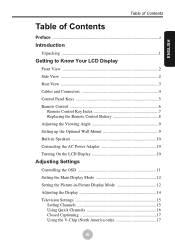
... Contents Preface ...i Introduction Unpacking 1 Getting to Know Your LCD Display Front View 2 Side View 2 Rear View 3 Cables and Connectors 4 Control Panel Keys 5 Remote Control 6 Remote Control Key Index 7 Replacing the Remote Control Battery 8 Adjusting the Viewing Angle 9 Setting up the Optional Wall Mount 9 Built-in Speakers 10 Connecting the AC Power Adapter 10...
... Contents Preface ...i Introduction Unpacking 1 Getting to Know Your LCD Display Front View 2 Side View 2 Rear View 3 Cables and Connectors 4 Control Panel Keys 5 Remote Control 6 Remote Control Key Index 7 Replacing the Remote Control Battery 8 Adjusting the Viewing Angle 9 Setting up the Optional Wall Mount 9 Built-in Speakers 10 Connecting the AC Power Adapter 10...
User Manual
Page 7
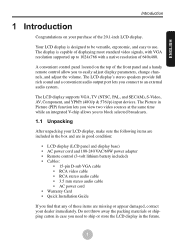
... LCD display in good condition: • LCD display (LCD panel and display base) • AC power cord and 100-240 VAC/60W power adapter • Remote control (3-volt lithium battery included) • Cables: • 15-pin D-sub VGA cable • RCA video cable • RCA stereo audio cable • 3.5 mm stereo..., with VGA resolution supported up to 1024x768 with a native resolution of 640x480. ENGLISH Introduction 1 Introduction Congratulations on the top of the front panel and a handy remote control allow you to easily adjust display parameters, change channels, and adjust the volume.
... LCD display in good condition: • LCD display (LCD panel and display base) • AC power cord and 100-240 VAC/60W power adapter • Remote control (3-volt lithium battery included) • Cables: • 15-pin D-sub VGA cable • RCA video cable • RCA stereo audio cable • 3.5 mm stereo..., with VGA resolution supported up to 1024x768 with a native resolution of 640x480. ENGLISH Introduction 1 Introduction Congratulations on the top of the front panel and a handy remote control allow you to easily adjust display parameters, change channels, and adjust the volume.

User Manual
Page 8
LCD Panel Speaker Stand IR Remote Receiver Power LED Speaker 2.2 Side View Speaker 2 Stand The following figures identify the LCD display's components, controls, and ports. 2.1 Front View Note: Appearance varies according to all controls and connections. Getting to Know Your LCD Display 2 Getting to Know Your LCD Display The LCD display is designed to provide easy access to model.
LCD Panel Speaker Stand IR Remote Receiver Power LED Speaker 2.2 Side View Speaker 2 Stand The following figures identify the LCD display's components, controls, and ports. 2.1 Front View Note: Appearance varies according to all controls and connections. Getting to Know Your LCD Display 2 Getting to Know Your LCD Display The LCD display is designed to provide easy access to model.
User Manual
Page 11
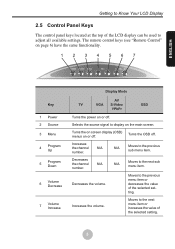
... to Know Your LCD Display 2.5 Control Panel Keys The control panel keys located at the top of the selected setting. 5 Increases the volume. The remote control keys (see "Remote Control" on page 6) have the same functionality. 1234567 POWER SOURCE MENU PRG VOL Key 1 Power 2 Source 3 Menu 4 Program Up 5 Program Down 6 Volume Decrease...
... to Know Your LCD Display 2.5 Control Panel Keys The control panel keys located at the top of the selected setting. 5 Increases the volume. The remote control keys (see "Remote Control" on page 6) have the same functionality. 1234567 POWER SOURCE MENU PRG VOL Key 1 Power 2 Source 3 Menu 4 Program Up 5 Program Down 6 Volume Decrease...

User Manual
Page 13
ENGLISH Getting to Know Your LCD Display 2.6.1 Remote Control Key Index Key 1 Mute 2 MTS Selector 3 Numeric Keys (0 to directly key in channel numbers. Used to 9, and 100) OSD Navigation 4 Channel Up/Down Volume ...
ENGLISH Getting to Know Your LCD Display 2.6.1 Remote Control Key Index Key 1 Mute 2 MTS Selector 3 Numeric Keys (0 to directly key in channel numbers. Used to 9, and 100) OSD Navigation 4 Channel Up/Down Volume ...

User Manual
Page 14
... 16 Menu Exchanges the Main and PIP video screens (PIP appears on Main, Main appears in the line of sight. 2.6.2 Replacing the Remote Control Battery Refer to either the Main or PIP sources). Getting to your local recycling or waste disposal guidelines for information on disposing of... used batteries. 8 Note: • Using the remote control in direct sunlight reduces the functional distance at which it can be used for instructions on . Turns the screen display menu on replacing ...
... 16 Menu Exchanges the Main and PIP video screens (PIP appears on Main, Main appears in the line of sight. 2.6.2 Replacing the Remote Control Battery Refer to either the Main or PIP sources). Getting to your local recycling or waste disposal guidelines for information on disposing of... used batteries. 8 Note: • Using the remote control in direct sunlight reduces the functional distance at which it can be used for instructions on . Turns the screen display menu on replacing ...
User Manual
Page 16
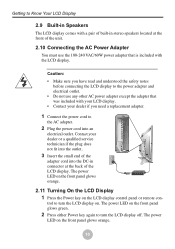
... On the LCD Display 1 Press the Power key on the front panel glows orange. 10 The power LED on the LCD display control panel or remote con- Caution: • Make sure you have read and understood the safety notes before connecting the LCD display to the power adapter and electrical outlet...
... On the LCD Display 1 Press the Power key on the front panel glows orange. 10 The power LED on the LCD display control panel or remote con- Caution: • Make sure you have read and understood the safety notes before connecting the LCD display to the power adapter and electrical outlet...

User Manual
Page 17
LCD Control Panel MENU MENU VOL PRG Remote Control CH VOL CH i MENU CH VOL CH i MENU CH VOL CH i MENU CH VOL CH i MENU Description MENU • turns on the OSD menu &#...8226; confirms a selection OFF/BACK • turns off . Using the OSD you can be accessed using either the remote control or the display control panel located on or off the OSD menu • exits a menu without making any changes / arrow keys • navigates through...
LCD Control Panel MENU MENU VOL PRG Remote Control CH VOL CH i MENU CH VOL CH i MENU CH VOL CH i MENU CH VOL CH i MENU Description MENU • turns on the OSD menu &#...8226; confirms a selection OFF/BACK • turns off . Using the OSD you can be accessed using either the remote control or the display control panel located on or off the OSD menu • exits a menu without making any changes / arrow keys • navigates through...
User Manual
Page 18
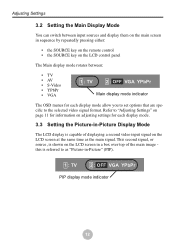
... You can switch between input sources and display them on the main screen in sequence by repeatedly pressing either: • the SOURCE key on the remote control • the SOURCE key on the LCD control panel The Main display mode rotates between: • TV • AV • S-Video • YPbPr •...
... You can switch between input sources and display them on the main screen in sequence by repeatedly pressing either: • the SOURCE key on the remote control • the SOURCE key on the LCD control panel The Main display mode rotates between: • TV • AV • S-Video • YPbPr •...
User Manual
Page 19
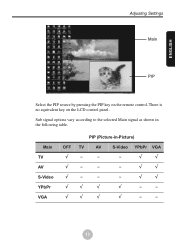
...;√ √ √ − − 13 Main TV AV S-Video YPbPr VGA PIP (Picture-in the following table. There is no equivalent key on the remote control.
...;√ √ √ − − 13 Main TV AV S-Video YPbPr VGA PIP (Picture-in the following table. There is no equivalent key on the remote control.

User Manual
Page 22
... VIDEO SWAP i MENU AUDIO Quick Channel Block 2 Press the MEM key in the quick channel block on the remote control. trol. 2 The quick channel settings appear on the remote control to delete. The quick channel screen disappears and the quick channel is complete. Assigning Quick Channels 1 First ...you want to switch between 0 and 9 to the quick channels by using the normal PRG/CH / keys or by the quick channel keys on the remote control. 3 Use the number keys to assign a number between assigned quick channels. rent channel. 4 Wait five seconds. Press the number key...
... VIDEO SWAP i MENU AUDIO Quick Channel Block 2 Press the MEM key in the quick channel block on the remote control. trol. 2 The quick channel settings appear on the remote control to delete. The quick channel screen disappears and the quick channel is complete. Assigning Quick Channels 1 First ...you want to switch between 0 and 9 to the quick channels by using the normal PRG/CH / keys or by the quick channel keys on the remote control. 3 Use the number keys to assign a number between assigned quick channels. rent channel. 4 Wait five seconds. Press the number key...
User Manual
Page 24
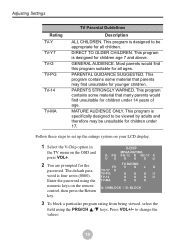
... are prompted for younger children. to set up the ratings system on your LCD display. 1 Select the V-Chip option in the TV menu on the remote control, then press the Return key. DIRECT TO OLDER CHILDREN. GENERAL AUDIENCE. This program contains some material that parents may be unsuitable for all ages...
... are prompted for younger children. to set up the ratings system on your LCD display. 1 Select the V-Chip option in the TV menu on the remote control, then press the Return key. DIRECT TO OLDER CHILDREN. GENERAL AUDIENCE. This program contains some material that parents may be unsuitable for all ages...

User Manual
Page 27
... timer turns the LCD display off automatically. 21 Select "Off" if you can be adjusted to suit your preferences. Press the SLEEP button on the remote control to select the length of the picture-in-picture window on the screen can set one to appear in the Picture-in which the...
... timer turns the LCD display off automatically. 21 Select "Off" if you can be adjusted to suit your preferences. Press the SLEEP button on the remote control to select the length of the picture-in-picture window on the screen can set one to appear in the Picture-in which the...
User Manual
Page 28
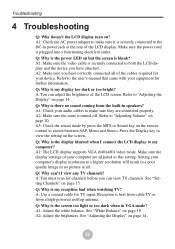
... your computer's display resolution to a higher resolution will result in speakers? A3: Check the sound mode by press the MTS or Sound key on the remote control to "Adjusting the Display" on page 15 Q: Why is the display blurred when I view any TV channels? Q: Why is my reception bad when watching...
... your computer's display resolution to a higher resolution will result in speakers? A3: Check the sound mode by press the MTS or Sound key on the remote control to "Adjusting the Display" on page 15 Q: Why is the display blurred when I view any TV channels? Q: Why is my reception bad when watching...
User Manual
Page 30
...size, 21 sleep timer, 21 O On-screen display adjusting settings, 11 menus, 11 OSD, 11 using the control panel, 11 using the remote control, 11 P Power adapter connecting to LCD TV, 10 replacement adapter, 10 safety notes, 10 troubleshooting, 22 Q Quick channels assigning, 16... deleting, 16 R Ratings setting channel ratings, 17 Recall default settings, 14 Remote control disposing of used batteries, 8 illustration of, 6 key index table, 7 replacing the battery, 8 safety notes, 8 S Scanning for channels, 15 ...
...size, 21 sleep timer, 21 O On-screen display adjusting settings, 11 menus, 11 OSD, 11 using the control panel, 11 using the remote control, 11 P Power adapter connecting to LCD TV, 10 replacement adapter, 10 safety notes, 10 troubleshooting, 22 Q Quick channels assigning, 16... deleting, 16 R Ratings setting channel ratings, 17 Recall default settings, 14 Remote control disposing of used batteries, 8 illustration of, 6 key index table, 7 replacing the battery, 8 safety notes, 8 S Scanning for channels, 15 ...


