User Manual
Page 2
... 4. English CONTENTS 1. APPENDIX WALL MOUNT AND SAFETY BRACKET OPTIONS 37 WALL MOUNT AND SAFETY BRACKET OPTIONS 38 32 INCH HIGH DEFINITION LCD TV SPECIFICATIONS 39 42 INCH HIGH DEFINITION LCD TV SPECIFICATIONS 39 TROUBLESHOOTING...41 CLEANING THE HIGH DEFINITION LCD TV 43 i A GUIDE TO DIGITAL TELEVISION WHAT IS DIGITAL TELEVISION?...5 A GUIDE TO DIGITAL CHANNELS ...6 THE ELECTRONIC PROGRAM...
... 4. English CONTENTS 1. APPENDIX WALL MOUNT AND SAFETY BRACKET OPTIONS 37 WALL MOUNT AND SAFETY BRACKET OPTIONS 38 32 INCH HIGH DEFINITION LCD TV SPECIFICATIONS 39 42 INCH HIGH DEFINITION LCD TV SPECIFICATIONS 39 TROUBLESHOOTING...41 CLEANING THE HIGH DEFINITION LCD TV 43 i A GUIDE TO DIGITAL TELEVISION WHAT IS DIGITAL TELEVISION?...5 A GUIDE TO DIGITAL CHANNELS ...6 THE ELECTRONIC PROGRAM...

User Manual
Page 3
Model No Serial No ii Refer to them whenever you have any questions or concerns, Please call upon your Westinghouse Digital dealer regarding this product. English CONTENTS If you call our toll free number 1-866-287-5555 Owner's Record The model and serial numbers are located on the back of the numbers in the spaces provided below. Keep a record of the TV.
Model No Serial No ii Refer to them whenever you have any questions or concerns, Please call upon your Westinghouse Digital dealer regarding this product. English CONTENTS If you call our toll free number 1-866-287-5555 Owner's Record The model and serial numbers are located on the back of the numbers in the spaces provided below. Keep a record of the TV.
User Manual
Page 5
... ..... However, there is no guarantee that is connected. • Consult the Westinghouse Service Center or an experienced radio/TV technician for your specific country. If this High Definition LCD TV is enclosed and has been selected according to the country of the following guidelines if...The power supply outlet should be located near High Definition LCD TV and should look like Figure A1 below for the selection criteria for this equipment does cause harmful interference to correct the interference by Westinghouse Digital will not occur in a particular installation. Cord Type...
... ..... However, there is no guarantee that is connected. • Consult the Westinghouse Service Center or an experienced radio/TV technician for your specific country. If this High Definition LCD TV is enclosed and has been selected according to the country of the following guidelines if...The power supply outlet should be located near High Definition LCD TV and should look like Figure A1 below for the selection criteria for this equipment does cause harmful interference to correct the interference by Westinghouse Digital will not occur in a particular installation. Cord Type...
User Manual
Page 6
.... You may be used , use caution when moving it. • If the High Definition LCD TV emits smoke, abnormal noise, or a strange odor, immediately turn it off and contact the Westinghouse Service Center. 3 The wide blade or the third prong are difficult to moisture or high humidity... • Do not attempt repairs yourself. Protect the power cord from being walked on the High Definition LCD TV. Keep these instructions. 2. Heed all...
.... You may be used , use caution when moving it. • If the High Definition LCD TV emits smoke, abnormal noise, or a strange odor, immediately turn it off and contact the Westinghouse Service Center. 3 The wide blade or the third prong are difficult to moisture or high humidity... • Do not attempt repairs yourself. Protect the power cord from being walked on the High Definition LCD TV. Keep these instructions. 2. Heed all...
User Manual
Page 7
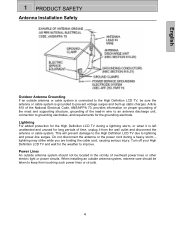
... lines or other electric light or power circuits. This will prevent damage to the High Definition LCD TV due to lightning and power-line surges. Turn off your High Definition LCD TV and wait for the grounding electrode. Power Lines An outside antenna system should be taken to.... English 1 PRODUCT SAFETY Antenna Installation Safety Outdoor Antenna Grounding If an outside antenna or cable system is connected to the High Definition LCD TV, be located in wire to an antenna discharge unit, connection to grounding electrodes, and requirements for the weather to improve. Lightning For...
... lines or other electric light or power circuits. This will prevent damage to the High Definition LCD TV due to lightning and power-line surges. Turn off your High Definition LCD TV and wait for the grounding electrode. Power Lines An outside antenna system should be taken to.... English 1 PRODUCT SAFETY Antenna Installation Safety Outdoor Antenna Grounding If an outside antenna or cable system is connected to the High Definition LCD TV, be located in wire to an antenna discharge unit, connection to grounding electrodes, and requirements for the weather to improve. Lightning For...
User Manual
Page 8
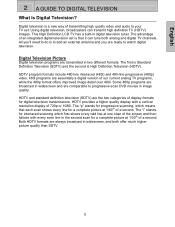
... of display formats for a complete picture at 1/30th of a second. Some 480p programs are broadcast in two different formats. This High Definition LCD TV has a built-in image quality. HDTV provides a higher quality display with every even line in widescreen, and both analog and digital...watch digital television. Digital television is to add an external antenna and you 'll need to do is a new way of our current analog TV programs, while the 480p format offers improved image detail over 480i. The "p" stands for progressive scanning, which first shows every odd line at ...
... of display formats for a complete picture at 1/30th of a second. Some 480p programs are broadcast in two different formats. This High Definition LCD TV has a built-in image quality. HDTV provides a higher quality display with every even line in widescreen, and both analog and digital...watch digital television. Digital television is to add an external antenna and you 'll need to do is a new way of our current analog TV programs, while the 480p format offers improved image detail over 480i. The "p" stands for progressive scanning, which first shows every odd line at ...
User Manual
Page 10
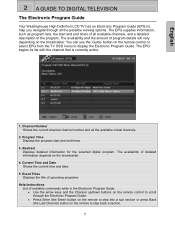
... all the possible viewing options. You can use the 'Guide' button on the broadcaster. 4. English 2 A GUIDE TO DIGITAL TELEVISION The Electronic Program Guide Your Westinghouse High Definition LCD TV has an Electronic Program Guide (EPG) to help you navigate through the Electronic Program Guide. • Press Enter (the Enter) button on the remote... start and end times of the program. The availability and the amount of detailed information depends on the remote control or select EPG from the TV OSD menu to display the Electronic Program Guide.
... all the possible viewing options. You can use the 'Guide' button on the broadcaster. 4. English 2 A GUIDE TO DIGITAL TELEVISION The Electronic Program Guide Your Westinghouse High Definition LCD TV has an Electronic Program Guide (EPG) to help you navigate through the Electronic Program Guide. • Press Enter (the Enter) button on the remote... start and end times of the program. The availability and the amount of detailed information depends on the remote control or select EPG from the TV OSD menu to display the Electronic Program Guide.
User Manual
Page 11
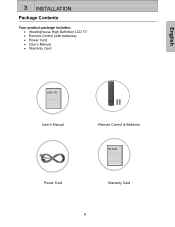
Card Power Cord Warranty Card 8 English 3 INSTALLATION Package Contents Your product package includes: • Westinghouse High Definition LCD TV • Remote Control (with batteries) • Power Cord • User's Manual • Warranty Card LCD - TV User's Manual Remote Control & Batteries W.
Card Power Cord Warranty Card 8 English 3 INSTALLATION Package Contents Your product package includes: • Westinghouse High Definition LCD TV • Remote Control (with batteries) • Power Cord • User's Manual • Warranty Card LCD - TV User's Manual Remote Control & Batteries W.
User Manual
Page 12
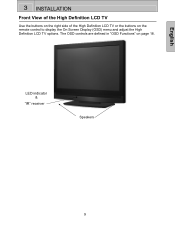
The OSD controls are defined in "OSD Functions" on the remote control to display the On Screen Display (OSD) menu and adjust the High Definition LCD TV options. LED indicator & "IR" receiver Speakers 9 English 3 INSTALLATION Front View of the High Definition LCD TV Use the buttons on the right side of the High Definition LCD TV or the buttons on page 18.
The OSD controls are defined in "OSD Functions" on the remote control to display the On Screen Display (OSD) menu and adjust the High Definition LCD TV options. LED indicator & "IR" receiver Speakers 9 English 3 INSTALLATION Front View of the High Definition LCD TV Use the buttons on the right side of the High Definition LCD TV or the buttons on page 18.
User Manual
Page 13
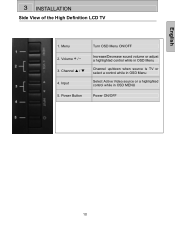
English 3 INSTALLATION Side View of the High Definition LCD TV 1. Power Button Turn OSD Menu ON/OFF Increase/Decrease sound volume or adjust a highlighted control while in OSD Menu Channel up/down when source is TV or select a control while in OSD Menu Select Active Video source or a highlighted control while in OSD MENU Power ON/OFF 10 Volume + / - 3. Input 5. Menu 2. Channel S / T 4.
English 3 INSTALLATION Side View of the High Definition LCD TV 1. Power Button Turn OSD Menu ON/OFF Increase/Decrease sound volume or adjust a highlighted control while in OSD Menu Channel up/down when source is TV or select a control while in OSD Menu Select Active Video source or a highlighted control while in OSD MENU Power ON/OFF 10 Volume + / - 3. Input 5. Menu 2. Channel S / T 4.

User Manual
Page 15
VGA Using a 15-pin VGA cable, connect to the Audio out (Green) on a computer. 3. Audio-In (VGA) Using a 3.5mm mini-jack cable, connect to a computer. 2. Audio Out (Right / Left) Connect this output to the antenna or cable service. 12 USB Connector used only for TV service. 6. SPDIF Digital Audio out connection 4. ANT (RF-input) Connect to an external audio amplifier. 5. English 3 INSTALLATION 1.
VGA Using a 15-pin VGA cable, connect to the Audio out (Green) on a computer. 3. Audio-In (VGA) Using a 3.5mm mini-jack cable, connect to a computer. 2. Audio Out (Right / Left) Connect this output to the antenna or cable service. 12 USB Connector used only for TV service. 6. SPDIF Digital Audio out connection 4. ANT (RF-input) Connect to an external audio amplifier. 5. English 3 INSTALLATION 1.
User Manual
Page 16
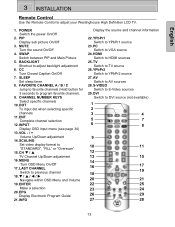
SWAP Switch between PIP and Main Picture 5. FAVORITE CHANNEL A / B / C Jump to favorite channels (Hold button for 3 seconds to adjust your Westinghouse High Definition LCD TV. 1. INPUT Display OSD input menu (see page 34) 13. VOL - / + Volume Up/Down adjustment 14. INFO Display the source and channel information 22. English 3 INSTALLATION ...
SWAP Switch between PIP and Main Picture 5. FAVORITE CHANNEL A / B / C Jump to favorite channels (Hold button for 3 seconds to adjust your Westinghouse High Definition LCD TV. 1. INPUT Display OSD input menu (see page 34) 13. VOL - / + Volume Up/Down adjustment 14. INFO Display the source and channel information 22. English 3 INSTALLATION ...
User Manual
Page 18
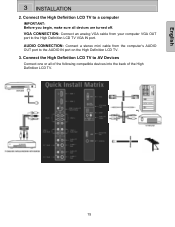
VGA CONNECTION: Connect an analog VGA cable from the computer's AUDIO OUT port to the High Definition LCD TV VGA IN port. English 3 INSTALLATION 2. AUDIO CONNECTION: Connect a stereo mini cable from your computer VGA OUT port to the AUDIO IN port on the High Definition LCD TV. 3. Connect the High Definition LCD TV to a computer IMPORTANT: Before you begin, make sure all of the following compatible devices into the back of the High Definition LCD TV. 15 Connect the High Definition LCD TV to AV Devices Connect one or all devices are turned off.
VGA CONNECTION: Connect an analog VGA cable from the computer's AUDIO OUT port to the High Definition LCD TV VGA IN port. English 3 INSTALLATION 2. AUDIO CONNECTION: Connect a stereo mini cable from your computer VGA OUT port to the AUDIO IN port on the High Definition LCD TV. 3. Connect the High Definition LCD TV to a computer IMPORTANT: Before you begin, make sure all of the following compatible devices into the back of the High Definition LCD TV. 15 Connect the High Definition LCD TV to AV Devices Connect one or all devices are turned off.
User Manual
Page 19
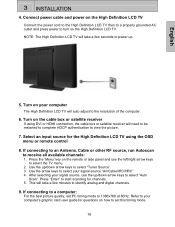
... arrow keys to identify analog and digital channels. 9. This will take a few minutes to select your computer The High Definition LCD TV will auto adjust to select the TV menu. 2. Turn on how to view the picture. 7. Refer to your signal source, use the left/right arrow keys ...keys to power up /down arrow keys to receive all available channels: 1. English 3 INSTALLATION 4. Connect power cable and power on the High Definition LCD TV. Select an input source for channels. 5. If connecting to a computer: For the best picture quality, set this timing mode. 16 Press "Enter"...
... arrow keys to identify analog and digital channels. 9. This will take a few minutes to select your computer The High Definition LCD TV will auto adjust to select the TV menu. 2. Turn on how to view the picture. 7. Refer to your signal source, use the left/right arrow keys ...keys to power up /down arrow keys to receive all available channels: 1. English 3 INSTALLATION 4. Connect power cable and power on the High Definition LCD TV. Select an input source for channels. 5. If connecting to a computer: For the best picture quality, set this timing mode. 16 Press "Enter"...
User Manual
Page 21
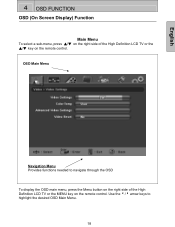
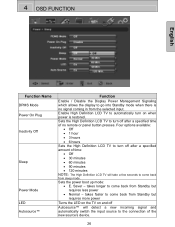
English 4 OSD FUNCTION OSD (On Screen Display) Function Main Menu To select a sub-menu, press ▲/▼ on the right side of the High Definition LCD TV or the MENU key on the remote control. Use the 3/4 arrow keys to navigate through the OSD To display the OSD main menu, press the Menu button on the right side of the High Definition LCD TV or the ▲/▼ key on the remote control. OSD Main Menu Navigation Menu Provides functions needed to highlight the desired OSD Main Menu. 18
English 4 OSD FUNCTION OSD (On Screen Display) Function Main Menu To select a sub-menu, press ▲/▼ on the right side of the High Definition LCD TV or the MENU key on the remote control. Use the 3/4 arrow keys to navigate through the OSD To display the OSD main menu, press the Menu button on the right side of the High Definition LCD TV or the ▲/▼ key on the remote control. OSD Main Menu Navigation Menu Provides functions needed to highlight the desired OSD Main Menu. 18
User Manual
Page 23
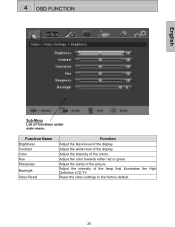
Adjust the color towards either red or green. Adjust the white level of the lamp that illuminates the High Definition LCD TV. Adjust the intensity of the display. Reset the video settings to the factory default. 20 Function Name Brightness Contrast Color Hue Sharpness Backlight Video Reset Function Adjust the black level of the colors. Adjust the intensity of the display. Adjust the clarity of functions under main menu. 4 OSD FUNCTION English Sub-Menu List of the picture.
Adjust the color towards either red or green. Adjust the white level of the lamp that illuminates the High Definition LCD TV. Adjust the intensity of the display. Reset the video settings to the factory default. 20 Function Name Brightness Contrast Color Hue Sharpness Backlight Video Reset Function Adjust the black level of the colors. Adjust the intensity of the display. Adjust the clarity of functions under main menu. 4 OSD FUNCTION English Sub-Menu List of the picture.
User Manual
Page 25
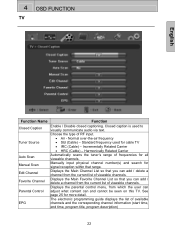
... input physical channel number(s) and search for all viewable channels. Normal over-the-air frequency • Std (Cable) - See page 25 for cable TV • IRC (Cable) - Displays the Main Channel List so that you can add / delete a channel from which the user can adjust what ...content can and cannot be seen on this TV. 4 OSD FUNCTION TV English Function Name Function Closed Caption Tuner Source Auto Scan Manual Scan Edit Channel Favorite Channel Parental Control EPG Enable / Disable closed captioning...
... input physical channel number(s) and search for all viewable channels. Normal over-the-air frequency • Std (Cable) - See page 25 for cable TV • IRC (Cable) - Displays the Main Channel List so that you can add / delete a channel from which the user can adjust what ...content can and cannot be seen on this TV. 4 OSD FUNCTION TV English Function Name Function Closed Caption Tuner Source Auto Scan Manual Scan Edit Channel Favorite Channel Parental Control EPG Enable / Disable closed captioning...
User Manual
Page 29
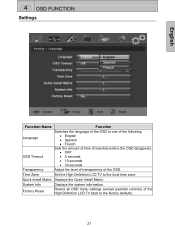
... amount of time: • Off • 30 minutes • 60 minutes • 90 minutes • 120 minutes NOTE: The High Definition LCD TV will take a few seconds to automatically turn off Autosource™ will detect a new incoming signal and automatically switch the input source to go into Standby... mode when there is restored. Enable High Definition LCD TV to come back from sleep mode. Four options available: • Off • 1 hour • 3 hours • 6 hours Sets the ...
... amount of time: • Off • 30 minutes • 60 minutes • 90 minutes • 120 minutes NOTE: The High Definition LCD TV will take a few seconds to automatically turn off Autosource™ will detect a new incoming signal and automatically switch the input source to go into Standby... mode when there is restored. Enable High Definition LCD TV to come back from sleep mode. Four options available: • Off • 1 hour • 3 hours • 6 hours Sets the ...
User Manual
Page 30
... inactivity before the OSD disappears. • OFF • 5 seconds • 10 seconds • 30 seconds Transparency Adjust the level of transparency of the High Definition LCD TV back to the local time zone. Time Zone Set the High Definition...
... inactivity before the OSD disappears. • OFF • 5 seconds • 10 seconds • 30 seconds Transparency Adjust the level of transparency of the High Definition LCD TV back to the local time zone. Time Zone Set the High Definition...
User Manual
Page 32
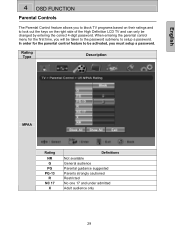
... based on their ratings and to lock out the keys on the right side of the High Definition LCD TV and can only be activated, you will be taken to the password submenu to be changed by entering the correct 4-digit password. In order for ...
... based on their ratings and to lock out the keys on the right side of the High Definition LCD TV and can only be activated, you will be taken to the password submenu to be changed by entering the correct 4-digit password. In order for ...


