User Manual
Page 2
... OPTIONS 37 WALL MOUNT AND SAFETY BRACKET OPTIONS 38 32 INCH HIGH DEFINITION LCD TV SPECIFICATIONS 39 42 INCH HIGH DEFINITION LCD TV SPECIFICATIONS 39 TROUBLESHOOTING...41 CLEANING THE HIGH DEFINITION LCD TV 43 i OSD FUNCTION OSD (ON SCREEN DISPLAY) FUNCTION 18 VIDEO ...19 DISPLAY ...21 TV...22 PC (VGA ONLY) ...23 AUDIO ...24 POWER MANAGEMENT ...25 SETTINGS...27...
... OPTIONS 37 WALL MOUNT AND SAFETY BRACKET OPTIONS 38 32 INCH HIGH DEFINITION LCD TV SPECIFICATIONS 39 42 INCH HIGH DEFINITION LCD TV SPECIFICATIONS 39 TROUBLESHOOTING...41 CLEANING THE HIGH DEFINITION LCD TV 43 i OSD FUNCTION OSD (ON SCREEN DISPLAY) FUNCTION 18 VIDEO ...19 DISPLAY ...21 TV...22 PC (VGA ONLY) ...23 AUDIO ...24 POWER MANAGEMENT ...25 SETTINGS...27...

User Manual
Page 15
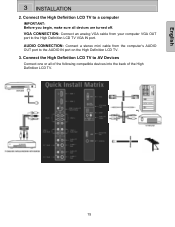
ANT (RF-input) Connect to the Audio out (Green) on a computer. 3. English 3 INSTALLATION 1. USB Connector used only for TV service. 6. Audio-In (VGA) Using a 3.5mm mini-jack cable, connect to the antenna or cable service. 12 VGA Using a 15-pin VGA cable, connect to an external audio amplifier. 5. SPDIF Digital Audio out connection 4. Audio Out (Right / Left) Connect this output to a computer. 2.
ANT (RF-input) Connect to the Audio out (Green) on a computer. 3. English 3 INSTALLATION 1. USB Connector used only for TV service. 6. Audio-In (VGA) Using a 3.5mm mini-jack cable, connect to the antenna or cable service. 12 VGA Using a 15-pin VGA cable, connect to an external audio amplifier. 5. SPDIF Digital Audio out connection 4. Audio Out (Right / Left) Connect this output to a computer. 2.
User Manual
Page 16
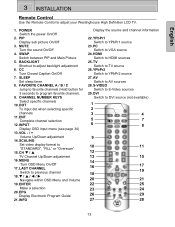
.../ C Jump to favorite channels (Hold button for 3 seconds to adjust your Westinghouse High Definition LCD TV. 1. CHANNEL NUMBER KEYS Select specific channels 10. T / S / W / X Navigate within OSD Menu and Volume 19. YPbPr1 Switch to VGA source 24. PC Switch to YPbPr1 source 23. AV Switch to previous channel ...18. SWAP Switch between PIP and Main Picture 5. CC Turn Closed Caption On/Off 7. LAST CHANNEL Switch to AV sources 28. TV Switch to DVI source (not available) 1...
.../ C Jump to favorite channels (Hold button for 3 seconds to adjust your Westinghouse High Definition LCD TV. 1. CHANNEL NUMBER KEYS Select specific channels 10. T / S / W / X Navigate within OSD Menu and Volume 19. YPbPr1 Switch to VGA source 24. PC Switch to YPbPr1 source 23. AV Switch to previous channel ...18. SWAP Switch between PIP and Main Picture 5. CC Turn Closed Caption On/Off 7. LAST CHANNEL Switch to AV sources 28. TV Switch to DVI source (not available) 1...
User Manual
Page 18
English 3 INSTALLATION 2. AUDIO CONNECTION: Connect a stereo mini cable from your computer VGA OUT port to a computer IMPORTANT: Before you begin, make sure all of the following compatible devices into the back of the High Definition LCD TV. 15 Connect the High Definition LCD TV to the AUDIO IN port on the High Definition LCD TV. 3. VGA CONNECTION: Connect an analog VGA cable from the computer's AUDIO OUT port to AV Devices Connect one or all devices are turned off. Connect the High Definition LCD TV to the High Definition LCD TV VGA IN port.
English 3 INSTALLATION 2. AUDIO CONNECTION: Connect a stereo mini cable from your computer VGA OUT port to a computer IMPORTANT: Before you begin, make sure all of the following compatible devices into the back of the High Definition LCD TV. 15 Connect the High Definition LCD TV to the AUDIO IN port on the High Definition LCD TV. 3. VGA CONNECTION: Connect an analog VGA cable from the computer's AUDIO OUT port to AV Devices Connect one or all devices are turned off. Connect the High Definition LCD TV to the High Definition LCD TV VGA IN port.
User Manual
Page 26
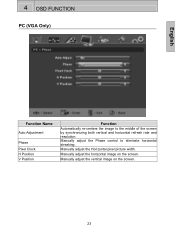
Manually adjust the horizontal image on the screen. 23 Manually adjust the Horizontal pixel picture width. Manually adjust the vertical image on the screen. Manually adjust the Phase control to the middle of the screen by synchronizing both vertical and horizontal refresh rate and resolution. 4 OSD FUNCTION PC (VGA Only) English Function Name Auto Adjustment Phase Pixel Clock H Position V Position Function Automatically re-centers the image to eliminate horizontal streaking.
Manually adjust the horizontal image on the screen. 23 Manually adjust the Horizontal pixel picture width. Manually adjust the vertical image on the screen. Manually adjust the Phase control to the middle of the screen by synchronizing both vertical and horizontal refresh rate and resolution. 4 OSD FUNCTION PC (VGA Only) English Function Name Auto Adjustment Phase Pixel Clock H Position V Position Function Automatically re-centers the image to eliminate horizontal streaking.
User Manual
Page 39
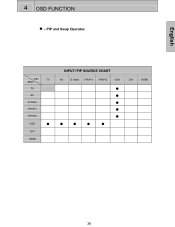
PIP and Swap Operates PIP TV Main TV AV S Video YPbPr1 YPbPr2 VGA ● DVI HDMI INPUT/ PIP SOURCE CHART AV S Video YPbPr1 YPbPr2 VGA DVI HDMI 36 English 4 OSD FUNCTION ● -
PIP and Swap Operates PIP TV Main TV AV S Video YPbPr1 YPbPr2 VGA ● DVI HDMI INPUT/ PIP SOURCE CHART AV S Video YPbPr1 YPbPr2 VGA DVI HDMI 36 English 4 OSD FUNCTION ● -
User Manual
Page 44
...Picture • Check the video connection. • Make sure the video cable connected to the High Definition LCD TV is supplying the proper voltage. • When set . English 5 APPENDIX Troubleshooting No Power • Make ...Found in 4:3 format. If the other end of the video cable is not attached permanently to the High Definition LCD TV, secure it off . • Check if Inactivity Off is set to turn it tightly. • Adjust.... If so, turn on. No Picture when I connect VGA cable or "No Input Signal" • Check VGA cable connection. • Lower the video resolution on time.
...Picture • Check the video connection. • Make sure the video cable connected to the High Definition LCD TV is supplying the proper voltage. • When set . English 5 APPENDIX Troubleshooting No Power • Make ...Found in 4:3 format. If the other end of the video cable is not attached permanently to the High Definition LCD TV, secure it off . • Check if Inactivity Off is set to turn it tightly. • Adjust.... If so, turn on. No Picture when I connect VGA cable or "No Input Signal" • Check VGA cable connection. • Lower the video resolution on time.