User Manual
Page 2
... MANAGEMENT ...25 SETTINGS...27 MAIN CHANNEL LIST ...28 PARENTAL CONTROLS (CANADIAN ENGLISH 31 PARENTAL CONTROLS (CANADIAN FRENCH 32 PARENTAL CONTROLS (PASSWORD EDIT 33 INPUT MENUS...34 FAVORITE BUTTONS...35 5. INSTALLATION PACKAGE CONTENTS ...8 FRONT VIEW OF THE HIGH DEFINITION LCD TV 9 SIDE VIEW OF THE HIGH DEFINITION LCD TV 10 REMOTE CONTROL ...13 INSTALLATION ...14 4. A GUIDE TO DIGITAL TELEVISION WHAT IS...
... MANAGEMENT ...25 SETTINGS...27 MAIN CHANNEL LIST ...28 PARENTAL CONTROLS (CANADIAN ENGLISH 31 PARENTAL CONTROLS (CANADIAN FRENCH 32 PARENTAL CONTROLS (PASSWORD EDIT 33 INPUT MENUS...34 FAVORITE BUTTONS...35 5. INSTALLATION PACKAGE CONTENTS ...8 FRONT VIEW OF THE HIGH DEFINITION LCD TV 9 SIDE VIEW OF THE HIGH DEFINITION LCD TV 10 REMOTE CONTROL ...13 INSTALLATION ...14 4. A GUIDE TO DIGITAL TELEVISION WHAT IS...
User Manual
Page 6
...type plug has two blades and a third grounding prong. The wide blade or the third prong are difficult to a void injury from the remote control • Only use this apparatus during lightning storms or when unused for long periods of time. 14. If the provided plug does not ... not attempt repairs yourself. Only use caution when moving it. • If the High Definition LCD TV emits smoke, abnormal noise, or a strange odor, immediately turn it off and contact the Westinghouse Service Center. 3 Servicing is damaged, liquid has been spilled or objects have fallen into your outlet...
...type plug has two blades and a third grounding prong. The wide blade or the third prong are difficult to a void injury from the remote control • Only use this apparatus during lightning storms or when unused for long periods of time. 14. If the provided plug does not ... not attempt repairs yourself. Only use caution when moving it. • If the High Definition LCD TV emits smoke, abnormal noise, or a strange odor, immediately turn it off and contact the Westinghouse Service Center. 3 Servicing is damaged, liquid has been spilled or objects have fallen into your outlet...
User Manual
Page 10
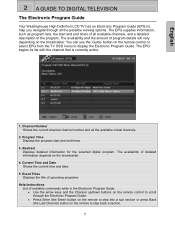
... available commands while in the Electronic Program Guide. • Use the arrow keys and the Channel up/down buttons on the remote control to scroll through all the possible viewing options. Abstract Displays detailed information for the selected digital program. You can use the '...English 2 A GUIDE TO DIGITAL TELEVISION The Electronic Program Guide Your Westinghouse High Definition LCD TV has an Electronic Program Guide (EPG) to help you navigate through the Electronic Program Guide. • Press Enter (the Enter) button on the remote to step into a sub section or press Back (the Last...
... available commands while in the Electronic Program Guide. • Use the arrow keys and the Channel up/down buttons on the remote control to scroll through all the possible viewing options. Abstract Displays detailed information for the selected digital program. You can use the '...English 2 A GUIDE TO DIGITAL TELEVISION The Electronic Program Guide Your Westinghouse High Definition LCD TV has an Electronic Program Guide (EPG) to help you navigate through the Electronic Program Guide. • Press Enter (the Enter) button on the remote to step into a sub section or press Back (the Last...
User Manual
Page 11
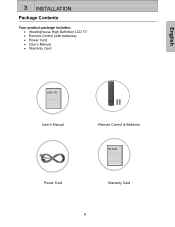
Card Power Cord Warranty Card 8 English 3 INSTALLATION Package Contents Your product package includes: • Westinghouse High Definition LCD TV • Remote Control (with batteries) • Power Cord • User's Manual • Warranty Card LCD - TV User's Manual Remote Control & Batteries W.
Card Power Cord Warranty Card 8 English 3 INSTALLATION Package Contents Your product package includes: • Westinghouse High Definition LCD TV • Remote Control (with batteries) • Power Cord • User's Manual • Warranty Card LCD - TV User's Manual Remote Control & Batteries W.
User Manual
Page 12
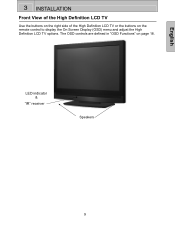
English 3 INSTALLATION Front View of the High Definition LCD TV Use the buttons on the right side of the High Definition LCD TV or the buttons on page 18. LED indicator & "IR" receiver Speakers 9 The OSD controls are defined in "OSD Functions" on the remote control to display the On Screen Display (OSD) menu and adjust the High Definition LCD TV options.
English 3 INSTALLATION Front View of the High Definition LCD TV Use the buttons on the right side of the High Definition LCD TV or the buttons on page 18. LED indicator & "IR" receiver Speakers 9 The OSD controls are defined in "OSD Functions" on the remote control to display the On Screen Display (OSD) menu and adjust the High Definition LCD TV options.
User Manual
Page 16
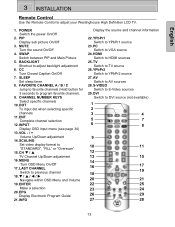
...to adjust backlight adjustment 6. MENU Turn OSD Menu On/Off 17. T / S / W / X Navigate within OSD Menu and Volume 19. TV Switch to program favorite channel). 9. MUTE Turn the sound On/Off 4. FAVORITE CHANNEL A / B / C Jump to favorite channels (Hold button for 3 seconds ...18. CC Turn Closed Caption On/Off 7. EPG Display Electronic Program Guide 21. YPbPr2 Switch to adjust your Westinghouse High Definition LCD TV. 1. English 3 INSTALLATION Remote Control Use the Remote Control to YPbPr2 source 27. POWER Switch the power On/Off 2. SWAP Switch between PIP and Main Picture 5. ...
...to adjust backlight adjustment 6. MENU Turn OSD Menu On/Off 17. T / S / W / X Navigate within OSD Menu and Volume 19. TV Switch to program favorite channel). 9. MUTE Turn the sound On/Off 4. FAVORITE CHANNEL A / B / C Jump to favorite channels (Hold button for 3 seconds ...18. CC Turn Closed Caption On/Off 7. EPG Display Electronic Program Guide 21. YPbPr2 Switch to adjust your Westinghouse High Definition LCD TV. 1. English 3 INSTALLATION Remote Control Use the Remote Control to YPbPr2 source 27. POWER Switch the power On/Off 2. SWAP Switch between PIP and Main Picture 5. ...
User Manual
Page 17
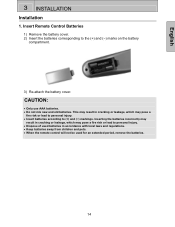
...CAUTION: • Only use AAA batteries. • Do not mix new and old batteries. English 3 INSTALLATION Installation 1. Insert Remote Control Batteries 1) Remove the battery cover. 2) Insert the batteries corresponding to personal injury. • Dispose of used batteries in accordance with... local laws and regulations. • Keep batteries away from children and pets. • When the remote control will not be used for an extended period, remove the batteries. 14 Inserting the batteries incorrectly may result in cracking or leakage, which...
...CAUTION: • Only use AAA batteries. • Do not mix new and old batteries. English 3 INSTALLATION Installation 1. Insert Remote Control Batteries 1) Remove the battery cover. 2) Insert the batteries corresponding to personal injury. • Dispose of used batteries in accordance with... local laws and regulations. • Keep batteries away from children and pets. • When the remote control will not be used for an extended period, remove the batteries. 14 Inserting the batteries incorrectly may result in cracking or leakage, which...
User Manual
Page 19
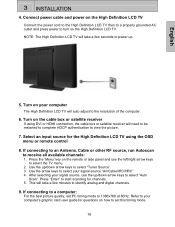
...satellite receiver If using the OSD menu or remote control 8. Press "Enter" to start scanning for the High Definition LCD TV using DVI or HDMI connection, the cable box or satellite receiver will take a few seconds to power up. 5. NOTE: The High Definition LCD TV will need to be restarted to complete HDCP...to select "Auto Scan". Connect power cable and power on the High Definition LCD TV Connect the power cord to the High Definition LCD TV then to a properly grounded AC outlet and press power to turn on the remote or side panel and use the up /down arrow keys to identify analog...
...satellite receiver If using the OSD menu or remote control 8. Press "Enter" to start scanning for the High Definition LCD TV using DVI or HDMI connection, the cable box or satellite receiver will take a few seconds to power up. 5. NOTE: The High Definition LCD TV will need to be restarted to complete HDCP...to select "Auto Scan". Connect power cable and power on the High Definition LCD TV Connect the power cord to the High Definition LCD TV then to a properly grounded AC outlet and press power to turn on the remote or side panel and use the up /down arrow keys to identify analog...
User Manual
Page 21
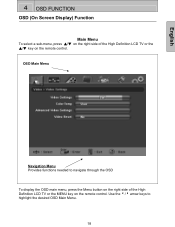
OSD Main Menu Navigation Menu Provides functions needed to highlight the desired OSD Main Menu. 18 Use the 3/4 arrow keys to navigate through the OSD To display the OSD main menu, press the Menu button on the right side of the High Definition LCD TV or the ▲/▼ key on the remote control. English 4 OSD FUNCTION OSD (On Screen Display) Function Main Menu To select a sub-menu, press ▲/▼ on the right side of the High Definition LCD TV or the MENU key on the remote control.
OSD Main Menu Navigation Menu Provides functions needed to highlight the desired OSD Main Menu. 18 Use the 3/4 arrow keys to navigate through the OSD To display the OSD main menu, press the Menu button on the right side of the High Definition LCD TV or the ▲/▼ key on the remote control. English 4 OSD FUNCTION OSD (On Screen Display) Function Main Menu To select a sub-menu, press ▲/▼ on the right side of the High Definition LCD TV or the MENU key on the remote control.
User Manual
Page 38
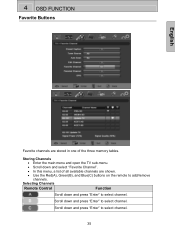
Selecting Channels Remote Control Function Scroll down and press "Enter" to select channel. Scroll down and press "Enter" to select channel. 35 4 OSD FUNCTION Favorite Buttons English Favorite channels are shown. • Use the Red(A), Green(B), and Blue(C) buttons on the remote to add/remove channels. ...Storing Channels • Enter the main menu and open the TV sub-menu. • Scroll down and press "Enter" to select channel. Scroll down and ...
Selecting Channels Remote Control Function Scroll down and press "Enter" to select channel. Scroll down and press "Enter" to select channel. 35 4 OSD FUNCTION Favorite Buttons English Favorite channels are shown. • Use the Red(A), Green(B), and Blue(C) buttons on the remote to add/remove channels. ...Storing Channels • Enter the main menu and open the TV sub-menu. • Scroll down and press "Enter" to select channel. Scroll down and ...
User Manual
Page 44
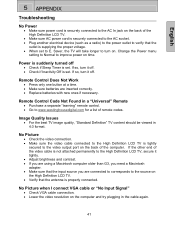
...• For the best TV image quality, "Standard Definition" TV content should be viewed in the cable again. 41 Power is suddenly turned off . • Check if Inactivity Off is set to E. Remote Control Code Not Found in a "Universal" Remote • Purchase a separate "learning" remote control. • Go to ...8226; Check the video connection. • Make sure the video cable connected to the High Definition LCD TV is tightly secured to www.westinghousedigital.com for a list of the High Definition LCD TV. • Make sure AC power cord is securely connected to the AC socket. • ...
...• For the best TV image quality, "Standard Definition" TV content should be viewed in the cable again. 41 Power is suddenly turned off . • Check if Inactivity Off is set to E. Remote Control Code Not Found in a "Universal" Remote • Purchase a separate "learning" remote control. • Go to ...8226; Check the video connection. • Make sure the video cable connected to the High Definition LCD TV is tightly secured to www.westinghousedigital.com for a list of the High Definition LCD TV. • Make sure AC power cord is securely connected to the AC socket. • ...
User Manual
Page 45
... the audio connection. • Press MUTE on the remote control, so that S-Video and Composite AV1 share the same audio source. How Can I Find More Help? 42 Parental Control Password is connected securely. Loose or broken pins in TV mode. • Check your antenna connection. If necessary... cause impaired autosource operation. Blocky images appear in the cable connector could cause an improper connection. • Connect the High Definition LCD TV to SAP or minimum. • Press the Volume + (Up) key on Screen • Check your antenna connection. AUDIO Interconnection...
... the audio connection. • Press MUTE on the remote control, so that S-Video and Composite AV1 share the same audio source. How Can I Find More Help? 42 Parental Control Password is connected securely. Loose or broken pins in TV mode. • Check your antenna connection. If necessary... cause impaired autosource operation. Blocky images appear in the cable connector could cause an improper connection. • Connect the High Definition LCD TV to SAP or minimum. • Press the Volume + (Up) key on Screen • Check your antenna connection. AUDIO Interconnection...


