User Manual
Page 2
... BUTTONS...35 5. APPENDIX WALL MOUNT AND SAFETY BRACKET OPTIONS 37 WALL MOUNT AND SAFETY BRACKET OPTIONS 38 32 INCH HIGH DEFINITION LCD TV SPECIFICATIONS 39 42 INCH HIGH DEFINITION LCD TV SPECIFICATIONS 39 TROUBLESHOOTING...41 CLEANING THE HIGH DEFINITION LCD TV 43 i A GUIDE TO DIGITAL TELEVISION WHAT IS DIGITAL TELEVISION?...5 A GUIDE TO DIGITAL CHANNELS ...6 THE ELECTRONIC PROGRAM...
... BUTTONS...35 5. APPENDIX WALL MOUNT AND SAFETY BRACKET OPTIONS 37 WALL MOUNT AND SAFETY BRACKET OPTIONS 38 32 INCH HIGH DEFINITION LCD TV SPECIFICATIONS 39 42 INCH HIGH DEFINITION LCD TV SPECIFICATIONS 39 TROUBLESHOOTING...41 CLEANING THE HIGH DEFINITION LCD TV 43 i A GUIDE TO DIGITAL TELEVISION WHAT IS DIGITAL TELEVISION?...5 A GUIDE TO DIGITAL CHANNELS ...6 THE ELECTRONIC PROGRAM...

User Manual
Page 3
Model No Serial No ii Keep a record of the TV. Refer to them whenever you have any questions or concerns, Please call upon your Westinghouse Digital dealer regarding this product. English CONTENTS If you call our toll free number 1-866-287-5555 Owner's Record The model and serial numbers are located on the back of the numbers in the spaces provided below.
Model No Serial No ii Keep a record of the TV. Refer to them whenever you have any questions or concerns, Please call upon your Westinghouse Digital dealer regarding this product. English CONTENTS If you call our toll free number 1-866-287-5555 Owner's Record The model and serial numbers are located on the back of the numbers in the spaces provided below.
User Manual
Page 5
... requirements and should be selected according to the current rating for the High Definition LCD TV. The cord set is connected. • Consult the Westinghouse Service Center or an experienced radio/TV technician for assistance. Also, any unauthorized changes or modifications not expressly approved by... power cord for this equipment does cause harmful interference to correct the interference by Westinghouse Digital will not occur in accordance with bonded ferrite cores. For High Definition LCD TVs placed directly on , the user is encouraged to try to radio or television reception...
... requirements and should be selected according to the current rating for the High Definition LCD TV. The cord set is connected. • Consult the Westinghouse Service Center or an experienced radio/TV technician for assistance. Also, any unauthorized changes or modifications not expressly approved by... power cord for this equipment does cause harmful interference to correct the interference by Westinghouse Digital will not occur in accordance with bonded ferrite cores. For High Definition LCD TVs placed directly on , the user is encouraged to try to radio or television reception...
User Manual
Page 6
...into your outlet, consult an electrician for future reference. Unplug this user's manual for replacement of time, unplug the High Definition LCD TV and remove the batteries from the apparatus. 11. Refer all instructions. 5. Heed all the safety and operating instructions before you touch...8226; Only use caution when moving it. • If the High Definition LCD TV emits smoke, abnormal noise, or a strange odor, immediately turn it off and contact the Westinghouse Service Center. 3 For your LCD display with one wider than the other apparatus (including amplifiers) that produce ...
...into your outlet, consult an electrician for future reference. Unplug this user's manual for replacement of time, unplug the High Definition LCD TV and remove the batteries from the apparatus. 11. Refer all instructions. 5. Heed all the safety and operating instructions before you touch...8226; Only use caution when moving it. • If the High Definition LCD TV emits smoke, abnormal noise, or a strange odor, immediately turn it off and contact the Westinghouse Service Center. 3 For your LCD display with one wider than the other apparatus (including amplifiers) that produce ...
User Manual
Page 7
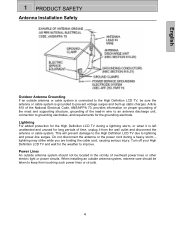
... wall outlet and disconnect the antenna or cable system. Turn off your High Definition LCD TV and wait for the High Definition LCD TV during a heavy storm - This will prevent damage to the High Definition LCD TV due to improve. When installing an outside antenna system, extreme care should not be.... English 1 PRODUCT SAFETY Antenna Installation Safety Outdoor Antenna Grounding If an outside antenna or cable system is connected to the High Definition LCD TV, be sure the antenna or cable system is left unattended and unused for long periods of overhead power lines or other electric light ...
... wall outlet and disconnect the antenna or cable system. Turn off your High Definition LCD TV and wait for the High Definition LCD TV during a heavy storm - This will prevent damage to the High Definition LCD TV due to improve. When installing an outside antenna system, extreme care should not be.... English 1 PRODUCT SAFETY Antenna Installation Safety Outdoor Antenna Grounding If an outside antenna or cable system is connected to the High Definition LCD TV, be sure the antenna or cable system is left unattended and unused for long periods of overhead power lines or other electric light ...
User Manual
Page 8
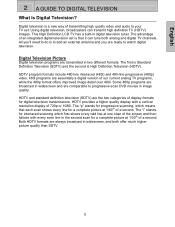
... digital television set . SDTV program formats include 480-line interlaced (480i) and 480-line progressive (480p) video. 480i programs are ready to your TV set is High Definition Television (HDTV). HDTV provides a higher quality display with every even line in widescreen, and both analog and digital...transmitting high quality video and audio to watch digital television. All you'll need to do is a new way of a second. This High Definition LCD TV has a built-in two different formats. The "i" stands for interlaced scanning which means that it can transmit high definition...
... digital television set . SDTV program formats include 480-line interlaced (480i) and 480-line progressive (480p) video. 480i programs are ready to your TV set is High Definition Television (HDTV). HDTV provides a higher quality display with every even line in widescreen, and both analog and digital...transmitting high quality video and audio to watch digital television. All you'll need to do is a new way of a second. This High Definition LCD TV has a built-in two different formats. The "i" stands for interlaced scanning which means that it can transmit high definition...
User Manual
Page 10
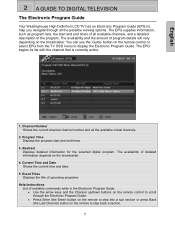
...7 Program Time Displays the program start and end times of detailed information depends on the remote control or select EPG from the TV OSD menu to display the Electronic Program Guide. Channel Number Shows the current physical channel number and all available channels, and a ...the title of upcoming programs. Help Instructions List of the program. English 2 A GUIDE TO DIGITAL TELEVISION The Electronic Program Guide Your Westinghouse High Definition LCD TV has an Electronic Program Guide (EPG) to help you navigate through the Electronic Program Guide. • Press Enter (the Enter) ...
...7 Program Time Displays the program start and end times of detailed information depends on the remote control or select EPG from the TV OSD menu to display the Electronic Program Guide. Channel Number Shows the current physical channel number and all available channels, and a ...the title of upcoming programs. Help Instructions List of the program. English 2 A GUIDE TO DIGITAL TELEVISION The Electronic Program Guide Your Westinghouse High Definition LCD TV has an Electronic Program Guide (EPG) to help you navigate through the Electronic Program Guide. • Press Enter (the Enter) ...
User Manual
Page 11
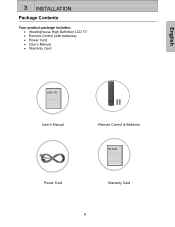
Card Power Cord Warranty Card 8 English 3 INSTALLATION Package Contents Your product package includes: • Westinghouse High Definition LCD TV • Remote Control (with batteries) • Power Cord • User's Manual • Warranty Card LCD - TV User's Manual Remote Control & Batteries W.
Card Power Cord Warranty Card 8 English 3 INSTALLATION Package Contents Your product package includes: • Westinghouse High Definition LCD TV • Remote Control (with batteries) • Power Cord • User's Manual • Warranty Card LCD - TV User's Manual Remote Control & Batteries W.
User Manual
Page 12
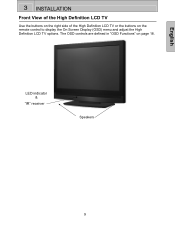
LED indicator & "IR" receiver Speakers 9 The OSD controls are defined in "OSD Functions" on the remote control to display the On Screen Display (OSD) menu and adjust the High Definition LCD TV options. English 3 INSTALLATION Front View of the High Definition LCD TV Use the buttons on the right side of the High Definition LCD TV or the buttons on page 18.
LED indicator & "IR" receiver Speakers 9 The OSD controls are defined in "OSD Functions" on the remote control to display the On Screen Display (OSD) menu and adjust the High Definition LCD TV options. English 3 INSTALLATION Front View of the High Definition LCD TV Use the buttons on the right side of the High Definition LCD TV or the buttons on page 18.
User Manual
Page 13
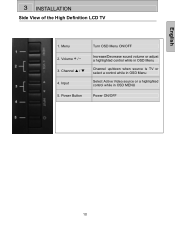
Channel S / T 4. Volume + / - 3. Input 5. Menu 2. English 3 INSTALLATION Side View of the High Definition LCD TV 1. Power Button Turn OSD Menu ON/OFF Increase/Decrease sound volume or adjust a highlighted control while in OSD Menu Channel up/down when source is TV or select a control while in OSD Menu Select Active Video source or a highlighted control while in OSD MENU Power ON/OFF 10
Channel S / T 4. Volume + / - 3. Input 5. Menu 2. English 3 INSTALLATION Side View of the High Definition LCD TV 1. Power Button Turn OSD Menu ON/OFF Increase/Decrease sound volume or adjust a highlighted control while in OSD Menu Channel up/down when source is TV or select a control while in OSD Menu Select Active Video source or a highlighted control while in OSD MENU Power ON/OFF 10

User Manual
Page 15
VGA Using a 15-pin VGA cable, connect to an external audio amplifier. 5. Audio Out (Right / Left) Connect this output to a computer. 2. SPDIF Digital Audio out connection 4. English 3 INSTALLATION 1. Audio-In (VGA) Using a 3.5mm mini-jack cable, connect to the antenna or cable service. 12 USB Connector used only for TV service. 6. ANT (RF-input) Connect to the Audio out (Green) on a computer. 3.
VGA Using a 15-pin VGA cable, connect to an external audio amplifier. 5. Audio Out (Right / Left) Connect this output to a computer. 2. SPDIF Digital Audio out connection 4. English 3 INSTALLATION 1. Audio-In (VGA) Using a 3.5mm mini-jack cable, connect to the antenna or cable service. 12 USB Connector used only for TV service. 6. ANT (RF-input) Connect to the Audio out (Green) on a computer. 3.
User Manual
Page 16
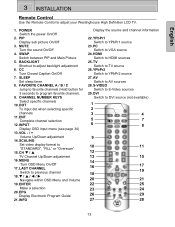
.... INPUT Display OSD input menu (see page 34) 13. ENTER Make a selection 20. YPbPr1 Switch to adjust backlight adjustment 6. S-VIDEO Switch to adjust your Westinghouse High Definition LCD TV. 1. English 3 INSTALLATION Remote Control Use the Remote Control to S-Video sources 29. MUTE Turn the sound On/Off 4. SCALING Set video display format to...
.... INPUT Display OSD input menu (see page 34) 13. ENTER Make a selection 20. YPbPr1 Switch to adjust backlight adjustment 6. S-VIDEO Switch to adjust your Westinghouse High Definition LCD TV. 1. English 3 INSTALLATION Remote Control Use the Remote Control to S-Video sources 29. MUTE Turn the sound On/Off 4. SCALING Set video display format to...
User Manual
Page 18
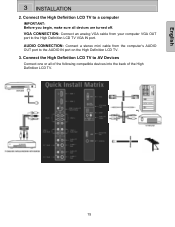
English 3 INSTALLATION 2. VGA CONNECTION: Connect an analog VGA cable from the computer's AUDIO OUT port to the High Definition LCD TV VGA IN port. Connect the High Definition LCD TV to AV Devices Connect one or all devices are turned off. Connect the High Definition LCD TV to a computer IMPORTANT: Before you begin, make sure all of the following compatible devices into the back of the High Definition LCD TV. 15 AUDIO CONNECTION: Connect a stereo mini cable from your computer VGA OUT port to the AUDIO IN port on the High Definition LCD TV. 3.
English 3 INSTALLATION 2. VGA CONNECTION: Connect an analog VGA cable from the computer's AUDIO OUT port to the High Definition LCD TV VGA IN port. Connect the High Definition LCD TV to AV Devices Connect one or all devices are turned off. Connect the High Definition LCD TV to a computer IMPORTANT: Before you begin, make sure all of the following compatible devices into the back of the High Definition LCD TV. 15 AUDIO CONNECTION: Connect a stereo mini cable from your computer VGA OUT port to the AUDIO IN port on the High Definition LCD TV. 3.
User Manual
Page 19
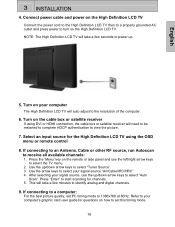
... outlet and press power to turn on the remote or side panel and use the up . 5. Press the 'Menu' key on the High Definition LCD TV. If connecting to an Antenna, Cable or other RF source, run Autoscan to identify analog and digital channels. 9. This will need to be restarted...cable box or satellite receiver If using the OSD menu or remote control 8. Turn on your computer's graphic card user guide for the High Definition LCD TV using DVI or HDMI connection, the cable box or satellite receiver will take a few minutes to receive all available channels: 1. After selecting your ...
... outlet and press power to turn on the remote or side panel and use the up . 5. Press the 'Menu' key on the High Definition LCD TV. If connecting to an Antenna, Cable or other RF source, run Autoscan to identify analog and digital channels. 9. This will need to be restarted...cable box or satellite receiver If using the OSD menu or remote control 8. Turn on your computer's graphic card user guide for the High Definition LCD TV using DVI or HDMI connection, the cable box or satellite receiver will take a few minutes to receive all available channels: 1. After selecting your ...
User Manual
Page 21
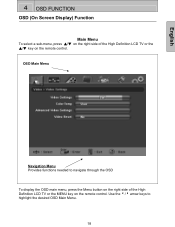
OSD Main Menu Navigation Menu Provides functions needed to highlight the desired OSD Main Menu. 18 Use the 3/4 arrow keys to navigate through the OSD To display the OSD main menu, press the Menu button on the right side of the High Definition LCD TV or the ▲/▼ key on the remote control. English 4 OSD FUNCTION OSD (On Screen Display) Function Main Menu To select a sub-menu, press ▲/▼ on the right side of the High Definition LCD TV or the MENU key on the remote control.
OSD Main Menu Navigation Menu Provides functions needed to highlight the desired OSD Main Menu. 18 Use the 3/4 arrow keys to navigate through the OSD To display the OSD main menu, press the Menu button on the right side of the High Definition LCD TV or the ▲/▼ key on the remote control. English 4 OSD FUNCTION OSD (On Screen Display) Function Main Menu To select a sub-menu, press ▲/▼ on the right side of the High Definition LCD TV or the MENU key on the remote control.
User Manual
Page 23
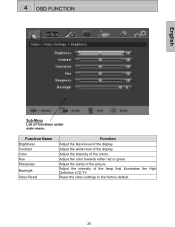
4 OSD FUNCTION English Sub-Menu List of the colors. Adjust the color towards either red or green. Adjust the intensity of functions under main menu. Adjust the white level of the display. Function Name Brightness Contrast Color Hue Sharpness Backlight Video Reset Function Adjust the black level of the display. Reset the video settings to the factory default. 20 Adjust the clarity of the lamp that illuminates the High Definition LCD TV. Adjust the intensity of the picture.
4 OSD FUNCTION English Sub-Menu List of the colors. Adjust the color towards either red or green. Adjust the intensity of functions under main menu. Adjust the white level of the display. Function Name Brightness Contrast Color Hue Sharpness Backlight Video Reset Function Adjust the black level of the display. Reset the video settings to the factory default. 20 Adjust the clarity of the lamp that illuminates the High Definition LCD TV. Adjust the intensity of the picture.
User Manual
Page 25
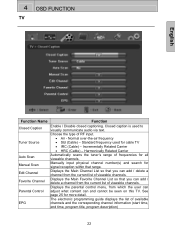
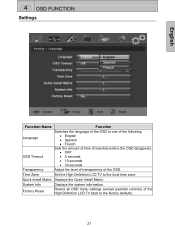
...8226; Std (Cable) - Closed caption is used for more detail. Incrementally Related Carrier • HRC (Cable) - See page 25 for cable TV • IRC (Cable) - The electronic programming guide displays the list of viewable channels. Choose the type of frequencies for signal reception within that ...you can and cannot be seen on this TV. Harmonically Related Carrier Automatically scans the tuner's range of RF input. • Air - Displays the Main Channel List so that ...
...8226; Std (Cable) - Closed caption is used for more detail. Incrementally Related Carrier • HRC (Cable) - See page 25 for cable TV • IRC (Cable) - The electronic programming guide displays the list of viewable channels. Choose the type of frequencies for signal reception within that ...you can and cannot be seen on this TV. Harmonically Related Carrier Automatically scans the tuner's range of RF input. • Air - Displays the Main Channel List so that ...
User Manual
Page 29
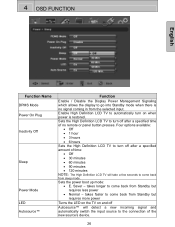
... the power boot up mode: • E. Four options available: • Off • 1 hour • 3 hours • 6 hours Sets the High Definition LCD TV to turn off after a specified time of time: • Off • 30 minutes • 60 minutes • 90 minutes • 120 minutes NOTE: The ...High Definition LCD TV will detect a new incoming signal and automatically switch the input source to come back from Standby but requires less power • Normal - Sets the ...
... the power boot up mode: • E. Four options available: • Off • 1 hour • 3 hours • 6 hours Sets the High Definition LCD TV to turn off after a specified time of time: • Off • 30 minutes • 60 minutes • 90 minutes • 120 minutes NOTE: The ...High Definition LCD TV will detect a new incoming signal and automatically switch the input source to come back from Standby but requires less power • Normal - Sets the ...
User Manual
Page 30
... inactivity before the OSD disappears. • OFF • 5 seconds • 10 seconds • 30 seconds Transparency Adjust the level of transparency of the High Definition LCD TV back to the local time zone. Time Zone Set the High Definition...
... inactivity before the OSD disappears. • OFF • 5 seconds • 10 seconds • 30 seconds Transparency Adjust the level of transparency of the High Definition LCD TV back to the local time zone. Time Zone Set the High Definition...
User Manual
Page 32
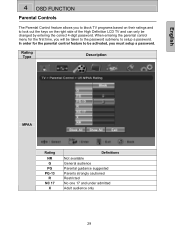
... and under admitted Adult audience only 29 In order for the first time, you will be activated, you to block TV programs based on the right side of the High Definition LCD TV and can only be changed by entering the correct 4-digit password. English 4 OSD FUNCTION Parental Controls The Parental Control feature...
... and under admitted Adult audience only 29 In order for the first time, you will be activated, you to block TV programs based on the right side of the High Definition LCD TV and can only be changed by entering the correct 4-digit password. English 4 OSD FUNCTION Parental Controls The Parental Control feature...


