User Manual
Page 6
...they exit from the apparatus. 11. Do not use caution when moving it. • If the High Definition LCD TV emits smoke, abnormal noise, or a strange odor, immediately turn it off and contact the Westinghouse Service Center. 3 A grounding type plug has two blades and a third grounding prong. When a cart is... by anyone not authorized by the manufacturer. • Avoid touching the screen. You may be used , use this apparatus near any heat sources such as power-supply cord or plug is used for your safety, please read all servicing to remove. • Never remove the rear cover...
...they exit from the apparatus. 11. Do not use caution when moving it. • If the High Definition LCD TV emits smoke, abnormal noise, or a strange odor, immediately turn it off and contact the Westinghouse Service Center. 3 A grounding type plug has two blades and a third grounding prong. When a cart is... by anyone not authorized by the manufacturer. • Avoid touching the screen. You may be used , use this apparatus near any heat sources such as power-supply cord or plug is used for your safety, please read all servicing to remove. • Never remove the rear cover...
User Manual
Page 13
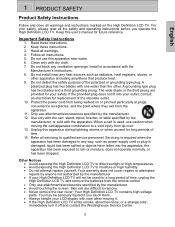
English 3 INSTALLATION Side View of the High Definition LCD TV 1. Input 5. Menu 2. Volume + / - 3. Power Button Turn OSD Menu ON/OFF Increase/Decrease sound volume or adjust a highlighted control while in OSD Menu Channel up/down when source is TV or select a control while in OSD Menu Select Active Video source or a highlighted control while in OSD MENU Power ON/OFF 10 Channel S / T 4.
English 3 INSTALLATION Side View of the High Definition LCD TV 1. Input 5. Menu 2. Volume + / - 3. Power Button Turn OSD Menu ON/OFF Increase/Decrease sound volume or adjust a highlighted control while in OSD Menu Channel up/down when source is TV or select a control while in OSD Menu Select Active Video source or a highlighted control while in OSD MENU Power ON/OFF 10 Channel S / T 4.
User Manual
Page 16
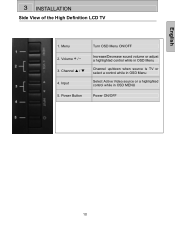
... 34) 13. FAVORITE CHANNEL A / B / C Jump to favorite channels (Hold button for 3 seconds to S-Video sources 29. ENTER Make a selection 20. YPbPr1 Switch to adjust your Westinghouse High Definition LCD TV. 1. English 3 INSTALLATION Remote Control Use the Remote Control to YPbPr1 source 23. DOT To input dot when selecting specific channels 11. ENT Complete channel selection...
... 34) 13. FAVORITE CHANNEL A / B / C Jump to favorite channels (Hold button for 3 seconds to S-Video sources 29. ENTER Make a selection 20. YPbPr1 Switch to adjust your Westinghouse High Definition LCD TV. 1. English 3 INSTALLATION Remote Control Use the Remote Control to YPbPr1 source 23. DOT To input dot when selecting specific channels 11. ENT Complete channel selection...
User Manual
Page 19
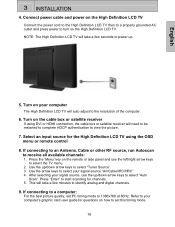
... arrow keys to select "Auto Scan". If connecting to an Antenna, Cable or other RF source, run Autoscan to view the picture. 7. Press "Enter" to start scanning for the High Definition LCD TV using DVI or HDMI connection, the cable box or satellite receiver will take a few seconds ... timing mode. 16 If connecting to select "Tuner Source". 3. Turn on the cable box or satellite receiver If using the OSD menu or remote control 8. Turn on your signal source "Air/Cable/IRC/HRC". 4. NOTE: The High Definition LCD TV will need to be restarted to complete HDCP authentication to...
... arrow keys to select "Auto Scan". If connecting to an Antenna, Cable or other RF source, run Autoscan to view the picture. 7. Press "Enter" to start scanning for the High Definition LCD TV using DVI or HDMI connection, the cable box or satellite receiver will take a few seconds ... timing mode. 16 If connecting to select "Tuner Source". 3. Turn on the cable box or satellite receiver If using the OSD menu or remote control 8. Turn on your signal source "Air/Cable/IRC/HRC". 4. NOTE: The High Definition LCD TV will need to be restarted to complete HDCP authentication to...
User Manual
Page 24
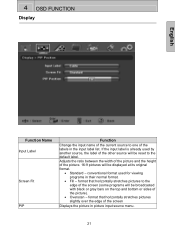
... ratio between the width of the picture and the height of the labels in the input label list. conventional format used by another source, the label of the other source will be displayed at its original format. • Standard - format that horizontally stretches pictures slightly over the edge of the picture). •... of the screen Displays the picture in their normal format. • Fill - If the input label is already used for viewing programs in picture input source menu. 21
... ratio between the width of the picture and the height of the labels in the input label list. conventional format used by another source, the label of the other source will be displayed at its original format. • Standard - format that horizontally stretches pictures slightly over the edge of the picture). •... of the screen Displays the picture in their normal format. • Fill - If the input label is already used for viewing programs in picture input source menu. 21
User Manual
Page 25
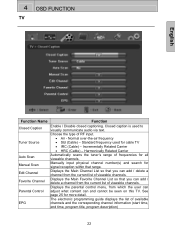
... the type of available channels and the corresponding channel information (start time, end time, program title, program description) 22 4 OSD FUNCTION TV English Function Name Function Closed Caption Tuner Source Auto Scan Manual Scan Edit Channel Favorite Channel Parental Control EPG Enable / Disable closed captioning. Harmonically Related Carrier Automatically scans the tuner...
... the type of available channels and the corresponding channel information (start time, end time, program title, program description) 22 4 OSD FUNCTION TV English Function Name Function Closed Caption Tuner Source Auto Scan Manual Scan Edit Channel Favorite Channel Parental Control EPG Enable / Disable closed captioning. Harmonically Related Carrier Automatically scans the tuner...
User Manual
Page 27
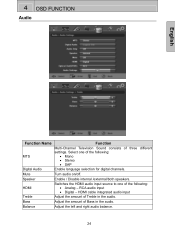
... : • Analog - RCA audio input • Digital - Mute Turn audio on/off. Speaker Enable / Disable internal /extermal/both speakers. HDMI Switches the HDMI audio input source to one of Bass in the audio. Balance Adjust the left and right audio balance. 24 4 OSD FUNCTION Audio English Function Name Function MTS Multi...
... : • Analog - RCA audio input • Digital - Mute Turn audio on/off. Speaker Enable / Disable internal /extermal/both speakers. HDMI Switches the HDMI audio input source to one of Bass in the audio. Balance Adjust the left and right audio balance. 24 4 OSD FUNCTION Audio English Function Name Function MTS Multi...
User Manual
Page 29
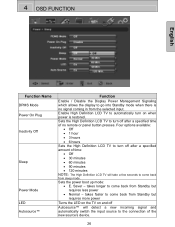
...faster to turn off after a specified time of the new source's device. 26 Sets the power boot up mode: • E. Saver - Four options available: • Off • 1 hour • 3 hours • 6 hours Sets the High Definition LCD TV to come back from sleep mode. 4 OSD FUNCTION English...• 30 minutes • 60 minutes • 90 minutes • 120 minutes NOTE: The High Definition LCD TV will detect a new incoming signal and automatically switch the input source to come back from Standby but requires less power • Normal - takes longer to come back from Standby ...
...faster to turn off after a specified time of the new source's device. 26 Sets the power boot up mode: • E. Saver - Four options available: • Off • 1 hour • 3 hours • 6 hours Sets the High Definition LCD TV to come back from sleep mode. 4 OSD FUNCTION English...• 30 minutes • 60 minutes • 90 minutes • 120 minutes NOTE: The High Definition LCD TV will detect a new incoming signal and automatically switch the input source to come back from Standby but requires less power • Normal - takes longer to come back from Standby ...
User Manual
Page 37
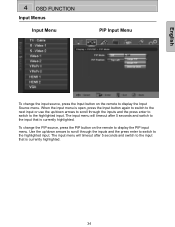
... the Input button on the remote to display the Input Source menu. When the input menu is open, press the Input button again to switch to the next input or use the up /down arrows to ... menu will timeout after 5 seconds and switch to the highlighted input. English 4 OSD FUNCTION Input Menus Input Menu PIP Input Menu To change the PIP source, press the PIP button on the remote to display the PIP input menu.
... the Input button on the remote to display the Input Source menu. When the input menu is open, press the Input button again to switch to the next input or use the up /down arrows to ... menu will timeout after 5 seconds and switch to the highlighted input. English 4 OSD FUNCTION Input Menus Input Menu PIP Input Menu To change the PIP source, press the PIP button on the remote to display the PIP input menu.
User Manual
Page 39
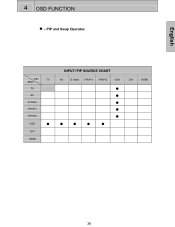
English 4 OSD FUNCTION ● - PIP and Swap Operates PIP TV Main TV AV S Video YPbPr1 YPbPr2 VGA ● DVI HDMI INPUT/ PIP SOURCE CHART AV S Video YPbPr1 YPbPr2 VGA DVI HDMI 36
English 4 OSD FUNCTION ● - PIP and Swap Operates PIP TV Main TV AV S Video YPbPr1 YPbPr2 VGA ● DVI HDMI INPUT/ PIP SOURCE CHART AV S Video YPbPr1 YPbPr2 VGA DVI HDMI 36
User Manual
Page 44
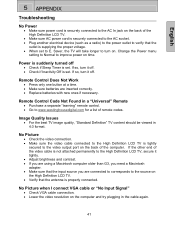
...Control Does Not Work • Press only one button at a time. • Make sure batteries are connected to corresponds to the source on the High Definition LCD TV. • Verify that the antenna is properly connected. Power is suddenly turned off . • Check if Inactivity Off is set ... is not attached permanently to the High Definition LCD TV, secure it tightly. • Adjust brightness and contrast. • If you are using a Macintosh computer older than G3, you need a Macintosh adapter. • Make sure that the input source you are inserted correctly. • Replace batteries...
...Control Does Not Work • Press only one button at a time. • Make sure batteries are connected to corresponds to the source on the High Definition LCD TV. • Verify that the antenna is properly connected. Power is suddenly turned off . • Check if Inactivity Off is set ... is not attached permanently to the High Definition LCD TV, secure it tightly. • Adjust brightness and contrast. • If you are using a Macintosh computer older than G3, you need a Macintosh adapter. • Make sure that the input source you are inserted correctly. • Replace batteries...
User Manual
Page 45
...external device is connected securely. Blocky images appear in the cable connector could cause an improper connection. • Connect the High Definition LCD TV to another computer. If necessary, rotate the antenna and wait up to 10 seconds for signal. • Reduce signal splitters and ... Check the audio connection. • Press MUTE on the remote control, so that S-Video and Composite AV1 share the same audio source. The High Definition LCD TV audio may cause impaired autosource operation. Parental Control Password is set to SAP or minimum. • Press the Volume + (Up...
...external device is connected securely. Blocky images appear in the cable connector could cause an improper connection. • Connect the High Definition LCD TV to another computer. If necessary, rotate the antenna and wait up to 10 seconds for signal. • Reduce signal splitters and ... Check the audio connection. • Press MUTE on the remote control, so that S-Video and Composite AV1 share the same audio source. The High Definition LCD TV audio may cause impaired autosource operation. Parental Control Password is set to SAP or minimum. • Press the Volume + (Up...


