

Uk Manual
Page 1
... Or write: ICON Health & Fitness, Ltd. Save this equipment. Serial Number Decal (Under Seat) QUESTIONS? USER'S MANUAL Visit our website at www.iconeurope.com Model No. Write the serial number in this manual before using this manual for future reference. Unit 4 Revie Road Industrial Estate Revie Road Beeston Leeds, LS118JG UK email: csuk...
... Or write: ICON Health & Fitness, Ltd. Save this equipment. Serial Number Decal (Under Seat) QUESTIONS? USER'S MANUAL Visit our website at www.iconeurope.com Model No. Write the serial number in this manual before using this manual for future reference. Unit 4 Revie Road Industrial Estate Revie Road Beeston Leeds, LS118JG UK email: csuk...
Uk Manual
Page 2
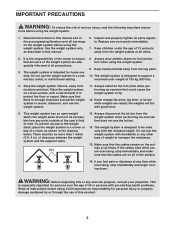
... has been placed on the front cover of ICON IP, Inc. 2 White Text/Clear Background WEIDER is missing or illegible, please call the telephone number on the weight system. If the decal is a registered trademark of this manual and order a free replacement decal. Black Text/Clear Background PN 218559 - Apply the decal...
... has been placed on the front cover of ICON IP, Inc. 2 White Text/Clear Background WEIDER is missing or illegible, please call the telephone number on the weight system. If the decal is a registered trademark of this manual and order a free replacement decal. Black Text/Clear Background PN 218559 - Apply the decal...
Uk Manual
Page 3
... health problems. Read all of 35 or persons with a mat beneath it to support a maximum user weight of a room, as described in this manual and in the accompanying literature and all instructions in a corner or bay of 135 kg (300 lbs). 4. Always stand on the pulleys at all... weight system to increase the resistance. 15. It is enough clearance around the weight system to the weight stack, place the weight system in this manual. 6. Wall 13. Always disconnect the lat bar from any worn parts immediately. 7. WARNING: Before beginning this product. 3 Keep hands and feet away ...
... health problems. Read all of 35 or persons with a mat beneath it to support a maximum user weight of a room, as described in this manual and in the accompanying literature and all instructions in a corner or bay of 135 kg (300 lbs). 4. Always stand on the pulleys at all... weight system to increase the resistance. 15. It is enough clearance around the weight system to the weight stack, place the weight system in this manual. 6. Wall 13. Always disconnect the lat bar from any worn parts immediately. 7. WARNING: Before beginning this product. 3 Keep hands and feet away ...
Uk Manual
Page 4
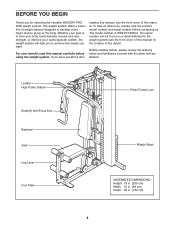
... before contacting us assist you want. The model number is to the weight system (see the front cover of this manual for selecting the versatile WEIDER® PRO 2000 weight system. The serial number can be found on a decal attached to tone your body, build dramatic muscle size and strength, or improve your goal...
... before contacting us assist you want. The model number is to the weight system (see the front cover of this manual for selecting the versatile WEIDER® PRO 2000 weight system. The serial number can be found on a decal attached to tone your body, build dramatic muscle size and strength, or improve your goal...
Uk Manual
Page 6
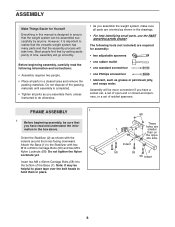
... the following tools (not included) are required for Yourself Everything in the box above. Before beginning assembly, carefully read and understand the information in this manual is completed. • Tighten all parts as you assemble the weight system, make sure all parts in the drawings. • For help identifying small parts...
... the following tools (not included) are required for Yourself Everything in the box above. Before beginning assembly, carefully read and understand the information in this manual is completed. • Tighten all parts as you assemble the weight system, make sure all parts in the drawings. • For help identifying small parts...
Uk Manual
Page 16
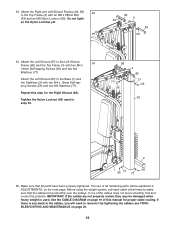
.... Tighten the Nylon Locknut (69) used . Attach the Right and Left Shroud Frames (84, 85) 33 to remove it by tightening the cables; Repeat this manual for the Right Shroud (88). see TROUBLESHOOTING AND MAINTENANCE on page 19 of the cables does not move smoothly over the pulleys. Make sure that...
.... Tighten the Nylon Locknut (69) used . Attach the Right and Left Shroud Frames (84, 85) 33 to remove it by tightening the cables; Repeat this manual for the Right Shroud (88). see TROUBLESHOOTING AND MAINTENANCE on page 19 of the cables does not move smoothly over the pulleys. Make sure that...
Uk Manual
Page 21
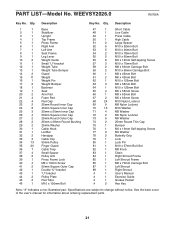
... 82 1 M8 Knob 83 1 Chain 84 1 Right Shroud Frame 85 1 Left Shroud Frame 86 1 M8 x 70mm Carriage Bolt 87 1 Left Shroud 88 1 Right Shroud # 1 User's Manual # 1 Exercise Guide # 1 Grease Packet # 2 Hex Key Note: "#" indicates a non-illustrated part. Specifications are subject to change without notice. See the back cover of the user...
... 82 1 M8 Knob 83 1 Chain 84 1 Right Shroud Frame 85 1 Left Shroud Frame 86 1 M8 x 70mm Carriage Bolt 87 1 Left Shroud 88 1 Right Shroud # 1 User's Manual # 1 Exercise Guide # 1 Grease Packet # 2 Hex Key Note: "#" indicates a non-illustrated part. Specifications are subject to change without notice. See the back cover of the user...
Uk Manual
Page 24
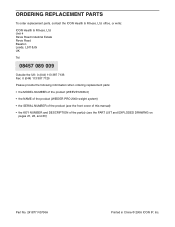
... ordering replacement parts: • the MODEL NUMBER of the product (WEEVSY2026.0) • the NAME of the product (WEIDER PRO 2000 weight system) • the SERIAL NUMBER of the product (see the front cover of this manual) • the KEY NUMBER and DESCRIPTION of the part(s) (see the PART LIST and EXPLODED DRAWING on pages...
... ordering replacement parts: • the MODEL NUMBER of the product (WEEVSY2026.0) • the NAME of the product (WEIDER PRO 2000 weight system) • the SERIAL NUMBER of the product (see the front cover of this manual) • the KEY NUMBER and DESCRIPTION of the part(s) (see the PART LIST and EXPLODED DRAWING on pages...


