
Uk Manual
Page 3
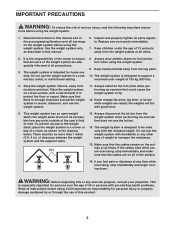
...10. the weights will fall with the included weight. Always disconnect the lat bar from the weight system when performing an exercise that the cables are exercising, stop immediately and begin cooling down. the weight stack must be no responsibility for persons over the age of this ... to support a maximum user weight of weight to protect the floor or carpet. Always stand on a level surface, with dumbbells or any exercise program, consult your physician. It is intended for foot protection when using the weight system. 1. The weight system is designed to tip....
...10. the weights will fall with the included weight. Always disconnect the lat bar from the weight system when performing an exercise that the cables are exercising, stop immediately and begin cooling down. the weight stack must be no responsibility for persons over the age of this ... to support a maximum user weight of weight to protect the floor or carpet. Always stand on a level surface, with dumbbells or any exercise program, consult your physician. It is intended for foot protection when using the weight system. 1. The weight system is designed to tip....
Uk Manual
Page 17
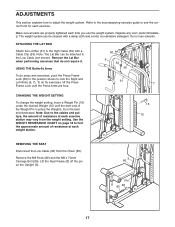
...THE WEIGHT SETTING To change the weight setting, insert a Weight Pin (16) under the desired Weight (15) until the Press Arms are properly tightened each exercise station may vary from the Chain (83). Note: Due to lock the Right and Left Arms (6, 7). Do not use the weight system. Note: ... the correct form for each weight station. 16 15 REMOVING THE SEAT Disconnect the Low Cable (48) from the weight setting. Refer to the accompanying exercise guide to the Low Cable (not shown). Remove the M8 Knob (82) and the M8 x 70mm Carriage Bolt (86). ADJUSTMENTS This section explains...
...THE WEIGHT SETTING To change the weight setting, insert a Weight Pin (16) under the desired Weight (15) until the Press Arms are properly tightened each exercise station may vary from the Chain (83). Note: Due to lock the Right and Left Arms (6, 7). Do not use the weight system. Note: ... the correct form for each weight station. 16 15 REMOVING THE SEAT Disconnect the Low Cable (48) from the weight setting. Refer to the accompanying exercise guide to the Low Cable (not shown). Remove the M8 Knob (82) and the M8 x 70mm Carriage Bolt (86). ADJUSTMENTS This section explains...
Uk Manual
Page 18
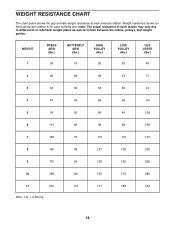
... vary due to differences in individual weight plates as well as friction between the cables, pulleys, and weight guides. Note: The actual resistance at each exercise station. WEIGHT RESISTANCE CHART The chart below shows the approximate weight resistance at each butterfly arm. WEIGHT 1 PRESS ARM (lbs.) 35 BUTTERFLY ARM (lbs.) 19...
... vary due to differences in individual weight plates as well as friction between the cables, pulleys, and weight guides. Note: The actual resistance at each exercise station. WEIGHT RESISTANCE CHART The chart below shows the approximate weight resistance at each butterfly arm. WEIGHT 1 PRESS ARM (lbs.) 35 BUTTERFLY ARM (lbs.) 19...
Uk Manual
Page 21
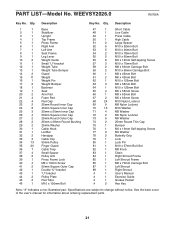
... 1 M8 Knob 83 1 Chain 84 1 Right Shroud Frame 85 1 Left Shroud Frame 86 1 M8 x 70mm Carriage Bolt 87 1 Left Shroud 88 1 Right Shroud # 1 User's Manual # 1 Exercise Guide # 1 Grease Packet # 2 Hex Key Note: "#" indicates a non-illustrated part. See the back cover of the user's manual for information about ordering replacement parts. 21...
... 1 M8 Knob 83 1 Chain 84 1 Right Shroud Frame 85 1 Left Shroud Frame 86 1 M8 x 70mm Carriage Bolt 87 1 Left Shroud 88 1 Right Shroud # 1 User's Manual # 1 Exercise Guide # 1 Grease Packet # 2 Hex Key Note: "#" indicates a non-illustrated part. See the back cover of the user's manual for information about ordering replacement parts. 21...


