
Uk Manual
Page 1
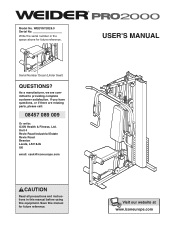
... Leeds, LS118JG UK email: [email protected] CAUTION Read all precautions and instructions in the space above for future reference. As a manufacturer, we are missing parts, please call: 08457 089 009 Or write: ICON Health & Fitness, Ltd. USER'S MANUAL Visit our website at www.iconeurope.com Serial Number Decal (Under Seat...
... Leeds, LS118JG UK email: [email protected] CAUTION Read all precautions and instructions in the space above for future reference. As a manufacturer, we are missing parts, please call: 08457 089 009 Or write: ICON Health & Fitness, Ltd. USER'S MANUAL Visit our website at www.iconeurope.com Serial Number Decal (Under Seat...
Uk Manual
Page 2
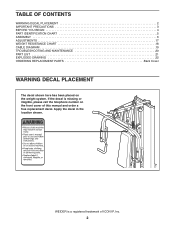
... Background WEIDER is missing or illegible, please call the telephone number on the weight system. Black Text/Clear Background PN 218559 - Apply the decal in the location shown. TABLE OF CONTENTS WARNING DECAL PLACEMENT 2 IMPORTANT PRECAUTIONS 3 BEFORE YOU BEGIN 4 PART IDENTIFICATION ...CHART 5 ASSEMBLY 6 ADJUSTMENTS 17 WEIGHT RESISTANCE CHART 18 CABLE DIAGRAM 19 TROUBLESHOOTING AND MAINTENANCE 20 PART LIST 21 EXPLODED DRAWING 22 ORDERING REPLACEMENT PARTS Back Cover WARNING DECAL PLACEMENT The decal shown ...
... Background WEIDER is missing or illegible, please call the telephone number on the weight system. Black Text/Clear Background PN 218559 - Apply the decal in the location shown. TABLE OF CONTENTS WARNING DECAL PLACEMENT 2 IMPORTANT PRECAUTIONS 3 BEFORE YOU BEGIN 4 PART IDENTIFICATION ...CHART 5 ASSEMBLY 6 ADJUSTMENTS 17 WEIGHT RESISTANCE CHART 18 CABLE DIAGRAM 19 TROUBLESHOOTING AND MAINTENANCE 20 PART LIST 21 EXPLODED DRAWING 22 ORDERING REPLACEMENT PARTS Back Cover WARNING DECAL PLACEMENT The decal shown ...
Uk Manual
Page 3
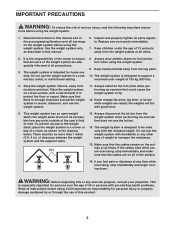
...exercise that all users of the weight system are on all of a room, as described in .) of 12 and pets away from moving parts. 10. There must not be accessible from any point outside of the user's field of view. Wall 13. WARNING: Before beginning this or...a commercial, rental, or institutional setting. 8. Always disconnect the lat bar from moisture and dust. Keep hands and feet away from the weight system at all parts regularly. The weight system is intended for foot protection when using the weight system. 1. ICON assumes no more than 1 meter (3 ft. 4 in this...
...exercise that all users of the weight system are on all of a room, as described in .) of 12 and pets away from moving parts. 10. There must not be accessible from any point outside of the user's field of view. Wall 13. WARNING: Before beginning this or...a commercial, rental, or institutional setting. 8. Always disconnect the lat bar from moisture and dust. Keep hands and feet away from the weight system at all parts regularly. The weight system is intended for foot protection when using the weight system. 1. ICON assumes no more than 1 meter (3 ft. 4 in this...
Uk Manual
Page 4
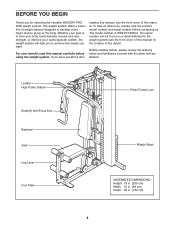
... review the drawing below and familiarize yourself with the parts that are labeled. Whether your cardiovascular system, the weight system will help us . The model number is to the weight system (see the front cover of this manual for selecting the versatile WEIDER® PRO 2000 weight system. The serial number can be found...
... review the drawing below and familiarize yourself with the parts that are labeled. Whether your cardiovascular system, the weight system will help us . The model number is to the weight system (see the front cover of this manual for selecting the versatile WEIDER® PRO 2000 weight system. The serial number can be found...
Uk Manual
Page 5
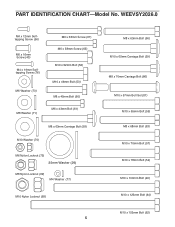
... (55) M8 x 68mm Bolt (63) M10 x 70mm Bolt (57) M10 x 78mm Bolt (54) M10 x 100mm Bolt (46) M10 x 125mm Bolt (64) M10 x 155mm Bolt (62) PART IDENTIFICATION CHART-Model No.
... (55) M8 x 68mm Bolt (63) M10 x 70mm Bolt (57) M10 x 78mm Bolt (54) M10 x 100mm Bolt (46) M10 x 125mm Bolt (64) M10 x 155mm Bolt (62) PART IDENTIFICATION CHART-Model No.
Uk Manual
Page 6
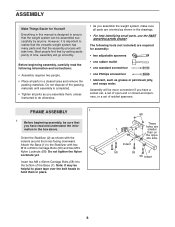
...tape over the bolt heads to hold them , unless instructed to do otherwise. • As you assemble the weight system, make sure all parts are oriented as you assemble them in place. 68 1 Indent These holes are required for Yourself Everything in this manual is designed to ensure ...that the weight system can be assembled successfully by setting aside plenty of the packing materials until assembly is completed. • Tighten all parts in the box above. Do not dispose of time, assembly will go smoothly. Before beginning assembly, be sure that you have read the following...
...tape over the bolt heads to hold them , unless instructed to do otherwise. • As you assemble the weight system, make sure all parts are oriented as you assemble them in place. 68 1 Indent These holes are required for Yourself Everything in this manual is designed to ensure ...that the weight system can be assembled successfully by setting aside plenty of the packing materials until assembly is completed. • Tighten all parts in the box above. Do not dispose of time, assembly will go smoothly. Before beginning assembly, be sure that you have read the following...
Uk Manual
Page 16
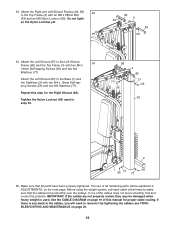
... Left Shroud 34 Frame (85) and the Top Frame (4) with an M8 x 68mm Bolt (63) and an M8 Nylon Locknut (69). The use of all parts have been properly tightened. 33. Attach the Left Shroud (87) to the Top Frame (4) with two M4 x 12mm Self-tapping Screws (56) and two M4... Nylon Locknut yet. 63 18 84 4 85 69 34. Before using the weight system, pull each cable a few times to make sure that all remaining parts will be damaged when heavy weight is any slack in the cables, you will need to the Base (1) and the Stabilizer (2) with two M4 x 12mm...
... Left Shroud 34 Frame (85) and the Top Frame (4) with an M8 x 68mm Bolt (63) and an M8 Nylon Locknut (69). The use of all parts have been properly tightened. 33. Attach the Left Shroud (87) to the Top Frame (4) with two M4 x 12mm Self-tapping Screws (56) and two M4... Nylon Locknut yet. 63 18 84 4 85 69 34. Before using the weight system, pull each cable a few times to make sure that all remaining parts will be damaged when heavy weight is any slack in the cables, you will need to the Base (1) and the Stabilizer (2) with two M4 x 12mm...
Uk Manual
Page 17
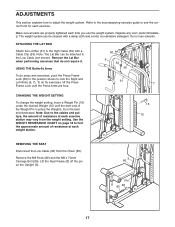
... (3). 3 86 Pin 8 83 48 17 Lift the Seat Frame (8) off the pin on page 18 to lock the Right and Left Arms (6, 7). Replace any worn parts immediately. Remove the M8 Knob (82) and the M8 x 70mm Carriage Bolt (86). ATTACHING THE LAT BAR Attach the Lat Bar (31) to see the... correct form for each exercise station may vary from the Chain (83). To do not require it. Make sure all parts are free. 31 7 CHANGING THE WEIGHT SETTING To change the weight setting, insert a Weight Pin (16) under the desired Weight (15) until the bent end...
... (3). 3 86 Pin 8 83 48 17 Lift the Seat Frame (8) off the pin on page 18 to lock the Right and Left Arms (6, 7). Replace any worn parts immediately. Remove the M8 Knob (82) and the M8 x 70mm Carriage Bolt (86). ATTACHING THE LAT BAR Attach the Lat Bar (31) to see the... correct form for each exercise station may vary from the Chain (83). To do not require it. Make sure all parts are free. 31 7 CHANGING THE WEIGHT SETTING To change the weight setting, insert a Weight Pin (16) under the desired Weight (15) until the bent end...
Uk Manual
Page 21
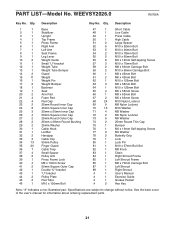
... Shroud Frame 86 1 M8 x 70mm Carriage Bolt 87 1 Left Shroud 88 1 Right Shroud # 1 User's Manual # 1 Exercise Guide # 1 Grease Packet # 2 Hex Key Note: "#" indicates a non-illustrated part. Qty. Specifications are subject to change without notice. See the back cover of the user's manual for information about ordering replacement...
... Shroud Frame 86 1 M8 x 70mm Carriage Bolt 87 1 Left Shroud 88 1 Right Shroud # 1 User's Manual # 1 Exercise Guide # 1 Grease Packet # 2 Hex Key Note: "#" indicates a non-illustrated part. Qty. Specifications are subject to change without notice. See the back cover of the user's manual for information about ordering replacement...
Uk Manual
Page 24
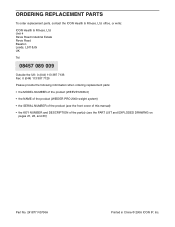
... 113 387 7133 Fax: 0 (044) 113 387 7125 Please provide the following information when ordering replacement parts: • the MODEL NUMBER of the product (WEEVSY2026.0) • the NAME of the product (WEIDER PRO 2000 weight system) • the SERIAL NUMBER of the product (see the front cover of this manual) ...• the KEY NUMBER and DESCRIPTION of the part(s) (see the PART LIST and EXPLODED DRAWING on pages 21, 22, and 23) Part No. 241877 R0706A Printed in...
... 113 387 7133 Fax: 0 (044) 113 387 7125 Please provide the following information when ordering replacement parts: • the MODEL NUMBER of the product (WEEVSY2026.0) • the NAME of the product (WEIDER PRO 2000 weight system) • the SERIAL NUMBER of the product (see the front cover of this manual) ...• the KEY NUMBER and DESCRIPTION of the part(s) (see the PART LIST and EXPLODED DRAWING on pages 21, 22, and 23) Part No. 241877 R0706A Printed in...


