
Uk Manual
Page 2
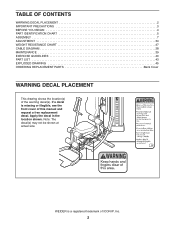
WEIDER is missing or illegible, see the front cover of this manual and request a free replacement decal. If a decal is a registered trademark of the warning decal(s). ... not be shown at actual size. TABLE OF CONTENTS WARNING DECAL PLACEMENT 2 IMPORTANT PRECAUTIONS 3 BEFORE YOU BEGIN 4 PART IDENTIFICATION CHART 5 ASSEMBLY 7 ADJUSTMENT 34 WEIGHT RESISTANCE CHART 37 CABLE DIAGRAM 38 MAINTENANCE 39 EXERCISE GUIDELINES 40 PART LIST 43 EXPLODED DRAWING 45 ORDERING REPLACEMENT PARTS Back Cover WARNING DECAL PLACEMENT This drawing shows the...
WEIDER is missing or illegible, see the front cover of this manual and request a free replacement decal. If a decal is a registered trademark of the warning decal(s). ... not be shown at actual size. TABLE OF CONTENTS WARNING DECAL PLACEMENT 2 IMPORTANT PRECAUTIONS 3 BEFORE YOU BEGIN 4 PART IDENTIFICATION CHART 5 ASSEMBLY 7 ADJUSTMENT 34 WEIGHT RESISTANCE CHART 37 CABLE DIAGRAM 38 MAINTENANCE 39 EXERCISE GUIDELINES 40 PART LIST 43 EXPLODED DRAWING 45 ORDERING REPLACEMENT PARTS Back Cover WARNING DECAL PLACEMENT This drawing shows the...

Uk Manual
Page 34
... amount of resistance at each time the weight system is engaged in a hole. Turn the bent end downward. Use the WEIGHT 41 RESISTANCE CHART on page 40 for several exercises. Insert the Weight Pin so that the Adjustment Knob is used. Adjust the Backrest (25) and the Leg Lock Frame (12) in... THE WEIGHT SETTING To change the setting of the holes in the same way. 25 24 12 29 8 29 34 Also, refer to the accompanying exercise guide to see the correct form for important information about how to the desired position, and then tighten the Adjustment Knob into the Seat Tube...
... amount of resistance at each time the weight system is engaged in a hole. Turn the bent end downward. Use the WEIGHT 41 RESISTANCE CHART on page 40 for several exercises. Insert the Weight Pin so that the Adjustment Knob is used. Adjust the Backrest (25) and the Leg Lock Frame (12) in... THE WEIGHT SETTING To change the setting of the holes in the same way. 25 24 12 29 8 29 34 Also, refer to the accompanying exercise guide to see the correct form for important information about how to the desired position, and then tighten the Adjustment Knob into the Seat Tube...

Uk Manual
Page 35
... Chain (not shown) between the Lat Bar and the High Cable so that the Lat Bar is not in the correct starting position for the exercise to view the amount resistance added by the burn band at the ab station or the low pulley station in the same way. See the... WEIGHT RESISTANCE CHART on the Burn Band. USING THE BURN BAND To add resistance, attach the hook on the Burn Band (26) to the High Anchor (C) or to...
... Chain (not shown) between the Lat Bar and the High Cable so that the Lat Bar is not in the correct starting position for the exercise to view the amount resistance added by the burn band at the ab station or the low pulley station in the same way. See the... WEIGHT RESISTANCE CHART on the Burn Band. USING THE BURN BAND To add resistance, attach the hook on the Burn Band (26) to the High Anchor (C) or to...

Uk Manual
Page 37
... / 145 135 / 158 143 / 163 158 / 182 166 / 189 180 / 194 189 / 212 199 / 226 210 / 237 Note: 1 lb. = 0.45 kg 37 WEIGHT RESISTANCE CHART The chart below shows the approximate weight resistance at each station may vary due to differences in the left column refer to the 12.5-lb. The actual...
... / 145 135 / 158 143 / 163 158 / 182 166 / 189 180 / 194 189 / 212 199 / 226 210 / 237 Note: 1 lb. = 0.45 kg 37 WEIGHT RESISTANCE CHART The chart below shows the approximate weight resistance at each station may vary due to differences in the left column refer to the 12.5-lb. The actual...


