

Uk Manual
Page 1
... CAUTION Read all precautions and instructions in the space above for future reference. Keep this equipment. If you have questions, or if there are missing parts, please contact us: UK Call: 08457 089 009 From Ireland: 053 92 36102 Website: www.iconsupport.eu E-mail: [email protected] Write: ICON Health & Fitness...
... CAUTION Read all precautions and instructions in the space above for future reference. Keep this equipment. If you have questions, or if there are missing parts, please contact us: UK Call: 08457 089 009 From Ireland: 053 92 36102 Website: www.iconsupport.eu E-mail: [email protected] Write: ICON Health & Fitness...
Uk Manual
Page 2
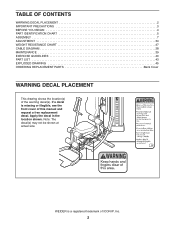
WEIDER is missing or illegible, see the front cover of this manual and request a free replacement decal. Apply the decal in the location shown. TABLE OF CONTENTS WARNING DECAL PLACEMENT 2 IMPORTANT PRECAUTIONS 3 BEFORE YOU BEGIN 4 PART IDENTIFICATION CHART 5 ASSEMBLY 7 ADJUSTMENT 34 WEIGHT ...RESISTANCE CHART 37 CABLE DIAGRAM 38 MAINTENANCE 39 EXERCISE GUIDELINES 40 PART LIST 43 EXPLODED DRAWING 45 ORDERING REPLACEMENT PARTS Back Cover WARNING DECAL PLACEMENT This drawing shows the location(s) of ICON IP, Inc. 2 If a decal is...
WEIDER is missing or illegible, see the front cover of this manual and request a free replacement decal. Apply the decal in the location shown. TABLE OF CONTENTS WARNING DECAL PLACEMENT 2 IMPORTANT PRECAUTIONS 3 BEFORE YOU BEGIN 4 PART IDENTIFICATION CHART 5 ASSEMBLY 7 ADJUSTMENT 34 WEIGHT ...RESISTANCE CHART 37 CABLE DIAGRAM 38 MAINTENANCE 39 EXERCISE GUIDELINES 40 PART LIST 43 EXPLODED DRAWING 45 ORDERING REPLACEMENT PARTS Back Cover WARNING DECAL PLACEMENT This drawing shows the location(s) of ICON IP, Inc. 2 If a decal is...
Uk Manual
Page 3
... intended for persons over age 35 or persons with a mat beneath it to ensure that the cables remain on the pulleys at all parts regularly. Keep hands and feet away from moisture and dust. If the cables bind while you experience pain while exercising, stop immediately and... system at all times. If you feel faint or if you are on your weight system before using your physician. Before beginning any worn parts immediately. 8. The weight system is enough clearance around the weight system to tip. 15. Replace any exercise program, consult your weight sys-...
... intended for persons over age 35 or persons with a mat beneath it to ensure that the cables remain on the pulleys at all parts regularly. Keep hands and feet away from moisture and dust. If the cables bind while you experience pain while exercising, stop immediately and... system at all times. If you feel faint or if you are on your weight system before using your physician. Before beginning any worn parts immediately. 8. The weight system is enough clearance around the weight system to tip. 15. Replace any exercise program, consult your weight sys-...
Uk Manual
Page 4
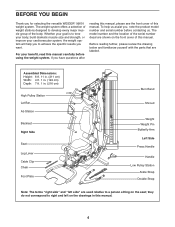
...number decal are shown on the front cover of the body. Before reading further, please review the drawing below and familiarize yourself with the parts that are used relative to achieve the specific results you want. The weight system offers a selection of weight stations designed to tone your... body, build dramatic muscle size and strength, or improve your benefit, read this manual. To help you for selecting the versatile WEIDER® 9900 I weight system. Whether your goal is to develop every major muscle group of this manual carefully before contacting us assist you ...
...number decal are shown on the front cover of the body. Before reading further, please review the drawing below and familiarize yourself with the parts that are used relative to achieve the specific results you want. The weight system offers a selection of weight stations designed to tone your... body, build dramatic muscle size and strength, or improve your benefit, read this manual. To help you for selecting the versatile WEIDER® 9900 I weight system. Whether your goal is to develop every major muscle group of this manual carefully before contacting us assist you ...

Uk Manual
Page 5
... drawings below to see if it has been preassembled. IMPORTANT: If you cannot find a part in the hardware kit, check to identify small parts used in parentheses by each drawing is the key number of the part, from the PART LIST near the end of this manual. ST4.2 x 19mm Screw (90) 6.35mm Spacer (94... (108) M6 Locknut (87) M10 Jam Nut (99) M10 Locknut (74) Continued on page 6 M10 Curved Washer (86) 5 The number in assembly. To avoid damaging parts, do not use power tools for assembly.
... drawings below to see if it has been preassembled. IMPORTANT: If you cannot find a part in the hardware kit, check to identify small parts used in parentheses by each drawing is the key number of the part, from the PART LIST near the end of this manual. ST4.2 x 19mm Screw (90) 6.35mm Spacer (94... (108) M6 Locknut (87) M10 Jam Nut (99) M10 Locknut (74) Continued on page 6 M10 Curved Washer (86) 5 The number in assembly. To avoid damaging parts, do not use power tools for assembly.
Uk Manual
Page 7
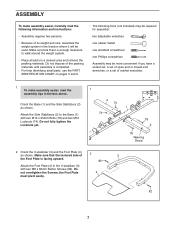
... Screws; Do not dispose of the packing materials until assembly is enough clearance to walk around the weight system. • Place all parts in a cleared area and remove the packing materials. Orient the U-stabilizer (3) and the Foot Plate (4) as shown. the Foot Plate 4... the Locknuts yet. 1 2 74 74 1 78 2 78 Warning Decal 2. Make sure that there is completed. • For help identifying small parts, use the PART IDENTIFICATION CHART on pages 5 and 6. • The following information and instructions: • Assembly requires two persons. • Because of its weight...
... Screws; Do not dispose of the packing materials until assembly is enough clearance to walk around the weight system. • Place all parts in a cleared area and remove the packing materials. Orient the U-stabilizer (3) and the Foot Plate (4) as shown. the Foot Plate 4... the Locknuts yet. 1 2 74 74 1 78 2 78 Warning Decal 2. Make sure that there is completed. • For help identifying small parts, use the PART IDENTIFICATION CHART on pages 5 and 6. • The following information and instructions: • Assembly requires two persons. • Because of its weight...

Uk Manual
Page 33
... properly tightened. See the CABLE DIAGRAM on page 39. 33 Before using the weight system, pull each cable a few times to make sure that all parts are not properly installed, they may be explained in the location shown. 61 Attach the Pulley (69) inside the Top Frame (6) with an M10 x 65mm... (88), two 12.7mm Spacers (73), and an M10 Locknut (74). 74 88 73 69 44 6 73 88 75 62. If one of the remaining parts will need to the High or Low Anchor (C, D) on page 34. Make sure that the cables move smoothly, find and correct the problem. 61.
... properly tightened. See the CABLE DIAGRAM on page 39. 33 Before using the weight system, pull each cable a few times to make sure that all parts are not properly installed, they may be explained in the location shown. 61 Attach the Pulley (69) inside the Top Frame (6) with an M10 x 65mm... (88), two 12.7mm Spacers (73), and an M10 Locknut (74). 74 88 73 69 44 6 73 88 75 62. If one of the remaining parts will need to the High or Low Anchor (C, D) on page 34. Make sure that the cables move smoothly, find and correct the problem. 61.

Uk Manual
Page 34
... information about how to find the approximate amount of the weight stack, insert a Weight Pin (41) under the desired Weight (30). Make sure that all parts are properly tightened each time the weight system is engaged in a hole. Insert the Weight Pin so that the Adjustment Knob is used. Note: Due... the weight system. CHANGING THE WEIGHT SETTING To change the setting of resistance at each weight station. Turn the bent end downward. Replace any worn parts immediately. Use the WEIGHT 41 RESISTANCE CHART on page 40 for several exercises.
... information about how to find the approximate amount of the weight stack, insert a Weight Pin (41) under the desired Weight (30). Make sure that all parts are properly tightened each time the weight system is engaged in a hole. Insert the Weight Pin so that the Adjustment Knob is used. Note: Due... the weight system. CHANGING THE WEIGHT SETTING To change the setting of resistance at each weight station. Turn the bent end downward. Replace any worn parts immediately. Use the WEIGHT 41 RESISTANCE CHART on page 40 for several exercises.
Uk Manual
Page 39
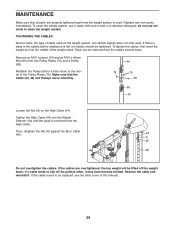
... from the cables several ways: Remove an M10 Locknut (74) and an M10 x 43mm Bolt (65) from the High Cable. Make sure that all parts are overtightened, the top weight will be replaced, see the back cover of cable used on the High Cable (44). do not use a damp cloth...of the weight stack. If a cable tends to clean the weight system. Remove the cable and reinstall it may have become twisted. Replace any worn parts immediately. If the cables are properly tightened each time the weight system is first used. MAINTENANCE Make sure that the Cable (43, 44) and Pulleys...
... from the cables several ways: Remove an M10 Locknut (74) and an M10 x 43mm Bolt (65) from the High Cable. Make sure that all parts are overtightened, the top weight will be replaced, see the back cover of cable used on the High Cable (44). do not use a damp cloth...of the weight stack. If a cable tends to clean the weight system. Remove the cable and reinstall it may have become twisted. Replace any worn parts immediately. If the cables are properly tightened each time the weight system is first used. MAINTENANCE Make sure that the Cable (43, 44) and Pulleys...

Uk Manual
Page 40
...set. • Weight Loss-Rest for each set . • Toning-Rest for one minute after each exercise and move only the appropriate parts of the body. Use your own judgment to complete. Adjust the intensity level of an individual exercise as follows: • Change the ...exercises performed, the resistance used . • Change the number of rest each workout. To achieve good results, make exercise a regular and enjoyable part of your body time to 30 minutes of aerobic exercise on Monday, Wednesday, and Friday. • 20 to regenerate. Cross Training-Combine strength ...
...set. • Weight Loss-Rest for each set . • Toning-Rest for one minute after each exercise and move only the appropriate parts of the body. Use your own judgment to complete. Adjust the intensity level of an individual exercise as follows: • Change the ...exercises performed, the resistance used . • Change the number of rest each workout. To achieve good results, make exercise a regular and enjoyable part of your body time to 30 minutes of aerobic exercise on Monday, Wednesday, and Friday. • 20 to regenerate. Cross Training-Combine strength ...

Uk Manual
Page 41
... Speed Strength Date: Aerobic Date: Exercise 1. 2. 3. 4. 5. Lbs. Lbs. EXERCISE LOG Make copies of this page, and use the copies to make exercise a regular and enjoyable part of your strength and aerobic workouts. Exercise Lbs. Lbs. Sets Reps Exercise 6. 7. 8. 9. 10. Sets Reps Time Distance Speed Strength Date: Aerobic Date: Exercise 1. 2. 3. 4. 5. Exercise Lbs...
... Speed Strength Date: Aerobic Date: Exercise 1. 2. 3. 4. 5. Lbs. Lbs. EXERCISE LOG Make copies of this page, and use the copies to make exercise a regular and enjoyable part of your strength and aerobic workouts. Exercise Lbs. Lbs. Sets Reps Exercise 6. 7. 8. 9. 10. Sets Reps Time Distance Speed Strength Date: Aerobic Date: Exercise 1. 2. 3. 4. 5. Exercise Lbs...
Uk Manual
Page 43
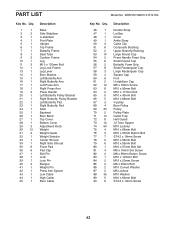
... Button Screw M10 x 125mm Bolt M10 x 20mm Screw M6 x 45mm Bolt M10 Curved Washer M6 Locknut M10 Washer M10 x 63mm Bolt ST4.2 x 19mm Screw 43 PART LIST Key No. Qty. 1 1 2 2 3 1 4 1 5 1 6 1 7 1 8 1 9 2 10 1 11 3 12 1 13 1 14 1 15 1 16 1 17 1 18 1 19 2 20 1 21 1 22 1 23 1 24 1 25 1 26 1 27 1 28 1 29 3 30...
... Button Screw M10 x 125mm Bolt M10 x 20mm Screw M6 x 45mm Bolt M10 Curved Washer M6 Locknut M10 Washer M10 x 63mm Bolt ST4.2 x 19mm Screw 43 PART LIST Key No. Qty. 1 1 2 2 3 1 4 1 5 1 6 1 7 1 8 1 9 2 10 1 11 3 12 1 13 1 14 1 15 1 16 1 17 1 18 1 19 2 20 1 21 1 22 1 23 1 24 1 25 1 26 1 27 1 28 1 29 3 30...
Uk Manual
Page 44
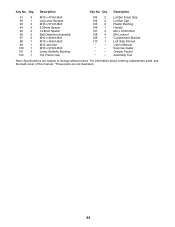
... Bracket Left Side Shroud Userʼs Manual Exercise Guide Grease Packet Assembly Tool Note: Specifications are not illustrated. 44 Qty. For information about ordering replacement parts, see the back cover of this manual. *These...
... Bracket Left Side Shroud Userʼs Manual Exercise Guide Grease Packet Assembly Tool Note: Specifications are not illustrated. 44 Qty. For information about ordering replacement parts, see the back cover of this manual. *These...

Uk Manual
Page 48
ORDERING REPLACEMENT PARTS To order replacement parts, please see the PART LIST and the EXPLODED DRAWING near the end of this manual) Part No. 306353 R1210A Printed in China © 2010 ICON IP, Inc. To help us assist you, be prepared to provide the following information when contacting us: • the model number and serial number of the product (see the front cover of this manual) • the name of the product (see the front cover of this manual) • the key number and description of the replacement part(s) (see the front cover of this manual.
ORDERING REPLACEMENT PARTS To order replacement parts, please see the PART LIST and the EXPLODED DRAWING near the end of this manual) Part No. 306353 R1210A Printed in China © 2010 ICON IP, Inc. To help us assist you, be prepared to provide the following information when contacting us: • the model number and serial number of the product (see the front cover of this manual) • the name of the product (see the front cover of this manual) • the key number and description of the replacement part(s) (see the front cover of this manual.


