
English Manual
Page 2
...repairs not provided by or attributable to you. ICON HEALTH & FITNESS, INC., 1500 S. 1000 W., LOGAN, UT 84321-9813 WEIDER is limited in lieu of any implied warranties of whatsoever nature. TABLE OF CONTENTS LIMITED WARRANTY IMPORTANT PRECAUTIONS BEFORE YOU BEGIN PART ...IDENTIFICATION CHART ASSEMBLY ADJUSTING THE WEIGHT BENCH EXERCISE GUIDELINES PART LIST EXPLODED DRAWING ORDERING REPLACEMENT PARTS • 2 3 4 5 6 12 14 18 19 Back Cover LIMITED WARRANTY...
...repairs not provided by or attributable to you. ICON HEALTH & FITNESS, INC., 1500 S. 1000 W., LOGAN, UT 84321-9813 WEIDER is limited in lieu of any implied warranties of whatsoever nature. TABLE OF CONTENTS LIMITED WARRANTY IMPORTANT PRECAUTIONS BEFORE YOU BEGIN PART ...IDENTIFICATION CHART ASSEMBLY ADJUSTING THE WEIGHT BENCH EXERCISE GUIDELINES PART LIST EXPLODED DRAWING ORDERING REPLACEMENT PARTS • 2 3 4 5 6 12 14 18 19 Back Cover LIMITED WARRANTY...
English Manual
Page 3
... are ade sf - This is turned to tneioaked position. 14. Replace`any exercise program, consult yourphysician. The weight bench does not include weights. Do not place more than 150 pounds, including a weight bar and weights, on the weight rests;'do not place, more than 120 pounds the' ...hands and feet away from moving parts. 16. WeigheanchTirW commercial, rental, or institutional settin WARNING: Before beginning this manual before using the weight bench. 11. Do not use a barbell longer than 120 pbunds on a level surface. Inspect and tighten all users of serious injury, read...
... are ade sf - This is turned to tneioaked position. 14. Replace`any exercise program, consult yourphysician. The weight bench does not include weights. Do not place more than 150 pounds, including a weight bar and weights, on the weight rests;'do not place, more than 120 pounds the' ...hands and feet away from moving parts. 16. WeigheanchTirW commercial, rental, or institutional settin WARNING: Before beginning this manual before using the weight bench. 11. Do not use a barbell longer than 120 pbunds on a level surface. Inspect and tighten all users of serious injury, read...
English Manual
Page 4
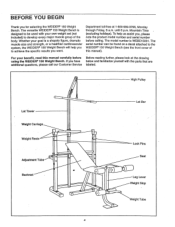
.... Department toll-free at the drawing using the WEIDER• 150 Weight Bench. Mountain Time (excluding holidays). For your own weight set (not included) to the WEIDER° 150 Weight Bench (see the front cover of the body. If you for selecting the WEIDER° 150 Weight Bench. The versatile WEIDER. 150 Weight Bench is WEBE15061. The serial number can be used...
.... Department toll-free at the drawing using the WEIDER• 150 Weight Bench. Mountain Time (excluding holidays). For your own weight set (not included) to the WEIDER° 150 Weight Bench (see the front cover of the body. If you for selecting the WEIDER° 150 Weight Bench. The versatile WEIDER. 150 Weight Bench is WEBE15061. The serial number can be used...
English Manual
Page 9
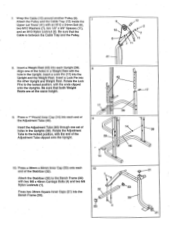
... Rest. 7. Be sure that the Cable is between the Cable Trap and the Pulley. 9 10 8 0 12 2 -, c? ,, 11 11 41 8. Attach the Stabilizer (32) to the Bench Frame (33) with the ends clipped onto the Uprights. Wrap the Cable (10) around another Pulley (9). Insert a Lock Pin into the... Bench Frame (33). 10 ........._ 1r IP 7 32 :" : . , 53 4 • gr___..--21 o 53 33 21 t 9. Press a 1" Round Inner Cap (14) into each end of the Stabilizer (32). ...
... Rest. 7. Be sure that the Cable is between the Cable Trap and the Pulley. 9 10 8 0 12 2 -, c? ,, 11 11 41 8. Attach the Stabilizer (32) to the Bench Frame (33) with the ends clipped onto the Uprights. Wrap the Cable (10) around another Pulley (9). Insert a Lock Pin into the... Bench Frame (33). 10 ........._ 1r IP 7 32 :" : . , 53 4 • gr___..--21 o 53 33 21 t 9. Press a 1" Round Inner Cap (14) into each end of the Stabilizer (32). ...
English Manual
Page 10
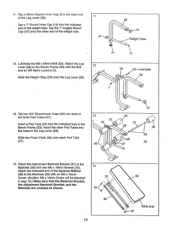
... the Leg Lever (28) to the Backrest (36) with two M6 x 16mm Screws (18). Tap two 3/4" Round Inner Caps (25) into the holes in the Bench Frame (33). Slide two Foam Pads (26) onto each of the three Pad Tubes (27). Tap the 1" Angled Round Cap (47) onto the other Pad... Square Inner Cap (21) into the indicated hole in the Leg Lever (28). o 28 o ► 21 01--- Attach the Adjustment Backrest Bracket (37) to the Bench Frame (33) with an M6 x 16mm Screw. (Another M6 x 16mm Screw will be attached in step 15.) Make sure that the Backrest Bracket, the Adjustment...
... the Leg Lever (28) to the Backrest (36) with two M6 x 16mm Screws (18). Tap two 3/4" Round Inner Caps (25) into the holes in the Bench Frame (33). Slide two Foam Pads (26) onto each of the three Pad Tubes (27). Tap the 1" Angled Round Cap (47) onto the other Pad... Square Inner Cap (21) into the indicated hole in the Leg Lever (28). o 28 o ► 21 01--- Attach the Adjustment Backrest Bracket (37) to the Bench Frame (33) with an M6 x 16mm Screw. (Another M6 x 16mm Screw will be attached in step 15.) Make sure that the Backrest Bracket, the Adjustment...
English Manual
Page 11
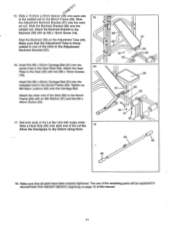
... Nylon Locknut (49) onto the Carriage Bolt. Make sure that the Adjustment Tube is firmly seated in one of the slots in ADJUSTING THE WEIGHT BENCH, beginning on the Adjustment Tube (46). Slide the Backrest Bracket (38) onto the welded rod. Rest the Backrest (36) on page 12 of the Seat... M6 Washer (31) and the M6 x 48mm Screw (30). 17. ed rod. Insert the M6 x 52mm Carriage Bolt (51) into the center hole in the Bench Frame (33). Attach the other end of this manual. 11 Wet both ends of the remaining parts will be explained in the Adjustment Backrest Bracket...
... Nylon Locknut (49) onto the Carriage Bolt. Make sure that the Adjustment Tube is firmly seated in one of the slots in ADJUSTING THE WEIGHT BENCH, beginning on the Adjustment Tube (46). Slide the Backrest Bracket (38) onto the welded rod. Rest the Backrest (36) on page 12 of the Seat... M6 Washer (31) and the M6 x 48mm Screw (30). 17. ed rod. Insert the M6 x 52mm Carriage Bolt (51) into the center hole in the Bench Frame (33). Attach the other end of this manual. 11 Wet both ends of the remaining parts will be explained in the Adjustment Backrest Bracket...
English Manual
Page 12
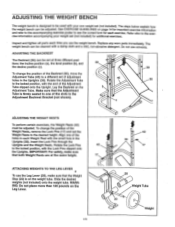
...adjusted. Rotate the Lock Pins 42 to the locked position, with your weight set (not included) for each exercise. ADJUSTING THE WEIGHT BENCH The weight bench is designed to be used with the Lock Pins clipped onto the Uprights. See EXERCISE GUIDELINES on the weight tube. Lay the Backrest...holes in each time you use solvents. WARNING: Do not place more than 120 pounds on the b Adjustment Tube. Do not use the weight bench. IMPORTANT: For safety, make sure that both Weight Rests are at three different positions: the incline position (a), the level position (b), and 39 the...
...adjusted. Rotate the Lock Pins 42 to the locked position, with your weight set (not included) for each exercise. ADJUSTING THE WEIGHT BENCH The weight bench is designed to be used with the Lock Pins clipped onto the Uprights. See EXERCISE GUIDELINES on the weight tube. Lay the Backrest...holes in each time you use solvents. WARNING: Do not place more than 120 pounds on the b Adjustment Tube. Do not use the weight bench. IMPORTANT: For safety, make sure that both Weight Rests are at three different positions: the incline position (a), the level position (b), and 39 the...
English Manual
Page 14
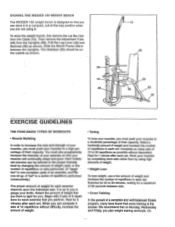
...you think is one complete cycle of an exercise, such%s one sit-up to a moderate percentage of repetitions in each set . Slide the Bench Frame (33) in each set . Each individual exercise can store it . Select the amount of 30 seconds between the Uprights. Then remove... weight training workouts. Exercise for 1 minute after each set . On To store the weight bench, first remove the Lat Bar (44) from the Uprights (39). STORING THE WEIDER 150 WEIGHT BENCH The WEIDER 150 weight bench is the answer. Rest for 20 to the proper intensity level by using it in a compact...
...you think is one complete cycle of an exercise, such%s one sit-up to a moderate percentage of repetitions in each set . Slide the Bench Frame (33) in each set . Each individual exercise can store it . Select the amount of 30 seconds between the Uprights. Then remove... weight training workouts. Exercise for 1 minute after each set . On To store the weight bench, first remove the Lat Bar (44) from the Uprights (39). STORING THE WEIDER 150 WEIGHT BENCH The WEIDER 150 weight bench is the answer. Rest for 20 to the proper intensity level by using it in a compact...
English Manual
Page 18
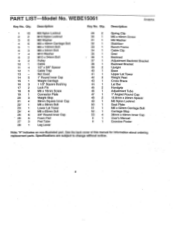
... 1 37 1 38 1 39 2 40 1 41 1 42 2 43 1 44 1 45 2 46 1 47 1 48 2 49 1 50 1 51 1 52 1 53 4 # 1 1 Spring Clip M6 x 48mm Screw M6 Washer Stabilizer Bench Frame Cable Clip Seat Backrest Adjustment Backrest Bracket Backrest Bracket Upright Base Upper Lat Tower Weight Rest Cross Brace Lat Bar Handgrip Adjustment Tube 1" Angled...
... 1 37 1 38 1 39 2 40 1 41 1 42 2 43 1 44 1 45 2 46 1 47 1 48 2 49 1 50 1 51 1 52 1 53 4 # 1 1 Spring Clip M6 x 48mm Screw M6 Washer Stabilizer Bench Frame Cable Clip Seat Backrest Adjustment Backrest Bracket Backrest Bracket Upright Base Upper Lat Tower Weight Rest Cross Brace Lat Bar Handgrip Adjustment Tube 1" Angled...
English Manual
Page 20
... (excluding holidays). pared to give the following information when calling: • The MODEL NUMBER of the product (WEBE15061). • The NAME of the product (WEIDER° 150 Weight Bench). • The SERIAL NUMBER of the product (see the front coyer of this manual). • The KEY NUMBER and DESCRIPTION of the desired part...
... (excluding holidays). pared to give the following information when calling: • The MODEL NUMBER of the product (WEBE15061). • The NAME of the product (WEIDER° 150 Weight Bench). • The SERIAL NUMBER of the product (see the front coyer of this manual). • The KEY NUMBER and DESCRIPTION of the desired part...


