
English Manual
Page 2
...you . You may not apply to the original purchaser. ICON HEALTH & FITNESS, INC., 1500 S. 1000 W., LOGAN, UT 84321-9813 WEIDER is a registered trademark of any product or damage to a product caused by ICON. This warranty does not extend to any and all ...by ICON. No other consequential damages of whatsoever nature. TABLE OF CONTENTS LIMITED WARRANTY IMPORTANT PRECAUTIONS BEFORE YOU BEGIN PART IDENTIFICATION CHART ASSEMBLY ADJUSTING THE WEIGHT BENCH EXERCISE GUIDELINES PART LIST EXPLODED DRAWING ORDERING REPLACEMENT PARTS • 2 3 4 5 6 12 14 18 19 Back Cover LIMITED WARRANTY ICON ...
...you . You may not apply to the original purchaser. ICON HEALTH & FITNESS, INC., 1500 S. 1000 W., LOGAN, UT 84321-9813 WEIDER is a registered trademark of any product or damage to a product caused by ICON. This warranty does not extend to any and all ...by ICON. No other consequential damages of whatsoever nature. TABLE OF CONTENTS LIMITED WARRANTY IMPORTANT PRECAUTIONS BEFORE YOU BEGIN PART IDENTIFICATION CHART ASSEMBLY ADJUSTING THE WEIGHT BENCH EXERCISE GUIDELINES PART LIST EXPLODED DRAWING ORDERING REPLACEMENT PARTS • 2 3 4 5 6 12 14 18 19 Back Cover LIMITED WARRANTY ICON ...
English Manual
Page 3
...use a barbell longer than five feet with pre-existing health problerns. Do not place more than 150 pounds, including a weight bar and weights, on the weight rests;'do not place, more than 120 pbunds on thaWeight reststo balance thebench. 8 Always wear... s.....s 4. Cover the floor beneath the weight bench:for , ome us only. The weight bench does not include weights. quately informedCf ail precautions. The weight bench is especia importantfor persons overthe age of this 'or any exercise program, consult yourphysician. The weight bench is turned to support maximum of your'...
...use a barbell longer than five feet with pre-existing health problerns. Do not place more than 150 pounds, including a weight bar and weights, on the weight rests;'do not place, more than 120 pbunds on thaWeight reststo balance thebench. 8 Always wear... s.....s 4. Cover the floor beneath the weight bench:for , ome us only. The weight bench does not include weights. quately informedCf ail precautions. The weight bench is especia importantfor persons overthe age of this 'or any exercise program, consult yourphysician. The weight bench is turned to support maximum of your'...
English Manual
Page 4
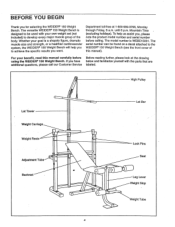
... figure, dramatic muscle size and strength, or a healthier cardiovascular system, the WEIDER° 150 Weight Bench will help us assist you want. Lock Pins Seat Leg Lever Weight Stop Weight Tube A The model number is designed to be found on a decal attached to the WEIDER° 150 Weight Bench (see the front cover of the body. To help you to...
... figure, dramatic muscle size and strength, or a healthier cardiovascular system, the WEIDER° 150 Weight Bench will help us assist you want. Lock Pins Seat Leg Lever Weight Stop Weight Tube A The model number is designed to be found on a decal attached to the WEIDER° 150 Weight Bench (see the front cover of the body. To help you to...
English Manual
Page 9
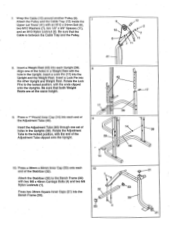
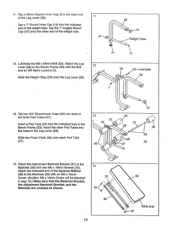
... Stabilizer (32). Insert the Adjustment Tube (46) through one of the holes in the Uprights (39). o 46 14 10. Insert a Lock Pin (17) into the Bench Frame (33). 10 ........._ 1r IP 7 32 :" : . , 53 4 • gr___..--21 o 53 33 21 Press a 38mm x 50mm Inner Cap (53) onto each...the Uprights. Press two 38mm Square Inner Caps (21) into the Upright and the Weight Rest. Insert a Lock Pin into each Upright (39). 7. Wrap the Cable (10) around another Pulley (9). Rotate the Lock Pins to the Bench Frame (33) with two M8 x 48mm Carriage Bolts (4) and two M8 Nylon ...
... Stabilizer (32). Insert the Adjustment Tube (46) through one of the holes in the Uprights (39). o 46 14 10. Insert a Lock Pin (17) into the Bench Frame (33). 10 ........._ 1r IP 7 32 :" : . , 53 4 • gr___..--21 o 53 33 21 Press a 38mm x 50mm Inner Cap (53) onto each...the Uprights. Press two 38mm Square Inner Caps (21) into the Upright and the Weight Rest. Insert a Lock Pin into each Upright (39). 7. Wrap the Cable (10) around another Pulley (9). Rotate the Lock Pins to the Bench Frame (33) with two M8 x 48mm Carriage Bolts (4) and two M8 Nylon ...
English Manual
Page 10
...Angled Round Cap (47) onto the other Pad Tubes into the indicated end of the weight tube. Attach the Adjustment Backrest Bracket (37) to the Backrest (36) with an...10 36 . i-•-, 18 Wide End 11. Tap a 1" Round Inner Cap (14) into the holes in the Bench Frame (33). Insert the other end of the three Pad Tubes (27). Slide two Foam Pads (26) onto each end... with two M6 x 16mm Screws (18). Insert a Pad Tube (27) into each of the weight tube. 11 47---co. Weight Tube 21 14 12. Slide the Weight Stop (20) onto the Leg Lever (28). 12 0:' ' • 33 , - Tap ...
...Angled Round Cap (47) onto the other Pad Tubes into the indicated end of the weight tube. Attach the Adjustment Backrest Bracket (37) to the Backrest (36) with an...10 36 . i-•-, 18 Wide End 11. Tap a 1" Round Inner Cap (14) into the holes in the Bench Frame (33). Insert the other end of the three Pad Tubes (27). Slide two Foam Pads (26) onto each end... with two M6 x 16mm Screws (18). Insert a Pad Tube (27) into each of the weight tube. 11 47---co. Weight Tube 21 14 12. Slide the Weight Stop (20) onto the Leg Lever (28). 12 0:' ' • 33 , - Tap ...
English Manual
Page 11
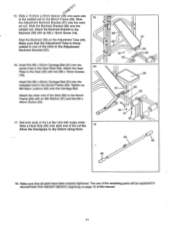
Attach the Seat 16 Plate to the Bench Frame (33) with an M6 x 16mm Screw (18). Wet both ends of the Lat Bar (44) with two M6 x 16mm...38) onto the welded rod. Attach the other end of the slots in the Seat Plate (50). Rest the Backrest (36) on the Bench Frame (33). Slide a Hand Grip (45) onto each side of the Lat Bar. 17 Allow the Handgrips to the Backrest (36) ...the Adjustment Backrest Bracket (37). 16. Insert the M6 x 52mm Carriage Bolt (51) into the indicated hole in ADJUSTING THE WEIGHT BENCH, beginning on page 12 of the remaining parts will be explained in the...
Attach the Seat 16 Plate to the Bench Frame (33) with an M6 x 16mm Screw (18). Wet both ends of the Lat Bar (44) with two M6 x 16mm...38) onto the welded rod. Attach the other end of the slots in the Seat Plate (50). Rest the Backrest (36) on the Bench Frame (33). Slide a Hand Grip (45) onto each side of the Lat Bar. 17 Allow the Handgrips to the Backrest (36) ...the Adjustment Backrest Bracket (37). 16. Insert the M6 x 52mm Carriage Bolt (51) into the indicated hole in ADJUSTING THE WEIGHT BENCH, beginning on page 12 of the remaining parts will be explained in the...
English Manual
Page 12
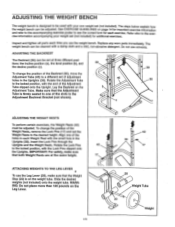
...that the Adjustment Tube is firmly seated in one of the holes in each time you use the weight bench. Slide the desired weights (not included) onto the weight tube. ADJUSTING THE WEIGHT BENCH The weight bench is designed to be used with the end of the Adjustment Tube clipped onto the Upright. Inspect ...and tighten all parts each Weight Rest with the small hole in the Uprights (39). The weight bench can be adjusted. To change the position of the Backrest (36), move the Adjustment Tube (46) to ...
...that the Adjustment Tube is firmly seated in one of the holes in each time you use the weight bench. Slide the desired weights (not included) onto the weight tube. ADJUSTING THE WEIGHT BENCH The weight bench is designed to be used with the end of the Adjustment Tube clipped onto the Upright. Inspect ...and tighten all parts each Weight Rest with the small hole in the Uprights (39). The weight bench can be adjusted. To change the position of the Backrest (36), move the Adjustment Tube (46) to ...
English Manual
Page 14
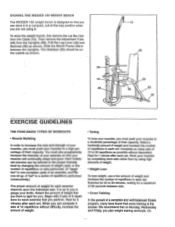
... by using it in a compact, out-of-the-way position when you are not using high amounts of weight. • Weight Loss To lose weight, use a low amount of weight and increase the number of repetitions in between sets. • Cross Training In the pursuit of a complete ... it . We recommend that you can be on Monday, Wednesday and Friday, you plan weight training workouts. It is designed so that on the outside as shown. STORING THE WEIDER 150 WEIGHT BENCH The WEIDER 150 weight bench is up . To store the weight bench, first remove the Lat Bar (44) from the Uprights (39).
... by using it in a compact, out-of-the-way position when you are not using high amounts of weight. • Weight Loss To lose weight, use a low amount of weight and increase the number of repetitions in between sets. • Cross Training In the pursuit of a complete ... it . We recommend that you can be on Monday, Wednesday and Friday, you plan weight training workouts. It is designed so that on the outside as shown. STORING THE WEIDER 150 WEIGHT BENCH The WEIDER 150 weight bench is up . To store the weight bench, first remove the Lat Bar (44) from the Uprights (39).
English Manual
Page 18
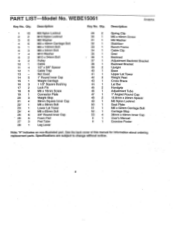
...Bolt M10 Washer M10 x 54mm Bolt Pulley Cable 1/2" x 3/8" Spacer Cable Trap Not Used 1" Round Inner Cap Weight Carriage 1 1/2" Square Bushing Lock Pin M6 x 16mm Screw Connector Plate Weight Stop 38mm Square Inner Cap M8 x 56mm Bolt Lower Lat Tower M8 x 65mm Bolt 3/4" Round Inner Cap ...2 49 1 50 1 51 1 52 1 53 4 # 1 1 Spring Clip M6 x 48mm Screw M6 Washer Stabilizer Bench Frame Cable Clip Seat Backrest Adjustment Backrest Bracket Backrest Bracket Upright Base Upper Lat Tower Weight Rest Cross Brace Lat Bar Handgrip Adjustment Tube 1" Angled Round Cap 15.8mm x 20mm Spacer M6 Nylon Locknut...
...Bolt M10 Washer M10 x 54mm Bolt Pulley Cable 1/2" x 3/8" Spacer Cable Trap Not Used 1" Round Inner Cap Weight Carriage 1 1/2" Square Bushing Lock Pin M6 x 16mm Screw Connector Plate Weight Stop 38mm Square Inner Cap M8 x 56mm Bolt Lower Lat Tower M8 x 65mm Bolt 3/4" Round Inner Cap ...2 49 1 50 1 51 1 52 1 53 4 # 1 1 Spring Clip M6 x 48mm Screw M6 Washer Stabilizer Bench Frame Cable Clip Seat Backrest Adjustment Backrest Bracket Backrest Bracket Upright Base Upper Lat Tower Weight Rest Cross Brace Lat Bar Handgrip Adjustment Tube 1" Angled Round Cap 15.8mm x 20mm Spacer M6 Nylon Locknut...
English Manual
Page 20
pared to give the following information when calling: • The MODEL NUMBER of the product (WEBE15061). • The NAME of the product (WEIDER° 150 Weight Bench). • The SERIAL NUMBER of the product (see the front coyer of this manual). • The KEY NUMBER and DESCRIPTION of the desired part(s) (see ...
pared to give the following information when calling: • The MODEL NUMBER of the product (WEBE15061). • The NAME of the product (WEIDER° 150 Weight Bench). • The SERIAL NUMBER of the product (see the front coyer of this manual). • The KEY NUMBER and DESCRIPTION of the desired part(s) (see ...


