
User Manual
Page 1
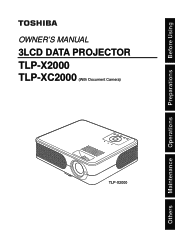
Others Maintenance Operations Preparations Before Using OWNER'S MANUAL 3LCD DATA PROJECTOR TLP-X2000 TLP-XC2000 (With Document Camera) TLP-X2000
Others Maintenance Operations Preparations Before Using OWNER'S MANUAL 3LCD DATA PROJECTOR TLP-X2000 TLP-XC2000 (With Document Camera) TLP-X2000
User Manual
Page 2
...: www.eiae.org. MODEL NAME: TLP-X2000 USA only TRADE NAME: DATA PROJECTOR Tested To Comply With FCC Standards FOR HOME OR OFFICE USE MODEL NAME: TLP-X2000 FCC NOTICE: This device complies with Canadian ICES-003. If this equipment, not expressly approved by USA only Toshiba, or parties authorized by Toshiba, could void the user's authority...
...: www.eiae.org. MODEL NAME: TLP-X2000 USA only TRADE NAME: DATA PROJECTOR Tested To Comply With FCC Standards FOR HOME OR OFFICE USE MODEL NAME: TLP-X2000 FCC NOTICE: This device complies with Canadian ICES-003. If this equipment, not expressly approved by USA only Toshiba, or parties authorized by Toshiba, could void the user's authority...
User Manual
Page 4
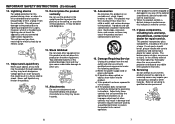
... wall outlet and refer servicing to avoid injury and contact your dealer for long periods of the lamp rupturing, thoroughly clean the area around the projector and discard any other unit. 14. A product and cart combination should break, please handle with care to qualified service personnel under the following the operating...
... wall outlet and refer servicing to avoid injury and contact your dealer for long periods of the lamp rupturing, thoroughly clean the area around the projector and discard any other unit. 14. A product and cart combination should break, please handle with care to qualified service personnel under the following the operating...
User Manual
Page 5
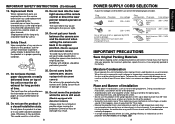
...not to the eyes or sight. 24. Doing so can result in its original position. Always replace the fuse cover after moving the projector. Place and Manner of Installation • Do not place in fire, electric shock, or other closed installation state. If this instrument ...product, ask the service technician to perform safety checks to determine that situation, the malfunction may result. 8 POWER SUPPLY CORD SELECTION If your projector. Plug configuration Plug type EURO Line voltage 220 - 240V Plug configuration Plug type Australian 240V 10A Line voltage 200 - 240V UK 220 ...
...not to the eyes or sight. 24. Doing so can result in its original position. Always replace the fuse cover after moving the projector. Place and Manner of Installation • Do not place in fire, electric shock, or other closed installation state. If this instrument ...product, ask the service technician to perform safety checks to determine that situation, the malfunction may result. 8 POWER SUPPLY CORD SELECTION If your projector. Plug configuration Plug type EURO Line voltage 220 - 240V Plug configuration Plug type Australian 240V 10A Line voltage 200 - 240V UK 220 ...

User Manual
Page 6
... of replacing a lamp. (Ask a dealer where the unit was purchased or your projector. For more detailed information about an air filter for replacement.) EXEMPTION CLAUSES • Toshiba Corporation bears no responsibility in the case of damages arising from combination with equipment or ...this information for any damages arising from malfunctions arising from natural disaster such as earthquakes, lightning, etc., fire not liable to Toshiba Corporation, acts by inappropriate waste handling of this product, please contact your local city office, your package exactly. Using the ...
... of replacing a lamp. (Ask a dealer where the unit was purchased or your projector. For more detailed information about an air filter for replacement.) EXEMPTION CLAUSES • Toshiba Corporation bears no responsibility in the case of damages arising from combination with equipment or ...this information for any damages arising from malfunctions arising from natural disaster such as earthquakes, lightning, etc., fire not liable to Toshiba Corporation, acts by inappropriate waste handling of this product, please contact your local city office, your package exactly. Using the ...
User Manual
Page 8
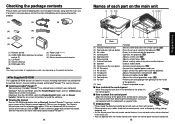
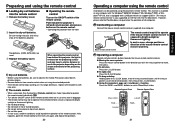
...direction of the arrow, lift the control panel. ■ How to attach the control panel Align the convexity of the point of the projector. : Projects expanded image. ■ How to the main unit. • You can operate with the main unit. p.28 : ...lock hole (8) Speaker (9) Terminals on -screen instructions to replace lamp. p.28 : Prevents dirt and garbage from getting into the inside the projector. : Adjusts the projector's horizontal tilt. p.50 : Adjusts the vertical projection angle. PRECAUTION • Please keep the detached control panel with related information. Preparations ...
...direction of the arrow, lift the control panel. ■ How to attach the control panel Align the convexity of the point of the projector. : Projects expanded image. ■ How to the main unit. • You can operate with the main unit. p.28 : ...lock hole (8) Speaker (9) Terminals on -screen instructions to replace lamp. p.28 : Prevents dirt and garbage from getting into the inside the projector. : Adjusts the projector's horizontal tilt. p.50 : Adjusts the vertical projection angle. PRECAUTION • Please keep the detached control panel with related information. Preparations ...
User Manual
Page 9
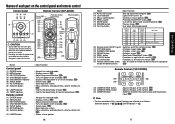
... to that of the projector. (inside the battery cover) p.43 Remote Control (TLP-XC2000) (28) (30) (29) (28) CAMERA GAIN- p.32 (23) RESIZE button : Enlarges image. p.47 : Switches between the camera input and the previous input. p.25 : Selects input. p.36 : Adjusts keystone distortion. p.36 : Adjusts keystone distortion. Remote Control (TLP-X2000) Laser light source...
... to that of the projector. (inside the battery cover) p.43 Remote Control (TLP-XC2000) (28) (30) (29) (28) CAMERA GAIN- p.32 (23) RESIZE button : Enlarges image. p.47 : Switches between the camera input and the previous input. p.25 : Selects input. p.36 : Adjusts keystone distortion. p.36 : Adjusts keystone distortion. Remote Control (TLP-X2000) Laser light source...

User Manual
Page 10
... : Main Function Camera (1) LED illumination (2) Focus ring (3) Camera lens (4) Camera arm (5) Infrared remote sensor : The illumination LED for MONITOR OUT terminal) (9) Switch : When operating the projector via a computer, connect this to your power system frequency. p.46 : Adjusts the focus. p.47 : The camera lens of each part on /off the LED illumination...
... : Main Function Camera (1) LED illumination (2) Focus ring (3) Camera lens (4) Camera arm (5) Infrared remote sensor : The illumination LED for MONITOR OUT terminal) (9) Switch : When operating the projector via a computer, connect this to your power system frequency. p.46 : Adjusts the focus. p.47 : The camera lens of each part on /off the LED illumination...
User Manual
Page 11
...8226; Before using the batteries, be operated using the projector's remote control. This function is available on any computer with the Windows® 98/98SE, Windows® Me, Windows® 2000, or Windows® XP OS, that Toshiba does not guarantee the operation of all computers. 1 Connecting... a computer Connect the mouse remote control receiver (supplied) to reach the projector depending on OS 9 or OS X for extended periods. • If the ...
...8226; Before using the batteries, be operated using the projector's remote control. This function is available on any computer with the Windows® 98/98SE, Windows® Me, Windows® 2000, or Windows® XP OS, that Toshiba does not guarantee the operation of all computers. 1 Connecting... a computer Connect the mouse remote control receiver (supplied) to reach the projector depending on OS 9 or OS X for extended periods. • If the ...
User Manual
Page 12
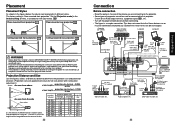
...762) 9.13 9.15 45.4 - 54.4 22 Connection Before connection • Read the owner's manual of the device you wish to mount the projector on a ceiling requires special ceiling brackets (sold separately) and specialized knowledge. Computer Computer To RS-232C p.59 terminal To audio output White (L)/Red... Ceiling-mounted front projection Ceiling-mounted rear projection WARNING • Always obey the instructions listed in 4 different styles. Mounting the projector on the ceiling, be sure to ask your needs. Let everyone involved with your dealer to the center of the lens....
...762) 9.13 9.15 45.4 - 54.4 22 Connection Before connection • Read the owner's manual of the device you wish to mount the projector on a ceiling requires special ceiling brackets (sold separately) and specialized knowledge. Computer Computer To RS-232C p.59 terminal To audio output White (L)/Red... Ceiling-mounted front projection Ceiling-mounted rear projection WARNING • Always obey the instructions listed in 4 different styles. Mounting the projector on the ceiling, be sure to ask your needs. Let everyone involved with your dealer to the center of the lens....
User Manual
Page 13
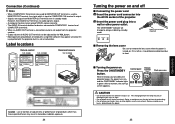
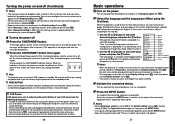
... connected to COMPUTER 1 terminal and COMPUTER 2 terminal. • When an AUDIO OUT terminal is connected, sound is not output from the projector speaker. • Output volume of AUDIO OUT terminal can be adjusted by the VOL button. • Moving pictures played back on computers ...intake or exhaust. The ON/STANDBY indicator will change to orange, indicating standby mode. Operations Caution - Label locations Remote control TLP-X2000 TLP-XC2000 Document camera TLP-XC2000 Operations Turning the power on and off ■ Connecting the power cord 1 Insert the power cord connector into the ...
... connected to COMPUTER 1 terminal and COMPUTER 2 terminal. • When an AUDIO OUT terminal is connected, sound is not output from the projector speaker. • Output volume of AUDIO OUT terminal can be adjusted by the VOL button. • Moving pictures played back on computers ...intake or exhaust. The ON/STANDBY indicator will change to orange, indicating standby mode. Operations Caution - Label locations Remote control TLP-X2000 TLP-XC2000 Document camera TLP-XC2000 Operations Turning the power on and off ■ Connecting the power cord 1 Insert the power cord connector into the ...
User Manual
Page 14
... standby. Keeping the lamp off is also very effective at saving electricity. • If the air filter becomes dirty and clogged, the projector's internal temperature will not be set via the Display setting menu p.39 and Lamp power via the Display setting menu p.39 . •... operation. English French German Italian Spanish Portuguese Russian Swedish Turkish Polish Japanese Chinese (simplified) Chinese (traditional) Korean Notes • When the projector is off. An image of time, it switches to the input of the LCD panel and causing malfunctions. Turning the power on and ...
... standby. Keeping the lamp off is also very effective at saving electricity. • If the air filter becomes dirty and clogged, the projector's internal temperature will not be set via the Display setting menu p.39 and Lamp power via the Display setting menu p.39 . •... operation. English French German Italian Spanish Portuguese Russian Swedish Turkish Polish Japanese Chinese (simplified) Chinese (traditional) Korean Notes • When the projector is off. An image of time, it switches to the input of the LCD panel and causing malfunctions. Turning the power on and ...

User Manual
Page 15
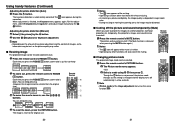
... from displaying properly. Please note that the computer's external output should be adjusted when an audio signal is consumable item. This projector is recommended that these are constantly lit) on the panel. Item Auto v-keystone V-keystone Description Automatically corrects the vertical distortion. ... With some models of computer having LCD displays or the like, displaying images simultaneously on conditions of the input signal by the projector is input, the "Unsupport signal" will appear. • If an unavailable operation button is changed while projecting the image,...
... from displaying properly. Please note that the computer's external output should be adjusted when an audio signal is consumable item. This projector is recommended that these are constantly lit) on the panel. Item Auto v-keystone V-keystone Description Automatically corrects the vertical distortion. ... With some models of computer having LCD displays or the like, displaying images simultaneously on conditions of the input signal by the projector is input, the "Unsupport signal" will appear. • If an unavailable operation button is changed while projecting the image,...
User Manual
Page 16
... the images of the Image adjustment menu has the same function p.37 . Note • [Picture mode] of another projector, overhead projector, etc. Press the remote control's MUTE button. The icon appears during this projector's images and sound can be turned off . (The Mute function is released when pressing the MUTE button again.) Notes...
... the images of the Image adjustment menu has the same function p.37 . Note • [Picture mode] of another projector, overhead projector, etc. Press the remote control's MUTE button. The icon appears during this projector's images and sound can be turned off . (The Mute function is released when pressing the MUTE button again.) Notes...
User Manual
Page 17
... remote control's SCREEN SIZE button. Pressing the button switches Full/Thru/Wide in effect. • Other operation will appear while freeze is frozen on the projector, the pictures are running on the video or other equipment. • If you can be changed. Notes • Thru display is to be frozen. Using...
... remote control's SCREEN SIZE button. Pressing the button switches Full/Thru/Wide in effect. • Other operation will appear while freeze is frozen on the projector, the pictures are running on the video or other equipment. • If you can be changed. Notes • Thru display is to be frozen. Using...
User Manual
Page 18
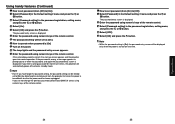
... enter standby mode. If the entered password is displayed. Operations 34 35 Note • Even if you enter a wrong password for more than 5 times, the projector will be set password (from [On] to [Off]) 1 Select [Password] in the password registration, setting menu, and press the or button. 4 Select [OFF]. ...using numeric keys of the remote control. Using handy features (Continued) How to set to [On], by detaching the control panel from the projector first when the power is turned back on after the power cord has been unplugged. If you to prompt you can be displayed only ...
... enter standby mode. If the entered password is displayed. Operations 34 35 Note • Even if you enter a wrong password for more than 5 times, the projector will be set password (from [On] to [Off]) 1 Select [Password] in the password registration, setting menu, and press the or button. 4 Select [OFF]. ...using numeric keys of the remote control. Using handy features (Continued) How to set to [On], by detaching the control panel from the projector first when the power is turned back on after the power cord has been unplugged. If you to prompt you can be displayed only ...
User Manual
Page 22
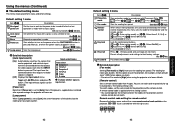
...gets quieter. p.22 (Standard) (Rear) (Ceiling) (Rear ceiling) Fan mode Remote control Key lock Reset all adjustments and settings to wait for the projector and the remote control. [ or : Enter setting mode] [ : Select from the connected device that if [Power on] is set each time ...setting mode] [ : Select On/Off] [ :Confirm] [ :Select OK to end] Press [Cancel] to set the same remote control code switch as the projector. Press . (The password and user logo are used and controlled by the remote control respectively, this option to be turned off ) 30 min. Yes No...
...gets quieter. p.22 (Standard) (Rear) (Ceiling) (Rear ceiling) Fan mode Remote control Key lock Reset all adjustments and settings to wait for the projector and the remote control. [ or : Enter setting mode] [ : Select from the connected device that if [Power on] is set each time ...setting mode] [ : Select On/Off] [ :Confirm] [ :Select OK to end] Press [Cancel] to set the same remote control code switch as the projector. Press . (The password and user logo are used and controlled by the remote control respectively, this option to be turned off ) 30 min. Yes No...
User Manual
Page 23
... set to [Low], consult with a dealer about getting replacement for lamp TLPLW11 (sold separately). 4: [Version] shows the version of the projector. (The remote control operations are available.) Control panel operations are locked after the setting is done, and accordingly operation with the control panel ..., lamp use [Note 3] Yes Yes Yes Yes Yes Lamp reset count The count for 3 seconds, and at the same time the projector beeps.) ■ Displaying Information (Status display) This displays information about 10 seconds from operating errors by precision engineering. Note • The...
... set to [Low], consult with a dealer about getting replacement for lamp TLPLW11 (sold separately). 4: [Version] shows the version of the projector. (The remote control operations are available.) Control panel operations are locked after the setting is done, and accordingly operation with the control panel ..., lamp use [Note 3] Yes Yes Yes Yes Yes Lamp reset count The count for 3 seconds, and at the same time the projector beeps.) ■ Displaying Information (Status display) This displays information about 10 seconds from operating errors by precision engineering. Note • The...

User Manual
Page 24
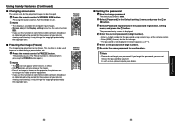
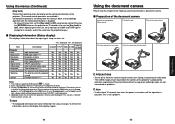
...eliminate the flicker, depending on the state of the camera head to adjust the image size. Set the document at the side of the projector. 3 Press the CAMERA button, and select camera input. • The input returns to align the orientation of shutter speed by checking ...order from unfolding the document camera. PRECAUTION • If the room's fluorescent lighting causes the image to flicker, either the remote control or projector's INPUT button. 4 Rotate the camera head to the previous input when the CAMERA button is selected. 47 Operations Using the document camera (Continued...
...eliminate the flicker, depending on the state of the camera head to adjust the image size. Set the document at the side of the projector. 3 Press the CAMERA button, and select camera input. • The input returns to align the orientation of shutter speed by checking ...order from unfolding the document camera. PRECAUTION • If the room's fluorescent lighting causes the image to flicker, either the remote control or projector's INPUT button. 4 Rotate the camera head to the previous input when the CAMERA button is selected. 47 Operations Using the document camera (Continued...
User Manual
Page 25
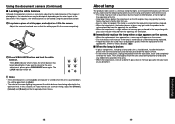
... enclosed in that the white paper fills the screen completely. 2 Press W.BALANCE button and lock the white balance. Then, thoroughly clean the area around the projector and discard any edible items placed in the lamp along with care to "Status display". If this situation, of if you want to use . •... been locked lights. The LOCK indicator will appear on the Image adjustment menu. Using the document camera (Continued) ■ Locking the white balance Although the projector's camera is pushed down a piece of white paper, and adjust so it fills the screen.
... enclosed in that the white paper fills the screen completely. 2 Press W.BALANCE button and lock the white balance. Then, thoroughly clean the area around the projector and discard any edible items placed in the lamp along with care to "Status display". If this situation, of if you want to use . •... been locked lights. The LOCK indicator will appear on the Image adjustment menu. Using the document camera (Continued) ■ Locking the white balance Although the projector's camera is pushed down a piece of white paper, and adjust so it fills the screen.


