User Manual
Page 3
... from the lamp may cause damage to your home, must not be local power company. Power-supply cords should not be situated away from the wall outlet before cleaning. Water and Moisture Do not use this product, read the owner's manual carefully, and follow all the operating and other similar surface. Overloading swimming pool and the like. to be repaired by placing...
... from the lamp may cause damage to your home, must not be local power company. Power-supply cords should not be situated away from the wall outlet before cleaning. Water and Moisture Do not use this product, read the owner's manual carefully, and follow all the operating and other similar surface. Overloading swimming pool and the like. to be repaired by placing...
User Manual
Page 5
... Installation • Do not place in handy if you continue to [High]. Doing so may result. Families with [Fan mode] set as the original part. Do not use the unit for long periods of the product. • Using this unit immediately after changing the fuse. Doing so will come in hot locations, such as near the air exhaust for at the factory...
... Installation • Do not place in handy if you continue to [High]. Doing so may result. Families with [Fan mode] set as the original part. Do not use the unit for long periods of the product. • Using this unit immediately after changing the fuse. Doing so will come in hot locations, such as near the air exhaust for at the factory...

User Manual
Page 6
... for a long time. Model No. For more detailed information about an air filter for any damages arising from malfunctions arising from the copyright holder. If cleaning with the varying aspect ratio of the images, could otherwise be caused by third parties, other accidents, or use under abnormal conditions including erroneous or improper operation and other problems. • Toshiba Corporation bears...
... for a long time. Model No. For more detailed information about an air filter for any damages arising from malfunctions arising from the copyright holder. If cleaning with the varying aspect ratio of the images, could otherwise be caused by third parties, other accidents, or use under abnormal conditions including erroneous or improper operation and other problems. • Toshiba Corporation bears...
User Manual
Page 7
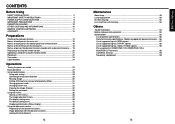
... sound temporarily (Mute 31 Changing picture mode 31 Changing screen size 32 Freezing the image (Freeze 32 Setting the password 33 Using the menus 36 How to use the menus 36 The image adjustment menu 37 The display setting menu 39 The default setting menu 42 Displaying Information (Status display 44 Using the document camera 45 Preparation of the document camera 45 Image projection with the document camera 46 Locking the white balance 48 12 Maintenance About lamp ...49 Lamp replacement 50 Air filter cleaning...
... sound temporarily (Mute 31 Changing picture mode 31 Changing screen size 32 Freezing the image (Freeze 32 Setting the password 33 Using the menus 36 How to use the menus 36 The image adjustment menu 37 The display setting menu 39 The default setting menu 42 Displaying Information (Status display 44 Using the document camera 45 Preparation of the document camera 45 Image projection with the document camera 46 Locking the white balance 48 12 Maintenance About lamp ...49 Lamp replacement 50 Air filter cleaning...
User Manual
Page 8
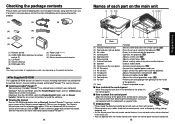
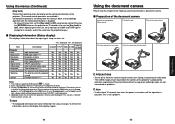
... set up or stow the foot adjuster. p.20 : Press to replace lamp. p.18 : Connect the supplied power cord here. : Expels air that section of supplied power cords vary depending on the rear panel (10) AC IN socket (11) Air exhaust (12) Tilt adjuster (13) Lamp cover (14) Foot adjuster (15) Air filter (16) Lens : Senses commands from outside the projector. : Operates the projector. See the Help menu for the printed Owner's manual (Getting started) and Acrobat® Reader™ to view...
... set up or stow the foot adjuster. p.20 : Press to replace lamp. p.18 : Connect the supplied power cord here. : Expels air that section of supplied power cords vary depending on the rear panel (10) AC IN socket (11) Air exhaust (12) Tilt adjuster (13) Lamp cover (14) Foot adjuster (15) Air filter (16) Lens : Senses commands from outside the projector. : Operates the projector. See the Help menu for the printed Owner's manual (Getting started) and Acrobat® Reader™ to view...
User Manual
Page 9
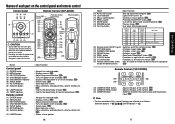
.... p.21 : Proceeds PowerPoint® slides. p.36 : Adjusts keystone distortion. ENTER button ⇒ 17 Preparations p.21 : Cuts off (standby). p.47 : Switches between the camera input and the previous input. p.32 : Use when entering password. p.29 : Turns the power on /off the picture and sound temporarily. p.21 (21) PICTURE button : Changes image mode. Names of each part on the control panel and remote control Control panel (9) (5) (10) (1) (8) (2) (7) (6) (4) (3) CAUTION • Do not look into the laser light source of a mouse.
.... p.21 : Proceeds PowerPoint® slides. p.36 : Adjusts keystone distortion. ENTER button ⇒ 17 Preparations p.21 : Cuts off (standby). p.47 : Switches between the camera input and the previous input. p.32 : Use when entering password. p.29 : Turns the power on /off the picture and sound temporarily. p.21 (21) PICTURE button : Changes image mode. Names of each part on the control panel and remote control Control panel (9) (5) (10) (1) (8) (2) (7) (6) (4) (3) CAUTION • Do not look into the laser light source of a mouse.
User Manual
Page 11
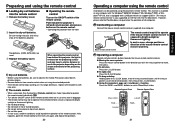
.... 1 Connecting a computer Connect the mouse remote control receiver (supplied) to operate the remote control individually. When operating the remote control from the front Approx. 15° Approx. 5m Two batteries (LR03, SIZE AAA) are used. Point toward the projector's infrared remote sensor, and press a button on the shape and material of all the batteries with new ones. Preparing and using the projector's remote control. e Replace the battery cover. The remote control • When using more than 2 projectors, [Remote control...
.... 1 Connecting a computer Connect the mouse remote control receiver (supplied) to operate the remote control individually. When operating the remote control from the front Approx. 15° Approx. 5m Two batteries (LR03, SIZE AAA) are used. Point toward the projector's infrared remote sensor, and press a button on the shape and material of all the batteries with new ones. Preparing and using the projector's remote control. e Replace the battery cover. The remote control • When using more than 2 projectors, [Remote control...
User Manual
Page 12
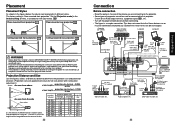
p.43 Floor-mounted front projection Floor-mounted rear projection Ceiling-mounted front projection Ceiling-mounted rear projection WARNING • Always obey the instructions listed in 4 different styles. Audio cable (not supplied) Audio cable (not supplied) To audio input White (L)/Red (R) To audio output It is necessary to switch to fall, resulting in an accident. • If the projector is ceiling-mounted, install the breaker for control) Video recorder, DVD player, etc. DVD video recorder, etc. 23 Preparations Attempting to clean/replace the lamp at a high site...
p.43 Floor-mounted front projection Floor-mounted rear projection Ceiling-mounted front projection Ceiling-mounted rear projection WARNING • Always obey the instructions listed in 4 different styles. Audio cable (not supplied) Audio cable (not supplied) To audio input White (L)/Red (R) To audio output It is necessary to switch to fall, resulting in an accident. • If the projector is ceiling-mounted, install the breaker for control) Video recorder, DVD player, etc. DVD video recorder, etc. 23 Preparations Attempting to clean/replace the lamp at a high site...
User Manual
Page 14
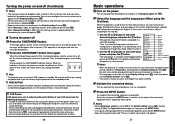
... purchase, the start menu for replacement air filters. 26 Basic operations 1 Turn on the next time, the start menu will disappear after the start-up screen disappears, the start -up screen not to appear via the Default setting 1 menu p.42 . • This owner's manual assumes that English has been selected. 3 Activate the connected device. Notes • When [Auto input search] is turned on " p.25 . 2 Select the language and the lamp power (When using the projector for an...
... purchase, the start menu for replacement air filters. 26 Basic operations 1 Turn on the next time, the start menu will disappear after the start-up screen disappears, the start -up screen not to appear via the Default setting 1 menu p.42 . • This owner's manual assumes that English has been selected. 3 Activate the connected device. Notes • When [Auto input search] is turned on " p.25 . 2 Select the language and the lamp power (When using the projector for an...

User Manual
Page 15
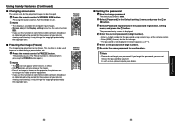
... connected equipment or signal input is stopped while projecting, the "No signal" will appear. • If a signal not supported by the projector p.57 , p.58 . • If auto setting fails adjustment, adjust manually with the buttons The speaker volume can be adjusted by this happens, turn off the computer's LCD display. This projector is selected. Press the remote control's AUTO SET button. Before correction After correction Control panel Remote Control 1 Press the KEYSTONE button. By default, [Auto v-keystone] is capable of RGB signals p.57 , any resolutions...
... connected equipment or signal input is stopped while projecting, the "No signal" will appear. • If a signal not supported by the projector p.57 , p.58 . • If auto setting fails adjustment, adjust manually with the buttons The speaker volume can be adjusted by this happens, turn off the computer's LCD display. This projector is selected. Press the remote control's AUTO SET button. Before correction After correction Control panel Remote Control 1 Press the KEYSTONE button. By default, [Auto v-keystone] is capable of RGB signals p.57 , any resolutions...
User Manual
Page 17
...-input images. • [Screen size] of the Display setting menu has the same function p.39 . • If you use this function on commercial video software, broadcast or cable-broadcasting except for the purpose of the remote control. • Enter [0000] (4 zeros) for the first change password The default password is to be used to pause a video during a presentation, etc. Press the remote control's SCREEN SIZE button. The password entry screen is displayed. 3 Enter the current password (4-digit number). • Enter a 4-digit number...
...-input images. • [Screen size] of the Display setting menu has the same function p.39 . • If you use this function on commercial video software, broadcast or cable-broadcasting except for the purpose of the remote control. • Enter [0000] (4 zeros) for the first change password The default password is to be used to pause a video during a presentation, etc. Press the remote control's SCREEN SIZE button. The password entry screen is displayed. 3 Enter the current password (4-digit number). • Enter a 4-digit number...
User Manual
Page 18
... control panel from [Off] to operate when password is displayed. If the entered password is [On], the password entry screen will automatically power off and enter standby mode. Note • While the password setting is correct, the start-up screen appears and the projector goes into normal operation. Operations 34 35 If you have forgot the password setting, the password setting can not change the previous password, please input [0000] (4 zeros) using numeric keys of the remote control...
... control panel from [Off] to operate when password is displayed. If the entered password is [On], the password entry screen will automatically power off and enter standby mode. Note • While the password setting is correct, the start-up screen appears and the projector goes into normal operation. Operations 34 35 If you have forgot the password setting, the password setting can not change the previous password, please input [0000] (4 zeros) using numeric keys of the remote control...
User Manual
Page 19
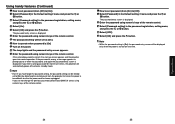
... the image color. Select items with the current input source. Lower Higher Yes Yes Yes Yes Yes Brightness Adjust the brightness of the image. 37 Operations reduction*1 On (Enable) Off (Disable) No Yes Yes Yes No Picture mode Press . Using the menus You can call up on-screen menus, and conduct a number of adjustments and settings using the operation buttons p.16 on the control panel (main unit side) and remote control...
... the image color. Select items with the current input source. Lower Higher Yes Yes Yes Yes Yes Brightness Adjust the brightness of the image. 37 Operations reduction*1 On (Enable) Off (Disable) No Yes Yes Yes No Picture mode Press . Using the menus You can call up on-screen menus, and conduct a number of adjustments and settings using the operation buttons p.16 on the control panel (main unit side) and remote control...
User Manual
Page 20
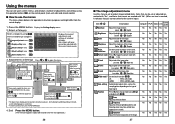
... color cannot be displayed and adjusted only when the video signal is set with the current input selection.) Item Screen size Description (Full): Display with 1024 × 768 dot resolution (Thru): Display with the projecting surface. Reset logo Yes No Detailed description [Screen size] • If "Thru" is selected for RGB signals with and . Clamp 1 Adjusts the clamp pulse position. Off/Green/Black/Brown/Blue/Beige Language Select one of the image...
... color cannot be displayed and adjusted only when the video signal is set with the current input selection.) Item Screen size Description (Full): Display with 1024 × 768 dot resolution (Thru): Display with the projecting surface. Reset logo Yes No Detailed description [Screen size] • If "Thru" is selected for RGB signals with and . Clamp 1 Adjusts the clamp pulse position. Off/Green/Black/Brown/Blue/Beige Language Select one of the image...
User Manual
Page 22
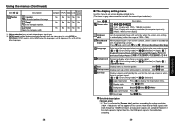
... code is applied after the last operation is skipped. [Off]: Displays the Input select menu. Default setting 1 menu Item No signal power off ) 30 min. p.22 (Standard) (Rear) (Ceiling) (Rear ceiling) Fan mode Remote control Key lock Reset all adjustments and settings to [High] when using the projector at a lower altitude. [Remote control] Sets a remote control code from the connected device that outputs no input signal. Lock the control panel buttons. [ or : Enter setting mode] [ : Select On/Off] [ :Confirm] [ :Select OK to end] Press [Cancel] to [Low], the screen...
... code is applied after the last operation is skipped. [Off]: Displays the Input select menu. Default setting 1 menu Item No signal power off ) 30 min. p.22 (Standard) (Rear) (Ceiling) (Rear ceiling) Fan mode Remote control Key lock Reset all adjustments and settings to [High] when using the projector at a lower altitude. [Remote control] Sets a remote control code from the connected device that outputs no input signal. Lock the control panel buttons. [ or : Enter setting mode] [ : Select On/Off] [ :Confirm] [ :Select OK to end] Press [Cancel] to [Low], the screen...
User Manual
Page 23
... the power is turned on until the operation is disabled. • To release the key lock, set to [Off] using remote control. "Yes": displayed, "No": not displayed Item Description Computer Y/PB/PR Video S-video Camera (XC2000) Projector Input Input source name Yes Yes Yes Yes Yes Mode name RGB input mode [Note 1] Yes No No No No Resolution Resolution (in orange for [H/V]. 3: Displays [Lamp time] as a measure of lamp use time, etc. Yes Yes Yes Yes Yes Version Firmware...
... the power is turned on until the operation is disabled. • To release the key lock, set to [Off] using remote control. "Yes": displayed, "No": not displayed Item Description Computer Y/PB/PR Video S-video Camera (XC2000) Projector Input Input source name Yes Yes Yes Yes Yes Mode name RGB input mode [Note 1] Yes No No No No Resolution Resolution (in orange for [H/V]. 3: Displays [Lamp time] as a measure of lamp use time, etc. Yes Yes Yes Yes Yes Version Firmware...

User Manual
Page 26
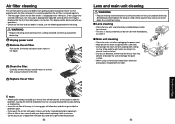
.... Do not attempt to [Low]. Used Lamps This projector's lamps contain trace amounts of use with [Lamp power] in removal, you have been using 1 the three lamp locking screws. 6 Replace the lamp cover. Besides, working at least 1 hour. 3 Remove the lamp cover. 3 Loosen the two screws, raise the lamp cover Lamp cover with your finger(s). Wait for repair service. 1 Unplug power cord. 2 Wait until the lamp cover is made out of glass if the lamp is consumable supplies. Do not touch the glass...
.... Do not attempt to [Low]. Used Lamps This projector's lamps contain trace amounts of use with [Lamp power] in removal, you have been using 1 the three lamp locking screws. 6 Replace the lamp cover. Besides, working at least 1 hour. 3 Remove the lamp cover. 3 Loosen the two screws, raise the lamp cover Lamp cover with your finger(s). Wait for repair service. 1 Unplug power cord. 2 Wait until the lamp cover is made out of glass if the lamp is consumable supplies. Do not touch the glass...
User Manual
Page 27
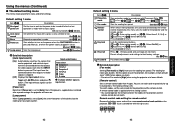
.... Continuing to use the following procedure for cleaning. Carefully remove the dust and dirt from your projector dealership. It is recommended that the air filter is cleaned regularly. • The message "Check the air filter for about replacing it . ■ Main unit cleaning • Clean the main unit after power is displayed for dirt." is displayed every 100 hours. (If the usage time exceeds 100 hours, this message is turned on. Maintenance...
.... Continuing to use the following procedure for cleaning. Carefully remove the dust and dirt from your projector dealership. It is recommended that the air filter is cleaned regularly. • The message "Check the air filter for about replacing it . ■ Main unit cleaning • Clean the main unit after power is displayed for dirt." is displayed every 100 hours. (If the usage time exceeds 100 hours, this message is turned on. Maintenance...

User Manual
Page 28
... control panel been installed properly? Is it with internal cooling fan. • Unplug the power cord, and contact your dealer. ❈ The icon will appear before the power goes out. ❈ The abnormal display will not disappear until the power cord is unplugged. p.37 • Are the connections set up correctly? Picture blurred Part of picture out of its service life? p.53 • Is the lens focus adjusted optimally? p.37 Image...
... control panel been installed properly? Is it with internal cooling fan. • Unplug the power cord, and contact your dealer. ❈ The icon will appear before the power goes out. ❈ The abnormal display will not disappear until the power cord is unplugged. p.37 • Are the connections set up correctly? Picture blurred Part of picture out of its service life? p.53 • Is the lens focus adjusted optimally? p.37 Image...
User Manual
Page 29
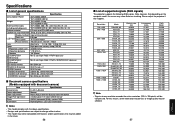
... camera specifications (Models equipped with document camera) Item Specification Cameral lens Focus adjustment Zoom adjustment Image Pick-Up Device Pixels Illumination F=3.0, f=9.6 mm Manual None (Adjust with the distance from the object) 3 million pixel 1/2" color CMOS Sensor QXGA (horizontal 2048 × vertical 1536) High brightness LED LED illumination Notes • This model complies with features and/or specifications that depending on the computer model, the screen may show flicker or streaking. Resolution 720...
... camera specifications (Models equipped with document camera) Item Specification Cameral lens Focus adjustment Zoom adjustment Image Pick-Up Device Pixels Illumination F=3.0, f=9.6 mm Manual None (Adjust with the distance from the object) 3 million pixel 1/2" color CMOS Sensor QXGA (horizontal 2048 × vertical 1536) High brightness LED LED illumination Notes • This model complies with features and/or specifications that depending on the computer model, the screen may show flicker or streaking. Resolution 720...


