
User Manual
Page 5
... Materials The original shipping carton and packing materials will dirty the LCD panel and other optical parts, shortening their lives, and darkening the screen. • Do not place slantwise in that situation, the malfunction may cause condensation on the crucial internal parts. If this happens, ... change in temperature. To prevent the unit from possible damage, do not use it away from the TV or radio. • Moving the projector from a cold location to wait until the condensation naturally disappears. • In a high altitude location where air is thin, cooling efficiency of...
... Materials The original shipping carton and packing materials will dirty the LCD panel and other optical parts, shortening their lives, and darkening the screen. • Do not place slantwise in that situation, the malfunction may cause condensation on the crucial internal parts. If this happens, ... change in temperature. To prevent the unit from possible damage, do not use it away from the TV or radio. • Moving the projector from a cold location to wait until the condensation naturally disappears. • In a high altitude location where air is thin, cooling efficiency of...

User Manual
Page 8
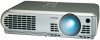
...; Reader™ to replace lamp. p.17 (2) Lens : Projects expanded image. (3) Focusing ring : Adjusts screen focus. p.23 (6) Lamp cover : Remove to view the manual. p.23 (10) Control panel : Operates the projector. Acrobat® Reader™ launches, and the menu screen of each part on a bookmark title to stow the foot adjuster. Click on the...
...; Reader™ to replace lamp. p.17 (2) Lens : Projects expanded image. (3) Focusing ring : Adjusts screen focus. p.23 (6) Lamp cover : Remove to view the manual. p.23 (10) Control panel : Operates the projector. Acrobat® Reader™ launches, and the menu screen of each part on a bookmark title to stow the foot adjuster. Click on the...
User Manual
Page 9
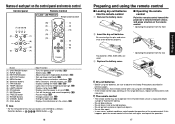
...p.26 : Pauses image. MENU button ⇒ 16 Preparing and using the batteries, be sure to operate if the infrared remote sensor is on the screen. p.20 : Selects input. p.25 : Sets up image and mode. p.29 : Displays cooling fan mode. p.28 : Displays the information on...° Approx. 5m Dry-cell batteries • Before using the remote control I Operating the remote control Point the remote control toward the projector's infrared remote sensor, and press a button on the control panel and remote control Control panel Remote Control CLASS 1 LED PRODUCT Remote control transmitter...
...p.26 : Pauses image. MENU button ⇒ 16 Preparing and using the batteries, be sure to operate if the infrared remote sensor is on the screen. p.20 : Selects input. p.25 : Sets up image and mode. p.29 : Displays cooling fan mode. p.28 : Displays the information on...° Approx. 5m Dry-cell batteries • Before using the remote control I Operating the remote control Point the remote control toward the projector's infrared remote sensor, and press a button on the control panel and remote control Control panel Remote Control CLASS 1 LED PRODUCT Remote control transmitter...

User Manual
Page 10
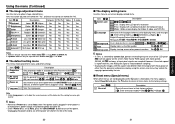
... AC IN CAUTION • Always obey the instructions listed in an accident. • If the projector is the distance (m) between the lens and the screen, and corresponds to a range of 1.52 m to 11.59 m. 18 screen size (cm) projection distance a (m) 40 (102) 1.52 60 (152) 2.29 80 (...8226; Read the owner's manual of the device to connect to the projector. • Some types of both devices before connecting. • The figure below to determine the screen size and projection distance. (Screen sizes are approximate values for input terminal. 19 Preparations Computer Audio cable (...
... AC IN CAUTION • Always obey the instructions listed in an accident. • If the projector is the distance (m) between the lens and the screen, and corresponds to a range of 1.52 m to 11.59 m. 18 screen size (cm) projection distance a (m) 40 (102) 1.52 60 (152) 2.29 80 (...8226; Read the owner's manual of the device to connect to the projector. • Some types of both devices before connecting. • The figure below to determine the screen size and projection distance. (Screen sizes are approximate values for input terminal. 19 Preparations Computer Audio cable (...

User Manual
Page 11
... . KEYSTONE AUTO SET ZOOM- If you will shorten the life of the LCD panel and causing malfunctions. However, please unplug the power cord if the projector locks up screen will be turned back on. This message will rise, shortening the lifetime of the lamp. If it back in use the... ON/STANDBY button again. In order to prolong the lifetime of the LCD panel, always turn off the power while the projector is running or being cooled will come on the screen, confirming that the LAMP indicator is completed FAN TEMP LAMP ON FAN TEMP LAMP ON FAN TEMP LAMP ON (Green...
... . KEYSTONE AUTO SET ZOOM- If you will shorten the life of the LCD panel and causing malfunctions. However, please unplug the power cord if the projector locks up screen will be turned back on. This message will rise, shortening the lifetime of the lamp. If it back in use the... ON/STANDBY button again. In order to prolong the lifetime of the LCD panel, always turn off the power while the projector is running or being cooled will come on the screen, confirming that the LAMP indicator is completed FAN TEMP LAMP ON FAN TEMP LAMP ON FAN TEMP LAMP ON (Green...

User Manual
Page 12
...front of use the tilt adjuster. Computer Y/PB/PR Video S-video 22 5 Projector placement angle adjustments The placement angle and the height of the lamp depends on the panel. Basic operations 1 Turn on the screen. w Use the buttons to lock the position. Release the button to select ...the desired input, and press the button. q Move the projector back and forth to adjust the focus. 7 Adjusting the volume with the...
...front of use the tilt adjuster. Computer Y/PB/PR Video S-video 22 5 Projector placement angle adjustments The placement angle and the height of the lamp depends on the panel. Basic operations 1 Turn on the screen. w Use the buttons to lock the position. Release the button to select ...the desired input, and press the button. q Move the projector back and forth to adjust the focus. 7 Adjusting the volume with the...

User Manual
Page 13
...projection angle, the picture will undergo keystone (trapezoidal) distortion. Signal format [ : Enter to setting mode] [ : Select one of correcting this projector, but it is projected with this keystone distortion. The Keystone menu appears. 2 Use the buttons for each type of the followings] [Apply: ...back to change the shape of images, some degradation.) 1 Press the ZOOM - Item Keystone Description Shrink button of the screen Shrink top of the screen Notes • Depending on the amount of keystone adjustment and the content of the menus. Using handy features I Using ...
...projection angle, the picture will undergo keystone (trapezoidal) distortion. Signal format [ : Enter to setting mode] [ : Select one of correcting this projector, but it is projected with this keystone distortion. The Keystone menu appears. 2 Use the buttons for each type of the followings] [Apply: ...back to change the shape of images, some degradation.) 1 Press the ZOOM - Item Keystone Description Shrink button of the screen Shrink top of the screen Notes • Depending on the amount of keystone adjustment and the content of the menus. Using handy features I Using ...

User Manual
Page 15
...again. • Conducting another operation while information is being displayed dismisses the display. 28 Using the menus You can call up on-screen menus, and conduct a number of when the lamp should be replaced. (Cannot be adjusted/set by using . If the power cable...+ KEYSTONE AUTOSET MUTE FREEZE RESIZE control to serve the same purpose) again to for [H/V]. 4: Displays [Lamp time] as a counter of the projector's internal control program. CANCEL INPUT "Yes": displayed, "No": not displayed Item Description Computer Y/PB/PR Input Input source name Yes Yes RGB signal...
...again. • Conducting another operation while information is being displayed dismisses the display. 28 Using the menus You can call up on-screen menus, and conduct a number of when the lamp should be replaced. (Cannot be adjusted/set by using . If the power cable...+ KEYSTONE AUTOSET MUTE FREEZE RESIZE control to serve the same purpose) again to for [H/V]. 4: Displays [Lamp time] as a counter of the projector's internal control program. CANCEL INPUT "Yes": displayed, "No": not displayed Item Description Computer Y/PB/PR Input Input source name Yes Yes RGB signal...
User Manual
Page 16
... input stops: Off (not turned off) 1 min 2 min ... 60 min Sets whether to turn off the power will not appear on the screen. Item Reset all Description Reset all menu items to the factory settings. Item Description Computer Contrast Lower Higher Yes Brightness Darker Brighter Yes Color Lighter...) Language Select one of the languages below to use for screen size, portions exceeding the pixel count of the LCD panel p.37 will shorten the life of time to wait until turning off the power after a power outage, the projector power will come on. • Even if Power on ...
... input stops: Off (not turned off) 1 min 2 min ... 60 min Sets whether to turn off the power will not appear on the screen. Item Reset all Description Reset all menu items to the factory settings. Item Description Computer Contrast Lower Higher Yes Brightness Darker Brighter Yes Color Lighter...) Language Select one of the languages below to use for screen size, portions exceeding the pixel count of the LCD panel p.37 will shorten the life of time to wait until turning off the power after a power outage, the projector power will come on. • Even if Power on ...

User Manual
Page 19
...functioning properly? p.22 • Is there something is dark • Are the brightness or contrast adjustments off? p.18 • Is the projector's screen placement angle tilted too far? p.18 • Are the sharpness or sampling phase adjustments off ? p.30 • Is the lamp nearing ... × D) (including protruding parts) Cabinet material* PC+ABS resin and ABS resin Conditions for instance the video tape? relative humidity: 30% to the projector? • Is the lamp cover loose? p.22 • Is the mute function on ? p.24 p.30 Image is wrong, check the followings before...
...functioning properly? p.22 • Is there something is dark • Are the brightness or contrast adjustments off? p.18 • Is the projector's screen placement angle tilted too far? p.18 • Are the sharpness or sampling phase adjustments off ? p.30 • Is the lamp nearing ... × D) (including protruding parts) Cabinet material* PC+ABS resin and ABS resin Conditions for instance the video tape? relative humidity: 30% to the projector? • Is the lamp cover loose? p.22 • Is the mute function on ? p.24 p.30 Image is wrong, check the followings before...

User Manual
Page 20
Specifications (Continued) I Pin assignment of supported signals (RGB signals) This projector supports the following RGB signals. For this happens. (Press the AUTO SET button, and adjust automatically or manually. During RGB input 1 Video signal (R) 2 Video signal ...level (Pos/neg polarity) • Y/PB/PR input Y signal: PB/PR signals: 1.0V (p-p) 75 Ω 0.7V (p-p) 75 Ω Pin Pin description No. Please adjust the projector if this reason, some information may be lost, or image quality may show flicker or streaking. Note, however, that depending on the computer model, the...
Specifications (Continued) I Pin assignment of supported signals (RGB signals) This projector supports the following RGB signals. For this happens. (Press the AUTO SET button, and adjust automatically or manually. During RGB input 1 Video signal (R) 2 Video signal ...level (Pos/neg polarity) • Y/PB/PR input Y signal: PB/PR signals: 1.0V (p-p) 75 Ω 0.7V (p-p) 75 Ω Pin Pin description No. Please adjust the projector if this reason, some information may be lost, or image quality may show flicker or streaking. Note, however, that depending on the computer model, the...


