User Guide
Page 31
Contents 31 Turning on the power 50 Setting up your software 51 Registering your computer with Toshiba 51 Adding optional external devices 51 Adding memory (optional 52 Recovering the Internal Storage Drive 52 Recovering to out-of-box state (... recovery method 54 Recovering to a custom size partition 56 Recovering without changing the internal storage drive partitions 59 Creating recovery DVDs/media 61 Restoring from recovery DVDs/media 64 Erasing the Internal Storage Drive 66 Checking the internal storage drive operating status 67 Installing drivers and applications 68 Using...
Contents 31 Turning on the power 50 Setting up your software 51 Registering your computer with Toshiba 51 Adding optional external devices 51 Adding memory (optional 52 Recovering the Internal Storage Drive 52 Recovering to out-of-box state (... recovery method 54 Recovering to a custom size partition 56 Recovering without changing the internal storage drive partitions 59 Creating recovery DVDs/media 61 Restoring from recovery DVDs/media 64 Erasing the Internal Storage Drive 66 Checking the internal storage drive operating status 67 Installing drivers and applications 68 Using...
User Guide
Page 32
...; Explorer 96 Starting a program using the Search programs and files field 97 Saving your work 98 Printing your work 99 Backing up your work 100 Restoring your work 101 Using the optical disc drive 101 Optical disc drive components 102 Media control buttons 103 Inserting an optical disc 103 Playing an...
...; Explorer 96 Starting a program using the Search programs and files field 97 Saving your work 98 Printing your work 99 Backing up your work 100 Restoring your work 101 Using the optical disc drive 101 Optical disc drive components 102 Media control buttons 103 Inserting an optical disc 103 Playing an...
User Guide
Page 52
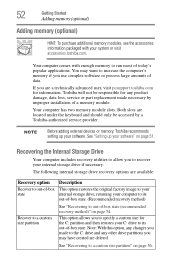
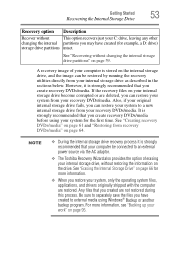
...utilities to allow you are located under the keyboard and should only be responsible for the C: partition and then restores your internal storage drive if necessary. Toshiba will not be accessed by improper installation of a memory module. See "Setting up your software" on page 56... created are available: Recovery option Recover to out-of-box state Description This option restores the original factory image to your internal storage drive, returning your system or visit accessories.toshiba.com. Your computer has two memory module slots. 52 Getting Started Adding memory (optional...
...utilities to allow you are located under the keyboard and should only be responsible for the C: partition and then restores your internal storage drive if necessary. Toshiba will not be accessed by improper installation of a memory module. See "Setting up your software" on page 56... created are available: Recovery option Recover to out-of-box state Description This option restores the original factory image to your internal storage drive, returning your system or visit accessories.toshiba.com. Your computer has two memory module slots. 52 Getting Started Adding memory (optional...
User Guide
Page 53
... storage drive partitions" on page 66 for more information, see "Backing up your computer is strongly recommended that your computer be restored by running the recovery utilities directly from your internal storage drive as described in the sections below. Be sure to separately save ...power source via the AC adaptor. ❖ The Toshiba Recovery Wizard also provides the option of your work" on your internal storage drive become corrupted or are not restored during this process. For more information. ❖ When you restore your C: drive, leaving any other changing the ...
... storage drive partitions" on page 66 for more information, see "Backing up your computer is strongly recommended that your computer be restored by running the recovery utilities directly from your internal storage drive as described in the sections below. Be sure to separately save ...power source via the AC adaptor. ❖ The Toshiba Recovery Wizard also provides the option of your work" on your internal storage drive become corrupted or are not restored during this process. For more information. ❖ When you restore your C: drive, leaving any other changing the ...
User Guide
Page 54
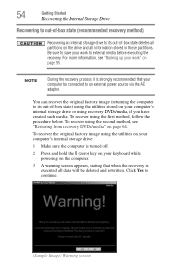
... be connected to an external power source via the AC adaptor. To recover using the first method, follow the procedure below. For more information, see "Restoring from recovery DVDs/media" on page 95. Be sure to save your work to external media before executing the recovery. NOTE During the recovery process...
... be connected to an external power source via the AC adaptor. To recover using the first method, follow the procedure below. For more information, see "Restoring from recovery DVDs/media" on page 95. Be sure to save your work to external media before executing the recovery. NOTE During the recovery process...
User Guide
Page 56
...keyboard to a custom size partition deletes all partitions on the drive and all data will be connected to external media before proceeding (see "Restoring from recovery DVDs/media" on your computer's internal storage drive: 1 Make sure the computer is complete, a message displays indicating that ... to begin the recovery. 56 Getting Started Recovering the Internal Storage Drive 6 Click Next. The "Recover to a custom size partition" option restores your work to external media before executing the recovery. If not, skip to specify the size for the C: partition. You can resize and...
...keyboard to a custom size partition deletes all partitions on the drive and all data will be connected to external media before proceeding (see "Restoring from recovery DVDs/media" on your computer's internal storage drive: 1 Make sure the computer is complete, a message displays indicating that ... to begin the recovery. 56 Getting Started Recovering the Internal Storage Drive 6 Click Next. The "Recover to a custom size partition" option restores your work to external media before executing the recovery. If not, skip to specify the size for the C: partition. You can resize and...
User Guide
Page 59
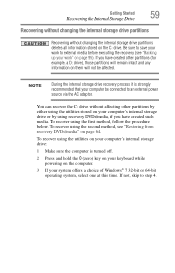
... your work to step 4. To recover using the first method, follow the procedure below. If not, skip to external media before executing the recovery (see "Restoring from recovery DVDs/media" on your computer's internal storage drive: 1 Make sure the computer is strongly recommended that your system offers a choice of Windows®...
... your work to step 4. To recover using the first method, follow the procedure below. If not, skip to external media before executing the recovery (see "Restoring from recovery DVDs/media" on your computer's internal storage drive: 1 Make sure the computer is strongly recommended that your system offers a choice of Windows®...
User Guide
Page 61
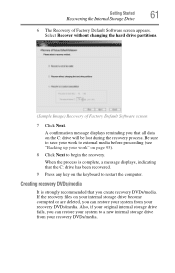
...reminding you that the C: drive has been recovered. 9 Press any key on your internal storage drive become corrupted or are deleted, you can restore your system from your recovery DVDs/media. If the recovery files on the keyboard to begin the recovery. Be sure to save your work ...to external media before proceeding (see "Backing up your recovery DVDs/media. Also, if your original internal storage drive fails, you can restore your system to a new internal storage drive from your work" on the C: drive will be lost during the recovery process. Select Recover without ...
...reminding you that the C: drive has been recovered. 9 Press any key on your internal storage drive become corrupted or are deleted, you can restore your system from your recovery DVDs/media. If the recovery files on the keyboard to begin the recovery. Be sure to save your work ...to external media before proceeding (see "Backing up your recovery DVDs/media. Also, if your original internal storage drive fails, you can restore your system to a new internal storage drive from your work" on the C: drive will be lost during the recovery process. Select Recover without ...
User Guide
Page 62
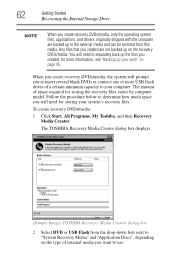
.... The amount of space required for more USB flash drives of external media you created are backed up to the external media and can be restored from the drop-down lists next to "System Recovery Media" and "Application Discs", depending on the type of a certain minimum capacity to your ... shipped with the computer are not backed up on the recovery DVDs/media. To create recovery DVDs/media: 1 Click Start, All Programs, My Toshiba, and then Recovery Media Creator. 62 Getting Started Recovering the Internal Storage Drive NOTE When you to insert several blank DVDs or connect one or...
.... The amount of space required for more USB flash drives of external media you created are backed up to the external media and can be restored from the drop-down lists next to "System Recovery Media" and "Application Discs", depending on the type of a certain minimum capacity to your ... shipped with the computer are not backed up on the recovery DVDs/media. To create recovery DVDs/media: 1 Click Start, All Programs, My Toshiba, and then Recovery Media Creator. 62 Getting Started Recovering the Internal Storage Drive NOTE When you to insert several blank DVDs or connect one or...
User Guide
Page 63
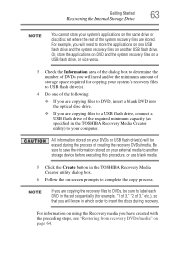
...flash drive and the system recovery files on another storage device before executing this procedure, or use blank media. 5 Click the Create button in the TOSHIBA Recovery Media Creator utility dialog box. 6 Follow the on a USB flash drive, or vice versa. 3 Check the Information area of the dialog...screen prompts to DVD, insert a blank DVD into the optical disc drive. ❖ If you have created with the preceding steps, see "Restoring from recovery DVDs/media" on your computer. All information stored on using the Recovery media you are copying files to complete the copy process. For...
...flash drive and the system recovery files on another storage device before executing this procedure, or use blank media. 5 Click the Create button in the TOSHIBA Recovery Media Creator utility dialog box. 6 Follow the on a USB flash drive, or vice versa. 3 Check the Information area of the dialog...screen prompts to DVD, insert a blank DVD into the optical disc drive. ❖ If you have created with the preceding steps, see "Restoring from recovery DVDs/media" on your computer. All information stored on using the Recovery media you are copying files to complete the copy process. For...
User Guide
Page 64
...into your optical disc drive. Any files that your recovery DVDs/media. Consult the documentation that came with the computer are not restored during this process. For more information on these options, see "Backing up your system from such media, if necessary. 64 Getting... Started Recovering the Internal Storage Drive Restoring from recovery DVDs/media The recovery process deletes information stored on page 95. For instructions on creating recovery DVDs/media, see "Backing...
...into your optical disc drive. Any files that your recovery DVDs/media. Consult the documentation that came with the computer are not restored during this process. For more information on these options, see "Backing up your system from such media, if necessary. 64 Getting... Started Recovering the Internal Storage Drive Restoring from recovery DVDs/media The recovery process deletes information stored on page 95. For instructions on creating recovery DVDs/media, see "Backing...
User Guide
Page 66
... Getting Started Erasing the Internal Storage Drive Erasing the Internal Storage Drive Erasing the internal storage drive will delete all data on page 52. Select Toshiba Recovery Wizard, and then click Next. 2 Select Erase the hard disk and then click Next. 3 Choose one of the recovery options instead ... Turn off your data to your internal storage drive: Press and hold the 0 (zero) key while powering on the computer. Be sure to restore the internal storage drive, use one of media you want to create recovery DVDs/media and back up your computer. NOTE If you are using...
... Getting Started Erasing the Internal Storage Drive Erasing the Internal Storage Drive Erasing the internal storage drive will delete all data on page 52. Select Toshiba Recovery Wizard, and then click Next. 2 Select Erase the hard disk and then click Next. 3 Choose one of the recovery options instead ... Turn off your data to your internal storage drive: Press and hold the 0 (zero) key while powering on the computer. Be sure to restore the internal storage drive, use one of media you want to create recovery DVDs/media and back up your computer. NOTE If you are using...
User Guide
Page 67
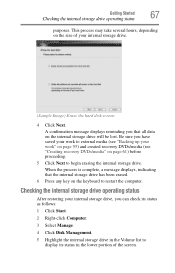
... on the size of the screen. Getting Started Checking the internal storage drive operating status 67 purposes. Checking the internal storage drive operating status After restoring your internal storage drive, you that the internal storage drive has been erased. 6 Press any key on page 95) and created recovery DVDs/media (see...
... on the size of the screen. Getting Started Checking the internal storage drive operating status 67 purposes. Checking the internal storage drive operating status After restoring your internal storage drive, you that the internal storage drive has been erased. 6 Press any key on page 95) and created recovery DVDs/media (see...
User Guide
Page 101
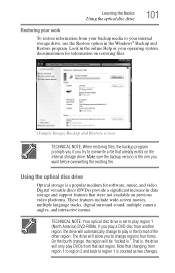
...back to region 1 is set to play region 1 (North America) DVD-ROMs. If you try to your internal storage drive, use the Restore option in the online Help or your operating system documentation for software, music, and video. Using the optical disc drive Optical storage is a ...menus. TECHNICAL NOTE: Your optical disc drive is counted as two changes. Learning the Basics Using the optical disc drive 101 Restoring your work To restore information from another region, the drive will automatically change regions four times. Digital versatile discs (DVDs) provide a significant increase in...
...back to region 1 is set to play region 1 (North America) DVD-ROMs. If you try to your internal storage drive, use the Restore option in the online Help or your operating system documentation for software, music, and video. Using the optical disc drive Optical storage is a ...menus. TECHNICAL NOTE: Your optical disc drive is counted as two changes. Learning the Basics Using the optical disc drive 101 Restoring your work To restore information from another region, the drive will automatically change regions four times. Digital versatile discs (DVDs) provide a significant increase in...
User Guide
Page 165
... the battery, leave the computer plugged into a live wall outlet for long periods of the desktop to display the Shut down options, and then select Restore to warn you when the battery is a diskette in the drive, remove it is not accessing the internal storage drive or the optional external diskette...
... the battery, leave the computer plugged into a live wall outlet for long periods of the desktop to display the Shut down options, and then select Restore to warn you when the battery is a diskette in the drive, remove it is not accessing the internal storage drive or the optional external diskette...

User Guide
Page 168
... the address with Command Prompt ❖ Enable Boot Logging ❖ Enable low-resolution video (640 x 480) ❖ Last Known Good Configuration (advanced) ❖ Directory Services Restore Mode ❖ Debugging Mode ❖ Disable automatic restart on system failure ❖ Disable Driver Signature Enforcement ❖ Start Windows® Normally When you separated the...
... the address with Command Prompt ❖ Enable Boot Logging ❖ Enable low-resolution video (640 x 480) ❖ Last Known Good Configuration (advanced) ❖ Directory Services Restore Mode ❖ Debugging Mode ❖ Disable automatic restart on system failure ❖ Disable Driver Signature Enforcement ❖ Start Windows® Normally When you separated the...

User Guide
Page 182
...effective than uninstalling the hardware or software, which often leaves behind unwanted files and settings. The Windows® operating system creates the restore point, automatically stamps it was successfully created. 5 Click Close. It is descriptive enough to the installation. 182 If Something Goes Wrong... Create. Take advantage of the System Properties window appears. 3 Click Create... 4 In the input field, enter a name that the restore point was in just prior to be easily understood in the Windows® operating system The Windows® operating system offers some new ...
...effective than uninstalling the hardware or software, which often leaves behind unwanted files and settings. The Windows® operating system creates the restore point, automatically stamps it was successfully created. 5 Click Close. It is descriptive enough to the installation. 182 If Something Goes Wrong... Create. Take advantage of the System Properties window appears. 3 Click Create... 4 In the input field, enter a name that the restore point was in just prior to be easily understood in the Windows® operating system The Windows® operating system offers some new ...
User Guide
Page 183
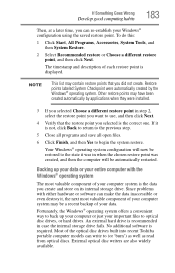
... with either hardware or software can write to optical disc drives, or hard drives. Most of the optical disc drives built into recent Toshiba portable computer models can make the data inaccessible or even destroy it, the next most valuable component of your computer system is the data... you did not create. An external hard drive is recommended in when the chosen restore point was created, and then the computer will now be a recent backup of your data. No additional software is displayed. External optical disc...
... with either hardware or software can write to optical disc drives, or hard drives. Most of the optical disc drives built into recent Toshiba portable computer models can make the data inaccessible or even destroy it, the next most valuable component of your computer system is the data... you did not create. An external hard drive is recommended in when the chosen restore point was created, and then the computer will now be a recent backup of your data. No additional software is displayed. External optical disc...
User Guide
Page 184
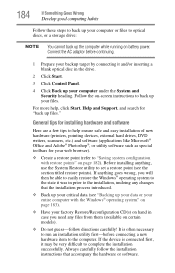
...the device is often necessary to run an installation utility first-before continuing. 1 Prepare your backup target by connecting it may be able to easily restore the Windows® operating system to the state it was in the drive. 2 Click Start. 3 Click Control Panel. 4 Click Back up ...the installation, undoing any files from them (available on battery power. If anything , use the System Restore utility to set a restore point (see "Backing up your data or your entire computer with restore points" on -screen instructions to back up your files. For more help ensure safe and easy ...
...the device is often necessary to run an installation utility first-before continuing. 1 Prepare your backup target by connecting it may be able to easily restore the Windows® operating system to the state it was in the drive. 2 Click Start. 3 Click Control Panel. 4 Click Back up ...the installation, undoing any files from them (available on battery power. If anything , use the System Restore utility to set a restore point (see "Backing up your data or your entire computer with restore points" on -screen instructions to back up your files. For more help ensure safe and easy ...

User Guide
Page 185
... starting at the current battery power level, or, if battery power is running low or is completed, and will clean up critical data. 2 Create a restore point. 3 Install one installation at step 1 if any new problems. For best results, follow this feature are attempting to charge a device without an AC... step 2 if no critical data has changed. This will ensure that supports the USB Sleep and Charge function. Lower the limit in the TOSHIBA Sleep and Charge Utility, if your computer system, install just one charging mode. This will make it much easier to your critical data has...
... starting at the current battery power level, or, if battery power is running low or is completed, and will clean up critical data. 2 Create a restore point. 3 Install one installation at step 1 if any new problems. For best results, follow this feature are attempting to charge a device without an AC... step 2 if no critical data has changed. This will ensure that supports the USB Sleep and Charge function. Lower the limit in the TOSHIBA Sleep and Charge Utility, if your computer system, install just one charging mode. This will make it much easier to your critical data has...


