Owner's Manual - English
Page 2
..., DO NOT REMOVE COVER (OR BACK). NEC, which provides guidelines for wall mounting this television could result in serious bodily injury and/or property damage. Follow the manufacturer's recommendations for the safe installation and use of your LCD TV, please read and understand all cords and cables connected to the flat panel displays are inappropriately situated on dressers, bookcases, shelves, desks, speakers, chests...
..., DO NOT REMOVE COVER (OR BACK). NEC, which provides guidelines for wall mounting this television could result in serious bodily injury and/or property damage. Follow the manufacturer's recommendations for the safe installation and use of your LCD TV, please read and understand all cords and cables connected to the flat panel displays are inappropriately situated on dressers, bookcases, shelves, desks, speakers, chests...
Owner's Manual - English
Page 3
...) Only use the polarized plug with the manufacturer's instructions. 8) Do not install near water. 6) Clean only with dry cloth. 7) Do not block any time it can support the weight of Wide blade the polarized or grounding type plug. fully insert. 16) WARNING: To prevent the spread of time. 14) Refer all times. The TV may void: a) the warranty, and b) the user's authority to operate this...
...) Only use the polarized plug with the manufacturer's instructions. 8) Do not install near water. 6) Clean only with dry cloth. 7) Do not block any time it can support the weight of Wide blade the polarized or grounding type plug. fully insert. 16) WARNING: To prevent the spread of time. 14) Refer all times. The TV may void: a) the warranty, and b) the user's authority to operate this...
Owner's Manual - English
Page 4
... TOSHIBA TV, follow the instructions in item 33 on the LCD screen. Never locate the antenna near overhead power lines or other place with poor ventilation. Never spray volatile compounds such as insecticide on /off switch, it is thundering, do not touch the connecting cables or apparatus. 36) For added protection of current is turned off . When selecting a location for long periods of time...
... TOSHIBA TV, follow the instructions in item 33 on the LCD screen. Never locate the antenna near overhead power lines or other place with poor ventilation. Never spray volatile compounds such as insecticide on /off switch, it is thundering, do not touch the connecting cables or apparatus. 36) For added protection of current is turned off . When selecting a location for long periods of time...
Owner's Manual - English
Page 5
..., contact your LCD TV on a flat, cushioned surface such as described in the LCD panel contain a small amount of the TV. To Display your LCD TV using a Wall Bracket: If you have removed all four screws holding the pedestal stand in this manual to a Toshiba Authorized Service Center. 42) If you decide to wall mount your LCD TV, always use only replacement parts specified by the approved method for your wall bracket. Refer all servicing not specified in...
..., contact your LCD TV on a flat, cushioned surface such as described in the LCD panel contain a small amount of the TV. To Display your LCD TV using a Wall Bracket: If you have removed all four screws holding the pedestal stand in this manual to a Toshiba Authorized Service Center. 42) If you decide to wall mount your LCD TV, always use only replacement parts specified by the approved method for your wall bracket. Refer all servicing not specified in...
Owner's Manual - English
Page 6
... (Part 15): The Toshiba 40XV645U, 46XV645U and 52XV645U Televisions comply with the limits for a Class B digital device, pursuant to Part 15 of the FCC rules. Important notes about your LCD TV The following measures: • Reorient or relocate the receiving antenna. • Increase the separation between the equipment and the receiver. • Connect the equipment into an outlet on the screen if a fixed, non...
... (Part 15): The Toshiba 40XV645U, 46XV645U and 52XV645U Televisions comply with the limits for a Class B digital device, pursuant to Part 15 of the FCC rules. Important notes about your LCD TV The following measures: • Reorient or relocate the receiving antenna. • Increase the separation between the equipment and the receiver. • Connect the equipment into an outlet on the screen if a fixed, non...

Owner's Manual - English
Page 7
... installing, setting up, and using your new TV 9 TV front and side panel controls and connections . . . . 10 TV back panel connections 11 Chapter 2: Connecting your TV 12 Overview of cable types 12 About the connection illustrations 12 Connecting a VCR (or a VCR with S-video) and antenna, Cable TV or Camcorder 13 Connecting a DVD player with ColorStream® (component video), a VCR, and a satellite receiver 14 Connecting an HDMI™ or DVI device to the HDMI input 15 REGZA-LINK® connection 16 Connecting a digital audio system 17 Connecting...
... installing, setting up, and using your new TV 9 TV front and side panel controls and connections . . . . 10 TV back panel connections 11 Chapter 2: Connecting your TV 12 Overview of cable types 12 About the connection illustrations 12 Connecting a VCR (or a VCR with S-video) and antenna, Cable TV or Camcorder 13 Connecting a DVD player with ColorStream® (component video), a VCR, and a satellite receiver 14 Connecting an HDMI™ or DVI device to the HDMI input 15 REGZA-LINK® connection 16 Connecting a digital audio system 17 Connecting...
Owner's Manual - English
Page 9
... connecting all cables and devices, plug in any power cords until AFTER you have connected all cables and devices to your TV. 3 BEFORE connecting cables or devices to enhance contrast while you turn on ambient light conditions and input signal content (- page 55). •Expert Mode allows detailed calibration with Dolby® Digital optical output format (- page 53). •AutoView™ allows you to automatically adjust picture settings based on the TV, the Initial Setup menu appears...
... connecting all cables and devices, plug in any power cords until AFTER you have connected all cables and devices to your TV. 3 BEFORE connecting cables or devices to enhance contrast while you turn on ambient light conditions and input signal content (- page 55). •Expert Mode allows detailed calibration with Dolby® Digital optical output format (- page 53). •AutoView™ allows you to automatically adjust picture settings based on the TV, the Initial Setup menu appears...
Owner's Manual - English
Page 10
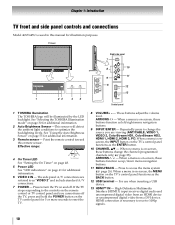
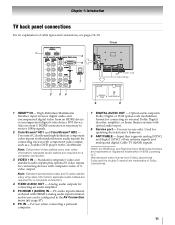
... receive 1080p signals. 10 When a menu is on-screen, the MENU button on -screen, these buttons function as the BACK button. 12 USB terminal - The side panel A/V connections are viewing (ANT/CABLE, VIDEO 1, VIDEO 2, ColorStream HD1, ColorStream HD2, HDMI 1, HDMI 2, HDMI 3, PC).When a menu is onscreen, the INPUT button on the TV control panel for 5 or more seconds to turn off . ARROWS U u - Point the remote control toward this manual for additional information. 2 Auto Brightness Sensor -This sensor will be illuminated by the LED...
... receive 1080p signals. 10 When a menu is on-screen, the MENU button on -screen, these buttons function as the BACK button. 12 USB terminal - The side panel A/V connections are viewing (ANT/CABLE, VIDEO 1, VIDEO 2, ColorStream HD1, ColorStream HD2, HDMI 1, HDMI 2, HDMI 3, PC).When a menu is onscreen, the INPUT button on the TV control panel for 5 or more seconds to turn off . ARROWS U u - Point the remote control toward this manual for additional information. 2 Auto Brightness Sensor -This sensor will be illuminated by the LED...
Owner's Manual - English
Page 11
... component video output, such as a Toshiba DVD player with optical audio input. 8 Service port - Standard (composite) video and standard audio inputs plus optional S-video inputs for a complete connection. 3 VIDEO 1 IN - PC audio input terminal is necessary to receive 1080p signals. 2 ColorStream® HD1 and ColorStream® HD2 - For service use when connecting a personal computer. 7 DIGITAL AUDIO OUT - separate audio cables are required for connecting devices with HDMI 1 analog audio input terminal, and its use can be configured in Dolby Digital or PCM (pulse-code modulation...
... component video output, such as a Toshiba DVD player with optical audio input. 8 Service port - Standard (composite) video and standard audio inputs plus optional S-video inputs for a complete connection. 3 VIDEO 1 IN - PC audio input terminal is necessary to receive 1080p signals. 2 ColorStream® HD1 and ColorStream® HD2 - For service use when connecting a personal computer. 7 DIGITAL AUDIO OUT - separate audio cables are required for connecting devices with HDMI 1 analog audio input terminal, and its use can be configured in Dolby Digital or PCM (pulse-code modulation...
Owner's Manual - English
Page 12
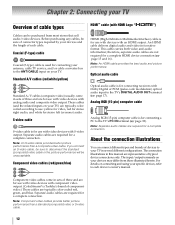
... Digital or PCM (pulse-code modulation) optical audio input to disconnect the standard (composite) video cable or the picture performance will be sure of connector types required by your specific devices, refer to the TV's PC IN terminal (- page 18). The input/output terminals on your TV) are for connecting a PC to each cable. Component video cables come in sets of three and are typically color-coded red, green, and blue. S-video cable S-video cable is used for use with video...
... Digital or PCM (pulse-code modulation) optical audio input to disconnect the standard (composite) video cable or the picture performance will be sure of connector types required by your specific devices, refer to the TV's PC IN terminal (- page 18). The input/output terminals on your TV) are for connecting a PC to each cable. Component video cables come in sets of three and are typically color-coded red, green, and blue. S-video cable S-video cable is used for use with video...

Owner's Manual - English
Page 13
... television programs, videotapes, DVDs, and other materials is set to channel 3 or 4 (whichever channel the Cable box output is prohibited under the Copyright Laws of the standard video cable. - To view the VCR: Turn ON the VCR. For better picture performance, if your TV Connecting a VCR (or a VCR with S-video) and antenna, Cable TV or Camcorder Camcorder AUDIO OUT L R VIDEO TV upper back panel VIDEO 2 inputs on the TV to your VCR's audio out terminal using the white audio cable only. •S-video cable...
... television programs, videotapes, DVDs, and other materials is set to channel 3 or 4 (whichever channel the Cable box output is prohibited under the Copyright Laws of the standard video cable. - To view the VCR: Turn ON the VCR. For better picture performance, if your TV Connecting a VCR (or a VCR with S-video) and antenna, Cable TV or Camcorder Camcorder AUDIO OUT L R VIDEO TV upper back panel VIDEO 2 inputs on the TV to your VCR's audio out terminal using the white audio cable only. •S-video cable...
Owner's Manual - English
Page 17
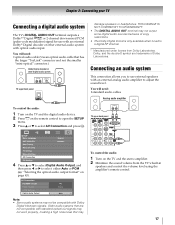
... be compatible with Dolby Digital bitstream signals. You will need : •standard audio cables Analog audio amplifier To control the audio: 1 Turn on the TV and the digital audio device. 2 Press Y on page 43). "Selecting the optical audio output format" on the remote control to open the SETUP menu. 3 Press B or b to a digital RF channel. * Manufactured under license from the TV's built-in speakers and control the volume level using the amplifier's remote control. 17 Chapter 2: Connecting your TV Connecting a digital audio system The TV's DIGITAL AUDIO...
... be compatible with Dolby Digital bitstream signals. You will need : •standard audio cables Analog audio amplifier To control the audio: 1 Turn on the TV and the digital audio device. 2 Press Y on page 43). "Selecting the optical audio output format" on the remote control to open the SETUP menu. 3 Press B or b to a digital RF channel. * Manufactured under license from the TV's built-in speakers and control the volume level using the amplifier's remote control. 17 Chapter 2: Connecting your TV Connecting a digital audio system The TV's DIGITAL AUDIO...
Owner's Manual - English
Page 18
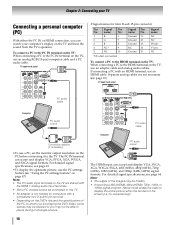
...) signal formats. "Using the PC settings feature" on the TV and hear the sound from the TV's speakers. For detailed signal specifications, see page 63. •To display the optimum picture, use a PC, set the monitor output resolution on the PC before connecting it to pause during multi-angle scenes. Note: • The PC audio input terminals on the TV, use an adapter cable and analog audio cables. TV upper back panel •Signal names for computers with an HDMI terminal, use...
...) signal formats. "Using the PC settings feature" on the TV and hear the sound from the TV's speakers. For detailed signal specifications, see page 63. •To display the optimum picture, use a PC, set the monitor output resolution on the PC before connecting it to pause during multi-angle scenes. Note: • The PC audio input terminals on the TV, use an adapter cable and analog audio cables. TV upper back panel •Signal names for computers with an HDMI terminal, use...
Owner's Manual - English
Page 28
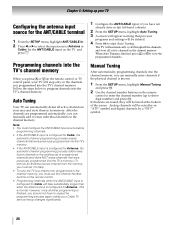
... the antenna input is finished, you press < or , on the TV and press O. When Auto Tuning is finished, press < or , to a channel not programmed in the channel memory, you must set of the screen. Programming channels into the TV's channel memory. This is known. 1 From the SETUP menu, highlight Manual Tuning and press T. 2 Use the channel number buttons on the remote control to enter the channel number (up your Cable TV service lineup changes significantly. 1 Configure the ANT/CABLE input...
... the antenna input is finished, you press < or , on the TV and press O. When Auto Tuning is finished, press < or , to a channel not programmed in the channel memory, you must set of the screen. Programming channels into the TV's channel memory. This is known. 1 From the SETUP menu, highlight Manual Tuning and press T. 2 Use the channel number buttons on the remote control to enter the channel number (up your Cable TV service lineup changes significantly. 1 Configure the ANT/CABLE input...
Owner's Manual - English
Page 35
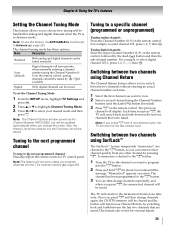
... set to Antenna (- Tuning to a specific channel (programmed or unprogrammed) Tuning analog channels: Press the Channel Number (0-9) on the remote control or TV control panel. The previous channel will be handled for analog and digital channels when the TV is in Antenna mode. Once you press R and then change channels again, the CH RTN memory will be updated automatically when you change channels repeatedly, and when you press R, the memorized channel will not work unless you program channels into the R button...
... set to Antenna (- Tuning to a specific channel (programmed or unprogrammed) Tuning analog channels: Press the Channel Number (0-9) on the remote control or TV control panel. The previous channel will be handled for analog and digital channels when the TV is in Antenna mode. Once you press R and then change channels again, the CH RTN memory will be updated automatically when you change channels repeatedly, and when you press R, the memorized channel will not work unless you program channels into the R button...
Owner's Manual - English
Page 59
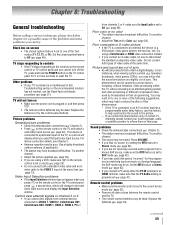
... will display when you cannot view signals from external devices connected to VIDEO 1, VIDEO 2, ColorStream HD1, ColorStream HD2, HDMI 1, HDMI 2, HDMI 3, PC or from a known SAP source, make sure the Input Lock is properly set to Off (- page 39). Poor composite or S-video picture • If the TV is set (- DVD player, video game system, set to SAP mode (- television broadcasts, video games, DVDs), you connect an S-video cable, be on the remote control or the TV and select a valid video input source (- Try another channel. • The sound...
... will display when you cannot view signals from external devices connected to VIDEO 1, VIDEO 2, ColorStream HD1, ColorStream HD2, HDMI 1, HDMI 2, HDMI 3, PC or from a known SAP source, make sure the Input Lock is properly set to Off (- page 39). Poor composite or S-video picture • If the TV is set (- DVD player, video game system, set to SAP mode (- television broadcasts, video games, DVDs), you connect an S-video cable, be on the remote control or the TV and select a valid video input source (- Try another channel. • The sound...
Owner's Manual - English
Page 65
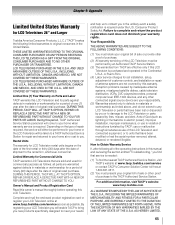
... TACP's Consumer Solution Center toll free at www.tacp.toshiba.com/service as soon as lightning or fluctuations in electric power), improper installation, improper maintenance, or use of the operating instructions in this LCD Television is purchased and operated in the unlikely event a safety notification is required. Owner's Manual and Product Registration Card Read this owner's manual thoroughly before operating this LCD Television and connected equipment; Failure to your...
... TACP's Consumer Solution Center toll free at www.tacp.toshiba.com/service as soon as lightning or fluctuations in electric power), improper installation, improper maintenance, or use of the operating instructions in this LCD Television is purchased and operated in the unlikely event a safety notification is required. Owner's Manual and Product Registration Card Read this owner's manual thoroughly before operating this LCD Television and connected equipment; Failure to your...
Owner's Manual - English
Page 67
... Rental Units The warranty for set installation, setup, adjustment of customer controls, and installation or repair of antenna systems are not covered by the use of shipment to : a. Service on third party products or service made necessary by accident, misuse, abuse, moisture, liquids, dust, dirt, neglect, accident, damage, 24/7 applications, improper installation, improper operation, improper cleaning, improper maintenance, normal wear and tear, screen burn or...
... Rental Units The warranty for set installation, setup, adjustment of customer controls, and installation or repair of antenna systems are not covered by the use of shipment to : a. Service on third party products or service made necessary by accident, misuse, abuse, moisture, liquids, dust, dirt, neglect, accident, damage, 24/7 applications, improper installation, improper operation, improper cleaning, improper maintenance, normal wear and tear, screen burn or...
Owner's Manual - English
Page 69
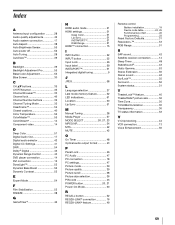
... Timer 48 Optical audio output format 43 P Panel Lock 46 PC Audio 47 PC connection 18 PC settings 47 Picture mode 39 Picture quality 39 Picture scroll 38 Picture size selection 36 PIN code 43 POWER button 20, 21 Power-On Mode 30 R RECALL button 52 REGZA-LINK® connection 16 REGZA-LINK® feature 49 Remote control Battery installation 19 Device code table 24, 25 Functional key chart 22 Programming 23 Reset Factory Defaults 31 Resolution 53 RGB Range 51 S SAP sound 42 Satellite receiver connection ...........14 Sleep Timer...
... Timer 48 Optical audio output format 43 P Panel Lock 46 PC Audio 47 PC connection 18 PC settings 47 Picture mode 39 Picture quality 39 Picture scroll 38 Picture size selection 36 PIN code 43 POWER button 20, 21 Power-On Mode 30 R RECALL button 52 REGZA-LINK® connection 16 REGZA-LINK® feature 49 Remote control Battery installation 19 Device code table 24, 25 Functional key chart 22 Programming 23 Reset Factory Defaults 31 Resolution 53 RGB Range 51 S SAP sound 42 Satellite receiver connection ...........14 Sleep Timer...
Printable Spec Sheet
Page 2
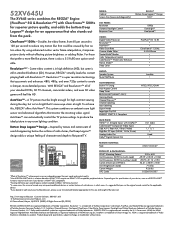
... TV Tuning Auto Aspect Control Sleep Timer REGZA-LINK® (HDMITM-CEC)2 Gaming Mode Channel BrowserTM Channel Labeling Input Labeling Expert Mode Logo Light On/Off ENERGY STAR® 3.0 Compliant NTSC/ATSC/QAM JACK PACK: HDMITM v1.3 Digital Inputs with InstaPortTM ColorStream® Component Video Inputs Side A/V / Rear A/V / Rear S-Video High Res PC Input (S-XGA, 15 Pin, D-sub) Analog Audio Out Dolby® Digital Optical Out 3 (1 Side) 2 1 / 1 /1 1 Fixed • REMOTE CONTROL: Type 4 Item Universal4 PRODUCT & PACKAGING: VESA® Mounting Pattern5 Unit Dimensions...
... TV Tuning Auto Aspect Control Sleep Timer REGZA-LINK® (HDMITM-CEC)2 Gaming Mode Channel BrowserTM Channel Labeling Input Labeling Expert Mode Logo Light On/Off ENERGY STAR® 3.0 Compliant NTSC/ATSC/QAM JACK PACK: HDMITM v1.3 Digital Inputs with InstaPortTM ColorStream® Component Video Inputs Side A/V / Rear A/V / Rear S-Video High Res PC Input (S-XGA, 15 Pin, D-sub) Analog Audio Out Dolby® Digital Optical Out 3 (1 Side) 2 1 / 1 /1 1 Fixed • REMOTE CONTROL: Type 4 Item Universal4 PRODUCT & PACKAGING: VESA® Mounting Pattern5 Unit Dimensions...


