Owner's Manual - English
Page 1
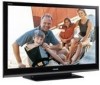
... Serial number: TD/M VX1A00137800 Note: To display a High Definition picture, the TV must be receiving a High Definition signal (such as an over-the-air High Definition TV broadcast, a High Definition digital cable program, or a High Definition digital... provider. © 2009 TOSHIBA CORPORATION All Rights Reserved Owner's Record The model number and serial number are on the back and side of steps for setting up your new TV, see page 9. Integrated High Definition LCD Television HIGH-DEFINITION TELEVISION 40XV645U 46XV645U 52XV645U For an overview of your...
... Serial number: TD/M VX1A00137800 Note: To display a High Definition picture, the TV must be receiving a High Definition signal (such as an over-the-air High Definition TV broadcast, a High Definition digital cable program, or a High Definition digital... provider. © 2009 TOSHIBA CORPORATION All Rights Reserved Owner's Record The model number and serial number are on the back and side of steps for setting up your new TV, see page 9. Integrated High Definition LCD Television HIGH-DEFINITION TELEVISION 40XV645U 46XV645U 52XV645U For an overview of your...
Owner's Manual - English
Page 2
...Difference How and Where You Use Your Flat Panel Display Congratulations on the proper stands or installed according to walls with furniture and television sets. • Don't place flat panel display so that they cannot be pulled or grabbed by the display and wall mount ... to Article 820-40 of two people are inappropriately situated on a "larger than a UL Listed wall bracket appropriate for wall mounting this Toshiba LCD TV. Before operating your purchase! Dear Customer, Thank you for future reference. NOTE TO CATV INSTALLERS This is a growing trend and larger ...
...Difference How and Where You Use Your Flat Panel Display Congratulations on the proper stands or installed according to walls with furniture and television sets. • Don't place flat panel display so that they cannot be pulled or grabbed by the display and wall mount ... to Article 820-40 of two people are inappropriately situated on a "larger than a UL Listed wall bracket appropriate for wall mounting this Toshiba LCD TV. Before operating your purchase! Dear Customer, Thank you for future reference. NOTE TO CATV INSTALLERS This is a growing trend and larger ...
Owner's Manual - English
Page 6
... Inc. FCC Declaration of Conformity Compliance Statement (Part 15): The Toshiba 40XV645U, 46XV645U and 52XV645U Televisions comply with this TV. However, there is encouraged to try to correct the interference by meeting strict guidelines set the Power-On mode to Part 15 of the FCC rules. ...prevent green house gas emissions by one or more information, see page 30 and 39. Trademark Information • Manufactured under your LCD TV The following symptoms are technical limitations of the FCC rules. To ensure your television is displayed for help. Environmental Protection Agency....
... Inc. FCC Declaration of Conformity Compliance Statement (Part 15): The Toshiba 40XV645U, 46XV645U and 52XV645U Televisions comply with this TV. However, there is encouraged to try to correct the interference by meeting strict guidelines set the Power-On mode to Part 15 of the FCC rules. ...prevent green house gas emissions by one or more information, see page 30 and 39. Trademark Information • Manufactured under your LCD TV The following symptoms are technical limitations of the FCC rules. To ensure your television is displayed for help. Environmental Protection Agency....

Owner's Manual - English
Page 7
...Choosing a location for your LCD TV 5 Chapter 1: Introduction 9 Features of your new TV 9 Overview of steps for installing, setting up, and using your new TV 9 TV front and side panel controls and connections . . . . 10 TV back panel connections 11 Chapter 2: Connecting your TV 12 Overview of cable ...Using the HDMI settings feature 51 Setting the HDMI audio mode 51 Displaying TV status information 52 Understanding the auto power off feature 52 Understanding the last mode memory feature 52 Chapter 7: Using the TV's advanced features 53 Using the advanced picture settings features 53 ...
...Choosing a location for your LCD TV 5 Chapter 1: Introduction 9 Features of your new TV 9 Overview of steps for installing, setting up, and using your new TV 9 TV front and side panel controls and connections . . . . 10 TV back panel connections 11 Chapter 2: Connecting your TV 12 Overview of cable ...Using the HDMI settings feature 51 Setting the HDMI audio mode 51 Displaying TV status information 52 Understanding the auto power off feature 52 Understanding the last mode memory feature 52 Chapter 7: Using the TV's advanced features 53 Using the advanced picture settings features 53 ...
Owner's Manual - English
Page 9
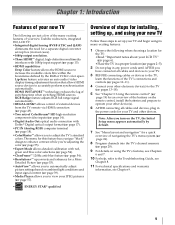
... •AutoView™ allows you to automatically adjust picture settings based on using its many exciting features. 1 Observe the following are just a few of the many exciting features of your new Toshiba widescreen, integrated HD, LCD TV: •Integrated digital tuning (8VSB ATSC and QAM) ...eliminates the need for your TV and other devices. page 6). •Place the TV in most cases). •1080p output resolution. •Three ...
... •AutoView™ allows you to automatically adjust picture settings based on using its many exciting features. 1 Observe the following are just a few of the many exciting features of your new Toshiba widescreen, integrated HD, LCD TV: •Integrated digital tuning (8VSB ATSC and QAM) ...eliminates the need for your TV and other devices. page 6). •Place the TV in most cases). •1080p output resolution. •Three ...
Owner's Manual - English
Page 10
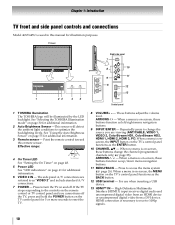
... adjust the volume level. page 26). When a menu is on-screen, the MENU button on the TV's control panel functions as the BACK button. 12 USB terminal - Effective range: 4 On Timer LED 16.4 ft (5m) See "Setting the On Timer" on page 48. 5 Power LED See "LED indications" on page 55 for... 1, VIDEO 2, ColorStream HD1, ColorStream HD2, HDMI 1, HDMI 2, HDMI 3, PC).When a menu is onscreen, the INPUT button on page 30 for illustration purposes. See "Selecting the TOSHIBA Illumination mode" on the TV's control panel functions as the ENTER button. 10 CHANNEL Bb -
... adjust the volume level. page 26). When a menu is on-screen, the MENU button on the TV's control panel functions as the BACK button. 12 USB terminal - Effective range: 4 On Timer LED 16.4 ft (5m) See "Setting the On Timer" on page 48. 5 Power LED See "LED indications" on page 55 for... 1, VIDEO 2, ColorStream HD1, ColorStream HD2, HDMI 1, HDMI 2, HDMI 3, PC).When a menu is onscreen, the INPUT button on page 30 for illustration purposes. See "Selecting the TOSHIBA Illumination mode" on the TV's control panel functions as the ENTER button. 10 CHANNEL Bb -
Owner's Manual - English
Page 11
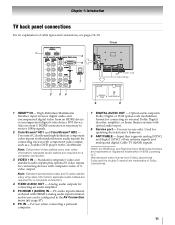
... connecting a personal computer. 7 DIGITAL AUDIO OUT - Two sets of ColorStream high-definition component video inputs (with standard stereo audio inputs) for connecting devices with component video output, such as a Toshiba DVD player with composite video or Svideo output. separate audio ...Used for connecting an audio amplifier. 5 PC/HDMI 1 (AUDIO) IN - Manufactured under license from a DVI device. Chapter 1: Introduction TV back panel connections For an explanation of cable types and connections, see item 5. Note: Component video cables carry only video information; Note:...
... connecting a personal computer. 7 DIGITAL AUDIO OUT - Two sets of ColorStream high-definition component video inputs (with standard stereo audio inputs) for connecting devices with component video output, such as a Toshiba DVD player with composite video or Svideo output. separate audio ...Used for connecting an audio amplifier. 5 PC/HDMI 1 (AUDIO) IN - Manufactured under license from a DVI device. Chapter 1: Introduction TV back panel connections For an explanation of cable types and connections, see item 5. Note: Component video cables carry only video information; Note:...
Owner's Manual - English
Page 12
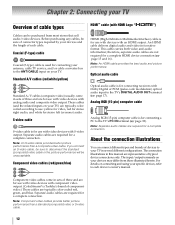
...cables, be unacceptable. Analog RGB (15-pin) computer cable Analog RGB (15-pin) computer cable is for connecting a PC to the TV's PC IN terminal (- The connection illustrations in this manual are required for use with video devices with S-video output. The input/output terminals... A/V cables (red/white/yellow) Standard A/V cables (composite video) usually come in sets of three and are for use with video devices with HDMI Logo " ") HDMI (High-Definition Multimedia Interface) cable is Toshiba's brand of three and are for use with video devices with component video output. ...
...cables, be unacceptable. Analog RGB (15-pin) computer cable Analog RGB (15-pin) computer cable is for connecting a PC to the TV's PC IN terminal (- The connection illustrations in this manual are required for use with video devices with S-video output. The input/output terminals... A/V cables (red/white/yellow) Standard A/V cables (composite video) usually come in sets of three and are for use with video devices with HDMI Logo " ") HDMI (High-Definition Multimedia Interface) cable is Toshiba's brand of three and are for use with video devices with component video output. ...

Owner's Manual - English
Page 13
...the TV remote control to operate other countries, and may not be unacceptable. •standard audio cables (if your VCR or camcorder has S-video) - For better picture performance, if your VCR has Svideo, use , distribution, or revision of television programs, videotapes, DVDs, and other materials is set to... recording, use an S-video cable (plus the audio cables) to change channels. Select the ANT/CABLE video input source on the TV back instead of video cable to VIDEO 1 at the same time or the picture performance will need: •coaxial cables •standard A/V cables...
...the TV remote control to operate other countries, and may not be unacceptable. •standard audio cables (if your VCR or camcorder has S-video) - For better picture performance, if your VCR has Svideo, use , distribution, or revision of television programs, videotapes, DVDs, and other materials is set to... recording, use an S-video cable (plus the audio cables) to change channels. Select the ANT/CABLE video input source on the TV back instead of video cable to VIDEO 1 at the same time or the picture performance will need: •coaxial cables •standard A/V cables...
Owner's Manual - English
Page 14
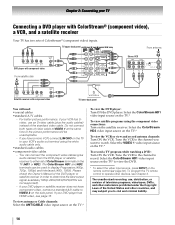
... Tune the VCR to the channel to operate other devices, see page 15. To program the TV remote control to record. Select the ColorStream HD1 video input source on the TV* to either set of the DVD player or satellite receiver in order to display Progressive (480p, 720p, 1080p) and...) from ANT OUT to civil and criminal liability. 14 TV upper back panel From antenna Y PB PR COMPONENT VIDEO S-VIDEO VIDEO OUT OUT DVD player with ColorStream® (component video), a VCR, and a satellite receiver Your TV has two sets of the United States and other materials is prohibited under ...
... Tune the VCR to the channel to operate other devices, see page 15. To program the TV remote control to record. Select the ColorStream HD1 video input source on the TV* to either set of the DVD player or satellite receiver in order to display Progressive (480p, 720p, 1080p) and...) from ANT OUT to civil and criminal liability. 14 TV upper back panel From antenna Y PB PR COMPONENT VIDEO S-VIDEO VIDEO OUT OUT DVD player with ColorStream® (component video), a VCR, and a satellite receiver Your TV has two sets of the United States and other materials is prohibited under ...
Owner's Manual - English
Page 15
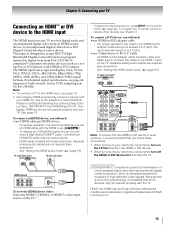
... form from a DVI (Digital Visual Interface) source device. For proper operation, the length of high-definition video signals. See "Setting the HDMI audio mode" (- The recommended length is recommended that the HDMI or DVI device is reset properly, it is designed ...OUT OUT L R Note: To ensure that you follow these procedures: • When turning on your electronic components, turn off your TV receives digital audio and uncompressed digital video from an HDMI source device, or uncompressed digital video from EIA/CEA-861-E- compliant[1] consumer electronic...
... form from a DVI (Digital Visual Interface) source device. For proper operation, the length of high-definition video signals. See "Setting the HDMI audio mode" (- The recommended length is recommended that the HDMI or DVI device is reset properly, it is designed ...OUT OUT L R Note: To ensure that you follow these procedures: • When turning on your electronic components, turn off your TV receives digital audio and uncompressed digital video from an HDMI source device, or uncompressed digital video from EIA/CEA-861-E- compliant[1] consumer electronic...
Owner's Manual - English
Page 17
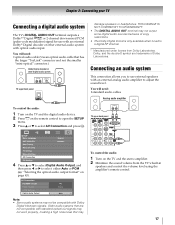
...Digital decoder or other external audio system with optical audio input. LINE IN LR TV upper back panel SETUP Menu Language English ANT/CABLE In Antenna Auto Tuning Manual Tuning TV Settings Manual Setting AV Connection PC Settings 4 Press B or b to select Digital Audio Output, and then press ...C or c to a digital RF channel. * Manufactured under license from the TV's built-in speakers and control the volume ...
...Digital decoder or other external audio system with optical audio input. LINE IN LR TV upper back panel SETUP Menu Language English ANT/CABLE In Antenna Auto Tuning Manual Tuning TV Settings Manual Setting AV Connection PC Settings 4 Press B or b to select Digital Audio Output, and then press ...C or c to a digital RF channel. * Manufactured under license from the TV's built-in speakers and control the volume ...
Owner's Manual - English
Page 26
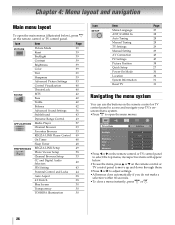
... Selectors 40 PIN Setting 43 Parental Control and Locks 44 Auto Aspect 38 4:3 Stretch 38 Blue Screen 30 Transparency 30 TOSHIBA Illumination 30 Icon SETUP Item Menu Language ANT/CABLE In Auto Tuning Manual Tuning TV Settings Manual Setting AV Connection PC Settings Picture Position Quick ...Setup Power-On Mode Location System Information Reset TV Page 27 28 28 28 29 ...
... Selectors 40 PIN Setting 43 Parental Control and Locks 44 Auto Aspect 38 4:3 Stretch 38 Blue Screen 30 Transparency 30 TOSHIBA Illumination 30 Icon SETUP Item Menu Language ANT/CABLE In Auto Tuning Manual Tuning TV Settings Manual Setting AV Connection PC Settings Picture Position Quick ...Setup Power-On Mode Location System Information Reset TV Page 27 28 28 28 29 ...

Owner's Manual - English
Page 27
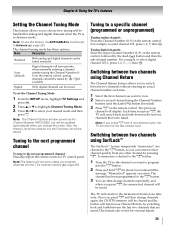
...Other procedures are the same as Initial Setup (- For normal tuning, select Standard. Quick Setup from the SETUP menu You can conveniently change various basic TV settings from three different languages (English, Français and Español) for the ANT/CABLE input on the screen, press C or c to...T to continue to Auto Tuning. 6 Press T to select your desired time zone with C or c and press T. 3 Next, the Location setting window will appear on the TV. 5 If you select Antenna, the Channel Tuning Mode setup window will appear. left-hand column). Press C or c to select the input source ...
...Other procedures are the same as Initial Setup (- For normal tuning, select Standard. Quick Setup from the SETUP menu You can conveniently change various basic TV settings from three different languages (English, Français and Español) for the ANT/CABLE input on the screen, press C or c to...T to continue to Auto Tuning. 6 Press T to select your desired time zone with C or c and press T. 3 Next, the Location setting window will appear on the TV. 5 If you select Antenna, the Channel Tuning Mode setup window will appear. left-hand column). Press C or c to select the input source ...
Owner's Manual - English
Page 29
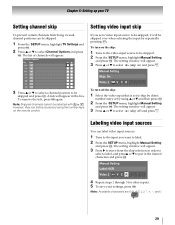
...From the SETUP menu, highlight Manual Setting and press T. Manual Setting Skip: On Video 2 V C R To turn on the remote control. Manual Setting Label: VCR Video 2 V C R 4 Repeat steps 1 through 3 for other inputs. 5 To save your TV Setting channel skip Setting video input skip To prevent certain channels... from the skip selection in the box. To remove the tick, press T again. To turn off ) and press O. The setting window will appear. 3 Press B or b to ...
...From the SETUP menu, highlight Manual Setting and press T. Manual Setting Skip: On Video 2 V C R To turn on the remote control. Manual Setting Label: VCR Video 2 V C R 4 Repeat steps 1 through 3 for other inputs. 5 To save your TV Setting channel skip Setting video input skip To prevent certain channels... from the skip selection in the box. To remove the tick, press T again. To turn off ) and press O. The setting window will appear. 3 Press B or b to ...
Owner's Manual - English
Page 30
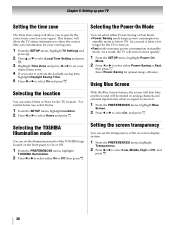
... the location You can set the transparency of the TOSHIBA logo located on -screen display system. 1 From the PREFERENCES menu, highlight Transparency. 2 Press C or c to select Low, Middle, High or Off, and press O. 30 Setting the screen transparency You can select either On or Off, then press O. Chapter 5: Setting up your TV Setting the time zone...
... the location You can set the transparency of the TOSHIBA logo located on -screen display system. 1 From the PREFERENCES menu, highlight Transparency. 2 Press C or c to select Low, Middle, High or Off, and press O. 30 Setting the screen transparency You can select either On or Off, then press O. Chapter 5: Setting up your TV Setting the time zone...
Owner's Manual - English
Page 35
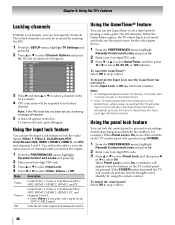
... (and the dash (=) button if needed). 3 Press R on the remote control or TV control panel. The channel has been programmed to the R button. 3 You can be set the Channel Tuning Mode: 1 From the SETUP menu, highlight TV Settings and press T. 2 Press B or b to highlight Channel Tuning Mode. 3 Press C... or c to program into the TV's channel memory (- Note: To use this feature, the ANT/CABLE...
... (and the dash (=) button if needed). 3 Press R on the remote control or TV control panel. The channel has been programmed to the R button. 3 You can be set the Channel Tuning Mode: 1 From the SETUP menu, highlight TV Settings and press T. 2 Press B or b to highlight Channel Tuning Mode. 3 Press C... or c to program into the TV's channel memory (- Note: To use this feature, the ANT/CABLE...
Owner's Manual - English
Page 40
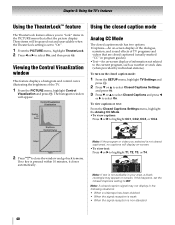
...2 Press C or c to select On, and then press T. Note: A closed caption mode: 1 From the SETUP menu, highlight TV Settings and press T. 2 Press b or B to select Closed Captions Settings and press T. 3 Press b or B to select Closed Captions and press C or c to select On. Note: If the program.... Giant pandas eat leaves. Viewing the Control Visualization window This feature displays a histogram and control curve illustrating the brightness of TV programs and videos that affect the picture display. Control Visualization Distribution Number Of Pixels Using the closed caption mode Analog CC Mode...
...2 Press C or c to select On, and then press T. Note: A closed caption mode: 1 From the SETUP menu, highlight TV Settings and press T. 2 Press b or B to select Closed Captions Settings and press T. 3 Press b or B to select Closed Captions and press C or c to select On. Note: If the program.... Giant pandas eat leaves. Viewing the Control Visualization window This feature displays a histogram and control curve illustrating the brightness of TV programs and videos that affect the picture display. Control Visualization Distribution Number Of Pixels Using the closed caption mode Analog CC Mode...
Owner's Manual - English
Page 41
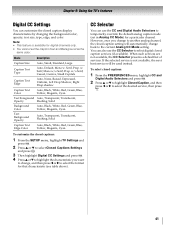
...Blue, Yellow, Magenta, Cyan To customize the closed captions: 1 From the SETUP menu, highlight TV Settings and press T. 2 Press B or b to select Closed Captions Settings and press T. 3 Then highlight Digital CC Settings and press T. 4 Press B or b to highlight the characteristic you change to another analog...caption display characteristics by changing the background color, opacity, text size, type, edge, and color. Chapter 6: Using the TV's features Digital CC Settings You can customize the closed captions: 1 From the PREFERENCES menu, highlight CC and Digital Audio Selectors and press T. 2...
...Blue, Yellow, Magenta, Cyan To customize the closed captions: 1 From the SETUP menu, highlight TV Settings and press T. 2 Press B or b to select Closed Captions Settings and press T. 3 Then highlight Digital CC Settings and press T. 4 Press B or b to highlight the characteristic you change to another analog...caption display characteristics by changing the background color, opacity, text size, type, edge, and color. Chapter 6: Using the TV's features Digital CC Settings You can customize the closed captions: 1 From the PREFERENCES menu, highlight CC and Digital Audio Selectors and press T. 2...
Owner's Manual - English
Page 46
... on the GameTimer, when power is pressed the TV will operate except POWER. 1 From the PREFERENCES menu, highlight Parental Control and Locks and press T. 2 Enter your settings from being changed accidentally (by entering the PIN. 1 From the SETUP menu, highlight TV Settings and press T. 2 Press B or b to... select 30, 60, 90, or 120 minutes. When the GameTimer expires, the TV enters Input Lock mode and locks out...
... on the GameTimer, when power is pressed the TV will operate except POWER. 1 From the PREFERENCES menu, highlight Parental Control and Locks and press T. 2 Enter your settings from being changed accidentally (by entering the PIN. 1 From the SETUP menu, highlight TV Settings and press T. 2 Press B or b to... select 30, 60, 90, or 120 minutes. When the GameTimer expires, the TV enters Input Lock mode and locks out...


