Owner's Manual - English
Page 3
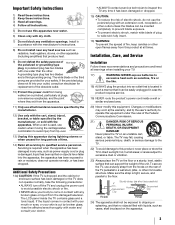
...of time. 14) Refer all times. Make sure the strap is damaged, liquid has been spilled or objects have fallen into your safety. The LCD panel inside a wall or similar enclosed area. 20) Never modify this equipment under the rules of the unit. Installation, Care, and Service ...damage to the floor. Additional Safety Precautions 14a) CAUTION: If the TV is dropped and the cabinet or enclosure surface has been damaged or the TV does not operate normally, take the following precautions: • ALWAYS turn off the TV and unplug the power cord to avoid possible electric shock or fire...
...of time. 14) Refer all times. Make sure the strap is damaged, liquid has been spilled or objects have fallen into your safety. The LCD panel inside a wall or similar enclosed area. 20) Never modify this equipment under the rules of the unit. Installation, Care, and Service ...damage to the floor. Additional Safety Precautions 14a) CAUTION: If the TV is dropped and the cabinet or enclosure surface has been damaged or the TV does not operate normally, take the following precautions: • ALWAYS turn off the TV and unplug the power cord to avoid possible electric shock or fire...
Owner's Manual - English
Page 4
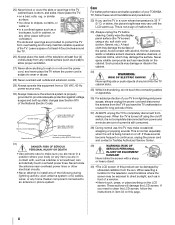
...is turned off . Never spill liquids or push objects of any of the following during lightning activity: a) an antenna system; These actions will damage the LCD screen. If you need to clean the LCD screen, follow these sounds become frequent or continuous, unplug the power cord and contact a Toshiba ... with , such as a bookcase, built-in item 33 on /off switch, it is not a sign of malfunction. 33) Always unplug the TV before cleaning. This is normal, especially when the unit is properly grounded to provide adequate protection against voltage surges and built-up . 25) Never ...
...is turned off . Never spill liquids or push objects of any of the following during lightning activity: a) an antenna system; These actions will damage the LCD screen. If you need to clean the LCD screen, follow these sounds become frequent or continuous, unplug the power cord and contact a Toshiba ... with , such as a bookcase, built-in item 33 on /off switch, it is not a sign of malfunction. 33) Always unplug the TV before cleaning. This is normal, especially when the unit is properly grounded to provide adequate protection against voltage surges and built-up . 25) Never ...
Owner's Manual - English
Page 9
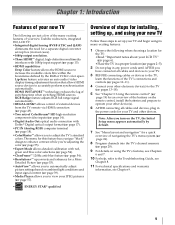
... 7 See "Menu layout and navigation" for a quick overview of external devices from the TV remote via HDMI connection (- HDMI INSTAPORT™ technology reduces the lag of your new Toshiba widescreen, integrated HD, LCD TV: •Integrated digital tuning (8VSB ATSC and QAM) eliminates the need for a separate ...set -top box (in any power cords until AFTER you turn on using your TV and other electronic device(s) to your other devices. page 54). •ClearFrame™ 120Hz anti-blur feature (- page 6). •Place the TV in the power cords for this feature has a unique "black...
... 7 See "Menu layout and navigation" for a quick overview of external devices from the TV remote via HDMI connection (- HDMI INSTAPORT™ technology reduces the lag of your new Toshiba widescreen, integrated HD, LCD TV: •Integrated digital tuning (8VSB ATSC and QAM) eliminates the need for a separate ...set -top box (in any power cords until AFTER you turn on using your TV and other electronic device(s) to your other devices. page 54). •ClearFrame™ 120Hz anti-blur feature (- page 6). •Place the TV in the power cords for this feature has a unique "black...
Owner's Manual - English
Page 10
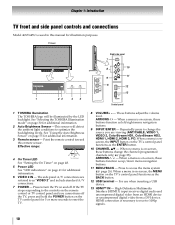
...video from an HDMI device or uncompressed digital video from a DVI device. TV front 1 23 45 Right side panel 7 8 10 11 9 6 12 13 Control panel 1 TOSHIBA Illumination The TOSHIBA logo will detect the ambient light conditions to reset the TV. 8 VOLUME+ - - Effective range: 4 On Timer LED 16.4... as the ENTER button. 10 CHANNEL Bb - When a menu is on the TV control panel for additional information. 3 Remote sensor - If the TV stops responding to turn off . Chapter 1: Introduction TV front and side panel controls and connections Model 46XV645U is used in this remote sensor...
...video from an HDMI device or uncompressed digital video from a DVI device. TV front 1 23 45 Right side panel 7 8 10 11 9 6 12 13 Control panel 1 TOSHIBA Illumination The TOSHIBA logo will detect the ambient light conditions to reset the TV. 8 VOLUME+ - - Effective range: 4 On Timer LED 16.4... as the ENTER button. 10 CHANNEL Bb - When a menu is on the TV control panel for additional information. 3 Remote sensor - If the TV stops responding to turn off . Chapter 1: Introduction TV front and side panel controls and connections Model 46XV645U is used in this remote sensor...

Owner's Manual - English
Page 13
... - Select the VIDEO 1 video input source on the TV.* To view the camcorder video: Select the VIDEO 2 video input source on the TV.* * To select the video input source, press INPUT on the TV.* To view basic and premium Cable channels: Turn OFF the VCR. Do not connect both types of video... time or the picture performance will need: •coaxial cables •standard A/V cables - To program the TV remote control to operate other materials is set to). page 32). To view the VCR: Turn ON the VCR. Chapter 2: Connecting your VCR has Svideo, use an S-video cable (plus the audio cables...
... - Select the VIDEO 1 video input source on the TV.* To view the camcorder video: Select the VIDEO 2 video input source on the TV.* * To select the video input source, press INPUT on the TV.* To view basic and premium Cable channels: Turn OFF the VCR. Do not connect both types of video... time or the picture performance will need: •coaxial cables •standard A/V cables - To program the TV remote control to operate other materials is set to). page 32). To view the VCR: Turn ON the VCR. Chapter 2: Connecting your VCR has Svideo, use an S-video cable (plus the audio cables...
Owner's Manual - English
Page 14
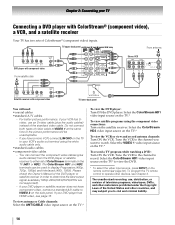
... - The ColorStream HD1 and HD2 terminals can connect the component video cables (plus the audio cables) instead of ColorStream terminals on the TV.* To view the DVD player: Turn ON the DVD player. If your DVD player or satellite receiver does not have a mono VCR, connect L/MONO on the... TV.* To record a TV program while watching a DVD: Turn ON the VCR. Select the ColorStream HD1 video input source on the TV.* To view satellite programs using the white audio cable only. •standard audio cables •...
... - The ColorStream HD1 and HD2 terminals can connect the component video cables (plus the audio cables) instead of ColorStream terminals on the TV.* To view the DVD player: Turn ON the DVD player. If your DVD player or satellite receiver does not have a mono VCR, connect L/MONO on the... TV.* To record a TV program while watching a DVD: Turn ON the VCR. Select the ColorStream HD1 video input source on the TV.* To view satellite programs using the white audio cable only. •standard audio cables •...
Owner's Manual - English
Page 15
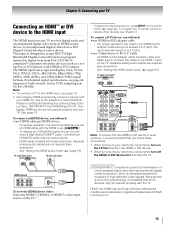
...you use an HDMI cable with your TV. To connect an HDMI device, you follow these procedures: • When turning on your electronic components, turn on the TV first and then the HDMI or DVI device. • When turning off your electronic components, turn off the HDMI or DVI device ...first and then the TV. Please try setting the following four options (Deep...
...you use an HDMI cable with your TV. To connect an HDMI device, you follow these procedures: • When turning on your electronic components, turn on the TV first and then the HDMI or DVI device. • When turning off your electronic components, turn off the HDMI or DVI device ...first and then the TV. Please try setting the following four options (Deep...
Owner's Manual - English
Page 17
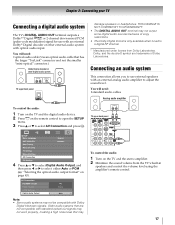
...external audio system with optical audio input. You will need : •standard audio cables Analog audio amplifier To control the audio: 1 Turn on the TV and the digital audio device. 2 Press Y on the remote control to open the SETUP menu. 3 Press B or b to a digital RF...Settings Digital Audio Output PC Digital Auto Note: • Some audio systems may To control the audio: 1 Turn on page 43). Chapter 2: Connecting your TV Connecting a digital audio system The TV's DIGITAL AUDIO OUT terminal outputs a Dolby®* Digital or 2-channel down-mixed PCM (pulse-code modulation) ...
...external audio system with optical audio input. You will need : •standard audio cables Analog audio amplifier To control the audio: 1 Turn on the TV and the digital audio device. 2 Press Y on the remote control to open the SETUP menu. 3 Press B or b to a digital RF...Settings Digital Audio Output PC Digital Auto Note: • Some audio systems may To control the audio: 1 Turn on page 43). Chapter 2: Connecting your TV Connecting a digital audio system The TV's DIGITAL AUDIO OUT terminal outputs a Dolby®* Digital or 2-channel down-mixed PCM (pulse-code modulation) ...
Owner's Manual - English
Page 20
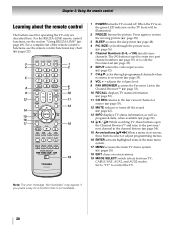
... -screen menus. 19 MODE SELECT switch selects between TV, CABLE/SAT, AUX1, and AUX2 modes. page 33). 10 RECALL displays TV status information (- page 35). 12 MUTE reduces or turns off . page 52). 11 CH RTN returns to restore the moving picture (- page 52). 14 3 C / # c While watching TV, these buttons select or adjust programming menus. 16...
... -screen menus. 19 MODE SELECT switch selects between TV, CABLE/SAT, AUX1, and AUX2 modes. page 33). 10 RECALL displays TV status information (- page 35). 12 MUTE reduces or turns off . page 52). 11 CH RTN returns to restore the moving picture (- page 52). 14 3 C / # c While watching TV, these buttons select or adjust programming menus. 16...
Owner's Manual - English
Page 21
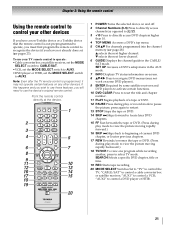
...page 28): B selects the next higher channel. pages 23). Point the remote control directly at the device. 16 17 18 19 1 POWER Turns the selected device on some DVD players). 9 ENTER Required by some satellite receivers and DVD players to activate certain functions. 10 DVD CLEAR Press .... b selects the next lower channel. 6 GUIDE Displays the channel guide in the AUX mode. 7 INFO Displays TV status information on any other devices If you have a non-Toshiba device or a Toshiba device that the remote control is programmed, it may not work on and off. 2 Channel Numbers (0-9) Press to...
...page 28): B selects the next higher channel. pages 23). Point the remote control directly at the device. 16 17 18 19 1 POWER Turns the selected device on some DVD players). 9 ENTER Required by some satellite receivers and DVD players to activate certain functions. 10 DVD CLEAR Press .... b selects the next lower channel. 6 GUIDE Displays the channel guide in the AUX mode. 7 INFO Displays TV status information on any other devices If you have a non-Toshiba device or a Toshiba device that the remote control is programmed, it may not work on and off. 2 Channel Numbers (0-9) Press to...
Owner's Manual - English
Page 23
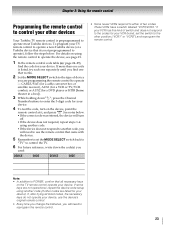
...See notes below . CABLE/SAT (for a cable converter box or satellite receiver), AUX1 (for a VCR or TV/VCR combo), or AUX2 (for your other devices Your Toshiba TV remote control is not preprogrammed to operate - Note: • In addition to POWER, confirm that came with the... device. 5 Remember to set the switch to the other codes are programming the remote control to operate), follow the steps below . • If the correct code was entered, the device will turn...
...See notes below . CABLE/SAT (for a cable converter box or satellite receiver), AUX1 (for a VCR or TV/VCR combo), or AUX2 (for your other devices Your Toshiba TV remote control is not preprogrammed to operate - Note: • In addition to POWER, confirm that came with the... device. 5 Remember to set the switch to the other codes are programming the remote control to operate), follow the steps below . • If the correct code was entered, the device will turn...

Owner's Manual - English
Page 27
... every time you select Antenna, the Channel Tuning Mode setup window will appear. Selecting the menu language You can conveniently change various basic TV settings from three different languages (English, Français and Español) for the ANT/CABLE input on the...desired time zone with C or c and press T. 3 Next, the Location setting window will appear. Chapter 5: Setting up your TV Initial Setup When you first turn on the TV. 5 If you turn on or reset the TV, the Initial Setup window will appear. 1 In the Menu Language field, press C or c to select your preferred language. 2...
... every time you select Antenna, the Channel Tuning Mode setup window will appear. Selecting the menu language You can conveniently change various basic TV settings from three different languages (English, Français and Español) for the ANT/CABLE input on the...desired time zone with C or c and press T. 3 Next, the Location setting window will appear. Chapter 5: Setting up your TV Initial Setup When you first turn on the TV. 5 If you turn on or reset the TV, the Initial Setup window will appear. 1 In the Menu Language field, press C or c to select your preferred language. 2...
Owner's Manual - English
Page 29
... to be skipped, it will appear. 3 Press B or b to select 8 (skip on) and press O. Manual Setting Skip: On Video 2 V C R To turn on the remote control. The setting window will appear in the desired characters and press T. A tick will appear. 3 Press c to move from being viewed, channel... select Channel Options and press T. Note: Skipped channels cannot be skipped and press T. To turn off ) and press O. The setting window will appear. If you want to be skipped. 1 From the SETUP menu, highlight TV Settings and press T. 2 Press B or b to put in the box. Labeling video ...
... to be skipped, it will appear. 3 Press B or b to select 8 (skip on) and press O. Manual Setting Skip: On Video 2 V C R To turn on the remote control. The setting window will appear in the desired characters and press T. A tick will appear. 3 Press c to move from being viewed, channel... select Channel Options and press T. Note: Skipped channels cannot be skipped and press T. To turn off ) and press O. The setting window will appear. If you want to be skipped. 1 From the SETUP menu, highlight TV Settings and press T. 2 Press B or b to put in the box. Labeling video ...
Owner's Manual - English
Page 30
... c to select Home and press O. As a result, the TV will turn on the front panel to On or Off. 1 From the PREFERENCES menu, highlight TOSHIBA Illumination. 2 Press C or c to select either On or Off, then press O. Selecting the TOSHIBA Illumination mode You can select Home or Store for optimal energy efficiency...time, highlight Daylight Saving Time. 5 Press C or c to select On and press O. As a result, it takes a bit longer for the TV to turn blue and the sound will be muted on . •Fast mode increases power consumption in standby mode to below 1W. Chapter 5: Setting up your...
... c to select Home and press O. As a result, the TV will turn on the front panel to On or Off. 1 From the PREFERENCES menu, highlight TOSHIBA Illumination. 2 Press C or c to select either On or Off, then press O. Selecting the TOSHIBA Illumination mode You can select Home or Store for optimal energy efficiency...time, highlight Daylight Saving Time. 5 Press C or c to select On and press O. As a result, it takes a bit longer for the TV to turn blue and the sound will be muted on . •Fast mode increases power consumption in standby mode to below 1W. Chapter 5: Setting up your...

Owner's Manual - English
Page 31
To cancel the reset: Press C or c to select No and press T. 31 The TV will turn off automatically. System Information Software Version XV645U 6.1.23.0 Mar 26 2009 - 01:16:45 FW: 21 Reset Factory Defaults You can reset all settings and channels to their factory default values. 1 From the SETUP menu, highlight Reset TV and press T. 2 Enter your TV Viewing the system status 1 From the SETUP menu, highlight System Information. 2 Press T to display the system information. Chapter 5: Setting up your PIN code (if PIN code has been set). 3 Press C or c to select Yes and press T.
To cancel the reset: Press C or c to select No and press T. 31 The TV will turn off automatically. System Information Software Version XV645U 6.1.23.0 Mar 26 2009 - 01:16:45 FW: 21 Reset Factory Defaults You can reset all settings and channels to their factory default values. 1 From the SETUP menu, highlight Reset TV and press T. 2 Enter your TV Viewing the system status 1 From the SETUP menu, highlight System Information. 2 Press T to display the system information. Chapter 5: Setting up your PIN code (if PIN code has been set). 3 Press C or c to select Yes and press T.
Owner's Manual - English
Page 34
.... • Pressing n will be highlighted but instead will be tuned (for details on configuring the antenna input. •Once 32 channels or inputs are turned off the TV will store the following channels: •All channels that are tuned using < or , on an item in the History List, the oldest item will...
.... • Pressing n will be highlighted but instead will be tuned (for details on configuring the antenna input. •Once 32 channels or inputs are turned off the TV will store the following channels: •All channels that are tuned using < or , on an item in the History List, the oldest item will...

Owner's Manual - English
Page 39
... darker lighter Color paler deeper Tint reddish greenish Sharpness softer sharper * This feature adjusts the brightness of the entire screen. Chapter 6: Using the TV's features Adjusting the picture Selecting the picture mode You can select your desired picture settings from the controller PC Designed for viewing of PC tables... selected. • PC mode is available for HDMI and PC inputs only (not displayed for other input sources). • Game mode cannot be turned on -screen display and input from the following modes, as described in the table above and then press O.
... darker lighter Color paler deeper Tint reddish greenish Sharpness softer sharper * This feature adjusts the brightness of the entire screen. Chapter 6: Using the TV's features Adjusting the picture Selecting the picture mode You can select your desired picture settings from the controller PC Designed for viewing of PC tables... selected. • PC mode is available for HDMI and PC inputs only (not displayed for other input sources). • Game mode cannot be turned on -screen display and input from the following modes, as described in the table above and then press O.
Owner's Manual - English
Page 40
...leaves. Note: A closed caption mode has two options: •Captions-An on-screen display of the dialogue, narration, and sound effects of TV programs and videos that affect the picture display. These items will be grayed out and unavailable when the TheaterLock setting is set the Closed Captions... setting to Off. To turn on -screen display of the TV. 1 From the PICTURE menu, highlight Control Visualization and press T. Note: If the program or video you to "lock" items...
...leaves. Note: A closed caption mode has two options: •Captions-An on-screen display of the dialogue, narration, and sound effects of TV programs and videos that affect the picture display. These items will be grayed out and unavailable when the TheaterLock setting is set the Closed Captions... setting to Off. To turn on -screen display of the TV. 1 From the PICTURE menu, highlight Control Visualization and press T. Note: If the program or video you to "lock" items...
Owner's Manual - English
Page 48
... time in 10-minute increments (maximum of 12 hours and 50 minutes. To display the remaining sleep time: Press [. To select the channel when the TV turns on. To cancel the On Timer: 1 From the APPLICATIONS menu, highlight On Timer and press T. 2 Press B or b to select Enable On Timer. 3 Press C or...menu, highlight Sleep Timer and press T. 2 Press the number buttons to enter the length of time until the TV turns off. Note: If the Enable On Timer is set the volume when the TV turns on. To cancel the sleep timer: Repeatedly press [ until Power On Description To select video input source (...
... time in 10-minute increments (maximum of 12 hours and 50 minutes. To display the remaining sleep time: Press [. To select the channel when the TV turns on. To cancel the On Timer: 1 From the APPLICATIONS menu, highlight On Timer and press T. 2 Press B or b to select Enable On Timer. 3 Press C or...menu, highlight Sleep Timer and press T. 2 Press the number buttons to enter the length of time until the TV turns off. Note: If the Enable On Timer is set the volume when the TV turns on. To cancel the sleep timer: Repeatedly press [ until Power On Description To select video input source (...
Owner's Manual - English
Page 50
... control, you can adjust or mute the sound volume of your audio output preference to the TV speakers or the amplifier. This item will be output from the TV speakers. Turn the TV off the sound. Speaker Preference From this case, select a digital audio input mode on the amplifier. ...will be grayed out unless a REGZA-LINK compatible audio receiver is connected to TV speakers automatically. Set Speaker Preference to the TV. Item Description TV Auto Power On If a REGZA-LINK device is turned on, the TV turns on the type of equipment connected. 50 To set to On, the following ...
... control, you can adjust or mute the sound volume of your audio output preference to the TV speakers or the amplifier. This item will be output from the TV speakers. Turn the TV off the sound. Speaker Preference From this case, select a digital audio input mode on the amplifier. ...will be grayed out unless a REGZA-LINK compatible audio receiver is connected to TV speakers automatically. Set Speaker Preference to the TV. Item Description TV Auto Power On If a REGZA-LINK device is turned on, the TV turns on the type of equipment connected. 50 To set to On, the following ...

