
User's Guide for Model 39L22U
Page 2
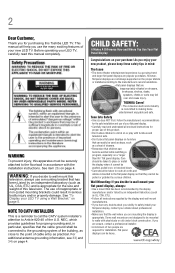
...-Listed mounting brackets could result in mind: The Issue • The home theater entertainment experience is appropriate. See "To Display your LED TV using a Wall Bracket:" on page 4. However, flat panel displays are not always supported on the proper stands or installed according to the manufacturer's recommendations. • Flat panel displays that the cable ground shall be heavy. Wall Mounting: If you are inappropriately situated on or play with the installation instructions. Before operating your LED...
...-Listed mounting brackets could result in mind: The Issue • The home theater entertainment experience is appropriate. See "To Display your LED TV using a Wall Bracket:" on page 4. However, flat panel displays are not always supported on the proper stands or installed according to the manufacturer's recommendations. • Flat panel displays that the cable ground shall be heavy. Wall Mounting: If you are inappropriately situated on or play with the installation instructions. Before operating your LED...
User's Guide for Model 39L22U
Page 3
... have fallen into an outlet that is used, use this product at plugs, convenience receptacles, and the point where they exit from the damaged television. The LCD panel inside a wall or similar enclosed area. 22) Never ...type plug has two blades and a third grounding prong. Installation, Care, and Service Installation Follow these instructions. 3) Heed all warnings. 4) Follow all instructions. 5) Do not use caution when moving the cart/apparatus combination to avoid injury from this apparatus near any small parts included on an unstable cart, stand, or table. Install...
... have fallen into an outlet that is used, use this product at plugs, convenience receptacles, and the point where they exit from the damaged television. The LCD panel inside a wall or similar enclosed area. 22) Never ...type plug has two blades and a third grounding prong. Installation, Care, and Service Installation Follow these instructions. 3) Heed all warnings. 4) Follow all instructions. 5) Do not use caution when moving the cart/apparatus combination to avoid injury from this apparatus near any small parts included on an unstable cart, stand, or table. Install...
User's Guide for Model 39L22U
Page 5
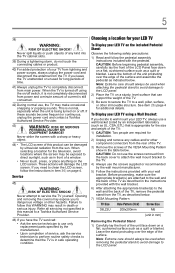
... the power cord and contact a Toshiba Authorized Service Provider. 43) WARNING: RISK OF SERIOUS PERSONAL INJURY OR EQUIPMENT DAMAGE! Never attempt to the LCD panel. 2) Place the TV on page 4. Failure to a wall, pillar, surface, or other hazards. CAUTION: Do not use the screws removed from power and a minute amount of current is turned off using a Wall Bracket: If you decide to use a wall bracket Listed by the wall mount manufacturer...
... the power cord and contact a Toshiba Authorized Service Provider. 43) WARNING: RISK OF SERIOUS PERSONAL INJURY OR EQUIPMENT DAMAGE! Never attempt to the LCD panel. 2) Place the TV on page 4. Failure to a wall, pillar, surface, or other hazards. CAUTION: Do not use the screws removed from power and a minute amount of current is turned off using a Wall Bracket: If you decide to use a wall bracket Listed by the wall mount manufacturer...
User's Guide for Model 39L22U
Page 6
... Part 15 of Conformity Compliance Statement (Part 15): Toshiba 39L22U Television models comply with the instructions, may cause undesired operation. If this equipment does cause harmful interference to radio or television reception, which the receiver is connected. • Consult the dealer or an experienced radio/TV technician for compliance to which can be determined by removing and applying power to the equipment, the user...
... Part 15 of Conformity Compliance Statement (Part 15): Toshiba 39L22U Television models comply with the instructions, may cause undesired operation. If this equipment does cause harmful interference to radio or television reception, which the receiver is connected. • Consult the dealer or an experienced radio/TV technician for compliance to which can be determined by removing and applying power to the equipment, the user...
User's Guide for Model 39L22U
Page 10
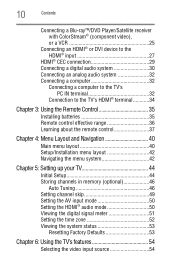
... Main menu layout 40 Setup/Installation menu layout 42 Navigating the menu system 42 Chapter 5: Setting up your TV 44 Initial Setup 44 Storing channels in memory (optional 46 Auto Tuning 46 Setting channel skip 49 Setting the AV input mode 50 Setting the HDMI® audio mode 50 Viewing the digital signal meter 51 Setting the time zone 52 Viewing the system status 53 Resetting Factory Defaults 53 Chapter 6: Using the TV's features 54 Selecting the video input source 54
... Main menu layout 40 Setup/Installation menu layout 42 Navigating the menu system 42 Chapter 5: Setting up your TV 44 Initial Setup 44 Storing channels in memory (optional 46 Auto Tuning 46 Setting channel skip 49 Setting the AV input mode 50 Setting the HDMI® audio mode 50 Viewing the digital signal meter 51 Setting the time zone 52 Viewing the system status 53 Resetting Factory Defaults 53 Chapter 6: Using the TV's features 54 Selecting the video input source 54

User's Guide for Model 39L22U
Page 13
...; digital Noise Reduction 111 MPEG Noise Reduction 112 Game Mode 112 Chapter 8: Troubleshooting 114 General troubleshooting 114 Picture problems 115 Sound problems 116 Remote control problems 117 Channel tuning problems 117 Closed caption problems 118 Rating blocking (V-Chip) problems 118 No HDMI® CEC operation 118 HDMI® problems 119 Media Player problems 119 If the problem persists after trying the solutions ..119 Appendix A: Specifications 120 Television system 120 Channel coverage 120 Power source 121 Power maximum current 121 Power consumption 121 Audio power...
...; digital Noise Reduction 111 MPEG Noise Reduction 112 Game Mode 112 Chapter 8: Troubleshooting 114 General troubleshooting 114 Picture problems 115 Sound problems 116 Remote control problems 117 Channel tuning problems 117 Closed caption problems 118 Rating blocking (V-Chip) problems 118 No HDMI® CEC operation 118 HDMI® problems 119 Media Player problems 119 If the problem persists after trying the solutions ..119 Appendix A: Specifications 120 Television system 120 Channel coverage 120 Power source 121 Power maximum current 121 Power consumption 121 Audio power...
User's Guide for Model 39L22U
Page 19
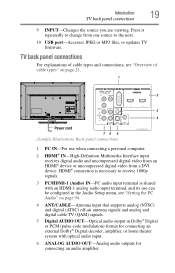
.... 4 ANT/CABLE-Antenna input that supports analog (NTSC) and digital (ATSC) off-air antenna signals and analog and digital cable TV (QAM) signals. 5 Digital AUDIO OUT-Optical audio output in Dolby® Digital or PCM (pulse-code modulation) format for connecting an external Dolby® Digital decoder, amplifier, or home theater system with an HDMI-1 analog audio input terminal, and its use can be configured in the Audio Setup menu, see "Overview of cable types and connections, see "Setting the PC Audio" on page 21. 1 2 3 4 Power cord 76...
.... 4 ANT/CABLE-Antenna input that supports analog (NTSC) and digital (ATSC) off-air antenna signals and analog and digital cable TV (QAM) signals. 5 Digital AUDIO OUT-Optical audio output in Dolby® Digital or PCM (pulse-code modulation) format for connecting an external Dolby® Digital decoder, amplifier, or home theater system with an HDMI-1 analog audio input terminal, and its use can be configured in the Audio Setup menu, see "Overview of cable types and connections, see "Setting the PC Audio" on page 21. 1 2 3 4 Power cord 76...
User's Guide for Model 39L22U
Page 24
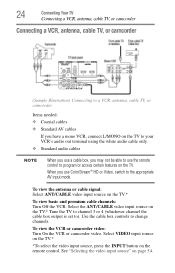
... cable box output is set to). Select the ANT/CABLE video input source on the TV.* To view basic and premium cable channels: Turn Off the VCR. To view the VCR or camcorder video: Turn On the VCR or camcorder video. Use the cable box controls to the appropriate AV input mode. Select VIDEO input source on the TV.* *To select the video input source, press the INPUT button on the TV. 24 Connecting Your TV Connecting a VCR, antenna, cable TV, or camcorder Connecting a VCR, antenna, cable...
... cable box output is set to). Select the ANT/CABLE video input source on the TV.* To view basic and premium cable channels: Turn Off the VCR. To view the VCR or camcorder video: Turn On the VCR or camcorder video. Use the cable box controls to the appropriate AV input mode. Select VIDEO input source on the TV.* *To select the video input source, press the INPUT button on the TV. 24 Connecting Your TV Connecting a VCR, antenna, cable TV, or camcorder Connecting a VCR, antenna, cable...
User's Guide for Model 39L22U
Page 26
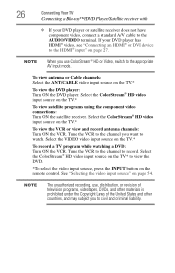
... video input source, press the INPUT button on the TV.* To view the VCR or view and record antenna channels: Turn ON the VCR. Select the ColorStream® HD video input source on the remote control. Tune the VCR to the channel to record. Select the ColorStream® HD video input source on the TV.* To view the DVD player: Turn ON the DVD player. If your DVD player or satellite receiver does not have component video, connect a standard A/V cable to the AUDIO/VIDEO...
... video input source, press the INPUT button on the TV.* To view the VCR or view and record antenna channels: Turn ON the VCR. Select the ColorStream® HD video input source on the remote control. Tune the VCR to the channel to record. Select the ColorStream® HD video input source on the TV.* To view the DVD player: Turn ON the DVD player. If your DVD player or satellite receiver does not have component video, connect a standard A/V cable to the AUDIO/VIDEO...

User's Guide for Model 39L22U
Page 38
... The C. CAPTION button accesses closed captions, see "Using closed captions" on page 74. 12 The MUTE button reduces or turns off the sound, see "Storing channels in the main menu system. 17 The CH RTN button returns to the last viewed channel or source. See "Switching between two channels using the Channel Browser" on page 59. 9 The RECALL button displays TV status information. 10 The CH ( / arrow) buttons cycle through the picture sizes. See "Selecting the video input source" on...
... The C. CAPTION button accesses closed captions, see "Using closed captions" on page 74. 12 The MUTE button reduces or turns off the sound, see "Storing channels in the main menu system. 17 The CH RTN button returns to the last viewed channel or source. See "Switching between two channels using the Channel Browser" on page 59. 9 The RECALL button displays TV status information. 10 The CH ( / arrow) buttons cycle through the picture sizes. See "Selecting the video input source" on...
User's Guide for Model 39L22U
Page 40
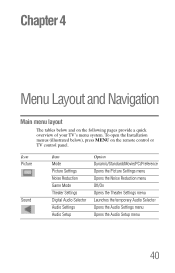
... Installation menus (illustrated below and on the remote control or TV control panel. Chapter 4 Menu Layout and Navigation Main menu layout The tables below ), press MENU on the following pages provide a quick overview of your TV's menu system. Icon Picture Sound Item Mode Picture Settings Noise Reduction Game Mode Theater Settings Digital Audio Selector Audio Settings Audio Setup Option Dynamic/Standard/Movie/PC/Preference Opens the Picture Settings menu Opens the Noise Reduction menu Off/On Opens the Theater Settings menu...
... Installation menus (illustrated below and on the remote control or TV control panel. Chapter 4 Menu Layout and Navigation Main menu layout The tables below ), press MENU on the following pages provide a quick overview of your TV's menu system. Icon Picture Sound Item Mode Picture Settings Noise Reduction Game Mode Theater Settings Digital Audio Selector Audio Settings Audio Setup Option Dynamic/Standard/Movie/PC/Preference Opens the Picture Settings menu Opens the Noise Reduction menu Off/On Opens the Theater Settings menu...
User's Guide for Model 39L22U
Page 42
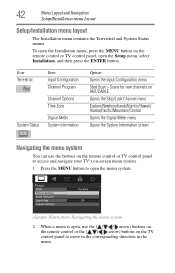
Icon Terrestrial Item Input Configuration Channel Program Channel Options Time Zone System Status Signal Meter System Information Option Opens the Input Configuration menu Start Scan > Scans for new channels on ANT/CABLE Opens the Skip/Lock Channel menu Eastern/Newfoundland/Atlantic/Hawaii/ Alaska/Pacific/Mountain/Central Opens the Signal Meter menu Opens the System Information screen Navigating the menu system You can use the buttons on the remote control or TV control panel to access and navigate...
Icon Terrestrial Item Input Configuration Channel Program Channel Options Time Zone System Status Signal Meter System Information Option Opens the Input Configuration menu Start Scan > Scans for new channels on ANT/CABLE Opens the Skip/Lock Channel menu Eastern/Newfoundland/Atlantic/Hawaii/ Alaska/Pacific/Mountain/Central Opens the Signal Meter menu Opens the System Information screen Navigating the menu system You can use the buttons on the remote control or TV control panel to access and navigate...
User's Guide for Model 39L22U
Page 44
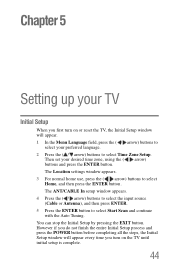
...) buttons to select Time Zone Setup. Then set your desired time zone, using the ( / arrow) buttons and press the ENTER button. The ANT/CABLE In setup window appears. 4 Press the ( / arrow) buttons to select the input source (Cable or Antenna), and then press ENTER. 5 Press the ENTER button to select Home, and then press the ENTER button. Chapter 5 Setting up your TV Initial Setup When you turn on or reset the...
...) buttons to select Time Zone Setup. Then set your desired time zone, using the ( / arrow) buttons and press the ENTER button. The ANT/CABLE In setup window appears. 4 Press the ( / arrow) buttons to select the input source (Cable or Antenna), and then press ENTER. 5 Press the ENTER button to select Home, and then press the ENTER button. Chapter 5 Setting up your TV Initial Setup When you turn on or reset the...
User's Guide for Model 39L22U
Page 50
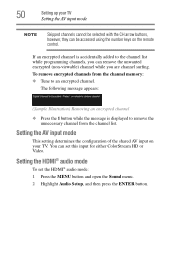
... AV input mode NOTE Skipped channels cannot be selected with the CH arrow buttons, however, they can be accessed using the number keys on the remote control. If an encrypted channel is displayed to remove the unnecessary channel from the channel memory: ❖ Tune to the channel list while programming channels, you can set the HDMI® audio mode: 1 Press the MENU button and open the Sound menu. 2 Highlight Audio Setup, and then press the ENTER button. To remove encrypted channels...
... AV input mode NOTE Skipped channels cannot be selected with the CH arrow buttons, however, they can be accessed using the number keys on the remote control. If an encrypted channel is displayed to remove the unnecessary channel from the channel memory: ❖ Tune to the channel list while programming channels, you can set the HDMI® audio mode: 1 Press the MENU button and open the Sound menu. 2 Highlight Audio Setup, and then press the ENTER button. To remove encrypted channels...
User's Guide for Model 39L22U
Page 81
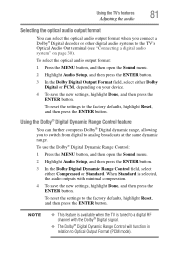
... ENTER button. Using the TV's features 81 Adjusting the audio Selecting the optical audio output format You can further compress Dolby® Digital dynamic range, allowing you connect a Dolby® Digital decoder or other digital audio systems to Optical Output Format (PCM mode). To reset the settings to the factory defaults, highlight Reset, and then press the ENTER button. To use the Dolby® Digital Dynamic Range Control: 1 Press the MENU button, and then open the Sound menu. 2 Highlight Audio Setup, and...
... ENTER button. Using the TV's features 81 Adjusting the audio Selecting the optical audio output format You can further compress Dolby® Digital dynamic range, allowing you connect a Dolby® Digital decoder or other digital audio systems to Optical Output Format (PCM mode). To reset the settings to the factory defaults, highlight Reset, and then press the ENTER button. To use the Dolby® Digital Dynamic Range Control: 1 Press the MENU button, and then open the Sound menu. 2 Highlight Audio Setup, and...

User's Guide for Model 39L22U
Page 94
... Audio: 1 Press the MENU button and open the Sound menu. 2 Highlight Audio Setup, and then press the ENTER button. 3 Press the ( / arrow) buttons to select PC Audio, and then press the ( / arrow) buttons to "Digital" and is set to "No," then the HDMI 1 Audio setting changes to your computer when connecting it to "Auto." If PC Audio is set of analog audio inputs, the PC Audio menu setting influences the HDMI 1 Audio menu setting. 94 Using the TV's features Using the PC Settings feature Mode...
... Audio: 1 Press the MENU button and open the Sound menu. 2 Highlight Audio Setup, and then press the ENTER button. 3 Press the ( / arrow) buttons to select PC Audio, and then press the ( / arrow) buttons to "Digital" and is set to "No," then the HDMI 1 Audio setting changes to your computer when connecting it to "Auto." If PC Audio is set of analog audio inputs, the PC Audio menu setting influences the HDMI 1 Audio menu setting. 94 Using the TV's features Using the PC Settings feature Mode...

User's Guide for Model 39L22U
Page 114
... modes (T1, T2, T3, or T4). For instructions, see "Using closed captions" on -screen. Black box on page 74. The TV should attempt to normal operation. 114 Before you should return to troubleshoot the problem. Set the closed caption feature is set to reset the TV. If the TV stops responding to the buttons on the remote control or TV control panel and you cannot turn off using this chapter or visit the Toshiba...
... modes (T1, T2, T3, or T4). For instructions, see "Using closed captions" on -screen. Black box on page 74. The TV should attempt to normal operation. 114 Before you should return to troubleshoot the problem. Set the closed caption feature is set to reset the TV. If the TV stops responding to the buttons on the remote control or TV control panel and you cannot turn off using this chapter or visit the Toshiba...
User's Guide for Model 39L22U
Page 115
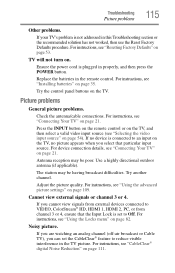
... the power cord is plugged in this Troubleshooting section or the recommended solution has not worked, then use the Reset Factory Defaults procedure. Picture problems General picture problems. Check the antenna/cable connections. Press the INPUT button on the remote control or on the TV, and then select a valid video input source (see "Using the Locks menu" on page 54). Antenna reception may be poor. If you cannot view signals from external devices connected to VIDEO, ColorStream® HD, HDMI 1, HDMI 2, PC, or from channel...
... the power cord is plugged in this Troubleshooting section or the recommended solution has not worked, then use the Reset Factory Defaults procedure. Picture problems General picture problems. Check the antenna/cable connections. Press the INPUT button on the remote control or on the TV, and then select a valid video input source (see "Using the Locks menu" on page 54). Antenna reception may be poor. If you cannot view signals from external devices connected to VIDEO, ColorStream® HD, HDMI 1, HDMI 2, PC, or from channel...
User's Guide for Model 39L22U
Page 130
... program ratings displaying 87 unlocking programs 89 Q quick setup ANT/CABLE IN 45 menu language 45 R rating system 86 downloading additional 84 S safety icons 15 scrolling TheaterWide® picture 69 specifications acceptable signal formats 122 audio power 121 channel coverage 120 ColorStream® HD input 121 Digital audio output 122 dimensions 122 HDMI® input 121 HDMI® signal formats 123 mass (weight) 122 operating conditions 122 PC IN signal formats 122 PC input 122 power consumption 121 power maximum current 121 power source 121 speaker type...
... program ratings displaying 87 unlocking programs 89 Q quick setup ANT/CABLE IN 45 menu language 45 R rating system 86 downloading additional 84 S safety icons 15 scrolling TheaterWide® picture 69 specifications acceptable signal formats 122 audio power 121 channel coverage 120 ColorStream® HD input 121 Digital audio output 122 dimensions 122 HDMI® input 121 HDMI® signal formats 123 mass (weight) 122 operating conditions 122 PC IN signal formats 122 PC input 122 power consumption 121 power maximum current 121 power source 121 speaker type...

Detailed Spec sheet for model 39L22U
Page 2
... the television. 39L22U S P E C I F I C AT I O N S1 Screen Size: 39" • Diagonal Screen Size: 38.50" Panel • Panel Type: LED • Resolution: 1080P Full HD2 • Refresh Rate: 60Hz • Backlight Control: DynaLight® Video Chassis • Dynamic Picture Mode • Native Mode™ • Game Mode Convenience • Remote Control: Standard Audio • Audyssey EQ® • Audyssey ABX™ • Speaker Output: 14W Connectivity • HDMI® with CEC3: 2 • USB Media: 1 • High Definition PC Input...
... the television. 39L22U S P E C I F I C AT I O N S1 Screen Size: 39" • Diagonal Screen Size: 38.50" Panel • Panel Type: LED • Resolution: 1080P Full HD2 • Refresh Rate: 60Hz • Backlight Control: DynaLight® Video Chassis • Dynamic Picture Mode • Native Mode™ • Game Mode Convenience • Remote Control: Standard Audio • Audyssey EQ® • Audyssey ABX™ • Speaker Output: 14W Connectivity • HDMI® with CEC3: 2 • USB Media: 1 • High Definition PC Input...


