
User's Guide for Model 39L22U
Page 4
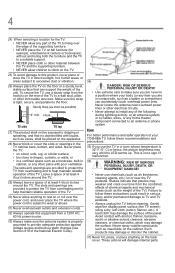
... of at least 4 (four) inches around the TV. Gently wipe the display panel surface (the TV screen) using a dry, soft cloth (cotton, flannel, etc.). The slots and openings are never in a position where your TOSHIBA TV, follow these recommendations and precautions: 35) If you are provided to protect the TV from the...
... of at least 4 (four) inches around the TV. Gently wipe the display panel surface (the TV screen) using a dry, soft cloth (cotton, flannel, etc.). The slots and openings are never in a position where your TOSHIBA TV, follow these recommendations and precautions: 35) If you are provided to protect the TV from the...
User's Guide for Model 39L22U
Page 5
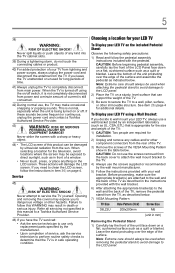
...SHOCK! Never strike the screen with the wall bracket. 6) After attaching the appropriate bracket(s) to the wall and the back of the TV, remove the pedestal stand from the TV, as described below. 7) VESA Mounting Pattern TV Size Hole Pattern (HxV) Screw Size 39L22U 200x200mm M6 (unit in ...Stand: Observe the following safety precautions: 1) Read and follow this manual to a Toshiba Authorized Service Provider. 46) If you leave the TV unattended or unused for the television, avoid locations where the screen may be used when removing the pedestal stand to avoid damage to service the TV...
...SHOCK! Never strike the screen with the wall bracket. 6) After attaching the appropriate bracket(s) to the wall and the back of the TV, remove the pedestal stand from the TV, as described below. 7) VESA Mounting Pattern TV Size Hole Pattern (HxV) Screw Size 39L22U 200x200mm M6 (unit in ...Stand: Observe the following safety precautions: 1) Read and follow this manual to a Toshiba Authorized Service Provider. 46) If you leave the TV unattended or unused for the television, avoid locations where the screen may be used when removing the pedestal stand to avoid damage to service the TV...
User's Guide for Model 39L22U
Page 7
... are not visible when the picture is not responsible for a long period of time. Such pixels are registered U.S. U.S. marks. therefore, Toshiba is viewed from a normal viewing distance. Note: Interactive video games that does not operate properly (does not light, remains constantly lit, ...work with a traditional system of the same size. • Manufactured under license from these symptoms. 1) An afterimage (ghost) may appear on -screen target may be an occasional pixel (dot of light) that involve shooting a "gun" type of joystick at optimal energy efficiency, select [Home...
... are not visible when the picture is not responsible for a long period of time. Such pixels are registered U.S. U.S. marks. therefore, Toshiba is viewed from a normal viewing distance. Note: Interactive video games that does not operate properly (does not light, remains constantly lit, ...work with a traditional system of the same size. • Manufactured under license from these symptoms. 1) An afterimage (ghost) may appear on -screen target may be an occasional pixel (dot of light) that involve shooting a "gun" type of joystick at optimal energy efficiency, select [Home...

User's Guide for Model 39L22U
Page 16
.... See "Connecting an HDMI® or DVI device to the HDMI® input" on page 32. ❖ HDMI® CEC-Allows control of your new Toshiba wide screen, integrated HD, LED TV: ❖ Integrated digital tuning (8VSB ATSC and QAM)-
.... See "Connecting an HDMI® or DVI device to the HDMI® input" on page 32. ❖ HDMI® CEC-Allows control of your new Toshiba wide screen, integrated HD, LED TV: ❖ Integrated digital tuning (8VSB ATSC and QAM)-
User's Guide for Model 39L22U
Page 17
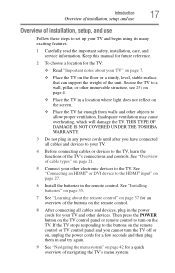
...navigating the TV's menu system. Keep this manual for future reference. 2 To choose a location for your TV" on page 7. ❖ Place the TV on the screen. ❖ Place the TV far enough from walls and other immovable structure, see 25) on page 4. ❖ Place the TV in the remote control. See... the functions of installation, setup, and use Follow these steps to set up your other devices. THIS TYPE OF DAMAGE IS NOT COVERED UNDER THE TOSHIBA WARRANTY. 3 Do not plug in and try again. 9 See "Navigating the menu system" on page 21. 5 Connect your TV and begin using its many ...
...navigating the TV's menu system. Keep this manual for future reference. 2 To choose a location for your TV" on page 7. ❖ Place the TV on the screen. ❖ Place the TV far enough from walls and other immovable structure, see 25) on page 4. ❖ Place the TV in the remote control. See... the functions of installation, setup, and use Follow these steps to set up your other devices. THIS TYPE OF DAMAGE IS NOT COVERED UNDER THE TOSHIBA WARRANTY. 3 Do not plug in and try again. 9 See "Navigating the menu system" on page 21. 5 Connect your TV and begin using its many ...
User's Guide for Model 39L22U
Page 18
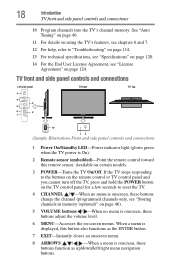
... toward this button also functions as the ENTER button. 7 EXIT-Instantly closes an onscreen menu. 8 ARROWS / / / -When a menu is displayed, this remote sensor. Available on -screen menus. When a menu is onscreen, these buttons adjust the volume level. 6 MENU-Accesses the on certain models. 3 POWER-Turns the TV On/Off.
... toward this button also functions as the ENTER button. 7 EXIT-Instantly closes an onscreen menu. 8 ARROWS / / / -When a menu is displayed, this remote sensor. Available on -screen menus. When a menu is onscreen, these buttons adjust the volume level. 6 MENU-Accesses the on certain models. 3 POWER-Turns the TV On/Off.
User's Guide for Model 39L22U
Page 31
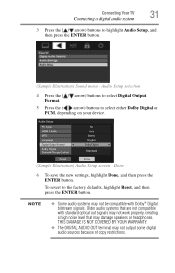
... not work properly, creating a high noise level that are not compatible with Dolby® Digital bitstream signals. Digital Output Format Standard (Sample Illustration) Audio Setup screen - Older audio systems that may not output some digital audio sources because of copy restrictions. Connecting Your TV 31 Connecting a digital audio system 3 Press the...
... not work properly, creating a high noise level that are not compatible with Dolby® Digital bitstream signals. Digital Output Format Standard (Sample Illustration) Audio Setup screen - Older audio systems that may not output some digital audio sources because of copy restrictions. Connecting Your TV 31 Connecting a digital audio system 3 Press the...
User's Guide for Model 39L22U
Page 34
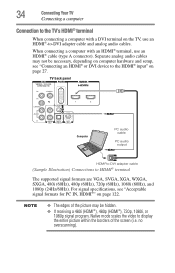
..., HDMI®" on computer hardware and setup, see "Connecting an HDMI® or DVI device to display the entire picture within the borders of the screen (i.e. Separate analog audio cables may be necessary, depending on page 122. no overscanning). 34 Connecting Your TV Connecting a computer Connection to the TV's HDMI®...
..., HDMI®" on computer hardware and setup, see "Connecting an HDMI® or DVI device to display the entire picture within the borders of the screen (i.e. Separate analog audio cables may be necessary, depending on page 122. no overscanning). 34 Connecting Your TV Connecting a computer Connection to the TV's HDMI®...

User's Guide for Model 39L22U
Page 38
... the picture sizes. Press again to enter two part channel numbers; See"Displaying TV status information" on page 107. 15 The EXIT button closes on -screen menu is on, the power LED indicator on page 77. 13 The VOL (+ -) buttons adjust the volume level. 14 The INFO button displays TV status... timer" on page 46. see "Muting the sound" on the TV front glows green. 2 The PIC SIZE button cycles through programmed channels (when no on -screen menus. 16 The ENTER button activates highlighted items in memory (optional)" on page 102. 6 The FREEZE button freezes the picture.
... the picture sizes. Press again to enter two part channel numbers; See"Displaying TV status information" on page 107. 15 The EXIT button closes on -screen menu is on, the power LED indicator on page 77. 13 The VOL (+ -) buttons adjust the volume level. 14 The INFO button displays TV status... timer" on page 46. see "Muting the sound" on the TV front glows green. 2 The PIC SIZE button cycles through programmed channels (when no on -screen menus. 16 The ENTER button activates highlighted items in memory (optional)" on page 102. 6 The FREEZE button freezes the picture.
User's Guide for Model 39L22U
Page 39
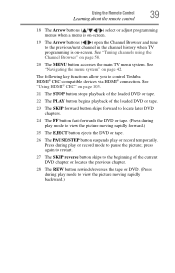
... key functions allow you to view the picture moving rapidly backward.) See "Navigating the menu system" on -screen. See "Using HDMI® CEC" on page 58. 20 The MENU button accesses the main TV menu... Learning about the remote control 18 The Arrow buttons ( / / / ) select or adjust programming menus when a menu is on-screen. 19 The Arrow buttons ( / ) open the Channel Browser and tune to the previous/next channel in the channel history when TV... the DVD or tape. 26 The PAUSE/STEP button suspends play mode to control Toshiba HDMI® CEC-compatible devices via HDMI® connection.
... key functions allow you to view the picture moving rapidly backward.) See "Navigating the menu system" on -screen. See "Using HDMI® CEC" on page 58. 20 The MENU button accesses the main TV menu... Learning about the remote control 18 The Arrow buttons ( / / / ) select or adjust programming menus when a menu is on-screen. 19 The Arrow buttons ( / ) open the Channel Browser and tune to the previous/next channel in the channel history when TV... the DVD or tape. 26 The PAUSE/STEP button suspends play mode to control Toshiba HDMI® CEC-compatible devices via HDMI® connection.
User's Guide for Model 39L22U
Page 41
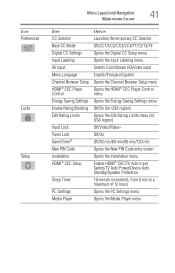
... Limits menu (for USA region) Off/Video/Video+ Off/On Off/30 min/60 min/90 min/120 min Opens the New PIN Code entry screen Opens the Installation menu Enable HDMI® CEC/TV Auto Input Switch/TV Auto Power/Device Auto Standby/Speaker Preference 10-minute increments, from 0 min...
... Limits menu (for USA region) Off/Video/Video+ Off/On Off/30 min/60 min/90 min/120 min Opens the New PIN Code entry screen Opens the Installation menu Enable HDMI® CEC/TV Auto Input Switch/TV Auto Power/Device Auto Standby/Speaker Preference 10-minute increments, from 0 min...
User's Guide for Model 39L22U
Page 42
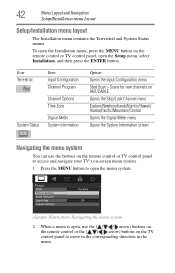
... ANT/CABLE Opens the Skip/Lock Channel menu Eastern/Newfoundland/Atlantic/Hawaii/ Alaska/Pacific/Mountain/Central Opens the Signal Meter menu Opens the System Information screen Navigating the menu system You can use the ( / / / arrow) buttons on the remote control or the ( / / / arrow) buttons on the remote control or TV control... the menu system 2 When a menu is open, use the buttons on the remote control or TV control panel to access and navigate your TV's on-screen menu system. 1 Press the MENU button to move in the corresponding direction in the menu.
... ANT/CABLE Opens the Skip/Lock Channel menu Eastern/Newfoundland/Atlantic/Hawaii/ Alaska/Pacific/Mountain/Central Opens the Signal Meter menu Opens the System Information screen Navigating the menu system You can use the ( / / / arrow) buttons on the remote control or the ( / / / arrow) buttons on the remote control or TV control... the menu system 2 When a menu is open, use the buttons on the remote control or TV control panel to access and navigate your TV's on-screen menu system. 1 Press the MENU button to move in the corresponding direction in the menu.
User's Guide for Model 39L22U
Page 45
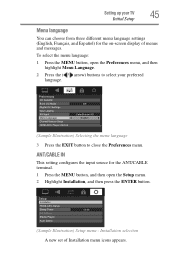
... 45 Initial Setup Menu language You can choose from three different menu language settings (English, Français, and Español) for the on-screen display of Installation menu icons appears.
... 45 Initial Setup Menu language You can choose from three different menu language settings (English, Français, and Español) for the on-screen display of Installation menu icons appears.
User's Guide for Model 39L22U
Page 46
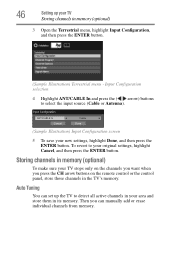
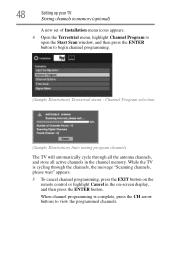
... or the control panel, store those channels in the TV's memory. To revert to select the input source (Cable or Antenna). (Sample Illustration) Input Configuration screen 5 To save your new settings, highlight Done, and then press the ENTER button. Then you press the CH arrow buttons on the channels you want...
... or the control panel, store those channels in the TV's memory. To revert to select the input source (Cable or Antenna). (Sample Illustration) Input Configuration screen 5 To save your new settings, highlight Done, and then press the ENTER button. Then you press the CH arrow buttons on the channels you want...
User's Guide for Model 39L22U
Page 48
..., the message "Scanning channels, please wait" appears. 5 To cancel channel programming, press the EXIT button on the remote control or highlight Cancel in the on-screen display, and then press the ENTER button. When channel programming is cycling through all the antenna channels, and store all active channels in the channel...
..., the message "Scanning channels, please wait" appears. 5 To cancel channel programming, press the EXIT button on the remote control or highlight Cancel in the on-screen display, and then press the ENTER button. When channel programming is cycling through all the antenna channels, and store all active channels in the channel...
User's Guide for Model 39L22U
Page 52
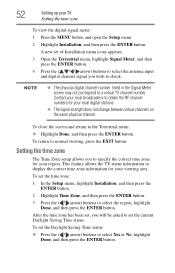
... Saving Time status: ❖ Press the ( / arrow) buttons to select Yes or No, highlight Done, and then press the ENTER button. To close the screen and return to normal viewing, press the EXIT button. Setting the time zone The Time Zone setup allows you to display the correct time zone...to the Terrestrial menu: ❖ Highlight Done, and then press the ENTER button. NOTE ❖ The physical digital channel number listed in the Signal Meter screen may not correspond to obtain the RF channel numbers for your TV Setting the time zone To view the digital signal meter: 1 Press the MENU...
... Saving Time status: ❖ Press the ( / arrow) buttons to select Yes or No, highlight Done, and then press the ENTER button. To close the screen and return to normal viewing, press the EXIT button. Setting the time zone The Time Zone setup allows you to display the correct time zone...to the Terrestrial menu: ❖ Highlight Done, and then press the ENTER button. NOTE ❖ The physical digital channel number listed in the Signal Meter screen may not correspond to obtain the RF channel numbers for your TV Setting the time zone To view the digital signal meter: 1 Press the MENU...
User's Guide for Model 39L22U
Page 53
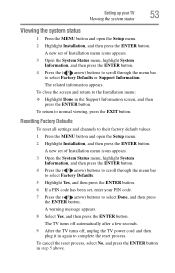
...in again to normal viewing, press the EXIT button. To cancel the reset process, select No, and press the ENTER button in the Support Information screen, and then press the ENTER button. A new set of Installation menu icons appears. 3 Open the System Status menu, highlight System Information, and... reset process. Setting up your PIN code. 7 Press the ( / arrow) buttons to select Done, and then press the ENTER button. To close the screen and return to the Installation menu: ❖ Highlight Done in step 5 above. A new set , enter your TV 53 Viewing the system status Viewing the...
...in again to normal viewing, press the EXIT button. To cancel the reset process, select No, and press the ENTER button in the Support Information screen, and then press the ENTER button. A new set of Installation menu icons appears. 3 Open the System Status menu, highlight System Information, and... reset process. Setting up your PIN code. 7 Press the ( / arrow) buttons to select Done, and then press the ENTER button. To close the screen and return to the Installation menu: ❖ Highlight Done in step 5 above. A new set , enter your TV 53 Viewing the system status Viewing the...
User's Guide for Model 39L22U
Page 55
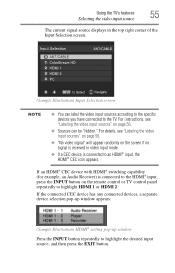
..., an Audio Receiver) is connected to the HDMI® input, press the INPUT button on the screen if no signal is received in the top right corner of the Input Selection screen. (Sample Illustration) Input Selection screen NOTE ❖ You can be "hidden." Using the TV's features 55 Selecting the video input source...
..., an Audio Receiver) is connected to the HDMI® input, press the INPUT button on the screen if no signal is received in the top right corner of the Input Selection screen. (Sample Illustration) Input Selection screen NOTE ❖ You can be "hidden." Using the TV's features 55 Selecting the video input source...
User's Guide for Model 39L22U
Page 56
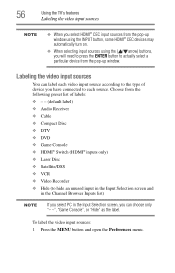
.../DSS ❖ VCR ❖ Video Recorder ❖ Hide (to hide an unused input in the Input Selection screen and in the Channel Browser Inputs list) NOTE If you select PC in the Input Selection screen, you can label each video input source according to the type of device you have connected to...
.../DSS ❖ VCR ❖ Video Recorder ❖ Hide (to hide an unused input in the Input Selection screen and in the Channel Browser Inputs list) NOTE If you select PC in the Input Selection screen, you can label each video input source according to the type of device you have connected to...

User's Guide for Model 39L22U
Page 57
...English HDMI-CEC Player Control (Sample Illustration) Preferences menu - This will cause that input source. Cable Compact Disc DTV (Sample Illustration) Input Labeling screen 5 To save the new input labels, highlight Done, and then press the ENTER button. To revert to be selected as the label. Input ... Highlight Input Labeling, and then press the ENTER button. If a particular input is not used, Hide can be grayed out in the Input Selection screen and skipped over when you wish to label. 4 Press the ( / arrow) buttons to select the desired label for that input to the factory...
...English HDMI-CEC Player Control (Sample Illustration) Preferences menu - This will cause that input source. Cable Compact Disc DTV (Sample Illustration) Input Labeling screen 5 To save the new input labels, highlight Done, and then press the ENTER button. To revert to be selected as the label. Input ... Highlight Input Labeling, and then press the ENTER button. If a particular input is not used, Hide can be grayed out in the Input Selection screen and skipped over when you wish to label. 4 Press the ( / arrow) buttons to select the desired label for that input to the factory...


