
User's Guide for Model 39L22U
Page 10
... a computer to the TV's PC IN terminal 32 Connection to the TV's HDMI® terminal............34 Chapter 3: Using the Remote Control 35 Installing batteries 35 Remote control effective range 36 Learning about the remote control 37 Chapter 4: Menu Layout and Navigation 40 Main menu layout 40 Setup/Installation menu layout 42 Navigating the...
... a computer to the TV's PC IN terminal 32 Connection to the TV's HDMI® terminal............34 Chapter 3: Using the Remote Control 35 Installing batteries 35 Remote control effective range 36 Learning about the remote control 37 Chapter 4: Menu Layout and Navigation 40 Main menu layout 40 Setup/Installation menu layout 42 Navigating the...

User's Guide for Model 39L22U
Page 13
... CableClear® digital Noise Reduction 111 MPEG Noise Reduction 112 Game Mode 112 Chapter 8: Troubleshooting 114 General troubleshooting 114 Picture problems 115 Sound problems 116 Remote control problems 117 Channel tuning problems 117 Closed caption problems 118 Rating blocking (V-Chip) problems 118 No HDMI® CEC operation 118 HDMI® problems...
... CableClear® digital Noise Reduction 111 MPEG Noise Reduction 112 Game Mode 112 Chapter 8: Troubleshooting 114 General troubleshooting 114 Picture problems 115 Sound problems 116 Remote control problems 117 Channel tuning problems 117 Closed caption problems 118 Rating blocking (V-Chip) problems 118 No HDMI® CEC operation 118 HDMI® problems...

User's Guide for Model 39L22U
Page 16
...;/DVD Player/Satellite receiver with 1080p input support. See "Using HDMI® CEC" on page 32. ❖ HDMI® CEC-Allows control of your new Toshiba wide screen, integrated HD, LED TV: ❖ Integrated digital tuning (8VSB ATSC and QAM)- 16 Introduction Features Features The following are just a few of the...
...;/DVD Player/Satellite receiver with 1080p input support. See "Using HDMI® CEC" on page 32. ❖ HDMI® CEC-Allows control of your new Toshiba wide screen, integrated HD, LED TV: ❖ Integrated digital tuning (8VSB ATSC and QAM)- 16 Introduction Features Features The following are just a few of the...
User's Guide for Model 39L22U
Page 17
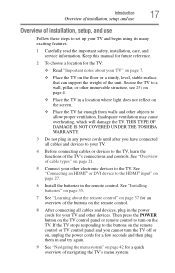
... your TV and other devices. Keep this manual for future reference. 2 To choose a location for the TV: ❖ Read "Important notes about the remote control" on page 37 for an overview of installation, setup, and use Follow these steps to set up your TV and begin using its many... objects to allow proper ventilation. THIS TYPE OF DAMAGE IS NOT COVERED UNDER THE TOSHIBA WARRANTY. 3 Do not plug in any power cords until after you cannot turn on page 27. 6 Install the batteries in the remote control. Introduction 17 Overview of installation, setup, and use Overview of the buttons ...
... your TV and other devices. Keep this manual for future reference. 2 To choose a location for the TV: ❖ Read "Important notes about the remote control" on page 37 for an overview of installation, setup, and use Follow these steps to set up your TV and begin using its many... objects to allow proper ventilation. THIS TYPE OF DAMAGE IS NOT COVERED UNDER THE TOSHIBA WARRANTY. 3 Do not plug in any power cords until after you cannot turn on page 27. 6 Install the batteries in the remote control. Introduction 17 Overview of installation, setup, and use Overview of the buttons ...
User's Guide for Model 39L22U
Page 18
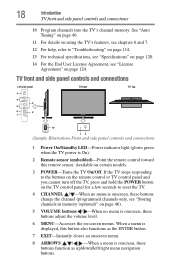
.... If the TV stops responding to the buttons on the remote control or TV control panel and you cannot turn off the TV, press and hold the POWER button on the TV control panel for a few ... Illustration) Front and side panel controls and connections 1 Power On/Standby LED-Power indicator light (glows green when the TV power is On). 2 Remote sensor (embedded)-Point the remote control toward this button also functions as the ENTER button. 7 EXIT-Instantly closes an onscreen menu. 8 ARROWS / / / -When a menu is onscreen, these buttons...
.... If the TV stops responding to the buttons on the remote control or TV control panel and you cannot turn off the TV, press and hold the POWER button on the TV control panel for a few ... Illustration) Front and side panel controls and connections 1 Power On/Standby LED-Power indicator light (glows green when the TV power is On). 2 Remote sensor (embedded)-Point the remote control toward this button also functions as the ENTER button. 7 EXIT-Instantly closes an onscreen menu. 8 ARROWS / / / -When a menu is onscreen, these buttons...
User's Guide for Model 39L22U
Page 24
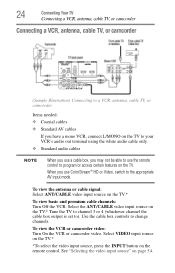
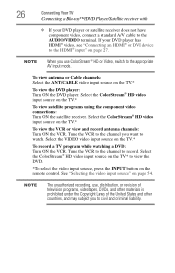
... source on the TV.* *To select the video input source, press the INPUT button on page 54. See "Selecting the video input source" on the remote control. Use the cable box controls to ). 24 Connecting Your TV Connecting a VCR, antenna, cable TV, or camcorder Connecting a VCR, antenna, cable TV, or ... your VCR's audio out terminal using the white audio cable only. ❖ Standard audio cables NOTE When you use a cable box, you use the remote control to program or access certain features on the TV.* To view basic and premium cable channels: Turn Off the VCR. Select the ANT/CABLE...
... source on the TV.* *To select the video input source, press the INPUT button on page 54. See "Selecting the video input source" on the remote control. Use the cable box controls to ). 24 Connecting Your TV Connecting a VCR, antenna, cable TV, or camcorder Connecting a VCR, antenna, cable TV, or ... your VCR's audio out terminal using the white audio cable only. ❖ Standard audio cables NOTE When you use a cable box, you use the remote control to program or access certain features on the TV.* To view basic and premium cable channels: Turn Off the VCR. Select the ANT/CABLE...
User's Guide for Model 39L22U
Page 26
... input source on the TV.* To view the DVD player: Turn ON the DVD player. Select the ColorStream® HD video input source on the remote control. Select the ColorStream® HD video input source on the TV* to view the DVD. *To select the video input source, press the INPUT...
... input source on the TV.* To view the DVD player: Turn ON the DVD player. Select the ColorStream® HD video input source on the remote control. Select the ColorStream® HD video input source on the TV* to view the DVD. *To select the video input source, press the INPUT...
User's Guide for Model 39L22U
Page 28
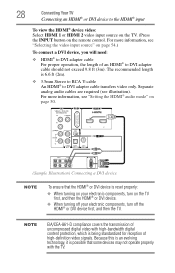
... evolving technology, it is possible that the HDMI® or DVI device is reset properly: ❖ When turning on your electronic components, turn on the remote control. VIDEO AUDIO L R IN IN DVI / HDCP OUT OUT L R (Sample Illustration) Connecting a DVI device NOTE To ensure that some devices may not operate properly with...
... evolving technology, it is possible that the HDMI® or DVI device is reset properly: ❖ When turning on your electronic components, turn on the remote control. VIDEO AUDIO L R IN IN DVI / HDCP OUT OUT L R (Sample Illustration) Connecting a DVI device NOTE To ensure that some devices may not operate properly with...

User's Guide for Model 39L22U
Page 29
...; This feature uses the CEC technology as regulated by the HDMI® standard. For details, see "Overview of connected audio/video devices using the TV's remote control if you use an HDMI® cable with the desired settings, see "HDMI® CEC input source selection" on page 21). NOTE ❖ If...
...; This feature uses the CEC technology as regulated by the HDMI® standard. For details, see "Overview of connected audio/video devices using the TV's remote control if you use an HDMI® cable with the desired settings, see "HDMI® CEC input source selection" on page 21). NOTE ❖ If...
User's Guide for Model 39L22U
Page 30
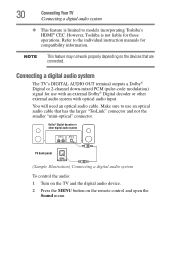
...10070; This feature is not liable for those operations. Dolby® Digital decoder or other external audio system with optical audio input. However, Toshiba is limited to the individual instruction manuals for use an optical audio cable that are connected. You will need an optical audio cable. NOTE... This feature may not work properly depending on the remote control and open the Sound menu. Connecting a digital audio system The TV's DIGITAL AUDIO OUT terminal outputs a Dolby® Digital or 2-...
...10070; This feature is not liable for those operations. Dolby® Digital decoder or other external audio system with optical audio input. However, Toshiba is limited to the individual instruction manuals for use an optical audio cable that are connected. You will need an optical audio cable. NOTE... This feature may not work properly depending on the remote control and open the Sound menu. Connecting a digital audio system The TV's DIGITAL AUDIO OUT terminal outputs a Dolby® Digital or 2-...

User's Guide for Model 39L22U
Page 35
Squeeze tab and lift cover (Sample Illustration) Removing the remote back cover 2 Insert two AAA batteries, corresponding to excessive heat such as sunshine, fire, etc. 35 Do not expose batteries to the (+) and (-) markings on the battery compartment. (Sample Illustration) Installing the batteries 3 Replace the battery cover. Chapter 3 Using the Remote Control Installing batteries To install batteries: 1 Remove the battery cover from the back of the remote control.
Squeeze tab and lift cover (Sample Illustration) Removing the remote back cover 2 Insert two AAA batteries, corresponding to excessive heat such as sunshine, fire, etc. 35 Do not expose batteries to the (+) and (-) markings on the battery compartment. (Sample Illustration) Installing the batteries 3 Replace the battery cover. Chapter 3 Using the Remote Control Installing batteries To install batteries: 1 Remove the battery cover from the back of the remote control.

User's Guide for Model 39L22U
Page 36
... not operate correctly, or if the operating range is no obstruction between the remote control and the TV. 16.4 ft (5m) (Sample Illustration) Remote control effective range Remote control effective range For optimum performance, aim the remote control directly at the TV and make sure there is reduced, replace the batteries.... ❖ Always replace both batteries with new ones. This prevents battery acid from the remote if they are dead or if the remote control is not to use new and used for an extended period of batteries. 36 Using the...
... not operate correctly, or if the operating range is no obstruction between the remote control and the TV. 16.4 ft (5m) (Sample Illustration) Remote control effective range Remote control effective range For optimum performance, aim the remote control directly at the TV and make sure there is reduced, replace the batteries.... ❖ Always replace both batteries with new ones. This prevents battery acid from the remote if they are dead or if the remote control is not to use new and used for an extended period of batteries. 36 Using the...
User's Guide for Model 39L22U
Page 37
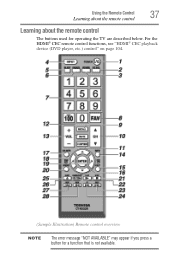
For the HDMI® CEC remote control functions, see "HDMI® CEC playback device (DVD player, etc.) control" on page 104. (Sample Illustration) Remote control overview NOTE The error message "NOT AVAILABLE" may appear if you press a button for operating the TV are described below. Using the Remote Control 37 Learning about the remote control Learning about the remote control The buttons used for a function that is not available.
For the HDMI® CEC remote control functions, see "HDMI® CEC playback device (DVD player, etc.) control" on page 104. (Sample Illustration) Remote control overview NOTE The error message "NOT AVAILABLE" may appear if you press a button for operating the TV are described below. Using the Remote Control 37 Learning about the remote control Learning about the remote control The buttons used for a function that is not available.

User's Guide for Model 39L22U
Page 38
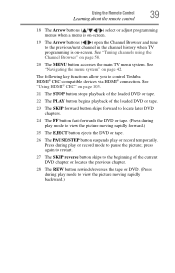
... program details, when available. See"Displaying TV status information" on page 107. 15 The EXIT button closes on page 63. 38 Using the Remote Control Learning about the remote control 1 The POWER button turns the TV On/Off. See "Selecting the video input source" on page 71. 7 The Channel Number buttons (0-9, and...
... program details, when available. See"Displaying TV status information" on page 107. 15 The EXIT button closes on page 63. 38 Using the Remote Control Learning about the remote control 1 The POWER button turns the TV On/Off. See "Selecting the video input source" on page 71. 7 The Channel Number buttons (0-9, and...
User's Guide for Model 39L22U
Page 39
... "Tuning channels using the Channel Browser" on page 42. The following key functions allow you to control Toshiba HDMI® CEC-compatible devices via HDMI® connection. Using the Remote Control 39 Learning about the remote control 18 The Arrow buttons ( / / / ) select or adjust programming menus when a menu is on-screen. 19 The...
... "Tuning channels using the Channel Browser" on page 42. The following key functions allow you to control Toshiba HDMI® CEC-compatible devices via HDMI® connection. Using the Remote Control 39 Learning about the remote control 18 The Arrow buttons ( / / / ) select or adjust programming menus when a menu is on-screen. 19 The...
User's Guide for Model 39L22U
Page 40
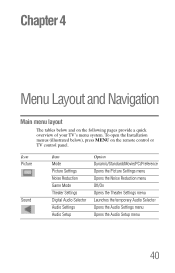
... below ), press MENU on the following pages provide a quick overview of your TV's menu system. To open the Installation menus (illustrated below and on the remote control or TV control panel. Icon Picture Sound Item Mode Picture Settings Noise Reduction Game Mode Theater Settings Digital Audio Selector Audio Settings Audio Setup...
... below ), press MENU on the following pages provide a quick overview of your TV's menu system. To open the Installation menus (illustrated below and on the remote control or TV control panel. Icon Picture Sound Item Mode Picture Settings Noise Reduction Game Mode Theater Settings Digital Audio Selector Audio Settings Audio Setup...
User's Guide for Model 39L22U
Page 42
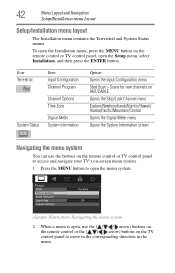
...Alaska/Pacific/Mountain/Central Opens the Signal Meter menu Opens the System Information screen Navigating the menu system You can use the buttons on the remote control or TV control panel to access and navigate your TV's on the TV control panel to move in the corresponding direction in the... menu. To open the Installation menu, press the MENU button on the remote control or TV control panel, open , use the ( / / / arrow) buttons on the remote control or the ( / / / arrow) buttons on -screen menu system. 1 Press the MENU button to open the menu system...
...Alaska/Pacific/Mountain/Central Opens the Signal Meter menu Opens the System Information screen Navigating the menu system You can use the buttons on the remote control or TV control panel to access and navigate your TV's on the TV control panel to move in the corresponding direction in the... menu. To open the Installation menu, press the MENU button on the remote control or TV control panel, open , use the ( / / / arrow) buttons on the remote control or the ( / / / arrow) buttons on -screen menu system. 1 Press the MENU button to open the menu system...
User's Guide for Model 39L22U
Page 46
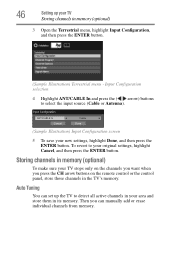
Storing channels in memory (optional) To make sure your TV stops only on the remote control or the control panel, store those channels in its memory. To revert to select the input source (Cable or Antenna). (Sample Illustration) Input Configuration ...
Storing channels in memory (optional) To make sure your TV stops only on the remote control or the control panel, store those channels in its memory. To revert to select the input source (Cable or Antenna). (Sample Illustration) Input Configuration ...
User's Guide for Model 39L22U
Page 47
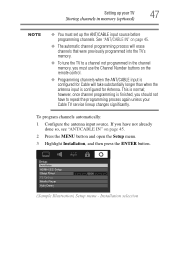
... changes significantly. however, once channel programming is normal; This is finished, you should not have not already done so, see "ANT/CABLE IN" on the remote control. ❖ Programming channels when the ANT/CABLE input is configured for Antenna. If you must set up the ANT/CABLE input source before programming...
... changes significantly. however, once channel programming is normal; This is finished, you should not have not already done so, see "ANT/CABLE IN" on the remote control. ❖ Programming channels when the ANT/CABLE input is configured for Antenna. If you must set up the ANT/CABLE input source before programming...
User's Guide for Model 39L22U
Page 48
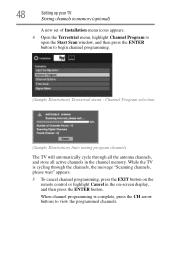
... The TV will automatically cycle through the channels, the message "Scanning channels, please wait" appears. 5 To cancel channel programming, press the EXIT button on the remote control or highlight Cancel in memory (optional) A new set of Installation menu icons appears. 4 Open the Terrestrial menu, highlight Channel Program to open the Start...
... The TV will automatically cycle through the channels, the message "Scanning channels, please wait" appears. 5 To cancel channel programming, press the EXIT button on the remote control or highlight Cancel in memory (optional) A new set of Installation menu icons appears. 4 Open the Terrestrial menu, highlight Channel Program to open the Start...


