Owner's Manual - English
Page 1
...LCD Television HIGH-DEFINITION TELEVISION 32RV530U 37RV530U 42RV530U 46RV530U 52RV530U For an overview of your new TV, see page 9. For details, please contact your TV antenna installer, cable provider, or satellite provider. © 2008 TOSHIBA CORPORATION All Rights Reserved Owner's Record The model number and serial number are on the back of steps for setting... up your TV. Refer to these numbers in the spaces below. Note: To display a High Definition picture, the TV must be receiving a High Definition signal (such as an over-the-air High Definition TV broadcast,...
...LCD Television HIGH-DEFINITION TELEVISION 32RV530U 37RV530U 42RV530U 46RV530U 52RV530U For an overview of your new TV, see page 9. For details, please contact your TV antenna installer, cable provider, or satellite provider. © 2008 TOSHIBA CORPORATION All Rights Reserved Owner's Record The model number and serial number are on the back of steps for setting... up your TV. Refer to these numbers in the spaces below. Note: To display a High Definition picture, the TV must be receiving a High Definition signal (such as an over-the-air High Definition TV broadcast,...
Owner's Manual - English
Page 7
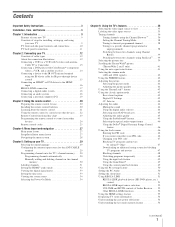
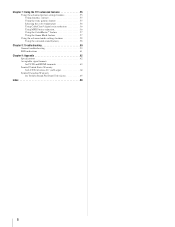
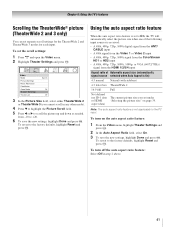
...4: Menu layout and navigation 27 Main menu layout 27 Setup/Installation menu layout 27 Navigating the menu system 28 Chapter 5: Setting up your TV 29 Selecting the menu language 29 Configuring the antenna input source for the ANT/CABLE terminal 29 Programming channels into the...38 Switching between two channels using Channel Return 39 Switching between two channels using SurfLock™. . . . 39 Selecting the picture size 39 Scrolling the TheaterWide® picture (TheaterWide 2 and 3 only 41 Using the auto aspect ratio feature 41 Selecting the cinema mode (480i and 1080i signals 42...
...4: Menu layout and navigation 27 Main menu layout 27 Setup/Installation menu layout 27 Navigating the menu system 28 Chapter 5: Setting up your TV 29 Selecting the menu language 29 Configuring the antenna input source for the ANT/CABLE terminal 29 Programming channels into the...38 Switching between two channels using Channel Return 39 Switching between two channels using SurfLock™. . . . 39 Selecting the picture size 39 Scrolling the TheaterWide® picture (TheaterWide 2 and 3 only 41 Using the auto aspect ratio feature 41 Selecting the cinema mode (480i and 1080i signals 42...
Owner's Manual - English
Page 8
Chapter 7: Using the TV's advanced features 55 Using the advanced picture settings features 55 Using dynamic contrast 55 Using the static gamma feature 55 Selecting the color temperature 56 Using CableClear® digital noise reduction...audio settings features 58 Using the surround sound features 58 Chapter 8: Troubleshooting 59 General troubleshooting 59 LED indications 61 Chapter 9: Appendix 62 Specifications 62 Acceptable signal formats for PC IN and HDMI terminals 63 Limited United States Warranty for LCD Televisions 26" and Larger 64 Limited Canadian Warranty for Toshiba ...
Chapter 7: Using the TV's advanced features 55 Using the advanced picture settings features 55 Using dynamic contrast 55 Using the static gamma feature 55 Selecting the color temperature 56 Using CableClear® digital noise reduction...audio settings features 58 Using the surround sound features 58 Chapter 8: Troubleshooting 59 General troubleshooting 59 LED indications 61 Chapter 9: Appendix 62 Specifications 62 Acceptable signal formats for PC IN and HDMI terminals 63 Limited United States Warranty for LCD Televisions 26" and Larger 64 Limited Canadian Warranty for Toshiba ...

Owner's Manual - English
Page 9
..., setting up, and using your new TV Follow these steps to put the Call Letters (e.g. page 46). • CableClear® digital picture noise reduction (- pages 2-5) 2 Do not plug in any power cords until AFTER you have connected all cables and devices, plug in the power cords for your new Toshiba widescreen, integrated HD, LCD TV: •...
..., setting up, and using your new TV Follow these steps to put the Call Letters (e.g. page 46). • CableClear® digital picture noise reduction (- pages 2-5) 2 Do not plug in any power cords until AFTER you have connected all cables and devices, plug in the power cords for your new Toshiba widescreen, integrated HD, LCD TV: •...
Owner's Manual - English
Page 12
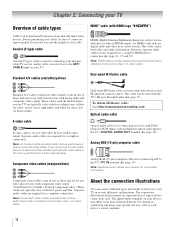
...cable is for use with video devices with analog audio and composite video output. Component video cables come in sets of devices to each cable. About the connection illustrations You can connect different types and brands of three, and...TV's DIGITAL AUDIO OUT terminal (- Note: Component video cables provide better picture performance than a standard (composite) video or S-video cable. For details on your devices and the length of component video.) These cables are required for stereo left (or mono) audio. To obtain IR blaster cable: Visit http://ceaccessories.toshiba...
...cable is for use with video devices with analog audio and composite video output. Component video cables come in sets of devices to each cable. About the connection illustrations You can connect different types and brands of three, and...TV's DIGITAL AUDIO OUT terminal (- Note: Component video cables provide better picture performance than a standard (composite) video or S-video cable. For details on your devices and the length of component video.) These cables are required for stereo left (or mono) audio. To obtain IR blaster cable: Visit http://ceaccessories.toshiba...
Owner's Manual - English
Page 13
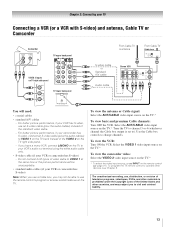
... the VCR. page 21). Chapter 2: Connecting your TV Connecting a VCR (or a VCR with S-video) and antenna, Cable TV or Camcorder Camcorder AUDIO OUT L R VIDEO TV upper back panel VIDEO 2 inputs on the TV right side panel. - For better picture performance, if your camcorder has S-video, connect an...4 OUT L R IN from ANT OUT to TV You will be unacceptable. • standard audio cables (if your VCR or camcorder has S-video) Note: When you use , distribution, or revision of television programs, videotapes, DVDs, and other materials is set to channel 3 or 4 (whichever channel the ...
... the VCR. page 21). Chapter 2: Connecting your TV Connecting a VCR (or a VCR with S-video) and antenna, Cable TV or Camcorder Camcorder AUDIO OUT L R VIDEO TV upper back panel VIDEO 2 inputs on the TV right side panel. - For better picture performance, if your camcorder has S-video, connect an...4 OUT L R IN from ANT OUT to TV You will be unacceptable. • standard audio cables (if your VCR or camcorder has S-video) Note: When you use , distribution, or revision of television programs, videotapes, DVDs, and other materials is set to channel 3 or 4 (whichever channel the ...
Owner's Manual - English
Page 14
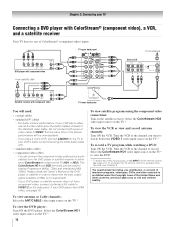
...COMPONENT VIDEO S-VIDEO VIDEO R IN OUT OUT Satellite receiver with ColorStream® (component video), a VCR, and a satellite receiver Your TV has two sets of ColorStream terminals on the remote control (- Do not connect both types of the DVD player or satellite in order to VIDEO 1 ...picture performance, if your DVD player has HDMI video, see Chapter 3. Select the VIDEO 1 video input source on the TV.* To view the VCR or view and record antenna channels: Turn ON the VCR. If your DVD player or satellite receiver does not have a mono VCR, connect L/MONO on the TV to either set...
...COMPONENT VIDEO S-VIDEO VIDEO R IN OUT OUT Satellite receiver with ColorStream® (component video), a VCR, and a satellite receiver Your TV has two sets of ColorStream terminals on the remote control (- Do not connect both types of the DVD player or satellite in order to VIDEO 1 ...picture performance, if your DVD player has HDMI video, see Chapter 3. Select the VIDEO 1 video input source on the TV.* To view the VCR or view and record antenna channels: Turn ON the VCR. If your DVD player or satellite receiver does not have a mono VCR, connect L/MONO on the TV to either set...
Owner's Manual - English
Page 19
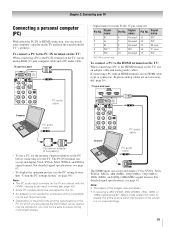
...• To display the optimum picture, use an HDMI cable (type A connector). Signal name 1 R 2 G 3 B 4 NC * 5 NC Pin No. TV upper back panel PC audio cable Computer PC audio output PC audio cable Conversion adapter (if necessary) • To use a PC, set the monitor output resolution on the... which you are not necessary (- If connecting a PC with the HDMI 1 analog audio input terminals (- "Using the PC settings feature" on the TV and hear the sound from the TV's speakers. page 50). • Some PC models cannot be hidden. • If receiving a 480i (HDMI), 480p (...
...• To display the optimum picture, use an HDMI cable (type A connector). Signal name 1 R 2 G 3 B 4 NC * 5 NC Pin No. TV upper back panel PC audio cable Computer PC audio output PC audio cable Conversion adapter (if necessary) • To use a PC, set the monitor output resolution on the... which you are not necessary (- If connecting a PC with the HDMI 1 analog audio input terminals (- "Using the PC settings feature" on the TV and hear the sound from the TV's speakers. page 50). • Some PC models cannot be hidden. • If receiving a 480i (HDMI), 480p (...

Owner's Manual - English
Page 21
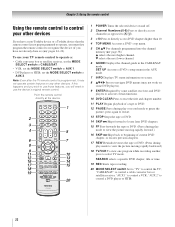
... 30). 8 VOL + - page 39). 12 MUTE reduces or turns off . page 37). (Also see "Arrow buttons.") 15 Arrow buttons (BbC c) When a menu is used for a function that is on the TV front will be illuminated. 2 FREEZE freezes the picture. page 36). 6 INPUT selects the video input source (- page 54). 14 3 C...27). 18 EXIT closes on-screen menus. 19 MODE SELECT switch switches between TV, CABLE/SAT, AUX 1, and AUX 2 modes (- Set to "TV" to edit the Favorites List (- page 54). 11 CH RTN returns to restore the moving picture (- Note: The error message "Not Available" may appear if you press...
... 30). 8 VOL + - page 39). 12 MUTE reduces or turns off . page 37). (Also see "Arrow buttons.") 15 Arrow buttons (BbC c) When a menu is used for a function that is on the TV front will be illuminated. 2 FREEZE freezes the picture. page 36). 6 INPUT selects the video input source (- page 54). 14 3 C...27). 18 EXIT closes on-screen menus. 19 MODE SELECT switch switches between TV, CABLE/SAT, AUX 1, and AUX 2 modes (- Set to "TV" to edit the Favorites List (- page 54). 11 CH RTN returns to restore the moving picture (- Note: The error message "Not Available" may appear if you press...
Owner's Manual - English
Page 22
.... 14 SKIP z Skips forward to locate later DVD chapters. 15 FF Fast-forwards the tape or DVD. (Press during play mode to view the picture moving rapidly forward.) 16 SKIP Z Skips back to beginning of a tape or DVD. 12 PAUSE Press during play or record mode to select...to control your TV remote control to operate a: • Cable converter box or satellite receiver, set the MODE SELECT switch to CABLE/SAT. • VCR, set the MODE SELECT switch to AUX 1. • DVD player or HTIB, set the MODE SELECT switch to recognize the device (if you have a non-Toshiba device or a Toshiba device that...
.... 14 SKIP z Skips forward to locate later DVD chapters. 15 FF Fast-forwards the tape or DVD. (Press during play mode to view the picture moving rapidly forward.) 16 SKIP Z Skips back to beginning of a tape or DVD. 12 PAUSE Press during play or record mode to select...to control your TV remote control to operate a: • Cable converter box or satellite receiver, set the MODE SELECT switch to CABLE/SAT. • VCR, set the MODE SELECT switch to AUX 1. • DVD player or HTIB, set the MODE SELECT switch to recognize the device (if you have a non-Toshiba device or a Toshiba device that...
Owner's Manual - English
Page 23
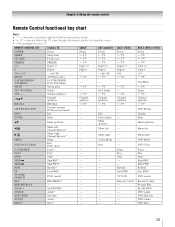
...™ --- REMOTE CONTROL KEY Toshiba TV CABLE SAT (satellite) POWER SLEEP PIC SIZE FREEZE Power Sleep timer Picture size FREEZE Power s TV s TV s TV Power s TV s TV s TV 1-9 Digit 1-9 Digit 1-9 Digit 1-9 0 Digit 0 Digit 0 Digit 0 100/-/+10 INPUT - (sub CH) TV/Video select --s TV - (sub CH) s TV FAV BROWSER/ TOP MENU MUTE FAV BROWSER DVD TOP Menu* Sound mute --s TV --s TV SET UP/GUIDE VOL + - Menu...
...™ --- REMOTE CONTROL KEY Toshiba TV CABLE SAT (satellite) POWER SLEEP PIC SIZE FREEZE Power Sleep timer Picture size FREEZE Power s TV s TV s TV Power s TV s TV s TV 1-9 Digit 1-9 Digit 1-9 Digit 1-9 0 Digit 0 Digit 0 Digit 0 100/-/+10 INPUT - (sub CH) TV/Video select --s TV - (sub CH) s TV FAV BROWSER/ TOP MENU MUTE FAV BROWSER DVD TOP Menu* Sound mute --s TV --s TV SET UP/GUIDE VOL + - Menu...
Owner's Manual - English
Page 27
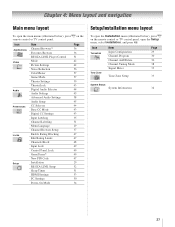
... below ), press Y on the remote control or TV control panel. Icon Applications Video Audio Preferences Locks Setup Item Channel Browser™ Favorites Browser REGZA-LINK Player Control Mode Picture Settings Noise Reduction ColorMaster Game Mode Theater Settings TheaterLock Digital Audio Selector Audio Settings Advanced Audio Settings Audio Setup CC Selector Base CC Mode Digital CC... Settings Power-On Mode Page 36 36 51 42 42 56 57 57 39 43 44 45 58 45 44 43 43 35 31 29 37 47 47 48 49 49 49 47 29 52 51 53 50 34 Setup/Installation menu layout To open the Setup menu, select Installation,...
... below ), press Y on the remote control or TV control panel. Icon Applications Video Audio Preferences Locks Setup Item Channel Browser™ Favorites Browser REGZA-LINK Player Control Mode Picture Settings Noise Reduction ColorMaster Game Mode Theater Settings TheaterLock Digital Audio Selector Audio Settings Advanced Audio Settings Audio Setup CC Selector Base CC Mode Digital CC... Settings Power-On Mode Page 36 36 51 42 42 56 57 57 39 43 44 45 58 45 44 43 43 35 31 29 37 47 47 48 49 49 49 47 29 52 51 53 50 34 Setup/Installation menu layout To open the Setup menu, select Installation,...
Owner's Manual - English
Page 39
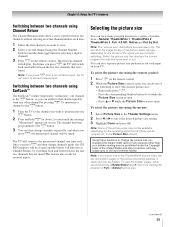
...channel to the R button, so you can view many program formats in the Theater Settings menu. 2 Press C or c to select the desired picture size setting. 3 Highlight Done and press T. Note: The "picture size" illustrations are tuned.This feature also works for external inputs. To memorize a ...channel to the R button: 1 Tune the TV to the channel you want to view. 2 Select...
...channel to the R button, so you can view many program formats in the Theater Settings menu. 2 Press C or c to select the desired picture size setting. 3 Highlight Done and press T. Note: The "picture size" illustrations are tuned.This feature also works for external inputs. To memorize a ...channel to the R button: 1 Tune the TV to the channel you want to view. 2 Select...
Owner's Manual - English
Page 41
... To revert to +20. 6 To save the new settings, highlight Done and press T. Video Mode Picture Settings Noise Reduction ColorMaster Game Mode Theater Settings TheaterLock Sports Off Off 3 In the Picture Size field, select either TheaterWide 2 or TheaterWide 3 (you set to On, the TV will automatically select the picture size when one of the following input sources is...
... To revert to +20. 6 To save the new settings, highlight Done and press T. Video Mode Picture Settings Noise Reduction ColorMaster Game Mode Theater Settings TheaterLock Sports Off Off 3 In the Picture Size field, select either TheaterWide 2 or TheaterWide 3 (you set to On, the TV will automatically select the picture size when one of the following input sources is...
Owner's Manual - English
Page 42
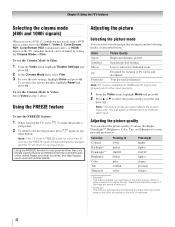
... the entire screen. Mode Sports Standard Movie PC Preference Picture Quality Bright and dynamic picture Standard picture settings Lower contrast for darkened room Designed for viewing of darkness. 42 Using the FREEZE feature To use the FREEZE feature: 1 When viewing the TV, press B to make the picture a still picture. 2 To return to civil and criminal liability. Note...
... the entire screen. Mode Sports Standard Movie PC Preference Picture Quality Bright and dynamic picture Standard picture settings Lower contrast for darkened room Designed for viewing of darkness. 42 Using the FREEZE feature To use the FREEZE feature: 1 When viewing the TV, press B to make the picture a still picture. 2 To return to civil and criminal liability. Note...
Owner's Manual - English
Page 43
... back to the base mode that when adjusted cause the Mode setting to automatically change to "Preference" will display on screen. Chapter 6: Using the TV's features To adjust the picture quality: 1 From the Video menu, highlight Picture Settings and press T. 2 Press B or b to select the picture quality you want to adjust (Contrast, Backlight, DynaLight, Brightness, Color...
... back to the base mode that when adjusted cause the Mode setting to automatically change to "Preference" will display on screen. Chapter 6: Using the TV's features To adjust the picture quality: 1 From the Video menu, highlight Picture Settings and press T. 2 Press B or b to select the picture quality you want to adjust (Contrast, Backlight, DynaLight, Brightness, Color...
Owner's Manual - English
Page 48
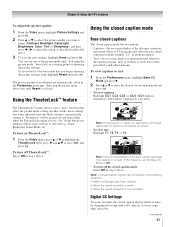
...4 above . Push 'mute' to highlight Channels Block and then press T. You will appear on-screen: This program exceeds the rating limit you set , the TV will enter program lock mode and the following message will not be able to tune blocked channels unless you unlock them. To block channels: 1 From...and press T. To temporarily unlock the program: 1 Press W. 2 Enter your four-digit PIN code and press T (- If it is released and the normal picture appears. A list of the channels available for that input will not be blocked. • To display the rating of the program you are designated...
...4 above . Push 'mute' to highlight Channels Block and then press T. You will appear on-screen: This program exceeds the rating limit you set , the TV will enter program lock mode and the following message will not be able to tune blocked channels unless you unlock them. To block channels: 1 From...and press T. To temporarily unlock the program: 1 Press W. 2 Enter your four-digit PIN code and press T (- If it is released and the normal picture appears. A list of the channels available for that input will not be blocked. • To display the rating of the program you are designated...
Owner's Manual - English
Page 50
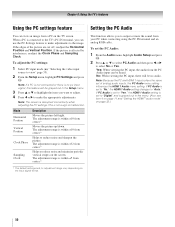
... 50 This is disrupted momentarily when adjusting the PC settings. The adjustment range is connected to the TV's PC IN terminal, you can be heard. Mode Horizontal Position Vertical Position Clock Phase Sampling Clock Description Moves the picture left/right. Note: Because the PC and HDMI 1...Clock Phase and Sampling Clock. "Selecting the video input source to reduce noise and minimize periodic vertical stripes on the TV screen. To set of the picture are cut off, readjust the Horizontal Position and Vertical Position. If the edges of analog audio inputs, the PC ...
... 50 This is disrupted momentarily when adjusting the PC settings. The adjustment range is connected to the TV's PC IN terminal, you can be heard. Mode Horizontal Position Vertical Position Clock Phase Sampling Clock Description Moves the picture left/right. Note: Because the PC and HDMI 1...Clock Phase and Sampling Clock. "Selecting the video input source to reduce noise and minimize periodic vertical stripes on the TV screen. To set of the picture are cut off, readjust the Horizontal Position and Vertical Position. If the edges of analog audio inputs, the PC ...
Owner's Manual - English
Page 55
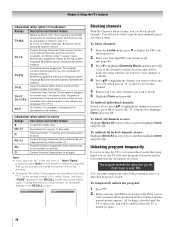
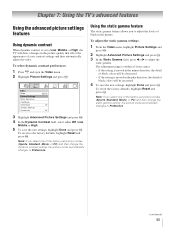
... be decreased. • If the setting is set to Low, Middle, or High, the TV will be increased. 4 To save the new settings, highlight Done and press T. To revert the factory defaults, highlight Reset and press T. To adjust the static gamma settings: 1 From the Video menu, highlight Picture Settings and press T. 2 Highlight Advanced Picture Settings and press T. 3 In the...
... be decreased. • If the setting is set to Low, Middle, or High, the TV will be increased. 4 To save the new settings, highlight Done and press T. To revert the factory defaults, highlight Reset and press T. To adjust the static gamma settings: 1 From the Video menu, highlight Picture Settings and press T. 2 Highlight Advanced Picture Settings and press T. 3 In the...
Owner's Manual - English
Page 56
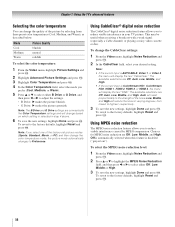
.... Low, Middle, and High will change the CableClear settings: 1 From the Video menu, highlight Noise Reduction and press T. 2 In the CableClear field, select your TV picture. To change based on which setting is disabled ("grayed out"). Choices for MPEG noise reduction...TV's advanced features Selecting the color temperature You can change the quality of the picture by MPEG compression. Mode Cool Medium Warm Picture Quality blueish neutral reddish To select the color temperature: 1 From the Video menu, highlight Picture Settings and press T. 2 Highlight Advanced Picture Settings...
.... Low, Middle, and High will change the CableClear settings: 1 From the Video menu, highlight Noise Reduction and press T. 2 In the CableClear field, select your TV picture. To change based on which setting is disabled ("grayed out"). Choices for MPEG noise reduction...TV's advanced features Selecting the color temperature You can change the quality of the picture by MPEG compression. Mode Cool Medium Warm Picture Quality blueish neutral reddish To select the color temperature: 1 From the Video menu, highlight Picture Settings and press T. 2 Highlight Advanced Picture Settings...


