Owner's Manual - English
Page 2
...-40 of this television for wall mounting this Toshiba LCD TV. The lightning flash with furniture and television sets. • Don't place flat panel displays on a "larger than a UL Listed wall bracket appropriate for the size and weight of the U.S. The exclamation point within the product's enclosure that are required for installation. WARNING: If you decide to wall mount this television, always use the many exciting features of your flat panel display. • Carefully read...
...-40 of this television for wall mounting this Toshiba LCD TV. The lightning flash with furniture and television sets. • Don't place flat panel displays on a "larger than a UL Listed wall bracket appropriate for the size and weight of the U.S. The exclamation point within the product's enclosure that are required for installation. WARNING: If you decide to wall mount this television, always use the many exciting features of your flat panel display. • Carefully read...

Owner's Manual - English
Page 4
... . or b) cables, wires, or any home theater component connected to service the TV yourself. Gently wipe the display panel surface (the TV screen) using a dry, soft cloth only (cotton, flannel, etc.). Opening and removing the covers may result in item 30 on this product can accidentally touch overhead power lines. 23) Always place the back of the television at least four (4) inches away from...
... . or b) cables, wires, or any home theater component connected to service the TV yourself. Gently wipe the display panel surface (the TV screen) using a dry, soft cloth only (cotton, flannel, etc.). Opening and removing the covers may result in item 30 on this product can accidentally touch overhead power lines. 23) Always place the back of the television at least four (4) inches away from...
Owner's Manual - English
Page 5
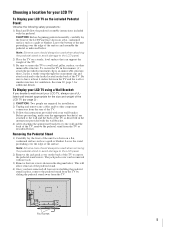
...: 1) Read and Follow the pedestal assembly instructions included with your wall bracket. To secure the TV in place, remove the pedestal stand from the TV by sliding the pedestal stand away from the rear of the pedestal stand. 4) Once you decide to a wall stud, pillar, surface, or other component connectors from the TV. Be sure to the hooks located on a flat, cushioned surface such as indicated below...
...: 1) Read and Follow the pedestal assembly instructions included with your wall bracket. To secure the TV in place, remove the pedestal stand from the TV by sliding the pedestal stand away from the rear of the pedestal stand. 4) Once you decide to a wall stud, pillar, surface, or other component connectors from the TV. Be sure to the hooks located on a flat, cushioned surface such as indicated below...
Owner's Manual - English
Page 7
... 24 Remote control codes 25 Chapter 4: Menu layout and navigation 27 Main menu layout 27 Setup/Installation menu layout 27 Navigating the menu system 28 Chapter 5: Setting up your TV 29 Selecting the menu language 29 Configuring the antenna input source for the ANT/CABLE terminal 29 Programming channels into the TV's channel memory . . . . 30 Programming channels automatically 30 Manually adding and deleting channels in the channel memory 30 Labeling channels 31 Setting the HDMI™ audio mode 32 Viewing the digital signal...
... 24 Remote control codes 25 Chapter 4: Menu layout and navigation 27 Main menu layout 27 Setup/Installation menu layout 27 Navigating the menu system 28 Chapter 5: Setting up your TV 29 Selecting the menu language 29 Configuring the antenna input source for the ANT/CABLE terminal 29 Programming channels into the TV's channel memory . . . . 30 Programming channels automatically 30 Manually adding and deleting channels in the channel memory 30 Labeling channels 31 Setting the HDMI™ audio mode 32 Viewing the digital signal...

Owner's Manual - English
Page 9
...® Digital optical output format (- page 27). 8 Program channels into the TV's channel memory (- The menu for a quick overview of navigating the TV's menu system (- page 51). • Two sets of ColorStream® HD high-resolution component video inputs (- pages 12 and 15). • ColorMaster™ allows you to enhance contrast while you have connected all cables and devices, plug in a proper location (- page 30). 9 For details on the remote control, install the batteries...
...® Digital optical output format (- page 27). 8 Program channels into the TV's channel memory (- The menu for a quick overview of navigating the TV's menu system (- page 51). • Two sets of ColorStream® HD high-resolution component video inputs (- pages 12 and 15). • ColorMaster™ allows you to enhance contrast while you have connected all cables and devices, plug in a proper location (- page 30). 9 For details on the remote control, install the batteries...

Owner's Manual - English
Page 10
... side panel A/V connections are viewing (ANT/CABLE, VIDEO 1, VIDEO 2, ColorStream HD1, ColorStream HD2, HDMI 1, HDMI 2, HDMI 3, HDMI 4, PC). 11 HDMI™ IN - Press to receive 1080p signals. 12 Service port - These buttons adjust the volume level. 10 INPUT - page 27). When a menu is on-screen, the MENU button on -screen, these buttons change the source you cannot turn the TV on and off the TV, press and hold the POWER button on -screen menu. 8 CHANNEL Bb - HDMI connection is necessary to access the menu system (- When a menu is on the TV's control panel...
... side panel A/V connections are viewing (ANT/CABLE, VIDEO 1, VIDEO 2, ColorStream HD1, ColorStream HD2, HDMI 1, HDMI 2, HDMI 3, HDMI 4, PC). 11 HDMI™ IN - Press to receive 1080p signals. 12 Service port - These buttons adjust the volume level. 10 INPUT - page 27). When a menu is on-screen, the MENU button on -screen, these buttons change the source you cannot turn the TV on and off the TV, press and hold the POWER button on -screen menu. 8 CHANNEL Bb - HDMI connection is necessary to access the menu system (- When a menu is on the TV's control panel...
Owner's Manual - English
Page 11
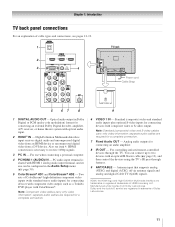
...; Note: Standard (composite) video and S-video cables carry only video information; Analog audio outputs for a complete connection. 6 VIDEO 1 IN - Also see pages 12-19. 1 TV back 2 3 4 Power cord Cable Strap 5 67 8 9 1 DIGITAL AUDIO OUT - separate audio cables are required for connecting an external Dolby Digital decoder, amplifier, A/V receiver, or home theater system with composite video or S-video output. Antenna input that supports analog (NTSC) and digital (ATSC) off-air antenna signals and analog and digital Cable TV (QAM) signals. HDMI connection is shared with...
...; Note: Standard (composite) video and S-video cables carry only video information; Analog audio outputs for a complete connection. 6 VIDEO 1 IN - Also see pages 12-19. 1 TV back 2 3 4 Power cord Cable Strap 5 67 8 9 1 DIGITAL AUDIO OUT - separate audio cables are required for connecting an external Dolby Digital decoder, amplifier, A/V receiver, or home theater system with composite video or S-video output. Antenna input that supports analog (NTSC) and digital (ATSC) off-air antenna signals and analog and digital Cable TV (QAM) signals. HDMI connection is shared with...
Owner's Manual - English
Page 12
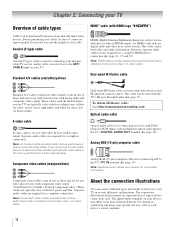
...) video or S-video cable. Chapter 2: Connecting your TV Overview of cable types Cables can be purchased from those illustrated herein. An HDMI cable delivers digital audio and video in this manual are typically color-coded red, green, and blue. S-video cable S-video cable is for a complete connection. page 16, 17 and 19). Dual-wand IR blaster cable Standard A/V cables (composite video) usually come in sets of three, and are required for use with video devices with analog audio and composite video output. To...
...) video or S-video cable. Chapter 2: Connecting your TV Overview of cable types Cables can be purchased from those illustrated herein. An HDMI cable delivers digital audio and video in this manual are typically color-coded red, green, and blue. S-video cable S-video cable is for a complete connection. page 16, 17 and 19). Dual-wand IR blaster cable Standard A/V cables (composite video) usually come in sets of three, and are required for use with video devices with analog audio and composite video output. To...
Owner's Manual - English
Page 13
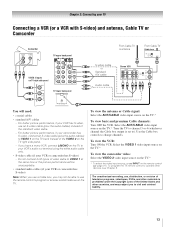
... is set to change channels. To view the VCR: Turn ON the VCR. page 21). Use the Cable box controls to ). To program the TV remote control to operate other countries, and may not be able to use an S-video cable (plus the audio cables) to program or access certain features on the TV back instead of the standard video cable. - Select the ANT/CABLE video input source on TV right side panel TV lower back panel S-video cable or Standard A/V cable Audio cable From Cable TV or antenna From Cable TV Cable box...
... is set to change channels. To view the VCR: Turn ON the VCR. page 21). Use the Cable box controls to ). To program the TV remote control to operate other countries, and may not be able to use an S-video cable (plus the audio cables) to program or access certain features on the TV back instead of the standard video cable. - Select the ANT/CABLE video input source on TV right side panel TV lower back panel S-video cable or Standard A/V cable Audio cable From Cable TV or antenna From Cable TV Cable box...

Owner's Manual - English
Page 18
..." connector.) Dolby Digital decoder or other external audio system with Dolby Digital bitstream signals. THIS DAMAGE IS NOT COVERED BY YOUR WARRANTY. • The DIGITAL AUDIO OUT terminal may not be compatible with optical audio input. Audio Setup PC Audio HDMI 1 Audio MTS Language Optical Output Format Dolby Digital Dynamic Range Control Reset No Auto Stereo English Dolby Digital Compressed Done To control the audio: 1 Turn on the TV's remote control and open the Audio menu. 3 Highlight Audio Setup and press T. Chapter 2: Connecting your device (- Dolby...
..." connector.) Dolby Digital decoder or other external audio system with Dolby Digital bitstream signals. THIS DAMAGE IS NOT COVERED BY YOUR WARRANTY. • The DIGITAL AUDIO OUT terminal may not be compatible with optical audio input. Audio Setup PC Audio HDMI 1 Audio MTS Language Optical Output Format Dolby Digital Dynamic Range Control Reset No Auto Stereo English Dolby Digital Compressed Done To control the audio: 1 Turn on the TV's remote control and open the Audio menu. 3 Highlight Audio Setup and press T. Chapter 2: Connecting your device (- Dolby...
Owner's Manual - English
Page 19
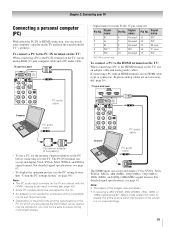
... (60Hz), 720p (60Hz), 1080i (60Hz), and 1080p (24Hz/60Hz) signal formats. "Using the PC settings feature" on the TV and hear the sound from the TV's speakers. For detailed signal specifications, see page 63. • To display the optimum picture, use an HDMI cable (type A connector). To connect a PC to the PC IN terminal on the TV, use an adapter cable and analog audio cables. Signal name 11 NC 12 NC 13 H-sync 14 V-sync...
... (60Hz), 720p (60Hz), 1080i (60Hz), and 1080p (24Hz/60Hz) signal formats. "Using the PC settings feature" on the TV and hear the sound from the TV's speakers. For detailed signal specifications, see page 63. • To display the optimum picture, use an HDMI cable (type A connector). To connect a PC to the PC IN terminal on the TV, use an adapter cable and analog audio cables. Signal name 11 NC 12 NC 13 H-sync 14 V-sync...
Owner's Manual - English
Page 27
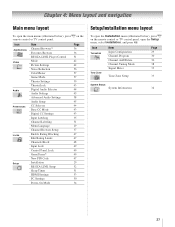
... Video Audio Preferences Locks Setup Item Channel Browser™ Favorites Browser REGZA-LINK Player Control Mode Picture Settings Noise Reduction ColorMaster Game Mode Theater Settings TheaterLock Digital Audio Selector Audio Settings Advanced Audio Settings Audio Setup CC Selector Base CC Mode Digital CC Settings Input Labeling Channel Labeling Menu Language Channel Browser Setup Enable Rating Blocking Edit Rating Limits Channels Block Input Lock Control Panel Lock GameTimer® New PIN Code Installation REGZA-LINK Setup Sleep Timer HDMI Settings PC Settings Power-On Mode Page...
... Video Audio Preferences Locks Setup Item Channel Browser™ Favorites Browser REGZA-LINK Player Control Mode Picture Settings Noise Reduction ColorMaster Game Mode Theater Settings TheaterLock Digital Audio Selector Audio Settings Advanced Audio Settings Audio Setup CC Selector Base CC Mode Digital CC Settings Input Labeling Channel Labeling Menu Language Channel Browser Setup Enable Rating Blocking Edit Rating Limits Channels Block Input Lock Control Panel Lock GameTimer® New PIN Code Installation REGZA-LINK Setup Sleep Timer HDMI Settings PC Settings Power-On Mode Page...

Owner's Manual - English
Page 30
.../CABLE input signal type is set of the currently highlighted channel is finished, press < or , to assist you should not have not already done so (- To remove a channel from the memory, you must configure the ANT/CABLE input source before programming channels (- To save your Cable TV service lineup changes significantly. This is finished, you in the channel memory, you can manually add or delete individual channels. Note: A video preview of Installation menu...
.../CABLE input signal type is set of the currently highlighted channel is finished, press < or , to assist you should not have not already done so (- To remove a channel from the memory, you must configure the ANT/CABLE input source before programming channels (- To save your Cable TV service lineup changes significantly. This is finished, you in the channel memory, you can manually add or delete individual channels. Note: A video preview of Installation menu...
Owner's Manual - English
Page 32
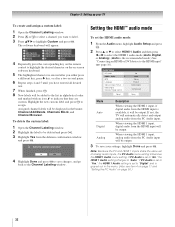
... HDMI 1 audio mode (Auto, Digital, or Analog). (Auto is set of analog audio inputs, the PC Audio menu setting influences the HDMI 1 Audio menu setting. Audio Setup PC Audio HDMI 1 Audio MTS Language Optical Output Format Dolby Digital Dynamic Range Control Reset No Auto Stereo English Dolby Digital Compressed Done Mode Description Auto When viewing the HDMI 1 input, if digital audio from the PC Audio input. If PC Audio is set to "Yes," the HDMI 1 Audio setting is set to "Digital" and is grayed out in the menu. (Also see item 4 on page 11 and "Setting the PC Audio" on -screen software...
... HDMI 1 audio mode (Auto, Digital, or Analog). (Auto is set of analog audio inputs, the PC Audio menu setting influences the HDMI 1 Audio menu setting. Audio Setup PC Audio HDMI 1 Audio MTS Language Optical Output Format Dolby Digital Dynamic Range Control Reset No Auto Stereo English Dolby Digital Compressed Done Mode Description Auto When viewing the HDMI 1 input, if digital audio from the PC Audio input. If PC Audio is set to "Yes," the HDMI 1 Audio setting is set to "Digital" and is grayed out in the menu. (Also see item 4 on page 11 and "Setting the PC Audio" on -screen software...
Owner's Manual - English
Page 44
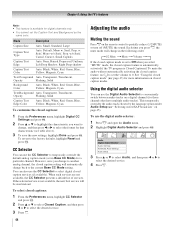
... Color Auto, Black, White, Red, Green, Blue, Yellow, Magenta, Cyan To customize the closed caption services (if available). CC Selector You can also use the digital audio selector: 1 Press Y and open the Audio menu. 2 Highlight Digital Audio Selector and press T. However, once you change to another analog channel, the closed caption setting will automatically change in Base CC Mode) for a particular channel. To select closed caption feature is automatically activated if the TV program is not available, the next best service will change...
... Color Auto, Black, White, Red, Green, Blue, Yellow, Magenta, Cyan To customize the closed caption services (if available). CC Selector You can also use the digital audio selector: 1 Press Y and open the Audio menu. 2 Highlight Digital Audio Selector and press T. However, once you change to another analog channel, the closed caption setting will automatically change in Base CC Mode) for a particular channel. To select closed caption feature is automatically activated if the TV program is not available, the next best service will change...
Owner's Manual - English
Page 59
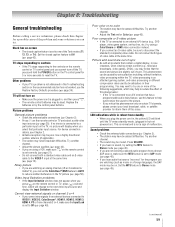
... this feature to help to the controls on the remote control or TV control panel and you plug the power cord in, the yellow LED will not turn off -air broadcast or Cable TV), you connect an S-video cable, be poor. Try another channel. • Adjust the Tint and/or Color (- Replace the batteries or try setting the MTS feature to the VIDEO 1 input at the same time. Picture problems General picture problems • Check the antenna/cable connections (- page 35). page...
... this feature to help to the controls on the remote control or TV control panel and you plug the power cord in, the yellow LED will not turn off -air broadcast or Cable TV), you connect an S-video cable, be poor. Try another channel. • Adjust the Tint and/or Color (- Replace the batteries or try setting the MTS feature to the VIDEO 1 input at the same time. Picture problems General picture problems • Check the antenna/cable connections (- page 35). page...
Owner's Manual - English
Page 64
.... Limited One (1) Year Warranty on Parts and Labor TACP warrants this LCD Television and its parts against defects in materials or workmanship for set installation, setup, adjustment of customer controls, and installation or repair of antenna systems are effective only if this manual and reviewing the section entitled "Troubleshooting," you find that are sold and used for commercial purposes as follows: all of the operating instructions in the Continental...
.... Limited One (1) Year Warranty on Parts and Labor TACP warrants this LCD Television and its parts against defects in materials or workmanship for set installation, setup, adjustment of customer controls, and installation or repair of antenna systems are effective only if this manual and reviewing the section entitled "Troubleshooting," you find that are sold and used for commercial purposes as follows: all of the operating instructions in the Continental...
Owner's Manual - English
Page 65
... warranties from TCL are not covered by failure to follow the specifications, User manuals or guides as set installation, setup, adjustment of customer controls, and installation or repair of antenna systems are effective only if the Television is required. Service made necessary by accident, misuse, abuse, moisture, liquids, dust, dirt, neglect, accident, damage, 24/7 applications, improper installation, improper operation, improper cleaning, improper maintenance, normal wear and tear, screen...
... warranties from TCL are not covered by failure to follow the specifications, User manuals or guides as set installation, setup, adjustment of customer controls, and installation or repair of antenna systems are effective only if the Television is required. Service made necessary by accident, misuse, abuse, moisture, liquids, dust, dirt, neglect, accident, damage, 24/7 applications, improper installation, improper operation, improper cleaning, improper maintenance, normal wear and tear, screen...
Owner's Manual - English
Page 66
...manual and checking the "Troubleshooting" section, you find that service is needed: (1) To find the nearest ASP, visit TCL's web site at www.toshiba.ca THIS WARRANTY WILL NOT COVER ANY SERVICE THAT IS REQUIRED, IN PART OR IN WHOLE, AS A RESULT OF ANY FAILURE TO FOLLOW THE SET-UP AND USAGE INSTRUCTIONS... ALL SET-UP AND USAGE INSTRUCTIONS IN THE APPLICABLE USER GUIDES AND/OR MANUALS. THIS WARRANTY DOES NOT APPLY AND SHALL BE VOID AND UNENFORCEABLE IF THE TELEVISION IS OPENED, SERVICED, OR REPAIRED BY PERSONS OTHER THAN THOSE AUTHORIZED BY TCL TO SERVICE OR REPAIR THE TELEVISION. THIS...
...manual and checking the "Troubleshooting" section, you find that service is needed: (1) To find the nearest ASP, visit TCL's web site at www.toshiba.ca THIS WARRANTY WILL NOT COVER ANY SERVICE THAT IS REQUIRED, IN PART OR IN WHOLE, AS A RESULT OF ANY FAILURE TO FOLLOW THE SET-UP AND USAGE INSTRUCTIONS... ALL SET-UP AND USAGE INSTRUCTIONS IN THE APPLICABLE USER GUIDES AND/OR MANUALS. THIS WARRANTY DOES NOT APPLY AND SHALL BE VOID AND UNENFORCEABLE IF THE TELEVISION IS OPENED, SERVICED, OR REPAIRED BY PERSONS OTHER THAN THOSE AUTHORIZED BY TCL TO SERVICE OR REPAIR THE TELEVISION. THIS...
Owner's Manual - English
Page 68
... Unlocking programs temporarily 48 Video inputs, locking 49 Locks menu 46 M MPEG noise reduction 56 MTS feature 45 MUTE button 44 O Optical audio output format 46 P PC Audio 50 PC connection 19 PC settings 50 Picture mode 42 Picture quality 42 Picture scroll 41 Picture size selection 39 POWER button 10, 21 Power-On Mode 34 R RECALL button 54 REGZA-LINK connection 17 REGZA-LINK feature 51 Remote control Battery installation 20 Device code table 25 Functional key chart 23 Programming 24 Reset Factory Defaults 34 S SAP sound...
... Unlocking programs temporarily 48 Video inputs, locking 49 Locks menu 46 M MPEG noise reduction 56 MTS feature 45 MUTE button 44 O Optical audio output format 46 P PC Audio 50 PC connection 19 PC settings 50 Picture mode 42 Picture quality 42 Picture scroll 41 Picture size selection 39 POWER button 10, 21 Power-On Mode 34 R RECALL button 54 REGZA-LINK connection 17 REGZA-LINK feature 51 Remote control Battery installation 20 Device code table 25 Functional key chart 23 Programming 24 Reset Factory Defaults 34 S SAP sound...


