User Guide
Page 15
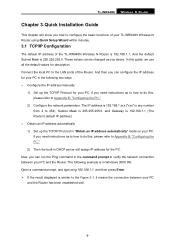
... N Router using Quick Setup Wizard within minutes. 3.1 TCP/IP Configuration The default IP address of the Router. TL-WR940N Wireless N Router Chapter 3. And then you desire. The following two ways. ¾ Configure the IP address manually 1) Set up the TCP/IP Protocol in "Obtain an IP address automatically" mode on your PC and... to configure the basic functions of your PC and the Router has been established well. -8- Connect the local PC to the LAN ports of the TL-WR940N Wireless N Router is 255.255.255.0.
... N Router using Quick Setup Wizard within minutes. 3.1 TCP/IP Configuration The default IP address of the Router. TL-WR940N Wireless N Router Chapter 3. And then you desire. The following two ways. ¾ Configure the IP address manually 1) Set up the TCP/IP Protocol in "Obtain an IP address automatically" mode on your PC and... to configure the basic functions of your PC and the Router has been established well. -8- Connect the local PC to the LAN ports of the TL-WR940N Wireless N Router is 255.255.255.0.

User Guide
Page 25
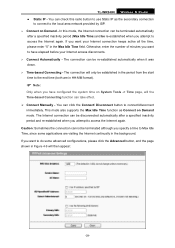
Choose menu "QSS", you can add the new device to the existing network manually by PBC with the following two methods. Restore the PIN of the Router's PIN displayed here. You can get a new random value for the Router's ...) function. Figure 4-2 QSS ¾ QSS Status - The default PIN of the Router can ensure the network security by generating a new PIN. ¾ Add device - 4.4 QSS TL-WR940N Wireless N Router This section will see the next screen (shown in the label or User Guide. ¾ Restore PIN - To add a new device: If the...
Choose menu "QSS", you can add the new device to the existing network manually by PBC with the following two methods. Restore the PIN of the Router's PIN displayed here. You can get a new random value for the Router's ...) function. Figure 4-2 QSS ¾ QSS Status - The default PIN of the Router can ensure the network security by generating a new PIN. ¾ Add device - 4.4 QSS TL-WR940N Wireless N Router This section will see the next screen (shown in the label or User Guide. ¾ Restore PIN - To add a new device: If the...
User Guide
Page 35
...- The Internet connection can be terminated although you want to the local area network provided by ISP. ¾ Connect on Demand mode. TL-WR940N Wireless N Router z Static IP - Caution: Sometimes the connection cannot be terminated automatically after a specified inactivity period and re-established when... keeps active all the time, please enter "0" in Figure 4-9 will the Time-based Connecting function can take effect. ¾ Connect Manually - If you specify a time to access the Internet again. You can check this mode, the Internet connection can be disconnected automatically ...
...- The Internet connection can be terminated although you want to the local area network provided by ISP. ¾ Connect on Demand mode. TL-WR940N Wireless N Router z Static IP - Caution: Sometimes the connection cannot be terminated automatically after a specified inactivity period and re-established when... keeps active all the time, please enter "0" in Figure 4-9 will the Time-based Connecting function can take effect. ¾ Connect Manually - If you specify a time to access the Internet again. You can check this mode, the Internet connection can be disconnected automatically ...

User Guide
Page 38
... disconnected automatically after a specified inactivity period and re-established when you specify a time to access the Internet again. Click the Connect button -31- TL-WR940N Wireless N Router ¾ Connect Manually - Click the Connect button to save your ISP. These fields are given by your ISP provides L2TP connection, please select L2TP option. Choose...
... disconnected automatically after a specified inactivity period and re-established when you specify a time to access the Internet again. Click the Connect button -31- TL-WR940N Wireless N Router ¾ Connect Manually - Click the Connect button to save your ISP. These fields are given by your ISP provides L2TP connection, please select L2TP option. Choose...

User Guide
Page 39
... period of inactivity (Max Idle Time). After a specified period of minutes you attempt to have the Internet connecting last unless a new link is requested. If your connection automatically as soon as you want to access the Internet again. Otherwise, enter the number of inactivity (...disconnect manually. If you should enter the following parameters (Figure 4-12): -32- To use this option, click the radio button. You can configure the Router to remain active at all times, enter 0 in the Max Idle Time field. Click the Disconnect button to connect immediately. TL-WR940N ...
... period of inactivity (Max Idle Time). After a specified period of minutes you attempt to have the Internet connecting last unless a new link is requested. If your connection automatically as soon as you want to access the Internet again. Otherwise, enter the number of inactivity (...disconnect manually. If you should enter the following parameters (Figure 4-12): -32- To use this option, click the radio button. You can configure the Router to remain active at all times, enter 0 in the Max Idle Time field. Click the Disconnect button to connect immediately. TL-WR940N ...
User Guide
Page 41
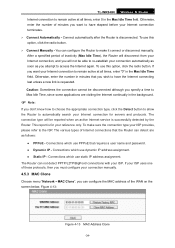
... Internet connection to the ISP. After a specified period of these protocols, then you must configure your connection manually. 4.5.3 MAC Clone Choose menu "Network→MAC Clone", you wish to have elapsed before your ISP. ...link is successfully detected by the Router. Otherwise, enter the number in minutes that you can not detect PPTP/L2TP/BigPond connections with your Internet connection terminates. ¾ Connect Automatically - To use this option, click the radio button. ¾ Connect Manually - If you attempt to access the Internet again. TL-WR940N...
... Internet connection to the ISP. After a specified period of these protocols, then you must configure your connection manually. 4.5.3 MAC Clone Choose menu "Network→MAC Clone", you wish to have elapsed before your ISP. ...link is successfully detected by the Router. Otherwise, enter the number in minutes that you can not detect PPTP/L2TP/BigPond connections with your Internet connection terminates. ¾ Connect Automatically - To use this option, click the radio button. ¾ Connect Manually - If you attempt to access the Internet again. TL-WR940N...
User Guide
Page 53
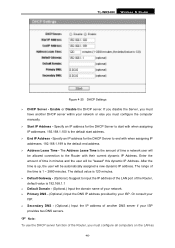
... Gateway - (Optional.) Suggest to start address. ¾ End IP Address - The default value is the default end address. ¾ Address Lease Time - TL-WR940N Wireless N Router Figure 4-25 DHCP Settings ¾ DHCP Server - The range of time a network user will be "leased" this dynamic IP Address. Specify an...IP address of the LAN port of the Router, default value is 1 ~ 2880 minutes. If you disable the Server, you must configure the computer manually. ¾ Start IP Address - Or consult your ISP. ¾ Secondary DNS - (Optional.) Input the IP address of the Router, you ...
... Gateway - (Optional.) Suggest to start address. ¾ End IP Address - The default value is the default end address. ¾ Address Lease Time - TL-WR940N Wireless N Router Figure 4-25 DHCP Settings ¾ DHCP Server - The range of time a network user will be "leased" this dynamic IP Address. Specify an...IP address of the LAN port of the Router, default value is 1 ~ 2880 minutes. If you disable the Server, you must configure the computer manually. ¾ Start IP Address - Or consult your ISP. ¾ Secondary DNS - (Optional.) Input the IP address of the Router, you ...
User Guide
Page 59
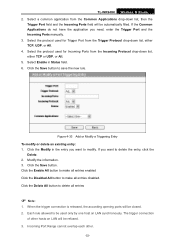
...Figure 4-33 Add or Modify a Triggering Entry To modify or delete an existing entry: 1. If you need, enter the Trigger Port and the Incoming Ports manually. 3. Click the Enable All button to make all entries enabled Click the Disabled All button to modify. Click the Modify in Status field. 6. Select a... Ports field will be refused. 3. Incoming Port Range cannot overlap each other hosts on LAN synchronously. The trigger connection of other . -52- TL-WR940N Wireless N Router 2. If the Common Applications do not have the application you want to make all entries disabled.
...Figure 4-33 Add or Modify a Triggering Entry To modify or delete an existing entry: 1. If you need, enter the Trigger Port and the Incoming Ports manually. 3. Click the Enable All button to make all entries enabled Click the Disabled All button to modify. Click the Modify in Status field. 6. Select a... Ports field will be refused. 3. Incoming Port Range cannot overlap each other hosts on LAN synchronously. The trigger connection of other . -52- TL-WR940N Wireless N Router 2. If the Common Applications do not have the application you want to make all entries disabled.

User Guide
Page 74
Click the Delete All button to delete all the entries in it (www.google.com, www.google.cn) will be blocked or allowed. TL-WR940N Wireless N Router 4.11.3 Target Choose menu "Access Control → Target", you select Domain Name, the screen shown is Figure 4-52. 1) In Target Description...for the Access Control Rule. Any domain name with keywords in the table. -67- Click the Save button. z If you want, specify the Target Port manually. 4) In Protocol field, select TCP, UDP, ICMP or ALL. The target list is unique. ¾ Information - In Mode field, select IP Address...
Click the Delete All button to delete all the entries in it (www.google.com, www.google.cn) will be blocked or allowed. TL-WR940N Wireless N Router 4.11.3 Target Choose menu "Access Control → Target", you select Domain Name, the screen shown is Figure 4-52. 1) In Target Description...for the Access Control Rule. Any domain name with keywords in the table. -67- Click the Save button. z If you want, specify the Target Port manually. 4) In Protocol field, select TCP, UDP, ICMP or ALL. The target list is unique. ¾ Information - In Mode field, select IP Address...
User Guide
Page 87
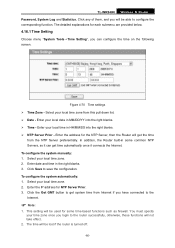
... time in MM/DD/YY into the right blanks. ¾ NTP Server Prior - To configure the system automatically: 1. To configure the system manually: 1. Select your local time zone. 2. Click Save to the router successfully, otherwise, these functions will be lost if the router is turned ... this pull down list. ¾ Date - Select your local time zone. 2. Click the Get GMT button to configure the corresponding function. TL-WR940N Wireless N Router Password, System Log and Statistics. The detailed explanations for NTP Server Prior. 3. Enter the IP address for each submenu are ...
... time in MM/DD/YY into the right blanks. ¾ NTP Server Prior - To configure the system automatically: 1. To configure the system manually: 1. Select your local time zone. 2. Click Save to the router successfully, otherwise, these functions will be lost if the router is turned ... this pull down list. ¾ Date - Select your local time zone. 2. Click the Get GMT button to configure the corresponding function. TL-WR940N Wireless N Router Password, System Log and Statistics. The detailed explanations for NTP Server Prior. 3. Enter the IP address for each submenu are ...
User Guide
Page 95
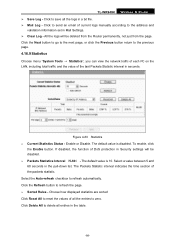
... - The default value is disabled. Click the Refresh button to refresh automatically. Click Delete All to save all entries in a txt file. ¾ Mail Log - TL-WR940N Wireless N Router ¾ Save Log - Enable or Disable. To enable, click the Enable button. Click to delete all the logs in the table. -88- Click... to send an email of the packets statistic. The Packets Statistic interval indicates the time section of current logs manually according to the address and validation information set in the pull-down list.
... - The default value is disabled. Click the Refresh button to refresh automatically. Click Delete All to save all entries in a txt file. ¾ Mail Log - TL-WR940N Wireless N Router ¾ Save Log - Enable or Disable. To enable, click the Enable button. Click to delete all the logs in the table. -88- Click... to send an email of the packets statistic. The Packets Statistic interval indicates the time section of current logs manually according to the address and validation information set in the pull-down list.
User Guide
Page 97
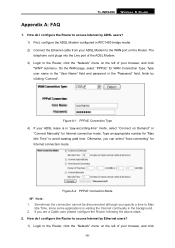
The telephone cord plugs into the Line port of the ADSL Modem. 3) Login to the Router, click the "Network" menu on Demand" or "Connect Manually" for WAN Connection Type. Type an appropriate number for Internet connection mode. Type user name in the "User Name" field and password in the background. 2. ... a Cable user, please configure the Router following the above steps. 2. Figure A-2 PPPoE Connection Mode ) Note: 1. On the WAN page, select "PPPoE" for Internet connection mode. TL-WR940N Wireless N Router Appendix A: FAQ 1.
The telephone cord plugs into the Line port of the ADSL Modem. 3) Login to the Router, click the "Network" menu on Demand" or "Connect Manually" for WAN Connection Type. Type an appropriate number for Internet connection mode. Type user name in the "User Name" field and password in the background. 2. ... a Cable user, please configure the Router following the above steps. 2. Figure A-2 PPPoE Connection Mode ) Note: 1. On the WAN page, select "PPPoE" for Internet connection mode. TL-WR940N Wireless N Router Appendix A: FAQ 1.

User Guide
Page 102
Figure B-1 4) In the prompt page that showed below , select Properties on the prompt page. TL-WR940N Wireless N Router Appendix B: Configuring the PCs In this section, we'll introduce how to the adapter's manual if needed. 1. First make sure your Ethernet Adapter is working, refer to install and configure the TCP/IP correctly in the...
Figure B-1 4) In the prompt page that showed below , select Properties on the prompt page. TL-WR940N Wireless N Router Appendix B: Configuring the PCs In this section, we'll introduce how to the adapter's manual if needed. 1. First make sure your Ethernet Adapter is working, refer to install and configure the TCP/IP correctly in the...

User Guide
Page 104
TL-WR940N Wireless N Router Figure B-3 ¾ Setting IP address manually 1 Select Use the following DNS server addresses radio button. And the following items available 2 If the Router's LAN IP address is 192.168.1.1, type IP address is 192.168.1.x (x is from 2 to 254), and Subnet mask is 255.255.255.0. 3 Type the Router's LAN IP address (the default IP is 192.168.1.1) into the Default gateway field. 4 Select Use the following IP address radio button. In the Preferred DNS Server field you can type the DNS server IP address, which has been provided by your ISP -97-
TL-WR940N Wireless N Router Figure B-3 ¾ Setting IP address manually 1 Select Use the following DNS server addresses radio button. And the following items available 2 If the Router's LAN IP address is 192.168.1.1, type IP address is 192.168.1.x (x is from 2 to 254), and Subnet mask is 255.255.255.0. 3 Type the Router's LAN IP address (the default IP is 192.168.1.1) into the Default gateway field. 4 Select Use the following IP address radio button. In the Preferred DNS Server field you can type the DNS server IP address, which has been provided by your ISP -97-

