Quick Installation Guide
Page 1
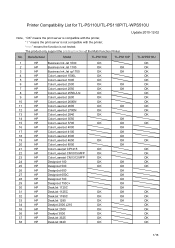
... OK OK 37 HP DeskJet 3325 OK OK 38 HP DeskJet 3420 OK OK 1/16 The product only support the printing function of the Multi Function Printer. No. "--" means the function is compatible with the printer; Printer Compatibility List for TL-PS110U/TL-PS110P/TL-WPS510U Update:2010-12-02 Note:"OK" means the print server is not tested; " \ " means the print server is not compatible with the...
... OK OK 37 HP DeskJet 3325 OK OK 38 HP DeskJet 3420 OK OK 1/16 The product only support the printing function of the Multi Function Printer. No. "--" means the function is compatible with the printer; Printer Compatibility List for TL-PS110U/TL-PS110P/TL-WPS510U Update:2010-12-02 Note:"OK" means the print server is not tested; " \ " means the print server is not compatible with the...
User Guide
Page 6
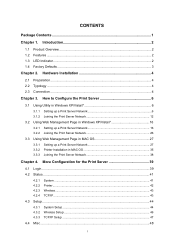
...Printer...42 Wireless...43 TCP/IP...43 4.3 Setup ...44 4.3.1 4.3.2 4.3.3 System Setup ...44 Wireless Setup ...46 TCP/IP Setup ...47 4.4 Misc ...48 I Hardware Installation 4 2.1 Preparation...4 2.2 Typology...4 2.3 Connection ...4 Chapter 3. Introduction 2 1.1 Product Overview ...2 1.2 Features ...2 1.3 LED Indicator...2 1.4 Factory Defaults ...3 Chapter 2. CONTENTS Package Contents ...1 Chapter 1. How to Configure the Print Server 6 3.1 Using Utility in Windows XP/Vista/7 6 3.1.1 Setting up a Print Server Network 6 3.1.2 Joining the Print Server Network 12 3.2 Using Web...
...Printer...42 Wireless...43 TCP/IP...43 4.3 Setup ...44 4.3.1 4.3.2 4.3.3 System Setup ...44 Wireless Setup ...46 TCP/IP Setup ...47 4.4 Misc ...48 I Hardware Installation 4 2.1 Preparation...4 2.2 Typology...4 2.3 Connection ...4 Chapter 3. Introduction 2 1.1 Product Overview ...2 1.2 Features ...2 1.3 LED Indicator...2 1.4 Factory Defaults ...3 Chapter 2. CONTENTS Package Contents ...1 Chapter 1. How to Configure the Print Server 6 3.1 Using Utility in Windows XP/Vista/7 6 3.1.1 Setting up a Print Server Network 6 3.1.2 Joining the Print Server Network 12 3.2 Using Web...

User Guide
Page 7
4.4.1 Factory Default ...48 4.4.2 Firmware Upgrade...49 4.5 Restart...50 Appendix A: How to Reset the Print Server 51 Appendix B: Frequently Asked Questions 52 Appendix C: Printer Installation in Windows OS 54 C-1 If You Have Installed A Printer Before 54 C-2 If You Never Install A Printer Before 59 Appendix D: Additional Installation Instructions 65
4.4.1 Factory Default ...48 4.4.2 Firmware Upgrade...49 4.5 Restart...50 Appendix A: How to Reset the Print Server 51 Appendix B: Frequently Asked Questions 52 Appendix C: Printer Installation in Windows OS 54 C-1 If You Have Installed A Printer Before 54 C-2 If You Never Install A Printer Before 59 Appendix D: Additional Installation Instructions 65

User Guide
Page 8
TL-WPS510U Pocket-Sized Wireless N Print Server Package Contents ¾ One TL-WPS510U Pocket-Sized Wireless N Print Server ¾ One external AC power adapter ¾ One USB cable ¾ One Quick Installation Guide ¾ One Resource CD containing Utility and User Guide 1
TL-WPS510U Pocket-Sized Wireless N Print Server Package Contents ¾ One TL-WPS510U Pocket-Sized Wireless N Print Server ¾ One external AC power adapter ¾ One USB cable ¾ One Quick Installation Guide ¾ One Resource CD containing Utility and User Guide 1

User Guide
Page 9
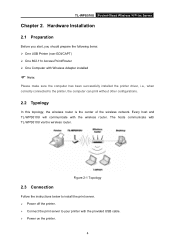
... Overview The external print servers enhance capability by letting you place your printers at convenient locations directly on . WLAN Blinking (Green) The Print Server is on the Ethernet network, and by increasing network printer performance and management. The Print Server is not connected to 150Mbps ¾ One USB 2.0 High Speed port(PID1) ¾ One Built-in Reset Button 1.3 LED Indicator Power LED WLAN LED LED Status Indication On (Red) Power Off The Print Server's power is transmitting data via wireless connectivity. 2 TL-WPS510U Pocket-Sized Wireless N Print Server Chapter...
... Overview The external print servers enhance capability by letting you place your printers at convenient locations directly on . WLAN Blinking (Green) The Print Server is on the Ethernet network, and by increasing network printer performance and management. The Print Server is not connected to 150Mbps ¾ One USB 2.0 High Speed port(PID1) ¾ One Built-in Reset Button 1.3 LED Indicator Power LED WLAN LED LED Status Indication On (Red) Power Off The Print Server's power is transmitting data via wireless connectivity. 2 TL-WPS510U Pocket-Sized Wireless N Print Server Chapter...
User Guide
Page 11
... prepare the following items: ¾ One USB Printer (non-GDI/CAPT) ¾ One 802.11n Access Point/Router ¾ One Computer with Wireless Adapter installed ) Note: Please make sure the computer has been successfully installed the printer driver, i.e., when correctly connected to your printer with the provided USB cable. ¾ Power on the printer. 4 Every host and TL-WPS510U will communicate with TL-WPS510U via the wireless router. TL-WPS510U Pocket-Sized Wireless N Print Server Chapter 2.
... prepare the following items: ¾ One USB Printer (non-GDI/CAPT) ¾ One 802.11n Access Point/Router ¾ One Computer with Wireless Adapter installed ) Note: Please make sure the computer has been successfully installed the printer driver, i.e., when correctly connected to your printer with the provided USB cable. ¾ Power on the printer. 4 Every host and TL-WPS510U will communicate with TL-WPS510U via the wireless router. TL-WPS510U Pocket-Sized Wireless N Print Server Chapter 2.
User Guide
Page 13
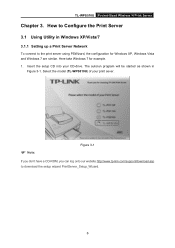
... started as shown in Windows XP/Vista/7 3.1.1 Setting up a Print Server Network To connect to the print server using PSWizard, the configuration for example. 1. Insert the setup CD into your print sever. ) Note: Figure 3-1 If you don't have a CD-ROM, you can log onto our website http://www.tp-link.com/support/download.asp to Configure the Print Server 3.1 Using Utility in Figure 3-1. Here take Windows 7 for Windows XP, Windows Vista and Windows 7 are similar. Select the model (TL-WPS510U...
... started as shown in Windows XP/Vista/7 3.1.1 Setting up a Print Server Network To connect to the print server using PSWizard, the configuration for example. 1. Insert the setup CD into your print sever. ) Note: Figure 3-1 If you don't have a CD-ROM, you can log onto our website http://www.tp-link.com/support/download.asp to Configure the Print Server 3.1 Using Utility in Figure 3-1. Here take Windows 7 for Windows XP, Windows Vista and Windows 7 are similar. Select the model (TL-WPS510U...
User Guide
Page 14
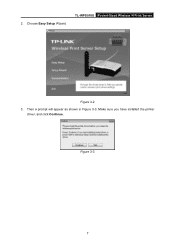
Then a prompt will appear as shown in Figure 3-3. TL-WPS510U Pocket-Sized Wireless N Print Server Figure 3-2 3. Make sure you have installed the printer driver, and click Continue. Choose Easy Setup Wizard. 2. Figure 3-3 7
Then a prompt will appear as shown in Figure 3-3. TL-WPS510U Pocket-Sized Wireless N Print Server Figure 3-2 3. Make sure you have installed the printer driver, and click Continue. Choose Easy Setup Wizard. 2. Figure 3-3 7
User Guide
Page 19
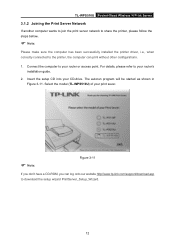
... the model (TL-WPS510U) of your router's installation guide. 2. TL-WPS510U Pocket-Sized Wireless N Print Server 3.1.2 Joining the Print Server Network If another computer wants to join the print server network to share the printer, please follow the steps bellow. ) Note: Please make sure the computer has been successfully installed the printer driver, i.e., when correctly connected to the printer, the computer can log onto our website http://www.tp-link.com/support/download.asp to download the setup...
... the model (TL-WPS510U) of your router's installation guide. 2. TL-WPS510U Pocket-Sized Wireless N Print Server 3.1.2 Joining the Print Server Network If another computer wants to join the print server network to share the printer, please follow the steps bellow. ) Note: Please make sure the computer has been successfully installed the printer driver, i.e., when correctly connected to the printer, the computer can log onto our website http://www.tp-link.com/support/download.asp to download the setup...
User Guide
Page 27
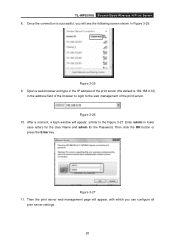
... shown in Figure 3-25. Open a web-browser and type in the IP address of the browser to login to the Figure 3-27. Enter admin in the address field of the print server (the default is successful, you can configure all print server settings. 20 TL-WPS510U Pocket-Sized Wireless N Print Server 8. Once the connection is 192.168.0.10) in lower case letters for the User Name and admin for the Password. Figure 3-27 11.
... shown in Figure 3-25. Open a web-browser and type in the IP address of the browser to login to the Figure 3-27. Enter admin in the address field of the print server (the default is successful, you can configure all print server settings. 20 TL-WPS510U Pocket-Sized Wireless N Print Server 8. Once the connection is 192.168.0.10) in lower case letters for the User Name and admin for the Password. Figure 3-27 11.
User Guide
Page 30
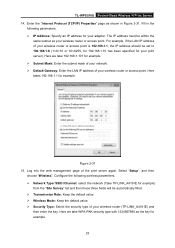
The IP address must be set to 192.168.1.X (1 Fill in Figure 3-31. For example, if the LAN IP address of your wireless router or access point is 192.168.1.1, the IP address should be within the same subnet as shown in the following parameters. ¾ IP Address: Specify an IP address for your wireless router or access point. Enter the "Internet Protocol (TCP/IP) Properties" page as your adapter. TL-WPS510U Pocket-Sized Wireless N Print Server 14.
The IP address must be set to 192.168.1.X (1 Fill in Figure 3-31. For example, if the LAN IP address of your wireless router or access point is 192.168.1.1, the IP address should be within the same subnet as shown in the following parameters. ¾ IP Address: Specify an IP address for your wireless router or access point. Enter the "Internet Protocol (TCP/IP) Properties" page as your adapter. TL-WPS510U Pocket-Sized Wireless N Print Server 14.

User Guide
Page 33
... never install a printer on your computer, please refer to C-2 If You Never Install A Printer Before to install a printer and add a Standard TCP/IP port for it . 3.2.2 Joining the Print Server Network If another computer wants to join the print server network to install a printer and add a Standard TCP/IP port for it . 26 For details, please refer to your router's installation guide. 2. Connect the computer to your router or access point. TL-WPS510U Pocket-Sized Wireless N Print Server Figure...
... never install a printer on your computer, please refer to C-2 If You Never Install A Printer Before to install a printer and add a Standard TCP/IP port for it . 3.2.2 Joining the Print Server Network If another computer wants to join the print server network to install a printer and add a Standard TCP/IP port for it . 26 For details, please refer to your router's installation guide. 2. Connect the computer to your router or access point. TL-WPS510U Pocket-Sized Wireless N Print Server Figure...
User Guide
Page 34
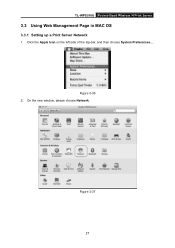
On the new window, please choose Network. Click the Apple Icon on the left side of the top-bar, and then choose System Preferences.... TL-WPS510U Pocket-Sized Wireless N Print Server 3.3 Using Web Management Page in MAC OS 3.3.1 Setting up a Print Server Network 1. Figure 3-37 27 Figure 3-36 2.
On the new window, please choose Network. Click the Apple Icon on the left side of the top-bar, and then choose System Preferences.... TL-WPS510U Pocket-Sized Wireless N Print Server 3.3 Using Web Management Page in MAC OS 3.3.1 Setting up a Print Server Network 1. Figure 3-37 27 Figure 3-36 2.
User Guide
Page 38
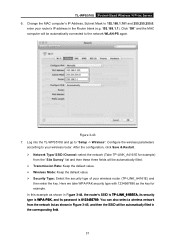
... TL-WPS510U Pocket-Sized Wireless N Print Server 6. enter your router's IP address in Figure 3-44, the router's SSID is TP-LINK_61BB7A, its security type is WPA-PSK, and its password is 0123456789. Figure 3-43 7. Here we take WPA-PAK security type with 1234567890 as the key for example) from the network list as shown in the Router blank (e.g. 192.168.1.1). After the configuration...
... TL-WPS510U Pocket-Sized Wireless N Print Server 6. enter your router's IP address in Figure 3-44, the router's SSID is TP-LINK_61BB7A, its security type is WPA-PSK, and its password is 0123456789. Figure 3-43 7. Here we take WPA-PAK security type with 1234567890 as the key for example) from the network list as shown in the Router blank (e.g. 192.168.1.1). After the configuration...
User Guide
Page 45
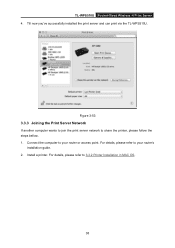
Connect the computer to your router or access point. For details, please refer to your router's installation guide. 2. For details, please refer to share the printer, please follow the steps bellow. 1. Install a printer. Till now you've successfully installed the print server and can print via the TL-WPS510U. Figure 3-53 3.3.3 Joining the Print Server Network If another computer wants to join the print server network to 3.3.2 Printer Installation in MAC OS. 38 TL-WPS510U Pocket-Sized Wireless N Print Server 4.
Connect the computer to your router or access point. For details, please refer to your router's installation guide. 2. For details, please refer to share the printer, please follow the steps bellow. 1. Install a printer. Till now you've successfully installed the print server and can print via the TL-WPS510U. Figure 3-53 3.3.3 Joining the Print Server Network If another computer wants to join the print server network to 3.3.2 Printer Installation in MAC OS. 38 TL-WPS510U Pocket-Sized Wireless N Print Server 4.
User Guide
Page 46
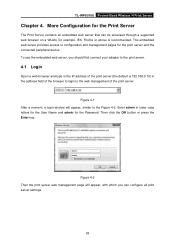
... address field of the browser to login to the print server. 4.1 Login Open a web-browser and type in lower case letters for the User Name and admin for the print server and the connected peripheral device. Figure 4-1 After a moment, a login window will appear, with which you should first connect your adapter to the web management of the print server (the default is recommended. More Configuration for the Print Server The Print Server contains an embedded web server that can configure all print server settings...
... address field of the browser to login to the print server. 4.1 Login Open a web-browser and type in lower case letters for the User Name and admin for the print server and the connected peripheral device. Figure 4-1 After a moment, a login window will appear, with which you should first connect your adapter to the web management of the print server (the default is recommended. More Configuration for the Print Server The Print Server contains an embedded web server that can configure all print server settings...
User Guide
Page 51
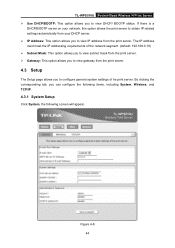
... from the print server. ¾ Gateway: This option allows you to view DHCP/ BOOTP status. The IP address must meet the IP addressing requirements of he print server. Figure 4-8 44 By clicking the corresponding tab, you to view gateway from the print server. TL-WPS510U Pocket-Sized Wireless N Print Server ¾ Use DHCP/BOOTP: This option allows you can configure the following items, including System, Wireless, and TCP/IP. 4.3.1 System Setup Click System...
... from the print server. ¾ Gateway: This option allows you to view DHCP/ BOOTP status. The IP address must meet the IP addressing requirements of he print server. Figure 4-8 44 By clicking the corresponding tab, you to view gateway from the print server. TL-WPS510U Pocket-Sized Wireless N Print Server ¾ Use DHCP/BOOTP: This option allows you can configure the following items, including System, Wireless, and TCP/IP. 4.3.1 System Setup Click System...
User Guide
Page 54
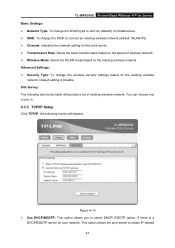
...: To change the wireless security settings based on your network. Site Survey: The following screen will provide a list of wireless network. ¾ Wireless Mode: Select the WLAN mode based on the existing wireless network Advanced Settings: ¾ Security Type: To change the SSID to select DHCP/ BOOTP option. Default setting is a DHCP/BOOTP server on the existing wireless network. If there is Disable. This option allows the print server to join in. 4.3.3 TCP/IP Setup Click TCP/IP...
...: To change the wireless security settings based on your network. Site Survey: The following screen will provide a list of wireless network. ¾ Wireless Mode: Select the WLAN mode based on the existing wireless network Advanced Settings: ¾ Security Type: To change the SSID to select DHCP/ BOOTP option. Default setting is a DHCP/BOOTP server on the existing wireless network. If there is Disable. This option allows the print server to join in. 4.3.3 TCP/IP Setup Click TCP/IP...
User Guide
Page 58
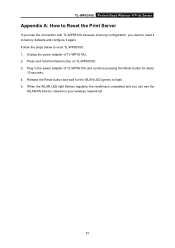
... wireless network list. 51 Press and hold the Reset button on TL-WPS510U; 3. When the WLAN LED light flashes regularly, the resetting is completed and you can see the WLAN-PS Ad-Hoc network in the power adapter of TL-WPS510U and continue pressing the Reset button for the WLAN LED (green) to flash. 5. Follow the steps below to reset TL-WPS510U: 1. Unplug the power adapter of wrong configuration, you need to reset it to factory defaults and configure it again. Release the Reset button...
... wireless network list. 51 Press and hold the Reset button on TL-WPS510U; 3. When the WLAN LED light flashes regularly, the resetting is completed and you can see the WLAN-PS Ad-Hoc network in the power adapter of TL-WPS510U and continue pressing the Reset button for the WLAN LED (green) to flash. 5. Follow the steps below to reset TL-WPS510U: 1. Unplug the power adapter of wrong configuration, you need to reset it to factory defaults and configure it again. Release the Reset button...
User Guide
Page 59
... in print port setting. 2. The setup Wizard can cause printing errors. Print Port Related Problems Printing data failure may be sent to the print queue successfully, but print very slowly or print unknown characters. Print jobs are properly connected. 3) Recheck the print server connection by PSAdmin or WEB browser. 4. Power Related Problems The print server requires an external AC power adapter in your print server. 6. Check to see if any of the pins on the USB port connector are damaged, contact your printer manufacturer. 3. TL-WPS510U...
... in print port setting. 2. The setup Wizard can cause printing errors. Print Port Related Problems Printing data failure may be sent to the print queue successfully, but print very slowly or print unknown characters. Print jobs are properly connected. 3) Recheck the print server connection by PSAdmin or WEB browser. 4. Power Related Problems The print server requires an external AC power adapter in your print server. 6. Check to see if any of the pins on the USB port connector are damaged, contact your printer manufacturer. 3. TL-WPS510U...


