
Quick Installation Guide
Page 1
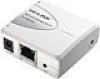
...following items ¾ Windows 2000/XP/Vista/7 computer with print server setup CD ¾ One USB device with the Ethernet cable. 4. Connect the power adapter to the network. When the Link LED lights up, the TL-PS310U is correctly connected to the TL-PS310U. Connect your USB device... to the router or switch/HUB with USB port Hardware Installation 1. Connect the TL-PS310U to the TL-PS310U. 3. Factory Default Settings ¾ IP address:...
...following items ¾ Windows 2000/XP/Vista/7 computer with print server setup CD ¾ One USB device with the Ethernet cable. 4. Connect the power adapter to the network. When the Link LED lights up, the TL-PS310U is correctly connected to the TL-PS310U. Connect your USB device... to the router or switch/HUB with USB port Hardware Installation 1. Connect the TL-PS310U to the TL-PS310U. 3. Factory Default Settings ¾ IP address:...

Quick Installation Guide
Page 5
Just click OK You can disable the "Disconnect Printer when Idle" in the Option menu. The windows will tell you want to connect and click Connect Device Because the "Disconnect Printer when Idle" option is enabled by default, the server will detect the printer and install its driver automatically 5 Connecting to the USB port of the TL-PS310U. The MFP and Storage Server will auto-detect the USB device connecting to an USB Printer Select the USB printer you this.
Just click OK You can disable the "Disconnect Printer when Idle" in the Option menu. The windows will tell you want to connect and click Connect Device Because the "Disconnect Printer when Idle" option is enabled by default, the server will detect the printer and install its driver automatically 5 Connecting to the USB port of the TL-PS310U. The MFP and Storage Server will auto-detect the USB device connecting to an USB Printer Select the USB printer you this.
User Guide
Page 2
... • Increase the separation between the equipment and receiver. • Connect the equipment into an outlet on a circuit different from TP-LINK TECHNOLOGIES CO., LTD. This device complies with part 15 of their respective holders. II All rights reserved. However, there is a registered...for a Class B digital device, pursuant to part 15 of TP-LINK TECHNOLOGIES CO., LTD. Any changes or modifications not expressly approved by any means or used in accordance with the limits for help. Windows 2000/XP/Vista are designed to provide reasonable protection against harmful ...
... • Increase the separation between the equipment and receiver. • Connect the equipment into an outlet on a circuit different from TP-LINK TECHNOLOGIES CO., LTD. This device complies with part 15 of their respective holders. II All rights reserved. However, there is a registered...for a Class B digital device, pursuant to part 15 of TP-LINK TECHNOLOGIES CO., LTD. Any changes or modifications not expressly approved by any means or used in accordance with the limits for help. Windows 2000/XP/Vista are designed to provide reasonable protection against harmful ...
User Guide
Page 3
... 1 INTRODUCTION...1 1.1 Product Overview...1 1.2 Network Management 1 1.3 Components and Features 1 1.4 Hardware Installation 1 2 THE SOFTWARE INSTALLATION 2 2.1 For Windows 2000/XP Users 2 2.1.1 Connecting to an USB Device 5 2.1.2 Connecting to an USB Printer or Multi-functional Printer 8 2.1.3 Connecting to an ... 2.1.5 Request to Disconnect ...12 2.1.6 Setting the Polling Interval 16 2.1.7 Setting the MFP and Storage Server by Setup Utility 16 2.2 For Windows Vista Users 18 2.2.1 Connecting to an USB Device 21 2.2.2 Connecting to an USB HUB 21 3 WEB MANAGEMENT INTERFACE 22 3.1 For...
... 1 INTRODUCTION...1 1.1 Product Overview...1 1.2 Network Management 1 1.3 Components and Features 1 1.4 Hardware Installation 1 2 THE SOFTWARE INSTALLATION 2 2.1 For Windows 2000/XP Users 2 2.1.1 Connecting to an USB Device 5 2.1.2 Connecting to an USB Printer or Multi-functional Printer 8 2.1.3 Connecting to an ... 2.1.5 Request to Disconnect ...12 2.1.6 Setting the Polling Interval 16 2.1.7 Setting the MFP and Storage Server by Setup Utility 16 2.2 For Windows Vista Users 18 2.2.1 Connecting to an USB Device 21 2.2.2 Connecting to an USB HUB 21 3 WEB MANAGEMENT INTERFACE 22 3.1 For...
User Guide
Page 4
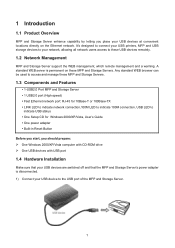
...High-speed) y Fast Ethernet network port: RJ-45 for 10Base-T or 100Base-TX y LINK LED to indicate network connection,100M LED to indicate 100M connection, USB LED to indicate USB status y One Setup CD for Windows 2000/XP/Vista, User's Guide y One power adapter y Built-in Reset Button Before... which remote management and a warning. 1 Introduction 1.1 Product Overview MFP and Storage Server enhance capability by letting you should prepare: ¾ One Windows 2000/XP/Vista computer with CD-ROM drive ¾ One USB devices with USB port 1.4 Hardware Installation Make sure that your USB devices are ...
...High-speed) y Fast Ethernet network port: RJ-45 for 10Base-T or 100Base-TX y LINK LED to indicate network connection,100M LED to indicate 100M connection, USB LED to indicate USB status y One Setup CD for Windows 2000/XP/Vista, User's Guide y One power adapter y Built-in Reset Button Before... which remote management and a warning. 1 Introduction 1.1 Product Overview MFP and Storage Server enhance capability by letting you should prepare: ¾ One Windows 2000/XP/Vista computer with CD-ROM drive ¾ One USB devices with USB port 1.4 Hardware Installation Make sure that your USB devices are ...
User Guide
Page 5
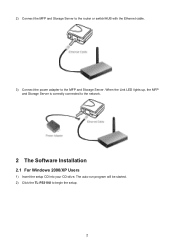
2) Connect the MFP and Storage Server to the router or switch/HUB with the Ethernet cable. 3) Connect the power adapter to the network. 2 The Software Installation 2.1 For Windows 2000/XP Users 1) Insert the setup CD into your CD-drive. When the Link LED lights up, the MFP and Storage Server is correctly connected to the MFP and Storage Server. The auto-run program will be started. 2) Click the TL-PS310U to begin the setup. 2
2) Connect the MFP and Storage Server to the router or switch/HUB with the Ethernet cable. 3) Connect the power adapter to the network. 2 The Software Installation 2.1 For Windows 2000/XP Users 1) Insert the setup CD into your CD-drive. When the Link LED lights up, the MFP and Storage Server is correctly connected to the MFP and Storage Server. The auto-run program will be started. 2) Click the TL-PS310U to begin the setup. 2

User Guide
Page 20
b) A Server Setting window will be displayed. Moreover, you can upgrade the firmware and reboot the MFP and Storage Server. 17 You may set the DHCP(default), IP address and password.
b) A Server Setting window will be displayed. Moreover, you can upgrade the firmware and reboot the MFP and Storage Server. 17 You may set the DHCP(default), IP address and password.
User Guide
Page 21
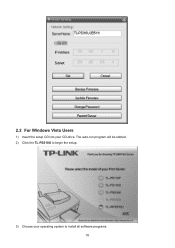
2.2 For Windows Vista Users 1) Insert the setup CD into your operating system to begin the setup. 3) Choose your CD-drive. The auto-run program will be started. 2) Click the TL-PS310U to install all software programs. 18
2.2 For Windows Vista Users 1) Insert the setup CD into your operating system to begin the setup. 3) Choose your CD-drive. The auto-run program will be started. 2) Click the TL-PS310U to install all software programs. 18
User Guide
Page 22
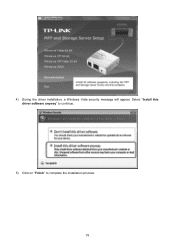
Select "Install this driver software anyway" to continue. 5) Click on "Finish" to complete the installation process. 19 4) During the driver installation, a Windows Vista security message will appear.
Select "Install this driver software anyway" to continue. 5) Click on "Finish" to complete the installation process. 19 4) During the driver installation, a Windows Vista security message will appear.
User Guide
Page 23
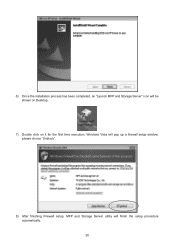
Windows Vista will pop up a firewall setup window, please choice "Unblock". 8) After finishing Firewall setup, MFP and Storage Server utility will be shown on Desktop. 7) Double click on it for the first time execution. 6) Once the installation process has been completed, an "Launch MFP and Storage Server" icon will finish the setup procedure automatically. 20
Windows Vista will pop up a firewall setup window, please choice "Unblock". 8) After finishing Firewall setup, MFP and Storage Server utility will be shown on Desktop. 7) Double click on it for the first time execution. 6) Once the installation process has been completed, an "Launch MFP and Storage Server" icon will finish the setup procedure automatically. 20
User Guide
Page 24
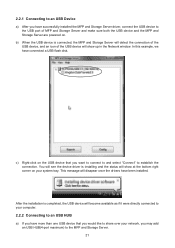
In this example, we have been installed. You will see the device driver is installing and the status will show up in the Network window. 2.2.1 Connecting to an USB Device a) After you have successfully installed the MFP and Storage Server driver, connect the USB device to the MFP and Storage ...
In this example, we have been installed. You will see the device driver is installing and the status will show up in the Network window. 2.2.1 Connecting to an USB Device a) After you have successfully installed the MFP and Storage Server driver, connect the USB device to the MFP and Storage ...
User Guide
Page 26
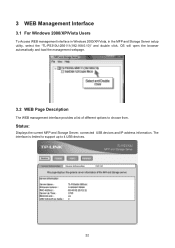
The interface is limited to support up to choose from. Status: Displays the current MFP and Storage Server, connected USB devices and IP address information. 3 WEB Management Interface 3.1 For Windows 2000/XP/Vista Users To Access WEB management interface in Windows 2000/XP/Vista, in the MFP and Storage Server setup utility, select the "TL-PS310U-2B5111(192.168.0.10)" and double click, OS will open the browser automatically and load the management webpage. 3.2 WEB Page Description The WEB management interface provides a list of different options to 4 USB devices. 22
The interface is limited to support up to choose from. Status: Displays the current MFP and Storage Server, connected USB devices and IP address information. 3 WEB Management Interface 3.1 For Windows 2000/XP/Vista Users To Access WEB management interface in Windows 2000/XP/Vista, in the MFP and Storage Server setup utility, select the "TL-PS310U-2B5111(192.168.0.10)" and double click, OS will open the browser automatically and load the management webpage. 3.2 WEB Page Description The WEB management interface provides a list of different options to 4 USB devices. 22
User Guide
Page 28
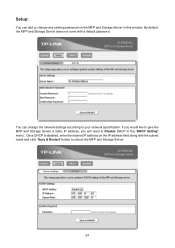
Setup: You can change any existing password on the IP address field along with a default password. Once DHCP is disabled, enter the desired IP address on the MFP and Storage Server in the "DHCP Setting" menu". By default, the MFP and Storage Server does not come with the subnet mask and click "Save & Restart" button to reboot the MFP and Storage Server. 24 If you would like to give the MFP and Storage Server a static IP address, you will need to your network specification. You can add or change the network settings according to Disable DHCP in this window.
Setup: You can change any existing password on the IP address field along with a default password. Once DHCP is disabled, enter the desired IP address on the MFP and Storage Server in the "DHCP Setting" menu". By default, the MFP and Storage Server does not come with the subnet mask and click "Save & Restart" button to reboot the MFP and Storage Server. 24 If you would like to give the MFP and Storage Server a static IP address, you will need to your network specification. You can add or change the network settings according to Disable DHCP in this window.
User Guide
Page 30
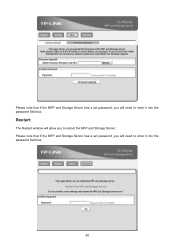
Restart: The Restart window will allow you will need to enter it into the password field box. 26 Please note that if the MFP and Storage Server has a set password, you to reboot the MFP and Storage Server. Please note that if the MFP and Storage Server has a set password, you will need to enter it into the password field box.
Restart: The Restart window will allow you will need to enter it into the password field box. 26 Please note that if the MFP and Storage Server has a set password, you to reboot the MFP and Storage Server. Please note that if the MFP and Storage Server has a set password, you will need to enter it into the password field box.
User Guide
Page 31
... not being blocked by ? ¾ Connected devices will automatically be released for details. 2) Why can 't I see any servers on my MFP and Storage Server listing window after installing it? ¾ Please make sure that might prevent the MFP and Storage Server setup utility from the computer stand-by your anti-virus...
... not being blocked by ? ¾ Connected devices will automatically be released for details. 2) Why can 't I see any servers on my MFP and Storage Server listing window after installing it? ¾ Please make sure that might prevent the MFP and Storage Server setup utility from the computer stand-by your anti-virus...
User Guide
Page 32
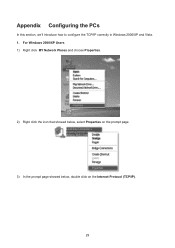
For Windows 2000/XP Users 1) Right click MY Network Places and choose Properties. 2) Right click the icon that showed below, select Properties on the prompt page. 3) In the prompt page showed below, double click on the Internet Protocol (TCP/IP). 29 Appendix Configuring the PCs In this section, we'll introduce how to configure the TCP/IP correctly in Windows 2000/XP and Vista. 1.
For Windows 2000/XP Users 1) Right click MY Network Places and choose Properties. 2) Right click the icon that showed below, select Properties on the prompt page. 3) In the prompt page showed below, double click on the Internet Protocol (TCP/IP). 29 Appendix Configuring the PCs In this section, we'll introduce how to configure the TCP/IP correctly in Windows 2000/XP and Vista. 1.

User Guide
Page 33
4) The following items are available. 5) Type IP address is 192.168.0.x (x is from 2 to 254), Subnet mask is 255.255.255.0 and Default gateway is 192.168.0.1.Then click OK. 30 And the following TCP/IP Properties window will display. Select Use the following IP address radio button.
4) The following items are available. 5) Type IP address is 192.168.0.x (x is from 2 to 254), Subnet mask is 255.255.255.0 and Default gateway is 192.168.0.1.Then click OK. 30 And the following TCP/IP Properties window will display. Select Use the following IP address radio button.
User Guide
Page 34
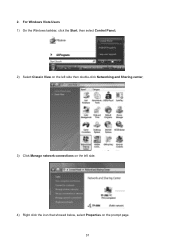
For Windows Vista Users 1) On the Windows taskbar, click the Start, then select Control Panel; 2) Select Classic View on the left side then double-click Networking and Sharing center; 3) Click Manage network connections on the left side. 4) Right click the icon that showed below, select Properties on the prompt page. 31 2.
For Windows Vista Users 1) On the Windows taskbar, click the Start, then select Control Panel; 2) Select Classic View on the left side then double-click Networking and Sharing center; 3) Click Manage network connections on the left side. 4) Right click the icon that showed below, select Properties on the prompt page. 31 2.
User Guide
Page 35
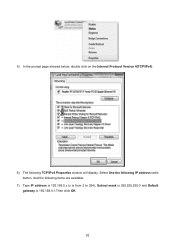
Select Use the following items are available. 7) Type IP address is 192.168.0.x (x is from 2 to 254), Subnet mask is 255.255.255.0 and Default gateway is 192.168.0.1.Then click OK. 32 And the following IP address radio button. 5) In the prompt page showed below, double click on the Internet Protocol Version 4(TCP/IPv4). 6) The following TCP/IPv4 Properties window will display.
Select Use the following items are available. 7) Type IP address is 192.168.0.x (x is from 2 to 254), Subnet mask is 255.255.255.0 and Default gateway is 192.168.0.1.Then click OK. 32 And the following IP address radio button. 5) In the prompt page showed below, double click on the Internet Protocol Version 4(TCP/IPv4). 6) The following TCP/IPv4 Properties window will display.
Compatibility List
Page 19
1. Scan: Pass* means pass either by Utility Scan or MS Paint Scan 2. ** Devices compatibility should be the same on both Windows VISTA and Windows 7, except for the case that the device does NOT support the OS. 3. ***Only support printing/Scan/Fax by USB over IP ; need to check off Bidirection support
1. Scan: Pass* means pass either by Utility Scan or MS Paint Scan 2. ** Devices compatibility should be the same on both Windows VISTA and Windows 7, except for the case that the device does NOT support the OS. 3. ***Only support printing/Scan/Fax by USB over IP ; need to check off Bidirection support


