User Guide
Page 6
4.7.1 DHCP Settings 56 4.7.2 DHCP Clients List 58 4.7.3 Address Reservation 58 4.8 Forwarding ...60 4.8.1 Virtual Servers 60 4.8.2 Port Triggering 62 4.8.3 DMZ...64 4.8.4 UPnP ...64 4.9 Security ...65 4.9.1 Basic Security 66 4.9.2 Advanced Security 67 4.9.3 Local Management 69 4.9.4 Remote ...77 4.11.3 Target...79 4.11.4 Schedule...81 4.12 Static Routing ...82 4.13 Bandwidth Control ...84 4.13.1 Control Settings 84 4.13.2 Rules List...85 4.14 IP & MAC Binding Setting 86 4.14.1 Binding Setting 86 4.14.2 ARP List...88 4.15 Dynamic DNS...88 4.15.1 Comexe.cn DDNS 89 4.15.2 Dyndns.org DDNS...
4.7.1 DHCP Settings 56 4.7.2 DHCP Clients List 58 4.7.3 Address Reservation 58 4.8 Forwarding ...60 4.8.1 Virtual Servers 60 4.8.2 Port Triggering 62 4.8.3 DMZ...64 4.8.4 UPnP ...64 4.9 Security ...65 4.9.1 Basic Security 66 4.9.2 Advanced Security 67 4.9.3 Local Management 69 4.9.4 Remote ...77 4.11.3 Target...79 4.11.4 Schedule...81 4.12 Static Routing ...82 4.13 Bandwidth Control ...84 4.13.1 Control Settings 84 4.13.2 Rules List...85 4.14 IP & MAC Binding Setting 86 4.14.1 Binding Setting 86 4.14.2 ARP List...88 4.15 Dynamic DNS...88 4.15.1 Comexe.cn DDNS 89 4.15.2 Dyndns.org DDNS...
User Guide
Page 67
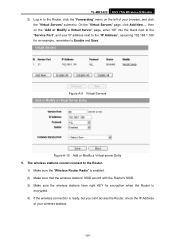
... the end port number). ¾ IP Address - Figure 4-37 Virtual Servers ¾ Service Port - TL-MR3420 3G/3.75G Wireless N Router Click the Delete All button to delete all requests from the Internet to this service port will be able to configure the corresponding function. 4.8.1 Virtual Servers Choose menu "Forwarding→Virtual Servers", you will...
... the end port number). ¾ IP Address - Figure 4-37 Virtual Servers ¾ Service Port - TL-MR3420 3G/3.75G Wireless N Router Click the Delete All button to delete all requests from the Internet to this service port will be able to configure the corresponding function. 4.8.1 Virtual Servers Choose menu "Forwarding→Virtual Servers", you will...

User Guide
Page 71
... allowed to be refused. 3) Incoming Port Range cannot overlap each other. 4.8.3 DMZ Choose menu "Forwarding→DMZ", you can view and configure DMZ host in the screen (shown in the DMZ Host IP Address field 3. Figure 4-41 DMZ To assign a computer or server to be changed when using ...to delete all entries ) Note: 1) When the trigger connection is being forwarded must have its DHCP client function disabled and should have a new static IP Address assigned to it because its IP Address may be a DMZ server: 1. TL-MR3420 3G/3.75G Wireless N Router Click the Disabled All button to make all...
... allowed to be refused. 3) Incoming Port Range cannot overlap each other. 4.8.3 DMZ Choose menu "Forwarding→DMZ", you can view and configure DMZ host in the screen (shown in the DMZ Host IP Address field 3. Figure 4-41 DMZ To assign a computer or server to be changed when using ...to delete all entries ) Note: 1) When the trigger connection is being forwarded must have its DHCP client function disabled and should have a new static IP Address assigned to it because its IP Address may be a DMZ server: 1. TL-MR3420 3G/3.75G Wireless N Router Click the Disabled All button to make all...
User Guide
Page 110
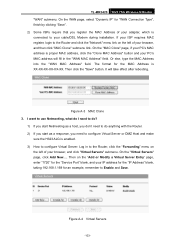
...H323 ALG is proper MAC address, click the "Clone MAC Address" button and your browser, and then click "MAC Clone" submenu link. It will fill in to the Router, click the "Forwarding" menu on the "Add or Modify a Virtual Server Entry" page, enter "1720" for the "Service Port" blank, and .... Figure A-3 MAC Clone 3. Then on the left of your adapter, which is XX-XX-XX-XX-XX-XX. TL-MR3420 3G/3.75G Wireless N Router "WAN" submenu. On the WAN page, select "Dynamic IP" for an example, remember to configure Virtual Server: Log in the "WAN MAC Address" field. On the "MAC Clone...
...H323 ALG is proper MAC address, click the "Clone MAC Address" button and your browser, and then click "MAC Clone" submenu link. It will fill in to the Router, click the "Forwarding" menu on the "Add or Modify a Virtual Server Entry" page, enter "1720" for the "Service Port" blank, and .... Figure A-3 MAC Clone 3. Then on the left of your adapter, which is XX-XX-XX-XX-XX-XX. TL-MR3420 3G/3.75G Wireless N Router "WAN" submenu. On the WAN page, select "Dynamic IP" for an example, remember to configure Virtual Server: Log in the "WAN MAC Address" field. On the "MAC Clone...
User Guide
Page 111
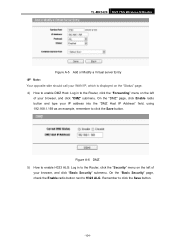
... click the Save button. Figure A-6 DMZ 5) How to enable H323 ALG: Log in to the Router, click the "Forwarding" menu on the left of your browser, and click "Basic Security" submenu. TL-MR3420 3G/3.75G Wireless N Router Figure A-5 Add or Modify a Virtual server Entry ) Note: Your opposite side should call your... menu on the left of your browser, and click "DMZ" submenu. On the "DMZ" page, click Enable radio button and type your IP address into the "DMZ Host IP Address" field, using 192.168.1.169 as an example, remember to click the Save button. -104- On the "Basic Security" page, ...
... click the Save button. Figure A-6 DMZ 5) How to enable H323 ALG: Log in to the Router, click the "Forwarding" menu on the left of your browser, and click "Basic Security" submenu. TL-MR3420 3G/3.75G Wireless N Router Figure A-5 Add or Modify a Virtual server Entry ) Note: Your opposite side should call your... menu on the left of your browser, and click "DMZ" submenu. On the "DMZ" page, click Enable radio button and type your IP address into the "DMZ Host IP Address" field, using 192.168.1.169 as an example, remember to click the Save button. -104- On the "Basic Security" page, ...
User Guide
Page 113
.... -106- Figure A-9 Virtual Servers Figure A-10 Add or Modify a Virtual server Entry 5. TL-MR3420 3G/3.75G Wireless N Router 3) Log in to the Router, click the "Forwarding" menu on the "Add or Modify a Virtual Server" page, enter "80" into the blank next to the "Service Port", and your IP address next to Enable and Save.
.... -106- Figure A-9 Virtual Servers Figure A-10 Add or Modify a Virtual server Entry 5. TL-MR3420 3G/3.75G Wireless N Router 3) Log in to the Router, click the "Forwarding" menu on the "Add or Modify a Virtual Server" page, enter "80" into the blank next to the "Service Port", and your IP address next to Enable and Save.

