
Quick Installation Guide
Page 3
Insert the provided Resource CD into your computer's screen. Click Start Setup, and then follow the step-by-step instructions until you can either run the setup CD-ROM (method one), or run the setup CD-ROM. The configuration has now been completed. Note To configure the device, you complete the configuration. The Setup Wizard will automatically pop up on your CD-ROM drive. TP-LINK strongly recommends that you run the Web based Quick Setup Wizard (method two). Please skip to step 3 Testing the Internet Connection. 3
Insert the provided Resource CD into your computer's screen. Click Start Setup, and then follow the step-by-step instructions until you can either run the setup CD-ROM (method one), or run the setup CD-ROM. The configuration has now been completed. Note To configure the device, you complete the configuration. The Setup Wizard will automatically pop up on your CD-ROM drive. TP-LINK strongly recommends that you run the Web based Quick Setup Wizard (method two). Please skip to step 3 Testing the Internet Connection. 3

Quick Installation Guide
Page 4
Login Open your web browser, type in 192.168.1.1 in the Troubleshooting guide. T2 will display after a successful login. Click Quick Setup 4 Enter the default values and click OK. User name:admin Password:admin Click OK Note If the dialog box does not pop up, please refer to T3 in the address field and press Enter. The web management page will help you if you for the User name and Password. A dialog box will prompt you forget the password.
Login Open your web browser, type in 192.168.1.1 in the Troubleshooting guide. T2 will display after a successful login. Click Quick Setup 4 Enter the default values and click OK. User name:admin Password:admin Click OK Note If the dialog box does not pop up, please refer to T3 in the address field and press Enter. The web management page will help you if you for the User name and Password. A dialog box will prompt you forget the password.
Quick Installation Guide
Page 7
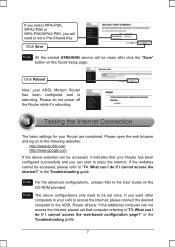
... page?" What can be clean after click the "Save" button on to enjoy the Internet. If you can start to the following websites: http://www.tp-link.com http://www.google.com If the above configurations only need to the User Guide on the CD-ROM provided. The basic settings for your... computers in your LAN to access the Internet, please connect the desired computer to "T3. Please open the web browser and log on this Quick Setup page. If you select WPA-PSK, WPA2-PSK or WPA-PSK/WPA2-PSK, you will be accessed, it 's rebooting. Click Save Note All the existed...
... page?" What can be clean after click the "Save" button on to enjoy the Internet. If you can start to the following websites: http://www.tp-link.com http://www.google.com If the above configurations only need to the User Guide on the CD-ROM provided. The basic settings for your... computers in your LAN to access the Internet, please connect the desired computer to "T3. Please open the web browser and log on this Quick Setup page. If you select WPA-PSK, WPA2-PSK or WPA-PSK/WPA2-PSK, you will be accessed, it 's rebooting. Click Save Note All the existed...

User Guide
Page 6
... Guide 9 Chapter 4. Connecting the Router 6 2.1 System Requirements ...6 2.2 Installation Environment Requirements 6 2.3 Connecting the Router ...6 Chapter 3. Configuring the Router 14 4.1 Login ...14 4.2 Device Info ...14 4.3 Quick Setup...15 4.4 Advanced Setup...15 4.4.1 Layer2 Interface ...15 4.4.2 WAN Service...19 4.4.3 LAN ...29 4.4.4 MAC Address Clone ...31 4.4.5 NAT ...32 4.4.6 Security ...37 4.4.7 Parental Control ...42 4.4.8 Quality of the Router...
... Guide 9 Chapter 4. Connecting the Router 6 2.1 System Requirements ...6 2.2 Installation Environment Requirements 6 2.3 Connecting the Router ...6 Chapter 3. Configuring the Router 14 4.1 Login ...14 4.2 Device Info ...14 4.3 Quick Setup...15 4.4 Advanced Setup...15 4.4.1 Layer2 Interface ...15 4.4.2 WAN Service...19 4.4.3 LAN ...29 4.4.4 MAC Address Clone ...31 4.4.5 NAT ...32 4.4.6 Security ...37 4.4.7 Parental Control ...42 4.4.8 Quality of the Router...
User Guide
Page 9
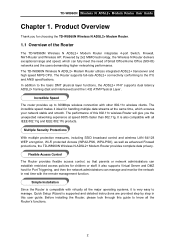
...encryption, Wi-Fi protected Access (WPA2-PSK, WPA-PSK), as well as advanced Firewall protections, the TD-W8960N Wireless N ADSL2+ Modem Router provides complete data privacy. Quick Setup Wizard is very easy to 300Mbps wireless connection with all the major operating systems, it ideal for ...choosing the TD-W8960N Wireless N ADSL2+ Modem Router. 1.1 Overview of Small Office/Home Office (SOHO) networks and the users...
...encryption, Wi-Fi protected Access (WPA2-PSK, WPA-PSK), as well as advanced Firewall protections, the TD-W8960N Wireless N ADSL2+ Modem Router provides complete data privacy. Quick Setup Wizard is very easy to 300Mbps wireless connection with all the major operating systems, it ideal for ...choosing the TD-W8960N Wireless N ADSL2+ Modem Router. 1.1 Overview of Small Office/Home Office (SOHO) networks and the users...
User Guide
Page 10
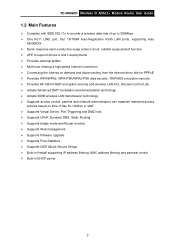
TD-W8960N Wireless N ADSL2+ Modem Router User Guide 1.2 Main Features ¾ Complies with IEEE 802.11n to provide a wireless data rate of up to 300Mbps ¾ One ... Routing ¾ Supports bridge mode and Router function ¾ Supports Web management ¾ Supports firmware upgrade ¾ Supports Flow Statistics ¾ Supports QSS (Quick Secure Setup) ¾ Built-in firewall supporting IP address filtering, MAC address filtering and parental control ¾ Built-in DHCP server 3
TD-W8960N Wireless N ADSL2+ Modem Router User Guide 1.2 Main Features ¾ Complies with IEEE 802.11n to provide a wireless data rate of up to 300Mbps ¾ One ... Routing ¾ Supports bridge mode and Router function ¾ Supports Web management ¾ Supports firmware upgrade ¾ Supports Flow Statistics ¾ Supports QSS (Quick Secure Setup) ¾ Built-in firewall supporting IP address filtering, MAC address filtering and parental control ¾ Built-in DHCP server 3
User Guide
Page 15
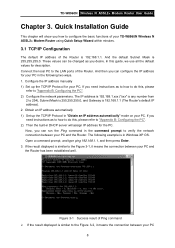
... PC". 2) Configure the network parameters. In this , please refer to the Figure 3-2, it means the connection between your TD-W8960N Wireless N ADSL2+ Modem Router using Quick Setup Wizard within minutes. 3.1 TCP/IP Configuration The default IP address of the Router. The following two ways. 1. Figure 3-1.... 3. Obtain an IP address automatically 1) Set up the TCP/IP Protocol for your PC in the following example is 192.168.1.1. TD-W8960N Wireless N ADSL2+ Modem Router User Guide Chapter 3. Connect the local PC to verify the network connection between your PC 8 Configure the...
... PC". 2) Configure the network parameters. In this , please refer to the Figure 3-2, it means the connection between your TD-W8960N Wireless N ADSL2+ Modem Router using Quick Setup Wizard within minutes. 3.1 TCP/IP Configuration The default IP address of the Router. The following two ways. 1. Figure 3-1.... 3. Obtain an IP address automatically 1) Set up the TCP/IP Protocol for your PC in the following example is 192.168.1.1. TD-W8960N Wireless N ADSL2+ Modem Router User Guide Chapter 3. Connect the local PC to verify the network connection between your PC 8 Configure the...
User Guide
Page 17
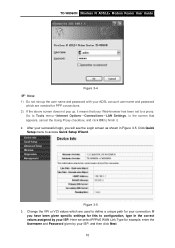
... this to a proxy. If you will see the Login screen as shown in the correct values assigned by your ISP, and then click Next. 10 TD-W8960N Wireless N ADSL2+ Modem Router User Guide Figure 3-4 ) Note: 1) Do not mix up , it . 2. After your successful login, you have been given specific settings for your... to finish it means that appears, cancel the Using Proxy checkbox, and click OK to access Quick Setup Wizard. Here we select PPPoE WAN Link Type for PPP connections. 2) If the above screen does not pop up the user name and password with your ADSL account user name and password ...
... this to a proxy. If you will see the Login screen as shown in the correct values assigned by your ISP, and then click Next. 10 TD-W8960N Wireless N ADSL2+ Modem Router User Guide Figure 3-4 ) Note: 1) Do not mix up , it . 2. After your successful login, you have been given specific settings for your... to finish it means that appears, cancel the Using Proxy checkbox, and click OK to access Quick Setup Wizard. Here we select PPPoE WAN Link Type for PPP connections. 2) If the above screen does not pop up the user name and password with your ADSL account user name and password ...
User Guide
Page 18
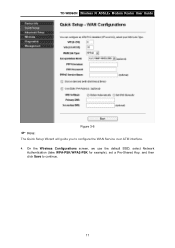
TD-W8960N Wireless N ADSL2+ Modem Router User Guide Figure 3-6 ) Note: The Quick Setup Wizard will guide you to continue. 11 On the Wireless Configurations screen, we use the default SSID, select Network Authentication (take WPA-PSK/WPA2-PSK for example), set a Pre-Shared Key, and then click Save to configure the WAN Service over ATM interface. 4.
TD-W8960N Wireless N ADSL2+ Modem Router User Guide Figure 3-6 ) Note: The Quick Setup Wizard will guide you to continue. 11 On the Wireless Configurations screen, we use the default SSID, select Network Authentication (take WPA-PSK/WPA2-PSK for example), set a Pre-Shared Key, and then click Save to configure the WAN Service over ATM interface. 4.
User Guide
Page 19
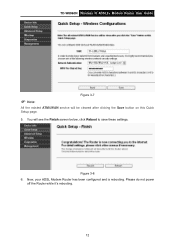
Please do not power off the Router while it's rebooting. 12 You will be cleared after clicking the Save button on this Quick Setup page. 5. Figure 3-8 6. TD-W8960N Wireless N ADSL2+ Modem Router User Guide Figure 3-7 ) Note: All the existed ATM&WAN service will see the Finish screen below, click Reboot to save these settings. Now, your ADSL Modem Router has been configured and is rebooting.
Please do not power off the Router while it's rebooting. 12 You will be cleared after clicking the Save button on this Quick Setup page. 5. Figure 3-8 6. TD-W8960N Wireless N ADSL2+ Modem Router User Guide Figure 3-7 ) Note: All the existed ATM&WAN service will see the Finish screen below, click Reboot to save these settings. Now, your ADSL Modem Router has been configured and is rebooting.
User Guide
Page 21
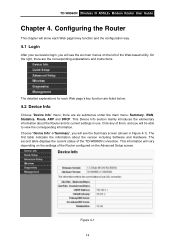
... will vary depending on the settings of the Router configured on the left of the Web-based utility. Click any of the TD-W8960N connection. The first table indicates the information about the Router and its current settings in Figure 4-1). The second table displays the current... information. Figure 4-1 14 Choose "Device Info"Æ"Summary", you will see the six main menus on the Advanced Setup screen. On the right, there are six submenus under the main menu: Summary, WAN, Statistics, Route, ARP and DHCP. TD-W8960N Wireless N ADSL2+ Modem Router User Guide Chapter 4.
... will vary depending on the settings of the Router configured on the left of the Web-based utility. Click any of the TD-W8960N connection. The first table indicates the information about the Router and its current settings in Figure 4-1). The second table displays the current... information. Figure 4-1 14 Choose "Device Info"Æ"Summary", you will see the six main menus on the Advanced Setup screen. On the right, there are six submenus under the main menu: Summary, WAN, Statistics, Route, ARP and DHCP. TD-W8960N Wireless N ADSL2+ Modem Router User Guide Chapter 4.
User Guide
Page 22
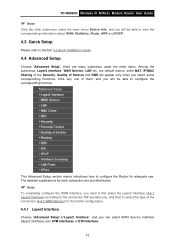
... be able to view the corresponding information about WAN, Statistics, Route, ARP and DHCP. 4.3 Quick Setup Please refer to Section 3.2 Quick Installation Guide. 4.4 Advanced Setup Choose "Advanced Setup", there are provided below. ) Note: To completely configure the WAN Interface, you need to first select...Choose "Advanced Setup"Æ"Layer2 Interface", and you can select WAN Service Interface (layer2 interface) over ATM interfaces or ETH interface. 15 Click any one of Service and DNS will appear only when you will be able to configure the corresponding function. TD-W8960N Wireless N ...
... be able to view the corresponding information about WAN, Statistics, Route, ARP and DHCP. 4.3 Quick Setup Please refer to Section 3.2 Quick Installation Guide. 4.4 Advanced Setup Choose "Advanced Setup", there are provided below. ) Note: To completely configure the WAN Interface, you need to first select...Choose "Advanced Setup"Æ"Layer2 Interface", and you can select WAN Service Interface (layer2 interface) over ATM interfaces or ETH interface. 15 Click any one of Service and DNS will appear only when you will be able to configure the corresponding function. TD-W8960N Wireless N ...
User Guide
Page 23
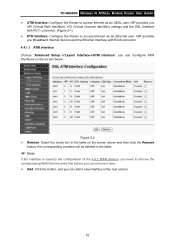
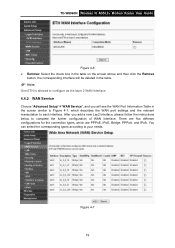
Figure 4-2 ¾ Remove: Select the check box in the table on the screen below. TD-W8960N Wireless N ADSL2+ Modem Router User Guide ¾ ATM Interface: Configure the Router to access Internet as an Ethernet user. ISP provides you Broadband Internet...16 ISP provides you VPI (Virtual Path Identifier), VCI (Virtual Channel Identifier) settings and the DSL Interface with RJ45 connector. 4.4.1.1 ATM interface Choose "Advanced Setup"Æ"Layer2 InterfaceÆATM interface", you can Configure ATM interfaces on the screen above and then click the Remove button, the corresponding interface will...
Figure 4-2 ¾ Remove: Select the check box in the table on the screen below. TD-W8960N Wireless N ADSL2+ Modem Router User Guide ¾ ATM Interface: Configure the Router to access Internet as an Ethernet user. ISP provides you Broadband Internet...16 ISP provides you VPI (Virtual Path Identifier), VCI (Virtual Channel Identifier) settings and the DSL Interface with RJ45 connector. 4.4.1.1 ATM interface Choose "Advanced Setup"Æ"Layer2 InterfaceÆATM interface", you can Configure ATM interfaces on the screen above and then click the Remove button, the corresponding interface will...
User Guide
Page 25
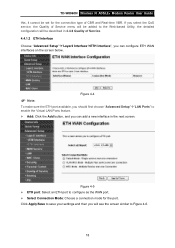
... the ETH port available, you should first choose "Advanced Setup"Æ"LAN Ports" to Figure 4-6. 18 Figure 4-5 ¾ ETH port: Select an ETH port to save your settings and then you can add a new interface in 4.4.8 Quality of CBR and Real-time VBR. TD-W8960N Wireless N ADSL2+ Modem Router User Guide this, it...
... the ETH port available, you should first choose "Advanced Setup"Æ"LAN Ports" to Figure 4-6. 18 Figure 4-5 ¾ ETH port: Select an ETH port to save your settings and then you can add a new interface in 4.4.8 Quality of CBR and Real-time VBR. TD-W8960N Wireless N ADSL2+ Modem Router User Guide this, it...
User Guide
Page 26
... the layer 2 WAN Interface. 4.4.2 WAN Service Choose "Advanced Setup"Æ"WAN Service", and you add a new Lay2 Interface, please follow the instructions below to complete the further configuration of WAN Interface. You can select the corresponding types according to each interface. Figure 4-7 19 TD-W8960N Wireless N ADSL2+ Modem Router User Guide Figure 4-6 ¾...
... the layer 2 WAN Interface. 4.4.2 WAN Service Choose "Advanced Setup"Æ"WAN Service", and you add a new Lay2 Interface, please follow the instructions below to complete the further configuration of WAN Interface. You can select the corresponding types according to each interface. Figure 4-7 19 TD-W8960N Wireless N ADSL2+ Modem Router User Guide Figure 4-6 ¾...
User Guide
Page 29
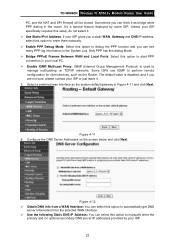
... in your ISP or just leave it as bridge while PPP dialing in Figure 4-11 and click Next. Select a preferred wan interface as the Router. TD-W8960N Wireless N ADSL2+ Modem Router User Guide PC, and the NAT and SPI Firewall will be closed. It's a special feature deployed by your ISP....optional secondary DNS server IP addresses provided by some ISP. Configure the DNS Server Addresses on TCP/IP networks. Unless your ISP specifically requires this setup, do not select it. ¾ Use Static IPv4 Address: If your ISP gives you can select this option to perform remote configuration for...
... in your ISP or just leave it as bridge while PPP dialing in Figure 4-11 and click Next. Select a preferred wan interface as the Router. TD-W8960N Wireless N ADSL2+ Modem Router User Guide PC, and the NAT and SPI Firewall will be closed. It's a special feature deployed by your ISP....optional secondary DNS server IP addresses provided by some ISP. Configure the DNS Server Addresses on TCP/IP networks. Unless your ISP specifically requires this setup, do not select it. ¾ Use Static IPv4 Address: If your ISP gives you can select this option to perform remote configuration for...
User Guide
Page 36
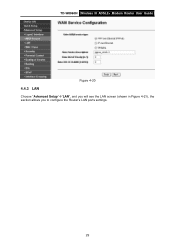
TD-W8960N Wireless N ADSL2+ Modem Router User Guide Figure 4-20 4.4.3 LAN Choose "Advanced Setup"Æ"LAN", and you will see the LAN screen (shown in Figure 4-21), the section allows you to configure the Router's LAN ports settings. 29
TD-W8960N Wireless N ADSL2+ Modem Router User Guide Figure 4-20 4.4.3 LAN Choose "Advanced Setup"Æ"LAN", and you will see the LAN screen (shown in Figure 4-21), the section allows you to configure the Router's LAN ports settings. 29

User Guide
Page 38
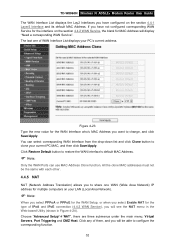
...connection type of Bridging here, they won't display on the preceding screen since only Bridging is selected. 4.4.4 MAC Address Clone Choose menu "Advanced Setup"Æ"MAC Address Clone", you want to reserved to the computer. ¾ Configure the second IP Address and Subnet Mask: You can configure ...190; Static IP Lease List: The function allows you will always obtain the assigned IP address each time when it accesses the DHCP server. TD-W8960N Wireless N ADSL2+ Modem Router User Guide • Start IP Address: Enter a value for the DHCP server to start with when issuing IP addresses...
...connection type of Bridging here, they won't display on the preceding screen since only Bridging is selected. 4.4.4 MAC Address Clone Choose menu "Advanced Setup"Æ"MAC Address Clone", you want to reserved to the computer. ¾ Configure the second IP Address and Subnet Mask: You can configure ...190; Static IP Lease List: The function allows you will always obtain the assigned IP address each time when it accesses the DHCP server. TD-W8960N Wireless N ADSL2+ Modem Router User Guide • Start IP Address: Enter a value for the DHCP server to start with when issuing IP addresses...
User Guide
Page 39
.... The last one WAN (Wide Area Network) IP address for multiple computers on the section 4.4.1 Layer2 Interface and its default MAC Address. TD-W8960N Wireless N ADSL2+ Modem Router User Guide The WAN Interface List displays the Lay2 Interfaces you have not configured corresponding WAN Service for the interface... WAN Service, the blank for MAC Address will see the NAT menu in the Web-based Utility (shown in Figure 4-24). Choose "Advanced Setup"Æ"NAT", there are three submenus under the main menu: Virtual Servers, Port Triggering and DMZ Host. Figure 4-23 Type the new value for...
.... The last one WAN (Wide Area Network) IP address for multiple computers on the section 4.4.1 Layer2 Interface and its default MAC Address. TD-W8960N Wireless N ADSL2+ Modem Router User Guide The WAN Interface List displays the Lay2 Interfaces you have not configured corresponding WAN Service for the interface... WAN Service, the blank for MAC Address will see the NAT menu in the Web-based Utility (shown in Figure 4-24). Choose "Advanced Setup"Æ"NAT", there are three submenus under the main menu: Virtual Servers, Port Triggering and DMZ Host. Figure 4-23 Type the new value for...
User Guide
Page 40
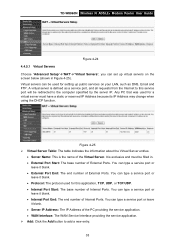
... indicates the information about the Virtual Server entries. • Server Name: This is defined as DNS, Email and FTP. TD-W8960N Wireless N ADSL2+ Modem Router User Guide Figure 4-24 4.4.5.1 Virtual Servers Choose "Advanced Setup"Æ"NAT"Æ"Virtual Servers", you can set up public services on the screen below (shown in . • External...
... indicates the information about the Virtual Server entries. • Server Name: This is defined as DNS, Email and FTP. TD-W8960N Wireless N ADSL2+ Modem Router User Guide Figure 4-24 4.4.5.1 Virtual Servers Choose "Advanced Setup"Æ"NAT"Æ"Virtual Servers", you can set up public services on the screen below (shown in . • External...


