Quick Installation Guide
Page 1
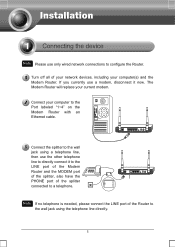
... with an Ethernet cable. Connect the splitter to the wall jack using the telephone line directly. 1 If you currently use only wired network connections to configure the Router. Note Please use a modem, disconnect it to the LINE port of the Modem Router and the MODEM port of the splitter, also have...
... with an Ethernet cable. Connect the splitter to the wall jack using the telephone line directly. 1 If you currently use only wired network connections to configure the Router. Note Please use a modem, disconnect it to the LINE port of the Modem Router and the MODEM port of the splitter, also have...

Quick Installation Guide
Page 3
The Setup Wizard will automatically pop up on your CD-ROM drive. TP-LINK strongly recommends that you can either run the setup CD-ROM (method one), or run the setup CD-ROM. Insert the provided Resource CD into your computer's screen. Please skip to step 3 Testing the Internet Connection. 3 Note To configure the device, you run the Web based Quick Setup Wizard (method two). The configuration has now been completed. Click Start Setup, and then follow the step-by-step instructions until you complete the configuration.
The Setup Wizard will automatically pop up on your CD-ROM drive. TP-LINK strongly recommends that you can either run the setup CD-ROM (method one), or run the setup CD-ROM. Insert the provided Resource CD into your computer's screen. Please skip to step 3 Testing the Internet Connection. 3 Note To configure the device, you run the Web based Quick Setup Wizard (method two). The configuration has now been completed. Click Start Setup, and then follow the step-by-step instructions until you complete the configuration.

Quick Installation Guide
Page 5
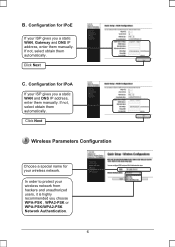
.... If not, select obtain them manually. Configuration for this option in order to A; If you may want your ISP. If IPoA is selected, please skip to select this information. If your ISP gives you did not get the VPI, VCI and WAN Link Type information, please contact your ISP for ...PPPoA/PPPoE Enter the Username and Password given by your ISP. Enter the VPI and VCI values given by time you want to B; Internet Parameters Configuration This page will then display. If IPoE is ...
.... If not, select obtain them manually. Configuration for this option in order to A; If you may want your ISP. If IPoA is selected, please skip to select this information. If your ISP gives you did not get the VPI, VCI and WAN Link Type information, please contact your ISP for ...PPPoA/PPPoE Enter the Username and Password given by your ISP. Enter the VPI and VCI values given by time you want to B; Internet Parameters Configuration This page will then display. If IPoE is ...
Quick Installation Guide
Page 6
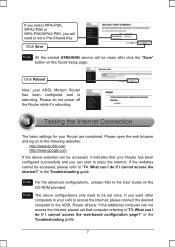
... IP address, enter them manually. In order to protect your ISP gives you choose WPA-PSK , WPA2-PSK or WPA-PSK/WPA2-PSK Network Authentication. 6 Configuration for IPoE If your wireless network. If not, select obtain them automatically. B. If not, select obtain them automatically. Click Next...
... IP address, enter them manually. In order to protect your ISP gives you choose WPA-PSK , WPA2-PSK or WPA-PSK/WPA2-PSK Network Authentication. 6 Configuration for IPoE If your wireless network. If not, select obtain them automatically. B. If not, select obtain them automatically. Click Next...
Quick Installation Guide
Page 7
...basic settings for your ADSL Modem Router has been configured and is rebooting. Note For the advanced configurations,please refer to the User Guide on to the following websites: http://www.tp-link.com http://www.google.com If the above configurations only need to set that your LAN to ... it indicates that computer referring to"T3. Click Reboot Now, your Router are completed. Please do if I cannot access the web-based configuration page?" Note The above websites can be clean after click the "Save" button on this Quick Setup page. in the Troubleshooting guide. ...
...basic settings for your ADSL Modem Router has been configured and is rebooting. Note For the advanced configurations,please refer to the User Guide on to the following websites: http://www.tp-link.com http://www.google.com If the above configurations only need to set that your LAN to ... it indicates that computer referring to"T3. Click Reboot Now, your Router are completed. Please do if I cannot access the web-based configuration page?" Note The above websites can be clean after click the "Save" button on this Quick Setup page. in the Troubleshooting guide. ...

Quick Installation Guide
Page 8
How do if I forgot my password? 1) Restore the Modem Router's configuration to its factory default settings? What can I do I restore my Modem Router's configuration to re-enter all the parameters. For Windows XP OS Go to Start > Settings > Control Panel, and then you will need to... to section T1. 2) Use the default user name and password: admin, admin. 3) Try to do if I cannot access the web-based configuration page? 1) Configure your Modem Router once again by following page. T1. If you will see the following the instructions in the previous steps of the QIG. With...
How do if I forgot my password? 1) Restore the Modem Router's configuration to its factory default settings? What can I do I restore my Modem Router's configuration to re-enter all the parameters. For Windows XP OS Go to Start > Settings > Control Panel, and then you will need to... to section T1. 2) Use the default user name and password: admin, admin. 3) Try to do if I cannot access the web-based configuration page? 1) Configure your Modem Router once again by following page. T1. If you will see the following the instructions in the previous steps of the QIG. With...
Quick Installation Guide
Page 13
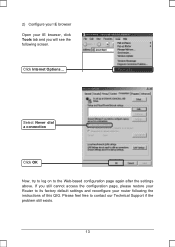
Select Never dial a connection Click OK Now, try to log on to contact our Technical Support if the problem still exists. 13 2) Configure your IE browser Open your router following screen. Please feel free to the Web-based configuration page again after the settings above. If you still cannot access the configuration page, please restore your Router to its factory default settings and reconfigure your IE browser, click Tools tab and you will see the following the instructions of this QIG. Click Internet Options...
Select Never dial a connection Click OK Now, try to log on to contact our Technical Support if the problem still exists. 13 2) Configure your IE browser Open your router following screen. Please feel free to the Web-based configuration page again after the settings above. If you still cannot access the configuration page, please restore your Router to its factory default settings and reconfigure your IE browser, click Tools tab and you will see the following the instructions of this QIG. Click Internet Options...
User Guide
Page 3
... be determined by turning the equipment off and on, the user is encouraged to try to correct the interference by unauthorized modifications to only Mobile Configurations. However, there is no guarantee that to which the receiver is applicable to this transmitter must be co-located or operating in conjunction with FCC...
... be determined by turning the equipment off and on, the user is encouraged to try to correct the interference by unauthorized modifications to only Mobile Configurations. However, there is no guarantee that to which the receiver is applicable to this transmitter must be co-located or operating in conjunction with FCC...

User Guide
Page 6
... UPNP ...53 4.4.13 Interface Grouping ...54 4.4.14 LAN Ports...56 CONTENTS Chapter 1. Quick Installation Guide 8 3.1 TCP/IP Configuration ...8 3.2 Quick Installation Guide 9 Chapter 4. Connecting the Router 6 2.1 System Requirements ...6 2.2 Installation Environment Requirements 6 2.3 Connecting the Router ...6 Chapter 3. Configuring the Router 14 4.1 Login ...14 4.2 Device Info ...14 4.3 Quick Setup...15 4.4 Advanced Setup...15 4.4.1 Layer2 Interface ...15...
... UPNP ...53 4.4.13 Interface Grouping ...54 4.4.14 LAN Ports...56 CONTENTS Chapter 1. Quick Installation Guide 8 3.1 TCP/IP Configuration ...8 3.2 Quick Installation Guide 9 Chapter 4. Connecting the Router 6 2.1 System Requirements ...6 2.2 Installation Environment Requirements 6 2.3 Connecting the Router ...6 Chapter 3. Configuring the Router 14 4.1 Login ...14 4.2 Device Info ...14 4.3 Quick Setup...15 4.4 Advanced Setup...15 4.4.1 Layer2 Interface ...15...

User Guide
Page 7
4.4.15 IPSec...56 4.5 Wireless ...60 4.5.1 Basic ...60 4.5.2 Security ...61 4.5.3 MAC Filter ...78 4.5.4 Wireless Bridge ...79 4.5.5 Advanced ...80 4.5.6 Station info ...81 4.6 Diagnostics...82 4.7 Management ...83 4.7.1 Settings ...83 4.7.2 System Log ...85 4.7.3 SNMP Agent ...87 4.7.4 TR-069 client...88 4.7.5 Access Control ...89 4.7.6 Update Software ...90 4.7.7 Reboot...91 Appendix A: FAQ...92 Appendix B: Configuring the PC 95 Appendix C: Specifications 99 Appendix D: Glossary 100
4.4.15 IPSec...56 4.5 Wireless ...60 4.5.1 Basic ...60 4.5.2 Security ...61 4.5.3 MAC Filter ...78 4.5.4 Wireless Bridge ...79 4.5.5 Advanced ...80 4.5.6 Station info ...81 4.6 Diagnostics...82 4.7 Management ...83 4.7.1 Settings ...83 4.7.2 System Log ...85 4.7.3 SNMP Agent ...87 4.7.4 TR-069 client...88 4.7.5 Access Control ...89 4.7.6 Update Software ...90 4.7.7 Reboot...91 Appendix A: FAQ...92 Appendix B: Configuring the PC 95 Appendix C: Specifications 99 Appendix D: Glossary 100
User Guide
Page 15
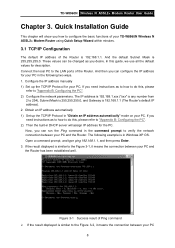
...the TCP/IP Protocol in Windows XP OS. These values can configure the IP address for the PC. Connect the local PC to the LAN ports of the Router is in "Obtain an IP address automatically" mode on your TD-W8960N Wireless N ADSL2+ Modem Router using Quick Setup Wizard within minutes.... 3.1 TCP/IP Configuration The default IP address of the Router. If you desire. Obtain an IP address automatically 1) Set up...
...the TCP/IP Protocol in Windows XP OS. These values can configure the IP address for the PC. Connect the local PC to the LAN ports of the Router is in "Obtain an IP address automatically" mode on your TD-W8960N Wireless N ADSL2+ Modem Router using Quick Setup Wizard within minutes.... 3.1 TCP/IP Configuration The default IP address of the Router. If you desire. Obtain an IP address automatically 1) Set up...

User Guide
Page 16
...link to on the Router and LEDs on any Windows, Macintosh or UNIX OS with a Web browser, such as Microsoft Internet Explorer, Mozilla Firefox or Apple Safari. 1. Enter admin for your PC correct? ) Note: If the Router's IP address is failed. Figure 3-2 Failure result of the browser. TD-W8960N...168.1.2 ~ 192.168.1.254. 3.2 Quick Installation Guide With a Web-based utility, it is easy to configure and manage the TD-W8960N Wireless N ADSL2+ Modem Router. Is the TCP/IP configuration for the User Name and Password, both in the address field of Ping command Please check the connection ...
...link to on the Router and LEDs on any Windows, Macintosh or UNIX OS with a Web browser, such as Microsoft Internet Explorer, Mozilla Firefox or Apple Safari. 1. Enter admin for your PC correct? ) Note: If the Router's IP address is failed. Figure 3-2 Failure result of the browser. TD-W8960N...168.1.2 ~ 192.168.1.254. 3.2 Quick Installation Guide With a Web-based utility, it is easy to configure and manage the TD-W8960N Wireless N ADSL2+ Modem Router. Is the TCP/IP configuration for the User Name and Password, both in the address field of Ping command Please check the connection ...
User Guide
Page 17
... will see the Login screen as shown in the screen that your ISP. Figure 3-5 3. TD-W8960N Wireless N ADSL2+ Modem Router User Guide Figure 3-4 ) Note: 1) Do not mix up , it . 2. Here we select PPPoE WAN Link Type for PPP connections. 2) If the above screen does not pop up the user name ...→Internet Options→Connections→LAN Settings, in Figure 3-5. After your successful login, you have been given specific settings for this to configuration, type in the correct values assigned by your connection. Change the VPI or VCI values which are used to define a unique path for...
... will see the Login screen as shown in the screen that your ISP. Figure 3-5 3. TD-W8960N Wireless N ADSL2+ Modem Router User Guide Figure 3-4 ) Note: 1) Do not mix up , it . 2. Here we select PPPoE WAN Link Type for PPP connections. 2) If the above screen does not pop up the user name ...→Internet Options→Connections→LAN Settings, in Figure 3-5. After your successful login, you have been given specific settings for this to configuration, type in the correct values assigned by your connection. Change the VPI or VCI values which are used to define a unique path for...
User Guide
Page 18
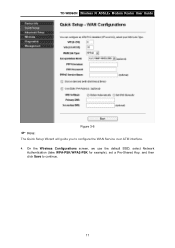
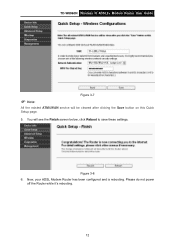
TD-W8960N Wireless N ADSL2+ Modem Router User Guide Figure 3-6 ) Note: The Quick Setup Wizard will guide you to continue. 11 On the Wireless Configurations screen, we use the default SSID, select Network Authentication (take WPA-PSK/WPA2-PSK for example), set a Pre-Shared Key, and then click Save to configure the WAN Service over ATM interface. 4.
TD-W8960N Wireless N ADSL2+ Modem Router User Guide Figure 3-6 ) Note: The Quick Setup Wizard will guide you to continue. 11 On the Wireless Configurations screen, we use the default SSID, select Network Authentication (take WPA-PSK/WPA2-PSK for example), set a Pre-Shared Key, and then click Save to configure the WAN Service over ATM interface. 4.
User Guide
Page 19
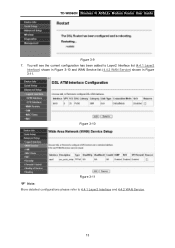
Please do not power off the Router while it's rebooting. 12 You will be cleared after clicking the Save button on this Quick Setup page. 5. Figure 3-8 6. Now, your ADSL Modem Router has been configured and is rebooting. TD-W8960N Wireless N ADSL2+ Modem Router User Guide Figure 3-7 ) Note: All the existed ATM&WAN service will see the Finish screen below, click Reboot to save these settings.
Please do not power off the Router while it's rebooting. 12 You will be cleared after clicking the Save button on this Quick Setup page. 5. Figure 3-8 6. Now, your ADSL Modem Router has been configured and is rebooting. TD-W8960N Wireless N ADSL2+ Modem Router User Guide Figure 3-7 ) Note: All the existed ATM&WAN service will see the Finish screen below, click Reboot to save these settings.
User Guide
Page 20
Figure 3-10 Figure 3-11 ) Note: More detailed configurations please refer to Layer2 Interface list (4.4.1 Layer2 Interface) shown in Figure 3-10 and WAN Service list (4.4.2 WAN Service) shown in Figure 3-11. TD-W8960N Wireless N ADSL2+ Modem Router User Guide Figure 3-9 7. You will see the current configuration has been added to 4.4.1 Layer2 Interface and 4.4.2 WAN Service. 13
Figure 3-10 Figure 3-11 ) Note: More detailed configurations please refer to Layer2 Interface list (4.4.1 Layer2 Interface) shown in Figure 3-10 and WAN Service list (4.4.2 WAN Service) shown in Figure 3-11. TD-W8960N Wireless N ADSL2+ Modem Router User Guide Figure 3-9 7. You will see the current configuration has been added to 4.4.1 Layer2 Interface and 4.4.2 WAN Service. 13
User Guide
Page 21
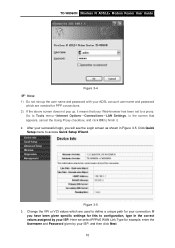
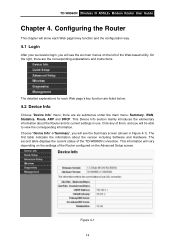
...corresponding explanations and instructions. The first table indicates the information about the Router and its current settings in Figure 4-1). Figure 4-1 14 Configuring the Router This chapter will be able to view the corresponding information. This Device Info section mainly introduces the elementary information about ...ARP and DHCP. Click any of the Web-based utility. The second table displays the current status of the Router configured on the settings of the TD-W8960N connection. Choose "Device Info"Æ"Summary", you will see the six main menus on the left of them, and ...
...corresponding explanations and instructions. The first table indicates the information about the Router and its current settings in Figure 4-1). Figure 4-1 14 Configuring the Router This chapter will be able to view the corresponding information. This Device Info section mainly introduces the elementary information about ...ARP and DHCP. Click any of the Web-based utility. The second table displays the current status of the Router configured on the settings of the TD-W8960N connection. Choose "Device Info"Æ"Summary", you will see the six main menus on the left of them, and ...
User Guide
Page 22
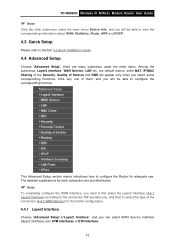
... to configure the corresponding function. TD-W8960N Wireless N ADSL2+ Modem Router User Guide ) Note: Click the other submenus under the main menu. are default menus, while NAT, IP/MAC filtering of the Security, Quality of the connection (4.4.2 WAN Service) for the further configuration. ...Please refer to Section 3.2 Quick Installation Guide. 4.4 Advanced Setup Choose "Advanced Setup", there are provided below. ) Note: To completely configure the WAN Interface, you need to first select the Layer2 Interface (4.4.1 Layer2 Interface) according to the connection ISP provides you, and then...
... to configure the corresponding function. TD-W8960N Wireless N ADSL2+ Modem Router User Guide ) Note: Click the other submenus under the main menu. are default menus, while NAT, IP/MAC filtering of the Security, Quality of the connection (4.4.2 WAN Service) for the further configuration. ...Please refer to Section 3.2 Quick Installation Guide. 4.4 Advanced Setup Choose "Advanced Setup", there are provided below. ) Note: To completely configure the WAN Interface, you need to first select the Layer2 Interface (4.4.1 Layer2 Interface) according to the connection ISP provides you, and then...
User Guide
Page 23
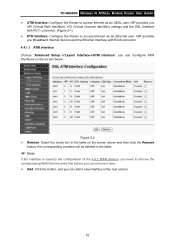
TD-W8960N Wireless N ADSL2+ Modem Router User Guide ¾ ATM Interface: Configure the Router to remove the corresponding WAN Service entry first before you can remove it here. ¾ Add: Click the button, and you can Configure ATM interfaces on the screen above and then click the Remove button, the corresponding...198;"Layer2 InterfaceÆATM interface", you can add a new interface in the table. ) Note: If the interface is used by the configuration of the 4.4.2 WAN Service, you Broadband Internet Service and the Ethernet Interface with RJ11 connector. (Figure 2-1) ¾ ETH Interface...
TD-W8960N Wireless N ADSL2+ Modem Router User Guide ¾ ATM Interface: Configure the Router to remove the corresponding WAN Service entry first before you can remove it here. ¾ Add: Click the button, and you can Configure ATM interfaces on the screen above and then click the Remove button, the corresponding...198;"Layer2 InterfaceÆATM interface", you can add a new interface in the table. ) Note: If the interface is used by the configuration of the 4.4.2 WAN Service, you Broadband Internet Service and the Ethernet Interface with RJ11 connector. (Figure 2-1) ¾ ETH Interface...
User Guide
Page 25
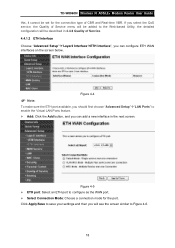
... the screen below. If you select the QoS service, the Quality of Service menu will be added to the Web-based Utility, the detailed configuration will see the screen similar to save your settings and then you can add a new interface in 4.4.8 Quality of Service. 4.4.1.2 ETH interface ...ETH port available, you should first choose "Advanced Setup"Æ"LAN Ports" to configure as the WAN port. ¾ Select Connection Mode: Choose a connection mode for the connection type of CBR and Real-time VBR. TD-W8960N Wireless N ADSL2+ Modem Router User Guide this, it cannot be described in the...
... the screen below. If you select the QoS service, the Quality of Service menu will be added to the Web-based Utility, the detailed configuration will see the screen similar to save your settings and then you can add a new interface in 4.4.8 Quality of Service. 4.4.1.2 ETH interface ...ETH port available, you should first choose "Advanced Setup"Æ"LAN Ports" to configure as the WAN port. ¾ Select Connection Mode: Choose a connection mode for the connection type of CBR and Real-time VBR. TD-W8960N Wireless N ADSL2+ Modem Router User Guide this, it cannot be described in the...


