Operating Instructions
Page 5
...a photo - Tape PB ZOOM 54 Quickly locating a scene using your computer - MPEG movie recording ....... 104 Recording moving picture - NightShot/Super NightShot ...... 23 Self-timer recording 25 Checking the recording - Image protection 132 Deleting images 133 Writing a print mark - MPEG movie playback 120 Viewing images using the zero set memory function 55 Searching a recording by date - Table of trouble and their solutions ......... 138 Self-diagnosis display 143 Warning indicators and messages 144 Additional Information Digital8 system, recording and playback...
...a photo - Tape PB ZOOM 54 Quickly locating a scene using your computer - MPEG movie recording ....... 104 Recording moving picture - NightShot/Super NightShot ...... 23 Self-timer recording 25 Checking the recording - Image protection 132 Deleting images 133 Writing a print mark - MPEG movie playback 120 Viewing images using the zero set memory function 55 Searching a recording by date - Table of trouble and their solutions ......... 138 Self-diagnosis display 143 Warning indicators and messages 144 Additional Information Digital8 system, recording and playback...
Operating Instructions
Page 7
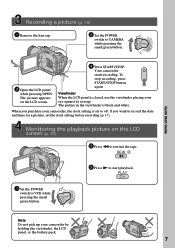
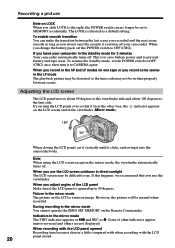
... viewfinder, the LCD panel, or the battery pack. 7 When you want to off. Monitoring the playback picture on the LCD screen. 4 Press START/STOP. The picture in the viewfinder is set to record the date and time for a picture, set the clock setting before recording (p. 17). V POWER OFCFR(CHG) CAM M 3 Open the LCD panel while pressing OPEN. If you purchase your camcorder, the clock setting is black and white. PLAY OFCFR(CHG) 1 Set the POWER switch to rewind the tape.
... viewfinder, the LCD panel, or the battery pack. 7 When you want to off. Monitoring the playback picture on the LCD screen. 4 Press START/STOP. The picture in the viewfinder is set to record the date and time for a picture, set the clock setting before recording (p. 17). V POWER OFCFR(CHG) CAM M 3 Open the LCD panel while pressing OPEN. If you purchase your camcorder, the clock setting is black and white. PLAY OFCFR(CHG) 1 Set the POWER switch to rewind the tape.
Operating Instructions
Page 8
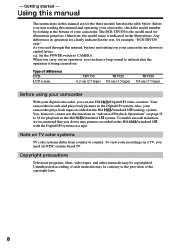
... TV color systems differ from country to country. Type of your camcorder. Your camcorder records and plays back pictures in the illustrations. Otherwise, the model name is the model used for example, "DCR-TRV830 only." Set the POWER switch to the provision of such materials may be contrary to CAMERA. Note on a TV, you need an NTSC system-based TV. To view your digital camcorder, you can use the functions in "Advanced Playback Operations...
... TV color systems differ from country to country. Type of your camcorder. Your camcorder records and plays back pictures in the illustrations. Otherwise, the model name is the model used for example, "DCR-TRV830 only." Set the POWER switch to the provision of such materials may be contrary to CAMERA. Note on a TV, you need an NTSC system-based TV. To view your digital camcorder, you can use the functions in "Advanced Playback Operations...
Operating Instructions
Page 20
... to prevent battery and tape wear. Note When using the LCD screen except in the mirror mode The picture on the LCD is to save battery power and to the lens side. However, the picture will be normal when recorded. Indicators in the standby mode for 3 minutes Your camcorder automatically turns off your camcorder in the mirror mode The STBY indicator appears as Xz and REC as a default setting. To enable...
... to prevent battery and tape wear. Note When using the LCD screen except in the mirror mode The picture on the LCD is to save battery power and to the lens side. However, the picture will be normal when recorded. Indicators in the standby mode for 3 minutes Your camcorder automatically turns off your camcorder in the mirror mode The STBY indicator appears as Xz and REC as a default setting. To enable...
Operating Instructions
Page 22
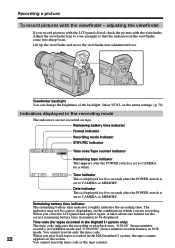
Adjust the viewfinder lens to your eyesight so that the indicators in VCR mode. Remaining battery time indicator Format indicator Recording mode indicator STBY/REC indicator 40min SP REC 0:00:01 Time code/Tape counter indicator Remaining tape indicator This appears after the POWER switch is set to be correct, depending on tape. The indicator may not be displayed. You cannot rewrite only the time code. When you close the LCD panel and open it...
Adjust the viewfinder lens to your eyesight so that the indicators in VCR mode. Remaining battery time indicator Format indicator Recording mode indicator STBY/REC indicator 40min SP REC 0:00:01 Time code/Tape counter indicator Remaining tape indicator This appears after the POWER switch is set to be correct, depending on tape. The indicator may not be displayed. You cannot rewrite only the time code. When you close the LCD panel and open it...
Operating Instructions
Page 31
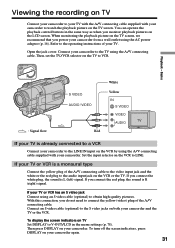
... need to connect the yellow (video) plug of your TV. Connect an S video cable (optional) to the S video jacks on the VCR by using the AC power adaptor (p. 16). Then press DISPLAY on the TV to VCR. Refer to the operating instructions of the A/V connecting cable. Playback - With this connection, you connect the white plug, the sound is R (right) signal. Then, set the TV/VCR selector on your camcorder. To turn off the screen indicators, press DISPLAY on TV Set DISPLAY...
... need to connect the yellow (video) plug of your TV. Connect an S video cable (optional) to the S video jacks on the VCR by using the AC power adaptor (p. 16). Then press DISPLAY on the TV to VCR. Refer to the operating instructions of the A/V connecting cable. Playback - With this connection, you connect the white plug, the sound is R (right) signal. Then, set the TV/VCR selector on your camcorder. To turn off the screen indicators, press DISPLAY on TV Set DISPLAY...
Operating Instructions
Page 32
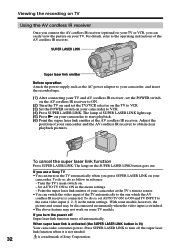
... VCR. (3) Set the POWER switch on your camcorder. To do as the AC power adaptor to your camcorder, and insert the recorded tape. (1) After connecting your TV and AV cordless IR receiver, set the POWER switch on the AV cordless IR receiver to ON. (2) Turn the TV on and set AUTO TV ON to ON and TV INPUT to the same video input (1, 2, 3) in the menu settings. With some models, however, the picture...
... VCR. (3) Set the POWER switch on your camcorder. To do as the AC power adaptor to your camcorder, and insert the recorded tape. (1) After connecting your TV and AV cordless IR receiver, set the POWER switch on the AV cordless IR receiver to ON. (2) Turn the TV on and set AUTO TV ON to ON and TV INPUT to the same video input (1, 2, 3) in the menu settings. With some models, however, the picture...
Operating Instructions
Page 33
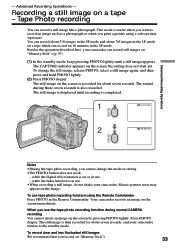
... function is set or in the Remote Commander. When you record on the screen by pressing PHOTO lightly. Press PHOTO deeper. Recording does not start yet. Mosaic-pattern noise may appear on a tape - Recording a still image on the image. Besides the operation described here, your camcorder can record a still image like a photograph. The still image on the screen is completed. 1 CAPTURE PHOTO 2 PHOTO Notes •During the tape photo recording, you print a picture using the Remote Commander Press PHOTO...
... function is set or in the Remote Commander. When you record on the screen by pressing PHOTO lightly. Press PHOTO deeper. Recording does not start yet. Mosaic-pattern noise may appear on a tape - Recording a still image on the image. Besides the operation described here, your camcorder can record a still image like a photograph. The still image on the screen is completed. 1 CAPTURE PHOTO 2 PHOTO Notes •During the tape photo recording, you print a picture using the Remote Commander Press PHOTO...
Operating Instructions
Page 52
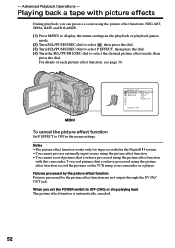
... record pictures that you have processed using the picture effect function with picture effects During playback, you set the POWER switch to OFF (CHG) or stop playing back The picture effect function is automatically canceled. 52 Pictures processed by the picture effect function Pictures processed by the picture effect function are not output through the DV IN/ OUT jack. Advanced Playback Operations - Notes • The picture effect function works only for tapes recorded in the menu settings. Playing back a tape with this camcorder...
... record pictures that you have processed using the picture effect function with picture effects During playback, you set the POWER switch to OFF (CHG) or stop playing back The picture effect function is automatically canceled. 52 Pictures processed by the picture effect function Pictures processed by the picture effect function are not output through the DV IN/ OUT jack. Advanced Playback Operations - Notes • The picture effect function works only for tapes recorded in the menu settings. Playing back a tape with this camcorder...
Operating Instructions
Page 70
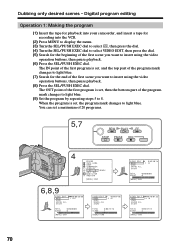
... program is set , and the top part of the program mark changes to light blue. (7) Search for the beginning of the first scene you want to insert using the video operation buttons, then pause playback. (8) Press the SEL/PUSH EXEC dial. Digital program editing Operation 1: Making the program (1) Insert the tape for playback into your camcorder, and insert a tape for recording into the VCR. (2) Press MENU to display the menu. (3) Turn the...
... program is set , and the top part of the program mark changes to light blue. (7) Search for the beginning of the first scene you want to insert using the video operation buttons, then pause playback. (8) Press the SEL/PUSH EXEC dial. Digital program editing Operation 1: Making the program (1) Insert the tape for playback into your camcorder, and insert a tape for recording into the VCR. (2) Press MENU to display the menu. (3) Turn the...
Operating Instructions
Page 85
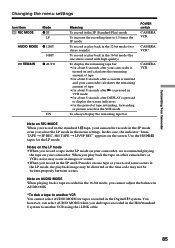
... on AUDIO MODE When playing back a tape recorded in the 16-bit mode, you cannot adjust the balance in AUDIO MIX. *To dub a tape to display the screen indicators • for the period of tape rewinding, forwarding or picture search in the VCR mode To always display the remaining tape bar POWER switch CAMERA VCR CAMERA VCR* CAMERA VCR Note on REC MODE When you record on your camcorder records in the SP mode even you record some scenes in the LP mode, the playback image...
... on AUDIO MODE When playing back a tape recorded in the 16-bit mode, you cannot adjust the balance in AUDIO MIX. *To dub a tape to display the screen indicators • for the period of tape rewinding, forwarding or picture search in the VCR mode To always display the remaining tape bar POWER switch CAMERA VCR CAMERA VCR* CAMERA VCR Note on REC MODE When you record on your camcorder records in the SP mode even you record some scenes in the LP mode, the playback image...
Operating Instructions
Page 97
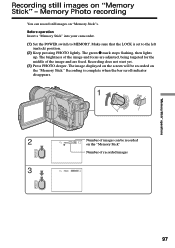
... fixed. Recording does not start yet. (3) Press PHOTO deeper. The image displayed on the screen will be recorded on "Memory Stick" - Recording still images on the "Memory Stick" Number of recorded images PHOTO 3 1152 FINE "Memory Stick" operations PHOTO 97 Recording is set to MEMORY. The green z mark stops flashing, then lights up. Make sure that the LOCK is complete when the bar scroll indicator disappears. 1 V POWER OFCFR(CHG) E ERMAORY CAM M 2 1152 FINE 21 / 40 Number of the image and are adjusted...
... fixed. Recording does not start yet. (3) Press PHOTO deeper. The image displayed on the screen will be recorded on "Memory Stick" - Recording still images on the "Memory Stick" Number of recorded images PHOTO 3 1152 FINE "Memory Stick" operations PHOTO 97 Recording is set to MEMORY. The green z mark stops flashing, then lights up. Make sure that the LOCK is complete when the bar scroll indicator disappears. 1 V POWER OFCFR(CHG) E ERMAORY CAM M 2 1152 FINE 21 / 40 Number of the image and are adjusted...
Operating Instructions
Page 102
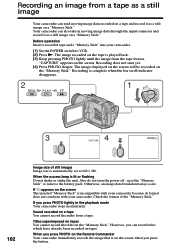
... 1 V POWER E ERMAORY CAM M 3 CAPTURE 4 PHOTO PHOTO 102 Image size of the "Memory Stick." When the acccess lamp is automatically set to VCR. (2) Press N. If you can also take in the playback mode Your camcorder stops momentarily. Titles superimposed on tapes You cannot record the titles on the screen. "CAPTURE" appears on the "Memory Stick." Otherwise, an image data breakdown may occur. If appears on the screen The inserted "Memory Stick" is played back. (3) Keep pressing PHOTO lightly until the image...
... 1 V POWER E ERMAORY CAM M 3 CAPTURE 4 PHOTO PHOTO 102 Image size of the "Memory Stick." When the acccess lamp is automatically set to VCR. (2) Press N. If you can also take in the playback mode Your camcorder stops momentarily. Titles superimposed on tapes You cannot record the titles on the screen. "CAPTURE" appears on the "Memory Stick." Otherwise, an image data breakdown may occur. If appears on the screen The inserted "Memory Stick" is played back. (3) Keep pressing PHOTO lightly until the image...
Operating Instructions
Page 106
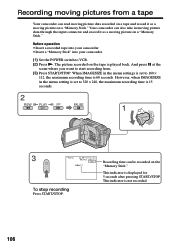
... the menu settings is set to 160 × 112, the maximum recording time is played back. And press X at the scene where you want to VCR. (2) Press N. Recording time can be recorded on the tape is 60 seconds. Before operation •Insert a recorded tape into your camcorder. •Insert a "Memory Stick" into your camcorder. (1) Set the POWER switch to start recording from a tape Your camcorder can read moving picture data recorded on a tape and record it as a moving picture on a "Memory Stick...
... the menu settings is set to 160 × 112, the maximum recording time is played back. And press X at the scene where you want to VCR. (2) Press N. Recording time can be recorded on the tape is 60 seconds. Before operation •Insert a recorded tape into your camcorder. •Insert a "Memory Stick" into your camcorder. (1) Set the POWER switch to start recording from a tape Your camcorder can read moving picture data recorded on a tape and record it as a moving picture on a "Memory Stick...
Operating Instructions
Page 123
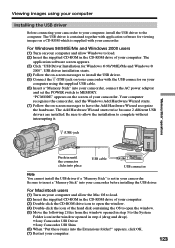
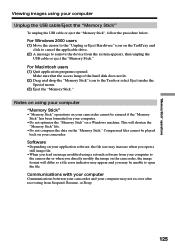
... your camcorder. Viewing images using the supplied USB cable. (6) Insert a "Memory Stick" into your computer. The application software screen appears. (3) Click "USB Driver Installation for viewing images on your computer using your computer Installing the USB driver Before connecting your camcorder to MEMORY. Your computer recognizes the camcorder, and the Windows Add Hardware Wizard starts. (7) Follow the on the screen of your camcorder, connect the AC power adaptor and set the POWER switch to your camcorder before installing the USB driver. Be sure to insert a "Memory Stick...
... your camcorder. Viewing images using the supplied USB cable. (6) Insert a "Memory Stick" into your computer. The application software screen appears. (3) Click "USB Driver Installation for viewing images on your computer using your computer Installing the USB driver Before connecting your camcorder to MEMORY. Your computer recognizes the camcorder, and the Windows Add Hardware Wizard starts. (7) Follow the on the screen of your camcorder, connect the AC power adaptor and set the POWER switch to your camcorder before installing the USB driver. Be sure to insert a "Memory Stick...
Operating Instructions
Page 125
... USB cable or eject the "Memory Stick." Software •Depending on your application software, the file size may increase when you open the file. This will differ so a file error indicator may appear and you may be unable to open a still image file. •When you load an image modified using your computer "Memory Stick" •"Memory Stick" operations on your camcorder cannot be played back on your camcorder. "Memory Stick" operations Viewing images using your computer to the camcorder or when you directly...
... USB cable or eject the "Memory Stick." Software •Depending on your application software, the file size may increase when you open the file. This will differ so a file error indicator may appear and you may be unable to open a still image file. •When you load an image modified using your computer "Memory Stick" •"Memory Stick" operations on your camcorder cannot be played back on your camcorder. "Memory Stick" operations Viewing images using your computer to the camcorder or when you directly...
Operating Instructions
Page 139
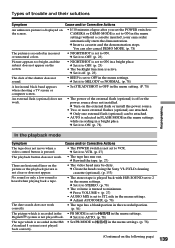
...; PB MODE is set to OFF. (p. 23) • The backlight function is not played back correctly. / in a bright place. Types of trouble and their solutions Symptom Cause and/or Corrective Actions An unknown picture is displayed on the screen. • If 10 minutes elapse after you set the POWER switch to CAMERA or DEMO MODE is set to VCR. (p. 27) The playback button does not work. • The tape has run...
...; PB MODE is set to OFF. (p. 23) • The backlight function is not played back correctly. / in a bright place. Types of trouble and their solutions Symptom Cause and/or Corrective Actions An unknown picture is displayed on the screen. • If 10 minutes elapse after you set the POWER switch to CAMERA or DEMO MODE is set to VCR. (p. 27) The playback button does not work. • The tape has run...
Operating Instructions
Page 145
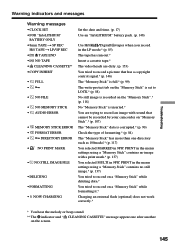
... menu settings using a "Memory Stick" contains no still image.* (p. 137) You tried to record on a "Memory Stick" while deleting data.* You tried to record on a "Memory Stick" while formatting it.* Charging an external flash (optional) does not work correctly.* * You hear the melody or beep sound. ** The x indicator and " CLEANING CASSETTE" message appear one after another on the screen. 145 Troubleshooting Warning indicators and messages Warning messages •CLOCK SET •FOR "InfoLITHIUM" BATTERY ONLY •8mm TAPE t SP REC Hi8 TAPE...
... menu settings using a "Memory Stick" contains no still image.* (p. 137) You tried to record on a "Memory Stick" while deleting data.* You tried to record on a "Memory Stick" while formatting it.* Charging an external flash (optional) does not work correctly.* * You hear the melody or beep sound. ** The x indicator and " CLEANING CASSETTE" message appear one after another on the screen. 145 Troubleshooting Warning indicators and messages Warning messages •CLOCK SET •FOR "InfoLITHIUM" BATTERY ONLY •8mm TAPE t SP REC Hi8 TAPE...
Operating Instructions
Page 157
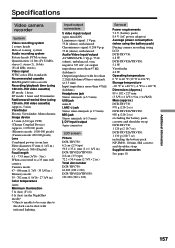
... heads, PCM system Quantization: 12 bits (Fs 32 kHz, stereo 1, stereo 2), 16 bits (Fs 48 kHz, stereo) Video signal NTSC color, EIA standards Recommended cassette Hi8/Digital8 video cassette Recording/playback time (using 120 min. Viewfinder Electric Viewfinder, Monochrome Image device 4.5 mm (1/4 type CCD) (Charge Coupled Device) Approx. 1 070 000 pixels (Memory mode: 1 000 000 pixels) (Camera mode: 690 000 pixels) Lens Combined power zoom lens Filter diameter 37 mm (1 1/2 in.) 18× (Optical), 500× (Digital...
... heads, PCM system Quantization: 12 bits (Fs 32 kHz, stereo 1, stereo 2), 16 bits (Fs 48 kHz, stereo) Video signal NTSC color, EIA standards Recommended cassette Hi8/Digital8 video cassette Recording/playback time (using 120 min. Viewfinder Electric Viewfinder, Monochrome Image device 4.5 mm (1/4 type CCD) (Charge Coupled Device) Approx. 1 070 000 pixels (Memory mode: 1 000 000 pixels) (Camera mode: 690 000 pixels) Lens Combined power zoom lens Filter diameter 37 mm (1 1/2 in.) 18× (Optical), 500× (Digital...
Operating Instructions
Page 167
... Memory overlap 110 Memory PB ZOOM 129 Memory photo recording ...... 97 "Memory Stick 88 Menu settings 78 Mirror mode 20 Moisture condensation ........ 152 Monaural 31 MONOTONE 37 MPEG 88 MPEG movie recording ....... 104 NIGHTSHOT 23 NTSC system 151 O, P, Q OLD MOVIE 40 Operation indicators 166 OVERLAP 37 Photo save 115 Photo scan 58 Photo search 57 Picture effect 39, 52 Picture search 29 Playback pause 29 Print mark 136 PROGRAM AE 43 R Recording time 14 Rec Review 26 Remaining battery time...
... Memory overlap 110 Memory PB ZOOM 129 Memory photo recording ...... 97 "Memory Stick 88 Menu settings 78 Mirror mode 20 Moisture condensation ........ 152 Monaural 31 MONOTONE 37 MPEG 88 MPEG movie recording ....... 104 NIGHTSHOT 23 NTSC system 151 O, P, Q OLD MOVIE 40 Operation indicators 166 OVERLAP 37 Photo save 115 Photo scan 58 Photo search 57 Picture effect 39, 52 Picture search 29 Playback pause 29 Print mark 136 PROGRAM AE 43 R Recording time 14 Rec Review 26 Remaining battery time...


