Camera Operations Guide
Page 5
Read this first 2 Quick Start Guide Recording movies 8 Recording still images 10 Recording/Playing back with ease - Easy Handycam 33 Recording a movie 33 Recording a still image 34 Making full use of Contents : Features available for tape only. : Features available for a longer time 26 Using ... a cassette tape 20 Inserting a "Memory Stick 21 Step 7: Setting the screen language 22 Recording Recording movies 24 Recording for "Memory Stick" only. Table of Easy Handycam operation 34 ,continued 5
Read this first 2 Quick Start Guide Recording movies 8 Recording still images 10 Recording/Playing back with ease - Easy Handycam 33 Recording a movie 33 Recording a still image 34 Making full use of Contents : Features available for tape only. : Features available for a longer time 26 Using ... a cassette tape 20 Inserting a "Memory Stick 21 Step 7: Setting the screen language 22 Recording Recording movies 24 Recording for "Memory Stick" only. Table of Easy Handycam operation 34 ,continued 5
Camera Operations Guide
Page 6
... Locating a scene on a tape - Digital effect 41 Overlaying still images on movies on a tape for playback 57 Searching quickly for the last scene of Easy Handycam operation 52 Various playback functions 53 Magnifying pictures - SPOT FOCUS 38 Adjusting the focus manually 39 Recording a picture using various effects 40 Fading in dark... places - Zero set memory 57 Searching for a scene by date of a scene - END SEARCH 44 Searching manually - Easy Handycam 51 Making full use of the most recently recorded scenes - Date search 57 6
... Locating a scene on a tape - Digital effect 41 Overlaying still images on movies on a tape for playback 57 Searching quickly for the last scene of Easy Handycam operation 52 Various playback functions 53 Magnifying pictures - SPOT FOCUS 38 Adjusting the focus manually 39 Recording a picture using various effects 40 Fading in dark... places - Zero set memory 57 Searching for a scene by date of a scene - END SEARCH 44 Searching manually - Easy Handycam 51 Making full use of the most recently recorded scenes - Date search 57 6
Camera Operations Guide
Page 12
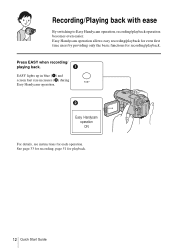
Recording/Playing back with ease By switching to Easy Handycam operation, recording/playback operation becomes even easier. Easy Handycam operation ON For details, see instructions for recording/playback. Press EASY when recording/ playing back. EASY lights up in blue (1) and screen font size increases (2) during Easy Handycam operation. Easy Handycam operation allows easy recording/playback for even first time users by providing only the basic functions for each operation. See page 33 for recording, page 51 for playback. 12 Quick Start Guide
Recording/Playing back with ease By switching to Easy Handycam operation, recording/playback operation becomes even easier. Easy Handycam operation ON For details, see instructions for recording/playback. Press EASY when recording/ playing back. EASY lights up in blue (1) and screen font size increases (2) during Easy Handycam operation. Easy Handycam operation allows easy recording/playback for even first time users by providing only the basic functions for each operation. See page 33 for recording, page 51 for playback. 12 Quick Start Guide
Camera Operations Guide
Page 24
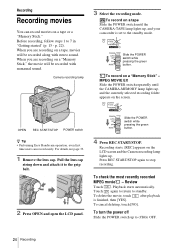
.... 4 Press REC START/STOP. Playback starts automatically. To record on the screen. OPEN REC START/STOP POWER switch z Tip • Performing Easy Handycam operation, even first time users can record movies on a tape or a "Memory Stick." Touch again to return to the grip belt. 2 Press ...recorded with stereo sound. When you are recording on a tape Slide the POWER switch until the CAMERA-MEMORY lamp lights up , and your camcorder is finished, then [YES]. Recording Recording movies You can record easily. p. 22). Slide the POWER switch while pressing the green button. Press...
.... 4 Press REC START/STOP. Playback starts automatically. To record on the screen. OPEN REC START/STOP POWER switch z Tip • Performing Easy Handycam operation, even first time users can record movies on a tape or a "Memory Stick." Touch again to return to the grip belt. 2 Press ...recorded with stereo sound. When you are recording on a tape Slide the POWER switch until the CAMERA-MEMORY lamp lights up , and your camcorder is finished, then [YES]. Recording Recording movies You can record easily. p. 22). Slide the POWER switch while pressing the green button. Press...
Camera Operations Guide
Page 29
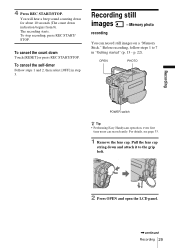
Recording still images - OPEN PHOTO POWER switch z Tip • Performing Easy Handycam operation, even first time users can record still images on a "Memory Stick." The recording starts. To cancel the self-timer Follow steps 1 and 2, then select [...
Recording still images - OPEN PHOTO POWER switch z Tip • Performing Easy Handycam operation, even first time users can record still images on a "Memory Stick." The recording starts. To cancel the self-timer Follow steps 1 and 2, then select [...
Camera Operations Guide
Page 33
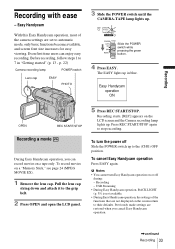
...defaults. Before recording, follow steps 1 to stop recording. Recording starts. [REC] appears on or off Slide the POWER switch up . To cancel Easy Handycam operation Press EASY again. Recording - Press REC START/STOP again to 7 in blue. Previously made settings are not displayed on the screen return to ...- Even first time users can record movies on a "Memory Stick," see page 24 (MPEG MOVIE EX). 1 Remove the lens cap. To turn Easy Handycam operation on the LCD screen and the Camera recording lamp lights up to the grip belt. 2 Press OPEN and open the LCD panel. 5 Press REC...
...defaults. Before recording, follow steps 1 to stop recording. Recording starts. [REC] appears on or off Slide the POWER switch up . To cancel Easy Handycam operation Press EASY again. Recording - Press REC START/STOP again to 7 in blue. Previously made settings are not displayed on the screen return to ...- Even first time users can record movies on a "Memory Stick," see page 24 (MPEG MOVIE EX). 1 Remove the lens cap. To turn Easy Handycam operation on the LCD screen and the Camera recording lamp lights up to the grip belt. 2 Press OPEN and open the LCD panel. 5 Press REC...
Camera Operations Guide
Page 34
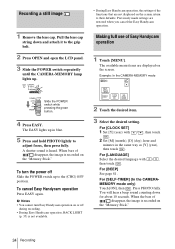
... the lens cap. Making full use of the functions that are restored when you cancel the Easy Handycam operation. A shutter sound is not available. • During Easy Handycam operation, the settings of Easy Handycam operation 1 Touch [MENU]. When bars of disappear, the image is recorded on the screen. For... recorded on the screen return to the (CHG) OFF position. Pull the lens cap string down for about 10 seconds. To turn Easy Handycam operation on or off Slide the POWER switch up to their defaults. b Notes • You cannot turn the power off during recording. ...
... the lens cap. Making full use of the functions that are restored when you cancel the Easy Handycam operation. A shutter sound is not available. • During Easy Handycam operation, the settings of Easy Handycam operation 1 Touch [MENU]. When bars of disappear, the image is recorded on the screen. For... recorded on the screen return to the (CHG) OFF position. Pull the lens cap string down for about 10 seconds. To turn Easy Handycam operation on or off Slide the POWER switch up to their defaults. b Notes • You cannot turn the power off during recording. ...
Camera Operations Guide
Page 46
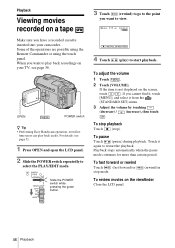
Playback Viewing movies recorded on a tape Make sure you want to play back recordings on your camcorder. For details, see page 56. Slide the POWER switch while pressing the green button. 3 Touch (rewind) to go to the point you have a recorded ... on the screen, touch / . When you cannot find it, touch [MENU], and select it again to start playback. OPEN POWER switch z Tip • Performing Easy Handycam operation, even first time users can play ) to restart the playback. To adjust the volume 1 Touch . 2 Touch [VOLUME]. To pause Touch (pause) during playback. ...
Playback Viewing movies recorded on a tape Make sure you want to play back recordings on your camcorder. For details, see page 56. Slide the POWER switch while pressing the green button. 3 Touch (rewind) to go to the point you have a recorded ... on the screen, touch / . When you cannot find it, touch [MENU], and select it again to start playback. OPEN POWER switch z Tip • Performing Easy Handycam operation, even first time users can play ) to restart the playback. To adjust the volume 1 Touch . 2 Touch [VOLUME]. To pause Touch (pause) during playback. ...
Camera Operations Guide
Page 49
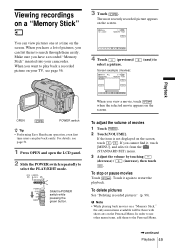
...screen, touch / . To adjust the volume of pictures, you can list them to Playback OPEN POWER switch z Tip • Performing Easy Handycam operation, even first time users can view pictures one at a time on the screen. Slide the POWER switch while pressing the green button.... In order to use other menu items, add them easily. Viewing recordings on a "Memory Stick" You can play back a recorded picture on your camcorder. To stop or pause movies Touch . When you want to the Personal Menu. ,continued Playback 49 If you view a movie, touch when the ...
...screen, touch / . To adjust the volume of pictures, you can list them to Playback OPEN POWER switch z Tip • Performing Easy Handycam operation, even first time users can view pictures one at a time on the screen. Slide the POWER switch while pressing the green button.... In order to use other menu items, add them easily. Viewing recordings on a "Memory Stick" You can play back a recorded picture on your camcorder. To stop or pause movies Touch . When you want to the Personal Menu. ,continued Playback 49 If you view a movie, touch when the ...
Camera Operations Guide
Page 51
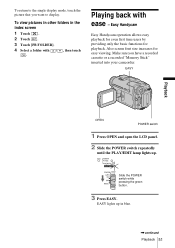
...Make sure you want to the single display mode, touch the picture that you have a recorded cassette or a recorded "Memory Stick" inserted into your camcorder. EASY Playback OPEN POWER switch 1 Press OPEN and open the LCD panel. 2 Slide the POWER switch repeatedly until the PLAY/EDIT lamp lights up... ease - Also screen font size increases for playback. To view pictures in other folders in blue. ,continued Playback 51 EASY lights up . Easy Handycam Easy Handycam operation allows easy playback for even first time users by providing only the basic functions for easy viewing.
...Make sure you want to the single display mode, touch the picture that you have a recorded cassette or a recorded "Memory Stick" inserted into your camcorder. EASY Playback OPEN POWER switch 1 Press OPEN and open the LCD panel. 2 Slide the POWER switch repeatedly until the PLAY/EDIT lamp lights up... ease - Also screen font size increases for playback. To view pictures in other folders in blue. ,continued Playback 51 EASY lights up . Easy Handycam Easy Handycam operation allows easy playback for even first time users by providing only the basic functions for easy viewing.
Camera Operations Guide
Page 52
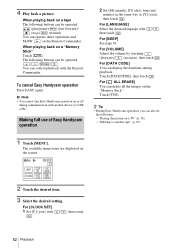
...)/ (fast forward)/ (stop)/ (rewind) You can display the date/time during communication with the Remote Commander. b Note • You cannot turn Easy Handycam operation on the Remote Commander. For [CLOCK SET] 1 Set [Y] (year) with then touch . /, For [BEEP] See page 81. Making full use of ...Easy Handycam operation 2 Set [M] (month), [D] (day), hour and minutes in the same way as [Y] (year), then touch . Touch [DATE/TIME], then touch . "...
...)/ (fast forward)/ (stop)/ (rewind) You can display the date/time during communication with the Remote Commander. b Note • You cannot turn Easy Handycam operation on the Remote Commander. For [CLOCK SET] 1 Set [Y] (year) with then touch . /, For [BEEP] See page 81. Making full use of ...Easy Handycam operation 2 Set [M] (month), [D] (day), hour and minutes in the same way as [Y] (year), then touch . Touch [DATE/TIME], then touch . "...
Camera Operations Guide
Page 105
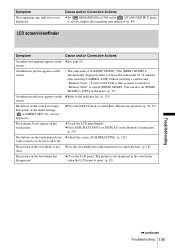
...lightly. The picture is not displayed in [DEMO MODE]. (The [DEMO MODE] is not cUse the viewfinder lens adjustment lever to cancel Easy Handycam operation (p. 33, 51). cPress DSPL/BATT INFO (or DISPLAY on the Remote Commander). (p. 54) The buttons on the cRefer to always ... or the menu settings ( (CAMERA SET) etc.) are not displayed. The picture in the viewfinder is automatically displayed when you leave the camcorder for 10 minutes after selecting CAMERA-TAPE without inserting a cassette and "Memory Stick.") Touch on the touch panel. cClose the LCD panel. Cause...
...lightly. The picture is not displayed in [DEMO MODE]. (The [DEMO MODE] is not cUse the viewfinder lens adjustment lever to cancel Easy Handycam operation (p. 33, 51). cPress DSPL/BATT INFO (or DISPLAY on the Remote Commander). (p. 54) The buttons on the cRefer to always ... or the menu settings ( (CAMERA SET) etc.) are not displayed. The picture in the viewfinder is automatically displayed when you leave the camcorder for 10 minutes after selecting CAMERA-TAPE without inserting a cassette and "Memory Stick.") Touch on the touch panel. cClose the LCD panel. Cause...
Camera Operations Guide
Page 113
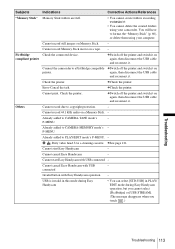
..., then disconnect the USB cable and reconnect it on a Memory Stick. - x Dirty video head. Cannot start Easy Handycam - You will have to a PictBridge compatible cSwitch off the printer and switch it . Connect the camcorder to format the "Memory Stick" (p. 66), or delete them using your computer. Error-Cancel the task. Others Cannot...
..., then disconnect the USB cable and reconnect it on a Memory Stick. - x Dirty video head. Cannot start Easy Handycam - You will have to a PictBridge compatible cSwitch off the printer and switch it . Connect the camcorder to format the "Memory Stick" (p. 66), or delete them using your computer. Error-Cancel the task. Others Cannot...

Camera Operations Guide
Page 126
... available during Easy Handycam operation. (z mark) I Viewfinder (p. 3, 18) J CHG (charge) lamp (p. 14) K CAMERA-TAPE, CAMERAMEMORY, PLAY/EDIT mode lamps (p. 17) L LIGHT button (p. 27) M Access lamp (p. 21, 116) N Battery pack (p. 14) O "Memory Stick" slot (p. 21) To attach the lens cap 126 Quick Reference Quick Reference Identifying parts and controls Camcorder A EASY button (p. 12...
... available during Easy Handycam operation. (z mark) I Viewfinder (p. 3, 18) J CHG (charge) lamp (p. 14) K CAMERA-TAPE, CAMERAMEMORY, PLAY/EDIT mode lamps (p. 17) L LIGHT button (p. 27) M Access lamp (p. 21, 116) N Battery pack (p. 14) O "Memory Stick" slot (p. 21) To attach the lens cap 126 Quick Reference Quick Reference Identifying parts and controls Camcorder A EASY button (p. 12...
Camera Operations Guide
Page 129
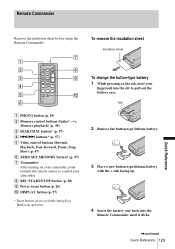
.... H REC START/STOP button (p. 28) I Power zoom button (p. 26) J DISPLAY button (p. 57) * These buttons are not available during Easy Handycam operation. Tab 2 Remove the button-type lithium battery. 3 Place a new button-type lithium battery with the + side facing up. 4 Insert the battery...to control your fingernail into the Remote Commander until it clicks. ,continued Quick Reference 129 To change the button-type battery 1 While pressing on your camcorder, point towards the remote sensor to pull out the battery case. button* (p. 57) D ./> buttons* (p. 57) E Video control buttons (Rewind...
.... H REC START/STOP button (p. 28) I Power zoom button (p. 26) J DISPLAY button (p. 57) * These buttons are not available during Easy Handycam operation. Tab 2 Remove the button-type lithium battery. 3 Place a new button-type lithium battery with the + side facing up. 4 Insert the battery...to control your fingernail into the Remote Commander until it clicks. ,continued Quick Reference 129 To change the button-type battery 1 While pressing on your camcorder, point towards the remote sensor to pull out the battery case. button* (p. 57) D ./> buttons* (p. 57) E Video control buttons (Rewind...
Camera Operations Guide
Page 132
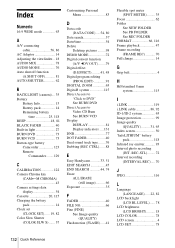
...BLACK FADER 40 Built-in light 27 BURN DVD 73 BURN VCD 73 Button-type battery Camcorder 123 Remote Commander........ 129 C CALIBRATION 122 Camera Chroma key (CAMTM CHROMA 43 Camera settings ...........79 Digital effect (D.EFFECT)..........41, 48 Digital program editing (PROG.EDIT 91 DIGITAL ZOOM 63 Digital8 system 115 Direct Access to "Click to DVD" See BURN DVD Direct Access to Video CD... DNR 77 DOT FADER 40 Dual sound track tape ........76 Dubbing (REC CTRL).......88 E Easy Handycam ...........33, 51 EDIT SEARCH 45 END SEARCH 44, 74 Erase ALL ERASE (still image)...........66 Exposure...
...BLACK FADER 40 Built-in light 27 BURN DVD 73 BURN VCD 73 Button-type battery Camcorder 123 Remote Commander........ 129 C CALIBRATION 122 Camera Chroma key (CAMTM CHROMA 43 Camera settings ...........79 Digital effect (D.EFFECT)..........41, 48 Digital program editing (PROG.EDIT 91 DIGITAL ZOOM 63 Digital8 system 115 Direct Access to "Click to DVD" See BURN DVD Direct Access to Video CD... DNR 77 DOT FADER 40 Dual sound track tape ........76 Dubbing (REC CTRL).......88 E Easy Handycam ...........33, 51 EDIT SEARCH 45 END SEARCH 44, 74 Erase ALL ERASE (still image)...........66 Exposure...


