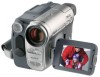
Camera Operations Guide
Page 3
... recording function to make sure the picture and sound are operational for a Class B digital device, pursuant to operate this device must be determined by one or more of FCC Rules. Notes on the LCD panel, viewfinder, and lens • The LCD screen and the viewfinder are located on standard 8 mm and Hi8 , Digital8 video cassettes in this manual could void your Sony dealer regarding this product, you need an NTSC...
... recording function to make sure the picture and sound are operational for a Class B digital device, pursuant to operate this device must be determined by one or more of FCC Rules. Notes on the LCD panel, viewfinder, and lens • The LCD screen and the viewfinder are located on standard 8 mm and Hi8 , Digital8 video cassettes in this manual could void your Sony dealer regarding this product, you need an NTSC...
Camera Operations Guide
Page 4
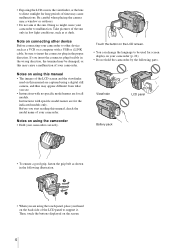
...; Instructions with specific model names are captured using a digital still camera, and thus may cause a malfunction of the LCD screen and the viewfinder used for the indicated models only. Notes on this manual • The images of your camcorder (p. 22) • Do not hold the camcorder by the following illustration. • When you insert the connector plug forcibly in the following parts. Notes on using this manual are for screen display...
...; Instructions with specific model names are captured using a digital still camera, and thus may cause a malfunction of the LCD screen and the viewfinder used for the indicated models only. Notes on this manual • The images of your camcorder (p. 22) • Do not hold the camcorder by the following illustration. • When you insert the connector plug forcibly in the following parts. Notes on using this manual are for screen display...
Camera Operations Guide
Page 7
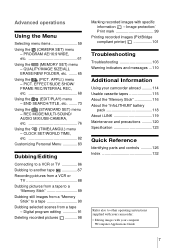
... REC/INTERVAL REC, etc 68 Using the (EDIT/PLAY) menu - CLOCK SET/WORLD TIME, etc 82 Customizing Personal Menu 83 Dubbing/Editing Connecting to a VCR or TV 86 Dubbing to another tape 87 Recording pictures from a VCR or TV 88 Dubbing pictures from a tape to a "Memory Stick 89 Dubbing still images from a "Memory Stick" to other operating instructions supplied with your camcorder: • Editing images with specific information - Advanced operations Using the Menu Selecting menu items 59 Using the (CAMERA SET) menu - APPLI.) menu - Digital program...
... REC/INTERVAL REC, etc 68 Using the (EDIT/PLAY) menu - CLOCK SET/WORLD TIME, etc 82 Customizing Personal Menu 83 Dubbing/Editing Connecting to a VCR or TV 86 Dubbing to another tape 87 Recording pictures from a VCR or TV 88 Dubbing pictures from a tape to a "Memory Stick 89 Dubbing still images from a "Memory Stick" to other operating instructions supplied with your camcorder: • Editing images with specific information - Advanced operations Using the Menu Selecting menu items 59 Using the (CAMERA SET) menu - APPLI.) menu - Digital program...
Camera Operations Guide
Page 15
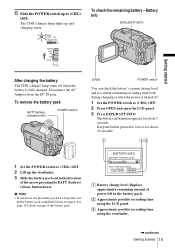
... remove the battery pack BATT(battery) release button POWER switch OPEN POWER switch You can check the battery's current charge level and its current remaining recording time both during charging or when the power is turned off when the battery is fully charged. Keep the button pressed to view it . BATTERY INFO BATTERY CHARGE LEVEL 0% 50% 100% REC TIME AVAILABLE LCD SCREEN: 72 min VIEWFINDER: 95 min A Battery charge level: Displays approximate remaining amount of the battery pack. See page 119 about 7 seconds. C Approximate possible recording time using...
... remove the battery pack BATT(battery) release button POWER switch OPEN POWER switch You can check the battery's current charge level and its current remaining recording time both during charging or when the power is turned off when the battery is fully charged. Keep the button pressed to view it . BATTERY INFO BATTERY CHARGE LEVEL 0% 50% 100% REC TIME AVAILABLE LCD SCREEN: 72 min VIEWFINDER: 95 min A Battery charge level: Displays approximate remaining amount of the battery pack. See page 119 about 7 seconds. C Approximate possible recording time using...

Camera Operations Guide
Page 16
... Recording time when recording with the LCD screen on other devices in the Digital8 system. Playing time Approximate number of minutes available when you use a fully charged battery pack at 25°C (77°F). The actual battery life may be shorter when you use a fully charged battery pack at 25°C (77°F). For DCR-TRV460: The playing time of tapes recorded on Approximate number of minutes available when you repeatedly record, start/stop, slide the POWER switch...
... Recording time when recording with the LCD screen on other devices in the Digital8 system. Playing time Approximate number of minutes available when you use a fully charged battery pack at 25°C (77°F). The actual battery life may be shorter when you use a fully charged battery pack at 25°C (77°F). For DCR-TRV460: The playing time of tapes recorded on Approximate number of minutes available when you repeatedly record, start/stop, slide the POWER switch...
Camera Operations Guide
Page 24
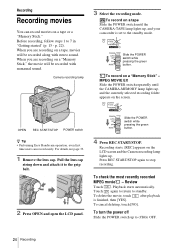
... are recording on a tape or a "Memory Stick." OPEN REC START/STOP POWER switch z Tip • Performing Easy Handycam operation, even first time users can record movies on a tape, movies will be recorded along with monaural sound. For details,see page 33. 1 Remove the lens cap. Press REC START/STOP again to 7 in "Getting started" (p. 13 - p. 22). To check the most recently recorded MPEG movie - Recording Recording movies You can record easily. When you are recording on a "Memory Stick" - To delete the movie, touch after playback is set...
... are recording on a tape or a "Memory Stick." OPEN REC START/STOP POWER switch z Tip • Performing Easy Handycam operation, even first time users can record movies on a tape, movies will be recorded along with monaural sound. For details,see page 33. 1 Remove the lens cap. Press REC START/STOP again to 7 in "Getting started" (p. 13 - p. 22). To check the most recently recorded MPEG movie - Recording Recording movies You can record easily. When you are recording on a "Memory Stick" - To delete the movie, touch after playback is set...
Camera Operations Guide
Page 25
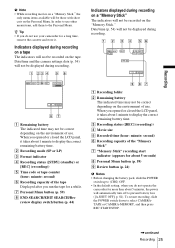
... remaining battery time. Date/time (p. 54) will not be displayed during recording. Date/time and the camera settings data (p. 54) will not be correct depending on the environment of use. B Recording mode (SP or LP) C Format indicator D Recording status ([STBY] (standby) or [REC] (recording)) E Time code or tape counter (hour: minute: second) F Recording capacity of the tape Displayed after you opened or closed the LCD panel, it . G Personal Menu button (p. 59) H END SEARCH/EDIT SEARCH/Rec review display switch button (p. 44) A Recording folder B Remaining battery...
... remaining battery time. Date/time (p. 54) will not be displayed during recording. Date/time and the camera settings data (p. 54) will not be correct depending on the environment of use. B Recording mode (SP or LP) C Format indicator D Recording status ([STBY] (standby) or [REC] (recording)) E Time code or tape counter (hour: minute: second) F Recording capacity of the tape Displayed after you opened or closed the LCD panel, it . G Personal Menu button (p. 59) H END SEARCH/EDIT SEARCH/Rec review display switch button (p. 44) A Recording folder B Remaining battery...
Camera Operations Guide
Page 26
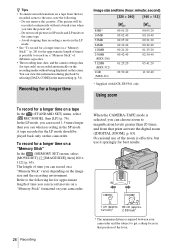
...:22:40 * Supplied with DCR-TRV361 only. The length of time you turn the power off). - Do not record pictures in the LP mode should be recorded continuously without being displayed on the screen. When the CAMERA-TAPE mode is possible to the following . - To record for approximate length of time you can record movies on a "Memory Stick" formatted on your camcorder and the subject to get a sharp focus in the menu setting (p. 54).
...:22:40 * Supplied with DCR-TRV361 only. The length of time you turn the power off). - Do not record pictures in the LP mode should be recorded continuously without being displayed on the screen. When the CAMERA-TAPE mode is possible to the following . - To record for approximate length of time you can record movies on a "Memory Stick" formatted on your camcorder and the subject to get a sharp focus in the menu setting (p. 54).
Camera Operations Guide
Page 27
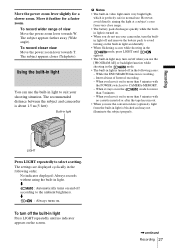
... light to suit your camcorder, turn the built- in the following order. in light off in light is turned off and remove the battery pack to CAMERA-MEMORY. - When it on . Recording LIGHT Press LIGHT repeatedly to the ambient brightness. No indicator displayed: Always records without using the built-in normal use your shooting situation. To record closer view Move the power zoom lever towards W. Interval time of view Move the power zoom lever towards T. m : Automatically turns...
... light to suit your camcorder, turn the built- in the following order. in light off in light is turned off and remove the battery pack to CAMERA-MEMORY. - When it on . Recording LIGHT Press LIGHT repeatedly to the ambient brightness. No indicator displayed: Always records without using the built-in normal use your shooting situation. To record closer view Move the power zoom lever towards W. Interval time of view Move the power zoom lever towards T. m : Automatically turns...
Camera Operations Guide
Page 33
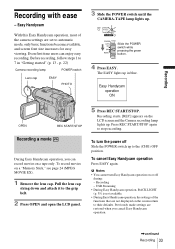
... it to stop recording. Recording starts. [REC] appears on a tape only. Recording - Easy Handycam operation ON OPEN REC START/STOP Recording a movie During Easy Handycam operation, you cancel Easy Handycam operation. ,continued Recording 33 Even first time users can record movies on the LCD screen and the Camera recording lamp lights up in "Getting started" (p. 13 - Before recording, follow steps 1 to automatic mode, only basic functions become available, and screen font size increases for easy viewing. Slide the POWER switch while pressing the green button. 4 Press...
... it to stop recording. Recording starts. [REC] appears on a tape only. Recording - Easy Handycam operation ON OPEN REC START/STOP Recording a movie During Easy Handycam operation, you cancel Easy Handycam operation. ,continued Recording 33 Even first time users can record movies on the LCD screen and the Camera recording lamp lights up in "Getting started" (p. 13 - Before recording, follow steps 1 to automatic mode, only basic functions become available, and screen font size increases for easy viewing. Slide the POWER switch while pressing the green button. 4 Press...
Camera Operations Guide
Page 41
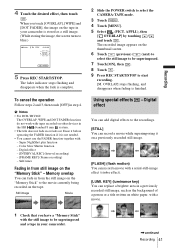
....) 60min STBY 0:00:00 BLACK FADER P-MENU 5 Press REC START/STOP. b Notes • For DCR-TRV460: The OVERLAP, WIPE and DOT FADER functions do not work with : - Erase it before operating the FADER function if it on white paper, with a movie. 1 Check that you touch [OVERLAP], [WIPE] and [DOT FADER], the image on the "Memory Stick" - Using special effects - When you have a "Memory Stick" with a serial-still-image effect (strobe effect). [LUMI...
....) 60min STBY 0:00:00 BLACK FADER P-MENU 5 Press REC START/STOP. b Notes • For DCR-TRV460: The OVERLAP, WIPE and DOT FADER functions do not work with : - Erase it before operating the FADER function if it on white paper, with a movie. 1 Check that you touch [OVERLAP], [WIPE] and [DOT FADER], the image on the "Memory Stick" - Using special effects - When you have a "Memory Stick" with a serial-still-image effect (strobe effect). [LUMI...
Camera Operations Guide
Page 54
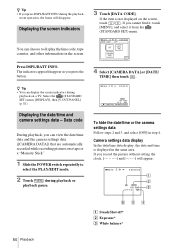
...B Exposure* C White balance* If the item is displayed in step 4. Camera settings data display In the date/time data display, the date and time is not displayed on a TV. Data code During playback, you can view the date/time data and the camera settings data ([CAMERA DATA]) that are automatically recorded while recording pictures on a tape or a "Memory Stick." 1 Slide the POWER switch repeatedly to display the time code, tape counter, and other information on the screen. Displaying the date/time and camera settings data - If you cannot find it, touch [MENU], and select...
...B Exposure* C White balance* If the item is displayed in step 4. Camera settings data display In the date/time data display, the date and time is not displayed on a TV. Data code During playback, you can view the date/time data and the camera settings data ([CAMERA DATA]) that are automatically recorded while recording pictures on a tape or a "Memory Stick." 1 Slide the POWER switch repeatedly to display the time code, tape counter, and other information on the screen. Displaying the date/time and camera settings data - If you cannot find it, touch [MENU], and select...
Camera Operations Guide
Page 72
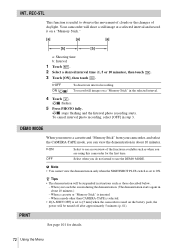
... about 10 minutes. When a cassette or "Memory Stick" is useful to see an overview of daylight. DEMO MODE When you remove a cassette and "Memory Stick" from your camcorder, and select the CAMERA-TAPE mode, you do not intend to ON. When you are using this camcorder for details. 72 Using the Menu PRINT See page 101 for the first time. REC-STL This function is inserted. - flashes. 5 Press PHOTO fully. GON OFF Select...
... about 10 minutes. When a cassette or "Memory Stick" is useful to see an overview of daylight. DEMO MODE When you remove a cassette and "Memory Stick" from your camcorder, and select the CAMERA-TAPE mode, you do not intend to ON. When you are using this camcorder for details. 72 Using the Menu PRINT See page 101 for the first time. REC-STL This function is inserted. - flashes. 5 Press PHOTO fully. GON OFF Select...

Camera Operations Guide
Page 76
.... SOUND/AUDIO MIX/USB-CAMERA, etc. Select to increase the recording time to play back a Digital8 system tape which is dubbed from a dual sound track tape recorded in stereo mode. However, you can select AUDIO MODE when you dub tapes recorded on other camcorders or VCRs. • When you play back the tape on other devices in the LP mode on a tape in the DV system. 76 Using the Menu Using the (STANDARD SET) menu - The settings you play back audio recorded on...
.... SOUND/AUDIO MIX/USB-CAMERA, etc. Select to increase the recording time to play back a Digital8 system tape which is dubbed from a dual sound track tape recorded in stereo mode. However, you can select AUDIO MODE when you dub tapes recorded on other camcorders or VCRs. • When you play back the tape on other devices in the LP mode on a tape in the DV system. 76 Using the Menu Using the (STANDARD SET) menu - The settings you play back audio recorded on...
Camera Operations Guide
Page 101
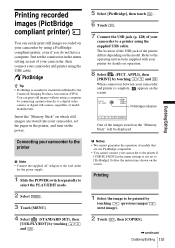
... PLAY/EDIT mode. 2 Select . 3 Touch [MENU]. 4 Select (STANDARD SET), then [USB-PLY/EDT] by connecting a printer directly to a printer using the supplied USB cable. APPLI), then [PRINT] by touching (previous image)/ (next image). 2 Touch , then [COPIES]. ,continued Dubbing/Editing 101 Dubbing/Editing The location of the USB jack of model manufacturer. Insert the "Memory Stick" on which still images are not PictBridge compatible. • You cannot connect your camcorder to the operating instructions...
... PLAY/EDIT mode. 2 Select . 3 Touch [MENU]. 4 Select (STANDARD SET), then [USB-PLY/EDT] by connecting a printer directly to a printer using the supplied USB cable. APPLI), then [PRINT] by touching (previous image)/ (next image). 2 Touch , then [COPIES]. ,continued Dubbing/Editing 101 Dubbing/Editing The location of the USB jack of model manufacturer. Insert the "Memory Stick" on which still images are not PictBridge compatible. • You cannot connect your camcorder to the operating instructions...
Camera Operations Guide
Page 107
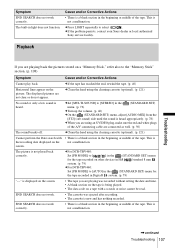
... are using an S VIDEO plug, make sure the red and white plugs of the A/V connecting cable are not clear or do not appear. The picture is a blank section in Hi8 /standard 8 mm system. (p. 79) cFor DCR-TRV460: Set [PB MODE] to select . Symptom END SEARCH does not work . • The cassette was recorded without setting the date and time. • A blank section on the tape is being played. • The data code on a tape...
... are using an S VIDEO plug, make sure the red and white plugs of the A/V connecting cable are not clear or do not appear. The picture is a blank section in Hi8 /standard 8 mm system. (p. 79) cFor DCR-TRV460: Set [PB MODE] to select . Symptom END SEARCH does not work . • The cassette was recorded without setting the date and time. • A blank section on the tape is being played. • The data code on a tape...
Camera Operations Guide
Page 116
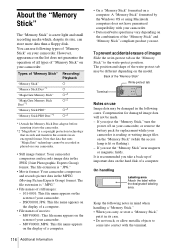
... its size, can use . DSC00001.JPG: This file name appears on the display of a computer. • File names of "Memory Stick" on the model. Compensation for replacement while your camcorder. • Still image format: Your camcorder compresses and records image data in the JPEG (Joint Photographic Experts Group) format. Keep the following notes in the following types of movies: - You can store more data than a floppy disk. If you eject the "Memory Stick," turn the power...
... its size, can use . DSC00001.JPG: This file name appears on the display of a computer. • File names of "Memory Stick" on the model. Compensation for replacement while your camcorder. • Still image format: Your camcorder compresses and records image data in the JPEG (Joint Photographic Experts Group) format. Keep the following notes in the following types of movies: - You can store more data than a floppy disk. If you eject the "Memory Stick," turn the power...
Camera Operations Guide
Page 123
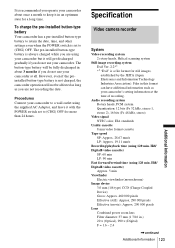
... 48 kHz, stereo) Video signal NTSC color, EIA standards Usable cassette 8 mm video format cassette Tape speed SP: Approx. 28.67 mm/s LP: Approx. 19.11 mm/s Recording/playback time (using 120 min. Hi8/ Digital8 video cassette) Approx. 5 min Viewfinder Electric viewfinder (monochrome) Image device 3.0 mm (1/6 type) CCD (Charge Coupled Device) Gross: Approx. 460 000 pixels Effective (still): Approx. 290 000 pixels Effective (movie): Approx. 290 000 pixels Lens Combined power zoom lens Filter diameter: 37 mm...
... 48 kHz, stereo) Video signal NTSC color, EIA standards Usable cassette 8 mm video format cassette Tape speed SP: Approx. 28.67 mm/s LP: Approx. 19.11 mm/s Recording/playback time (using 120 min. Hi8/ Digital8 video cassette) Approx. 5 min Viewfinder Electric viewfinder (monochrome) Image device 3.0 mm (1/6 type) CCD (Charge Coupled Device) Gross: Approx. 460 000 pixels Effective (still): Approx. 290 000 pixels Effective (movie): Approx. 290 000 pixels Lens Combined power zoom lens Filter diameter: 37 mm...
Camera Operations Guide
Page 132
... battery Camcorder 123 Remote Commander........ 129 C CALIBRATION 122 Camera Chroma key (CAMTM CHROMA 43 Camera settings data display 54 Cassette 20, 115 Charging the battery pack 14 Clock set (CLOCK SET)...... 19, 82 Color Slow Shutter (COLOR SLW S) ....... 37 Customizing Personal Menu 83 D Data code (DATA CODE) .....54, 80 Date search 57 Date/time 54 Delete Deleting pictures .........98 DEMO MODE 72 Digital convert function (A/V cDV OUT) ........79 Digital effect (D.EFFECT)..........41, 48 Digital program editing (PROG.EDIT 91 DIGITAL ZOOM 63 Digital8 system 115 Direct Access...
... battery Camcorder 123 Remote Commander........ 129 C CALIBRATION 122 Camera Chroma key (CAMTM CHROMA 43 Camera settings data display 54 Cassette 20, 115 Charging the battery pack 14 Clock set (CLOCK SET)...... 19, 82 Color Slow Shutter (COLOR SLW S) ....... 37 Customizing Personal Menu 83 D Data code (DATA CODE) .....54, 80 Date search 57 Date/time 54 Delete Deleting pictures .........98 DEMO MODE 72 Digital convert function (A/V cDV OUT) ........79 Digital effect (D.EFFECT)..........41, 48 Digital program editing (PROG.EDIT 91 DIGITAL ZOOM 63 Digital8 system 115 Direct Access...

Camera Operations Guide
Page 133
... MULTI-SOUND Manual focus 39 Memory Chroma key (MTCAM CHROMA 43 Memory Luminance key (MTCAM LUMI.) ....43 MEMORY MIX 42 Memory Overlap (OVERLAP 41 Memory photo 29, 49 "Memory Stick" General information ..116 Inserting 21 Number of pictures......31 Menu CAMERA SET............61 EDIT/PLAY 73 MEMORY SET...........65 MENU ROTATE ........81 PICT. EDIT 73 R REC FOLDER 67 Rec review 45 Recording capacity Display 25 REMAINING ....... 65, 80 Recording lamp (REC LED 80 Recording mode (REC MODE) ....... 25, 76 Recording time 16, 26 Remote...
... MULTI-SOUND Manual focus 39 Memory Chroma key (MTCAM CHROMA 43 Memory Luminance key (MTCAM LUMI.) ....43 MEMORY MIX 42 Memory Overlap (OVERLAP 41 Memory photo 29, 49 "Memory Stick" General information ..116 Inserting 21 Number of pictures......31 Menu CAMERA SET............61 EDIT/PLAY 73 MEMORY SET...........65 MENU ROTATE ........81 PICT. EDIT 73 R REC FOLDER 67 Rec review 45 Recording capacity Display 25 REMAINING ....... 65, 80 Recording lamp (REC LED 80 Recording mode (REC MODE) ....... 25, 76 Recording time 16, 26 Remote...


