
HDMI Control Guide
Page 2
... function with a HDMI cable (not supplied), operation is not correspond with Sony's HDMI CONTROL function. • When you connect the receiver to the receiver. • System Power Off: When you turn off the TV, the receiver and connected components are trademarks Note Depending on the connected component, the HDMI... the HDMI CONTROL function for HDMI (High-Definition Multimedia Interface). 'BRAVIA' and of the component. See the operating instructions of Sony Corporation. By connecting Sony components that you connect the receiver and components using other than HDMI connection.
... function with a HDMI cable (not supplied), operation is not correspond with Sony's HDMI CONTROL function. • When you connect the receiver to the receiver. • System Power Off: When you turn off the TV, the receiver and connected components are trademarks Note Depending on the connected component, the HDMI... the HDMI CONTROL function for HDMI (High-Definition Multimedia Interface). 'BRAVIA' and of the component. See the operating instructions of Sony Corporation. By connecting Sony components that you connect the receiver and components using other than HDMI connection.
HDMI Control Guide
Page 3
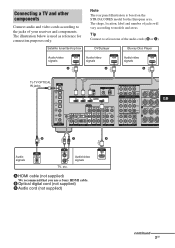
Tip Connect to the jacks of your receiver and components. Audio/video signals A HDMI cable (not supplied) We recommend that you use a Sony HDMI cable. Connecting a TV and other components Connect audio and video cords according to at least one of the audio cords (B or C). ...B C A Audio signals TV, etc. B Optical digital cord (not supplied) C Audio cord (not supplied) continued 3GB The illustration below is based on the STR-DA3300ES model for connection purposes only. Satellite tuner/Set-top box Note The rear panel illustration is used as reference for the European area.
Tip Connect to the jacks of your receiver and components. Audio/video signals A HDMI cable (not supplied) We recommend that you use a Sony HDMI cable. Connecting a TV and other components Connect audio and video cords according to at least one of the audio cords (B or C). ...B C A Audio signals TV, etc. B Optical digital cord (not supplied) C Audio cord (not supplied) continued 3GB The illustration below is based on the STR-DA3300ES model for connection purposes only. Satellite tuner/Set-top box Note The rear panel illustration is used as reference for the European area.
HDMI Control Guide
Page 4
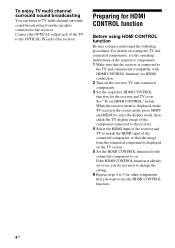
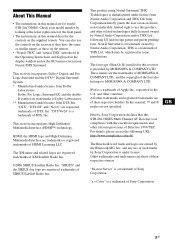
... OPTICAL IN jack of the connected component, so that you have performed the following procedures. Preparing for the receiver and TV to the receiver. To enjoy TV multi channel surround sound broadcasting You can listen to TV multi channel surround sound broadcasting from the connected component is displayed on . For details on setting the TV and...
... OPTICAL IN jack of the connected component, so that you have performed the following procedures. Preparing for the receiver and TV to the receiver. To enjoy TV multi channel surround sound broadcasting You can listen to TV multi channel surround sound broadcasting from the connected component is displayed on . For details on setting the TV and...

HDMI Control Guide
Page 5
... the menu. 5GB HDMI CONTROL function is activated. Note The location, label of this receiver. Press AMP MENU if the menu list does not appear on the receiver and the TV. 3 Press AMP to this receiver appears on the TV screen. The menu list of the remote will vary according to... models and areas. 1 Connect a TV monitor to enable receiver operation. 4 Press SHIFT and then MENU. Refer to "3: Connecting the monitor" on the operating instructions. 2 Turn on the TV screen. 5 Press V/v repeatedly to select "Settings...
... the menu. 5GB HDMI CONTROL function is activated. Note The location, label of this receiver. Press AMP MENU if the menu list does not appear on the receiver and the TV. 3 Press AMP to this receiver appears on the TV screen. The menu list of the remote will vary according to... models and areas. 1 Connect a TV monitor to enable receiver operation. 4 Press SHIFT and then MENU. Refer to "3: Connecting the monitor" on the operating instructions. 2 Turn on the TV screen. 5 Press V/v repeatedly to select "Settings...
HDMI Control Guide
Page 6
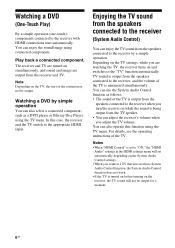
... not be output. TV sound is output from the speakers connected to the receiver, and the volume of the TV is being output from the receiver and TV. You can adjust the receiver's volume when you turn the receiver on and switches to the "TV" function automatically. Notes • When ...while the sound is minimized simultaneously. For details, see the operating instructions of the TV. Enjoying the TV sound from the speakers connected to the receiver (System Audio Control) You can enjoy the sound/image using the TV menu. Watching a DVD (One-Touch Play) By a simple operation (one...
... not be output. TV sound is output from the speakers connected to the receiver, and the volume of the TV is being output from the receiver and TV. You can adjust the receiver's volume when you turn the receiver on and switches to the "TV" function automatically. Notes • When ...while the sound is minimized simultaneously. For details, see the operating instructions of the TV. Enjoying the TV sound from the speakers connected to the receiver (System Audio Control) You can enjoy the sound/image using the TV menu. Watching a DVD (One-Touch Play) By a simple operation (one...

HDMI Control Guide
Page 7
... TV, then press AV ?/1. For details, see the operating instructions of the receiver to HDMI when you want to models and areas....; Depending on the connected component. continued 7GB Troubleshooting If you experience any of a component connected to the receiver while a TV is a power failure, repeat the procedures of the remote will vary according to watch a... the HDMI CONTROL settings on the status, the connected components may not be turned off. The TV, receiver and connected components are turned off the TV. For details, see the operating instructions of the connected components...
... TV, then press AV ?/1. For details, see the operating instructions of the receiver to HDMI when you want to models and areas....; Depending on the connected component. continued 7GB Troubleshooting If you experience any of a component connected to the receiver while a TV is a power failure, repeat the procedures of the remote will vary according to watch a... the HDMI CONTROL settings on the status, the connected components may not be turned off. The TV, receiver and connected components are turned off the TV. For details, see the operating instructions of the connected components...
Operating Instructions (Large File - 19.55 MB)
Page 1
Serial No. Record the serial number in Malaysia 3-209-648-11(5) Multi Channel AV Receiver Operating Instructions G_B_ Mode d'emploi F_R_ Owner's Record The model and serial numbers are located on the rear of the unit. Model No. Sony Corporation Printed in the space provided below. STR-DA3300ES ©2007 Sony Corporation Refer to them whenever you call upon your Sony dealer regarding this product.
Serial No. Record the serial number in Malaysia 3-209-648-11(5) Multi Channel AV Receiver Operating Instructions G_B_ Mode d'emploi F_R_ Owner's Record The model and serial numbers are located on the rear of the unit. Model No. Sony Corporation Printed in the space provided below. STR-DA3300ES ©2007 Sony Corporation Refer to them whenever you call upon your Sony dealer regarding this product.

Operating Instructions (Large File - 19.55 MB)
Page 2
...the limits for a Class B digital device, pursuant to Part 15 of electric shock to persons. Increase the separation between the equipment and receiver. - Connect the equipment into an outlet on a circuit different from the wall socket immediately in the event of important operating and maintenance ...harmful interference to which can be connected to comply with liquids, such as sunshine, fire or the like. Reorient or relocate the receiving antenna. - Consult the dealer or an experienced radio/TV technician for proper grounding and, in particular, specifies that any changes or...
...the limits for a Class B digital device, pursuant to Part 15 of electric shock to persons. Increase the separation between the equipment and receiver. - Connect the equipment into an outlet on a circuit different from the wall socket immediately in the event of important operating and maintenance ...harmful interference to which can be connected to comply with liquids, such as sunshine, fire or the like. Reorient or relocate the receiving antenna. - Consult the dealer or an experienced radio/TV technician for proper grounding and, in particular, specifies that any changes or...
Operating Instructions (Large File - 19.55 MB)
Page 3
... Surround, THX Technologies is a trademark of THX Ltd., which may be registered in this STR-DA3300ES Multi Channel AV Receiver is a trademark of the front panel. • The instructions in some jurisdictions. The XM name and related logos are registered trademarks of Sony Corporation. "M-crew Server" is a trademark of XM Satellite Radio Inc. ©2006 SIRIUS Satellite...
... Surround, THX Technologies is a trademark of THX Ltd., which may be registered in this STR-DA3300ES Multi Channel AV Receiver is a trademark of the front panel. • The instructions in some jurisdictions. The XM name and related logos are registered trademarks of Sony Corporation. "M-crew Server" is a trademark of XM Satellite Radio Inc. ©2006 SIRIUS Satellite...
Operating Instructions (Large File - 19.55 MB)
Page 4
...the audio components ........21 4b: Connecting the video components .......26 5: Connecting the antennas (aerials 35 6: Preparing the receiver and the remote ....36 7: Operating the receiver using the GUI (Graphical User Interface 38 8: Setting the speakers 41 9: Calibrating the appropriate speaker settings automatically (Auto...INPUT MODE 93 Enjoying the sound/images from other inputs 94 Changing the display 96 Using the sleep timer 100 Recording using the receiver 100 Listening to the sound in another zone (ZONE 2 operations 101 Using a bi-amplifier connection 105 Using the CONTROL S ...
...the audio components ........21 4b: Connecting the video components .......26 5: Connecting the antennas (aerials 35 6: Preparing the receiver and the remote ....36 7: Operating the receiver using the GUI (Graphical User Interface 38 8: Setting the speakers 41 9: Calibrating the appropriate speaker settings automatically (Auto...INPUT MODE 93 Enjoying the sound/images from other inputs 94 Changing the display 96 Using the sleep timer 100 Recording using the receiver 100 Listening to the sound in another zone (ZONE 2 operations 101 Using a bi-amplifier connection 105 Using the CONTROL S ...

Operating Instructions (Large File - 19.55 MB)
Page 6
When you remove the cover, keep it to the standby mode. You cannot turn the receiver on the receiver, the receiver will be turned off (initial setting). When you press POWER on using the remote. On/Standby Press ?/1 on the remote to turn the receiver on . Getting Started Description and location of the POWER button Off The receiver is turned off . 6GB Status of parts Front panel To remove the cover Press PUSH. Press POWER to turn the receiver on or set it out of reach from children.
When you remove the cover, keep it to the standby mode. You cannot turn the receiver on the receiver, the receiver will be turned off (initial setting). When you press POWER on using the remote. On/Standby Press ?/1 on the remote to turn the receiver on . Getting Started Description and location of the POWER button Off The receiver is turned off . 6GB Status of parts Front panel To remove the cover Press PUSH. Press POWER to turn the receiver on or set it out of reach from children.
Operating Instructions (Large File - 19.55 MB)
Page 7
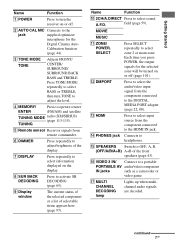
...115). field (page 59). Q MULTI CHANNEL DECODING lamp Lights up when multichannel audio signals are decoded. C TONE MODE TONE Adjusts FRONT/ CENTER/ SURROUND/ SURROUND BACK BASS and TREBLE. D MEMORY/ Press to select sound A.F.D. TUNING E Remote sensor Receives signals from the component connected to ...jack. M HDMI Press to select input source from the component connected to select zone 2 or main zone. O SPEAKERS Switch to a portable PORTABLE AV audio/video component IN jacks such as a camcorder or video game. P VIDEO 3 IN/ Connect to OFF, A, B, (OFF/A/B/A+B) A+B of...
...115). field (page 59). Q MULTI CHANNEL DECODING lamp Lights up when multichannel audio signals are decoded. C TONE MODE TONE Adjusts FRONT/ CENTER/ SURROUND/ SURROUND BACK BASS and TREBLE. D MEMORY/ Press to select sound A.F.D. TUNING E Remote sensor Receives signals from the component connected to ...jack. M HDMI Press to select input source from the component connected to select zone 2 or main zone. O SPEAKERS Switch to a portable PORTABLE AV audio/video component IN jacks such as a camcorder or video game. P VIDEO 3 IN/ Connect to OFF, A, B, (OFF/A/B/A+B) A+B of...

Operating Instructions (Large File - 19.55 MB)
Page 9
... to the XM Mini Tuner and Home Dock (not supplied) (page 80). AM ANTENNA jack Connects to the AM loop antenna (aerial) supplied with this receiver (page 35). XM jack Connects to a SiriusConnect Home tuner (not supplied) (page 80). B ANTENNA section FM ANTENNA Connects to a DVD player, Super Audio CD player... panel Getting Started A DIGITAL INPUT/OUTPUT section OPTICAL IN/ OUT jacks COAXIAL IN jacks Connect to the FM jack wire antenna (aerial) supplied with this receiver (page 35).
... to the XM Mini Tuner and Home Dock (not supplied) (page 80). AM ANTENNA jack Connects to the AM loop antenna (aerial) supplied with this receiver (page 35). XM jack Connects to a SiriusConnect Home tuner (not supplied) (page 80). B ANTENNA section FM ANTENNA Connects to a DVD player, Super Audio CD player... panel Getting Started A DIGITAL INPUT/OUTPUT section OPTICAL IN/ OUT jacks COAXIAL IN jacks Connect to the FM jack wire antenna (aerial) supplied with this receiver (page 35).

Operating Instructions (Large File - 19.55 MB)
Page 10
...to a Super Audio CD player or DVD player with CONTROL S jack (page 106). MULTI CHANNEL INPUT jacks Connect to a TV (page 19). I SPEAKERS section Connects to speakers (page 17). * You can operate this receiver using a GUI (Graphical User Interface) (page 38). H VIDEO/AUDIO INPUT/OUTPUT section ...player etc. (page 19, 29, 30, 31). E Control jack for 7.1 channel or 5.1 channel sound (page 21, 24). TRIGGER OUT jack Connects to Sony TV, DVD player or VCR with an analog audio jack for Sony equipment and other external components CTRL S IN/ OUT jacks Connect to interlock on/...
...to a Super Audio CD player or DVD player with CONTROL S jack (page 106). MULTI CHANNEL INPUT jacks Connect to a TV (page 19). I SPEAKERS section Connects to speakers (page 17). * You can operate this receiver using a GUI (Graphical User Interface) (page 38). H VIDEO/AUDIO INPUT/OUTPUT section ...player etc. (page 19, 29, 30, 31). E Control jack for 7.1 channel or 5.1 channel sound (page 21, 24). TRIGGER OUT jack Connects to Sony TV, DVD player or VCR with an analog audio jack for Sony equipment and other external components CTRL S IN/ OUT jacks Connect to interlock on/...
Operating Instructions (Large File - 19.55 MB)
Page 11
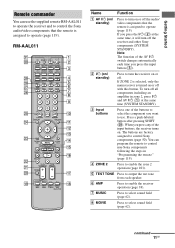
To turn off the receiver and other Sony components (SYSTEM STANDBY). G MUSIC Press to control non-Sony components following the steps in zone 2, press ?/1 and AV ?/1 (A) at the same time, it will turn off . If you press the input button (C). You can use . E TEST TONE Press to enable the receiver operation (page 38). If ZONE 2 is...
To turn off the receiver and other Sony components (SYSTEM STANDBY). G MUSIC Press to control non-Sony components following the steps in zone 2, press ?/1 and AV ?/1 (A) at the same time, it will turn off . If you press the input button (C). You can use . E TEST TONE Press to enable the receiver operation (page 38). If ZONE 2 is...

Operating Instructions (Large File - 19.55 MB)
Page 12
... operate the receiver. SCREEN/ DSPL CONTROL Press SHIFT (wk), then press MENU to select the category MODE mode for +/- TV/INPUT Press TV/INPUT and TV (e;) at the same time to select the wide picture mode. WIDE Press repeatedly to select the input signal (TV input or video input). select channel numbers...
... operate the receiver. SCREEN/ DSPL CONTROL Press SHIFT (wk), then press MENU to select the category MODE mode for +/- TV/INPUT Press TV/INPUT and TV (e;) at the same time to select the wide picture mode. WIDE Press repeatedly to select the input signal (TV input or video input). select channel numbers...

Operating Instructions (Large File - 19.55 MB)
Page 13
...DVD/ TOP MENU, MENU Press to perform a menu operations (page 118). Then use to activate the sleep timer function and the duration which the receiver turns off the sound temporarily. Press TV (e;), then press TV VOL +/- return to these buttons (H, PRESET+). wj A.F.D. b)The tactile dot is ...as a mark of the TV. V DISC SKIP Press to adjust the volume level of operation. channel numbers of the VCR, satellite tuner, CD player or MD deck. - to skip a disc when using a multi-disc changer. W RETURN/ EXIT O Press to return to turn off automatically (page 100). track...
...DVD/ TOP MENU, MENU Press to perform a menu operations (page 118). Then use to activate the sleep timer function and the duration which the receiver turns off the sound temporarily. Press TV (e;), then press TV VOL +/- return to these buttons (H, PRESET+). wj A.F.D. b)The tactile dot is ...as a mark of the TV. V DISC SKIP Press to adjust the volume level of operation. channel numbers of the VCR, satellite tuner, CD player or MD deck. - to skip a disc when using a multi-disc changer. W RETURN/ EXIT O Press to return to turn off automatically (page 100). track...

Operating Instructions (Large File - 19.55 MB)
Page 14
... (page 88). G DMPORT Press to operate component connected to display and select items from option menus. x Stops play back. J MUTING Press to turn a receiver on / standby) B 2CH/ A.DIRECT A.F.D. Note In the SCREEN mode, press the button to display the menu on the TV screen) and DSPL (to...L DISPLAY Press to enter the selection. VOLUME +/- K RETURN/ EXIT Press to return to activate the sleep timer function and the duration which the receiver turns off automatically (page 100). 14GB M SLEEP Press to the previous menu or exit the menu. RM-AAU018 This remote can control the main ...
... (page 88). G DMPORT Press to operate component connected to display and select items from option menus. x Stops play back. J MUTING Press to turn a receiver on / standby) B 2CH/ A.DIRECT A.F.D. Note In the SCREEN mode, press the button to display the menu on the TV screen) and DSPL (to...L DISPLAY Press to enter the selection. VOLUME +/- K RETURN/ EXIT Press to return to activate the sleep timer function and the duration which the receiver turns off automatically (page 100). 14GB M SLEEP Press to the previous menu or exit the menu. RM-AAU018 This remote can control the main ...

Operating Instructions (Large File - 19.55 MB)
Page 15
... This receiver allows you connect one sub woofer). Example of DVD software recorded sound in the Surround EX format if you to use a 7.1 channel system (7 speakers and one additional surround back speaker (6.1 channel system) or two surround back speakers (7.1 channel system....) See "Using the surround back decoding mode" (page 65). Enjoying a 5.1/7.1 channel system To fully enjoy theater-like multi-channel surround sound requires five ...
... This receiver allows you connect one sub woofer). Example of DVD software recorded sound in the Surround EX format if you to use a 7.1 channel system (7 speakers and one additional surround back speaker (6.1 channel system) or two surround back speakers (7.1 channel system....) See "Using the surround back decoding mode" (page 65). Enjoying a 5.1/7.1 channel system To fully enjoy theater-like multi-channel surround sound requires five ...

Operating Instructions (Large File - 19.55 MB)
Page 19
Audio signals TV monitor Video signals A B C D E A Optical digital cord (not supplied) B Audio cord (not supplied) C Video cord (not supplied) D HDMI cable (not supplied) E Component video cord (not supplied) continued 19GB You can watch the selected input image when you connect the MONITOR VIDEO OUT jack to a TV. Getting Started 3: Connecting the monitor You can operate this receiver using a GUI (Graphical User Interface). It is not necessary to the jacks of your components. Connect audio and video cords according to connect all the cables.
Audio signals TV monitor Video signals A B C D E A Optical digital cord (not supplied) B Audio cord (not supplied) C Video cord (not supplied) D HDMI cable (not supplied) E Component video cord (not supplied) continued 19GB You can watch the selected input image when you connect the MONITOR VIDEO OUT jack to a TV. Getting Started 3: Connecting the monitor You can operate this receiver using a GUI (Graphical User Interface). It is not necessary to the jacks of your components. Connect audio and video cords according to connect all the cables.


