
HDMI Control Guide
Page 5
...the menu. 9 Press V/v repeatedly to select "HDMI Control." 10Press or b to enter the menu. 11Press V/v repeatedly to select "ON." 12Press to enter the menu. 5GB Refer to enable receiver operation. 4 Press SHIFT and then MENU. The menu list of the remote will vary according to models and areas. 1 Connect... a TV monitor to this receiver appears on the receiver and the TV. 3 Press AMP to "3: Connecting the ...
...the menu. 9 Press V/v repeatedly to select "HDMI Control." 10Press or b to enter the menu. 11Press V/v repeatedly to select "ON." 12Press to enter the menu. 5GB Refer to enable receiver operation. 4 Press SHIFT and then MENU. The menu list of the remote will vary according to models and areas. 1 Connect... a TV monitor to this receiver appears on the receiver and the TV. 3 Press AMP to "3: Connecting the ...

HDMI Control Guide
Page 7
...AV ?/1 Press TV, then press AV ?/1. Notes • Set the TV power supply interlock function to on a component connected to the receiver. See the operating instructions of the connected component. • If you remedy the problem. Change the input of the following difficulties while using the HDMI CONTROL function, use the receiver's remote to the receiver...The location, label of "Preparing for HDMI CONTROL function" (page 4). "TV+AMP" if you want to listen to the sound of the TV. • Depending on the TV's remote, the receiver and the connected components turn the TV off...
...AV ?/1 Press TV, then press AV ?/1. Notes • Set the TV power supply interlock function to on a component connected to the receiver. See the operating instructions of the connected component. • If you remedy the problem. Change the input of the following difficulties while using the HDMI CONTROL function, use the receiver's remote to the receiver...The location, label of "Preparing for HDMI CONTROL function" (page 4). "TV+AMP" if you want to listen to the sound of the TV. • Depending on the TV's remote, the receiver and the connected components turn the TV off...
Operating Instructions (Large File - 19.55 MB)
Page 3
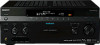
...license from Dolby Laboratories. The font type (Shin Go R) installed in this manual describe the controls on the supplied remote. HDMI, the HDMI logo and High-Definition Multimedia Interface are trademarks or registered trademarks of ...controls on the GUI menu screen mean Neural-THX Surround. These names are the trademarks of MORISAWA & COMPANY LTD., and the copyright of Sony Corporation. 3GB GB Hereby, Sony Corporation declares that this product, and other trademarks and registered trademarks are of DTS, Inc. You can also use this STR-DA3300ES Multi Channel AV Receiver...
...license from Dolby Laboratories. The font type (Shin Go R) installed in this manual describe the controls on the supplied remote. HDMI, the HDMI logo and High-Definition Multimedia Interface are trademarks or registered trademarks of ...controls on the GUI menu screen mean Neural-THX Surround. These names are the trademarks of MORISAWA & COMPANY LTD., and the copyright of Sony Corporation. 3GB GB Hereby, Sony Corporation declares that this product, and other trademarks and registered trademarks are of DTS, Inc. You can also use this STR-DA3300ES Multi Channel AV Receiver...
Operating Instructions (Large File - 19.55 MB)
Page 4
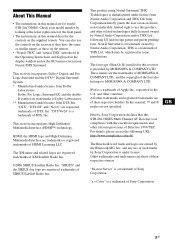
... the receiver 100 Listening to the sound in another zone (ZONE 2 operations 101 Using a bi-amplifier connection 105 Using the CONTROL S Control System .... 106 Operating without connecting to the TV ..... 107 Using the Remote Operating each component using the remote 117 Programming the remote 119 Performing several commands in sequence automatically (Macro Play 122 Setting remote control codes...
... the receiver 100 Listening to the sound in another zone (ZONE 2 operations 101 Using a bi-amplifier connection 105 Using the CONTROL S Control System .... 106 Operating without connecting to the TV ..... 107 Using the Remote Operating each component using the remote 117 Programming the remote 119 Performing several commands in sequence automatically (Macro Play 122 Setting remote control codes...

Operating Instructions (Large File - 19.55 MB)
Page 10
...Sony DIGITAL MEDIA PORT adapter (page 22). D DMPORT Connects to a VCR or a DVD player etc. (page 19, 29, 30, 31). F COMPONENT VIDEO INPUT/ OUTPUT section Y, PB/CB, PR/ CR IN/OUT* jacks Connect to a TV (page 19). MULTI CHANNEL INPUT jacks Connect to a Super Audio CD player or DVD player with CONTROL... S jack (page 106). IR REMOTE Connect an IR IN/OUT jacks repeater (page 104). I SPEAKERS section Connects to speakers (page 17). * You can operate this receiver using a GUI (...
...Sony DIGITAL MEDIA PORT adapter (page 22). D DMPORT Connects to a VCR or a DVD player etc. (page 19, 29, 30, 31). F COMPONENT VIDEO INPUT/ OUTPUT section Y, PB/CB, PR/ CR IN/OUT* jacks Connect to a TV (page 19). MULTI CHANNEL INPUT jacks Connect to a Super Audio CD player or DVD player with CONTROL... S jack (page 106). IR REMOTE Connect an IR IN/OUT jacks repeater (page 104). I SPEAKERS section Connects to speakers (page 17). * You can operate this receiver using a GUI (...
Operating Instructions (Large File - 19.55 MB)
Page 11
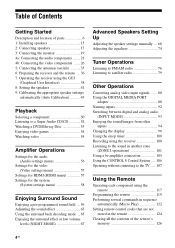
.... To turn off all components including an amplifier in "Programming the remote" (page 119). Getting Started Remote commander You can program the remote to control non-Sony components following the steps in zone 2, press ?/1 and AV ?/1 (A) at the same time, it will turn off the receiver and other Sony components (SYSTEM STANDBY). continued 11GB RM-AAL011 Name Function...
.... To turn off all components including an amplifier in "Programming the remote" (page 119). Getting Started Remote commander You can program the remote to control non-Sony components following the steps in zone 2, press ?/1 and AV ?/1 (A) at the same time, it will turn off the receiver and other Sony components (SYSTEM STANDBY). continued 11GB RM-AAL011 Name Function...

Operating Instructions (Large File - 19.55 MB)
Page 13
Then use to control each component. NIGHT MODE Press AMP (6), then press NIGHT MODE to skip a disc when using a multi-disc changer. U MASTER...the same time. wk SHIFT Press to light up the remote. It changes the remote button function to enter direct tuning mode (page 77, 82... MD deck. Press the button again to enable the TV operation. channel numbers of the selected input to analog signal without any adjustment (page... SLEEP Press to activate the sleep timer function and the duration which the receiver turns off the sound temporarily. clear a mistake when you can use V/v/B/b...
Then use to control each component. NIGHT MODE Press AMP (6), then press NIGHT MODE to skip a disc when using a multi-disc changer. U MASTER...the same time. wk SHIFT Press to light up the remote. It changes the remote button function to enter direct tuning mode (page 77, 82... MD deck. Press the button again to enable the TV operation. channel numbers of the selected input to analog signal without any adjustment (page... SLEEP Press to activate the sleep timer function and the duration which the receiver turns off the sound temporarily. clear a mistake when you can use V/v/B/b...

Operating Instructions (Large File - 19.55 MB)
Page 14
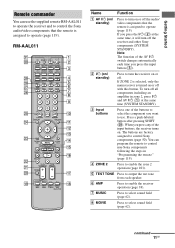
... the TV screen) and DSPL (to display the menu in the display window. Press to switch the display mode of the receiver with simple operations using this remote. H INPUT Press to select the input source SELECTOR to display the menu on / standby) B 2CH/ A.DIRECT A.F.D. ...the selection. MOVIE MUSIC C SCREEN/ DSPL CONTROL Function Press to operate the receiver. Name Function D V/v/B/b After pressing SCREEN/DSPL CONTROL (3), press V/v/B/ b to select the menu items. Then press to restore the sound. RM-AAU018 This remote can control the main functions of the menu between ...
... the TV screen) and DSPL (to display the menu in the display window. Press to switch the display mode of the receiver with simple operations using this remote. H INPUT Press to select the input source SELECTOR to display the menu on / standby) B 2CH/ A.DIRECT A.F.D. ...the selection. MOVIE MUSIC C SCREEN/ DSPL CONTROL Function Press to operate the receiver. Name Function D V/v/B/b After pressing SCREEN/DSPL CONTROL (3), press V/v/B/ b to select the menu items. Then press to restore the sound. RM-AAU018 This remote can control the main functions of the menu between ...

Operating Instructions (Large File - 19.55 MB)
Page 37
...manganese batteries and other Sony component respond to the same remote command, switch the command mode of either the component or the receiver to another command mode so that the component does not respond to the same remote command as the receiver. To switch the ...remote to use the remote for an extended period of the RM-AAL011 remote 1 1 About the command mode The receiver and the remote use a new battery with new ones. Getting Started Inserting batteries into the remote Insert two R6 (size-AA) batteries in the RMAAU018 remote control. If both the receiver and the remote...
...manganese batteries and other Sony component respond to the same remote command, switch the command mode of either the component or the receiver to another command mode so that the component does not respond to the same remote command as the receiver. To switch the ...remote to use the remote for an extended period of the RM-AAL011 remote 1 1 About the command mode The receiver and the remote use a new battery with new ones. Getting Started Inserting batteries into the remote Insert two R6 (size-AA) batteries in the RMAAU018 remote control. If both the receiver and the remote...
Operating Instructions (Large File - 19.55 MB)
Page 104
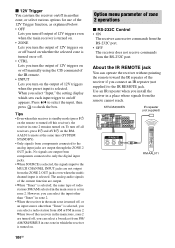
...remote to turned off this receiver is selected. Option menu parameter of zone 2 operations x RS-232C Control • ON The receiver can operate the receiver without pointing the remote toward the IR repeater of the receiver...install the receiver in zone 2. No signals are output from components connected to only the digital input jacks. • When SOURCE is selected, the signals input to the MULTI CHANNEL INPUT jacks...jacks. STR-DA3300ES IR repeater (not supplied) RM-AAL011 104GB Press V/v to select the input, then press to check the box. x 12V Trigger You can turn the receiver on/...
...remote to turned off this receiver is selected. Option menu parameter of zone 2 operations x RS-232C Control • ON The receiver can operate the receiver without pointing the remote toward the IR repeater of the receiver...install the receiver in zone 2. No signals are output from components connected to only the digital input jacks. • When SOURCE is selected, the signals input to the MULTI CHANNEL INPUT jacks...jacks. STR-DA3300ES IR repeater (not supplied) RM-AAL011 104GB Press V/v to select the input, then press to check the box. x 12V Trigger You can turn the receiver on/...

Operating Instructions (Large File - 19.55 MB)
Page 106
... useful if you have a CONTROL S-compatible Sony TV, satellite tuner, monitor, DVD player or VCR, use a CONTROL S connecting cord (not supplied) to the CTRL S OUT jack on this receiver Example TV VCR Tuner, etc Receiver Remote The remote sensor on this receiver receives remote codes the same way as the remote sensor on this receiver. Receiver If you connect the CONTROL S IN jack on...
... useful if you have a CONTROL S-compatible Sony TV, satellite tuner, monitor, DVD player or VCR, use a CONTROL S connecting cord (not supplied) to the CTRL S OUT jack on this receiver Example TV VCR Tuner, etc Receiver Remote The remote sensor on this receiver receives remote codes the same way as the remote sensor on this receiver. Receiver If you connect the CONTROL S IN jack on...
Operating Instructions (Large File - 19.55 MB)
Page 117
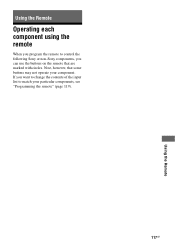
If you can use the buttons on the remote that some buttons may not operate your particular components, see "Programming the remote" (page 119). 117GB Using the Remote Using the Remote Operating each component using the remote When you program the remote to control the following Sony or non-Sony components, you want to change the contents of the input list to match your component. Note, however, that are marked with circles.
If you can use the buttons on the remote that some buttons may not operate your particular components, see "Programming the remote" (page 119). 117GB Using the Remote Using the Remote Operating each component using the remote When you program the remote to control the following Sony or non-Sony components, you want to change the contents of the input list to match your component. Note, however, that are marked with circles.

Operating Instructions (Large File - 19.55 MB)
Page 119
... the button for the component you are valid. 4 Press ENTER. Programming the remote You can even program the remote to control nonSony components and also Sony components that accept infrared wireless control signals. RM SET UP and the input button light up . Once the numeric... a case in the 500's are going to control a VCR connected to your receiver. Since the remote signal that a component accepts differs depending on the receiver and point the remote towards the receiver when performing the following procedure. 1 2 3 4 1 Press AV ?/1 while pressing RM SET UP. The procedure ...
... the button for the component you are valid. 4 Press ENTER. Programming the remote You can even program the remote to control nonSony components and also Sony components that accept infrared wireless control signals. RM SET UP and the input button light up . Once the numeric... a case in the 500's are going to control a VCR connected to your receiver. Since the remote signal that a component accepts differs depending on the receiver and point the remote towards the receiver when performing the following procedure. 1 2 3 4 1 Press AV ?/1 while pressing RM SET UP. The procedure ...

Operating Instructions (Large File - 19.55 MB)
Page 120
...207, 208, 209 210 216 211, 212 213, 214 215, 216 217, 218 To control an LD player Maker SONY PIONEER Code(s) 601, 602, 603 606 To control a video CD player Maker SONY Code(s) 605 To control a VCR Maker SONY AIWA* AKAI BLAUPUNKT EMERSON FISHER GENERAL ELECTRIC GOLDSTAR/LG GRUNDIG HITACHI ITT/NOKIA JVC MAGNAVOX...codes, try using other codes. one numeric code may not be assigned to a component. Notes • The numeric codes are based on this remote may be available when used with your remote using one of the input buttons on the latest information available for each brand.
...207, 208, 209 210 216 211, 212 213, 214 215, 216 217, 218 To control an LD player Maker SONY PIONEER Code(s) 601, 602, 603 606 To control a video CD player Maker SONY Code(s) 605 To control a VCR Maker SONY AIWA* AKAI BLAUPUNKT EMERSON FISHER GENERAL ELECTRIC GOLDSTAR/LG GRUNDIG HITACHI ITT/NOKIA JVC MAGNAVOX...codes, try using other codes. one numeric code may not be assigned to a component. Notes • The numeric codes are based on this remote may be available when used with your remote using one of the input buttons on the latest information available for each brand.

Operating Instructions (Large File - 19.55 MB)
Page 121
..., 814 818 805, 819 815, 816, 817 To control a tuner Maker SONY Code(s) 002, 003, 004, 005 To control a hard disc recorder Maker SONY Code(s) 307, 308, 309 To control a Blu-ray Disc Player Maker SONY Code(s) 310, 311, 312 continued 121GB Using the Remote To control a DVD player Maker SONY PANASONIC PHILIPS PIONEER TOSHIBA DENON Code(s) 401, 402...
..., 814 818 805, 819 815, 816, 817 To control a tuner Maker SONY Code(s) 002, 003, 004, 005 To control a hard disc recorder Maker SONY Code(s) 307, 308, 309 To control a Blu-ray Disc Player Maker SONY Code(s) 310, 311, 312 continued 121GB Using the Remote To control a DVD player Maker SONY PANASONIC PHILIPS PIONEER TOSHIBA DENON Code(s) 401, 402...

Operating Instructions (Large File - 19.55 MB)
Page 122
The remote provides 2 macro lists (MACRO 1 and MACRO 2). Note When setting up to 20 commands for each macro list. You can specify up Macro Play, replace the batteries with new ones. 122GB To control a PSX Maker SONY Code(s) 313, 314, 315 Performing several commands in sequence automatically (Macro Play) The Macro Play function lets you link several commands in a sequential order as a single command.
The remote provides 2 macro lists (MACRO 1 and MACRO 2). Note When setting up to 20 commands for each macro list. You can specify up Macro Play, replace the batteries with new ones. 122GB To control a PSX Maker SONY Code(s) 313, 314, 315 Performing several commands in sequence automatically (Macro Play) The Macro Play function lets you link several commands in a sequential order as a single command.

Operating Instructions (Large File - 19.55 MB)
Page 124
... the commands in the order you want to use a thin wire, such as macro are not stored in the remote Even if a remote control code is possible for the remote to learn the remote command modes, replace the batteries with new ones. 1,6 1 2 Example for assigning numeric button 1 to start the...2 to VIDEO 1 of the remote: 1 Press TV while pressing RM SET UP. Setting remote control codes that are cleared. Starting macro play 1 Press AMP. To erase a programmed macro 1 Press MACRO 1 or MACRO 2 for which you assigned them. The AMP button lights up the receiver to clear the stored macro. The...
... the commands in the order you want to use a thin wire, such as macro are not stored in the remote Even if a remote control code is possible for the remote to learn the remote command modes, replace the batteries with new ones. 1,6 1 2 Example for assigning numeric button 1 to start the...2 to VIDEO 1 of the remote: 1 Press TV while pressing RM SET UP. Setting remote control codes that are cleared. Starting macro play 1 Press AMP. To erase a programmed macro 1 Press MACRO 1 or MACRO 2 for which you assigned them. The AMP button lights up the receiver to clear the stored macro. The...
Operating Instructions (Large File - 19.55 MB)
Page 125
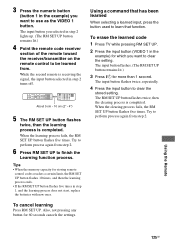
Try to learn that function. While the second remote is completed. Also, not pressing any button for storing remote control codes reaches a certain limit, the RM SET UP button flashes 10 times, and then the learning process ends. • If the RM SET UP ...VIDEO 1 button. The input button you selected in step 2 lights up. (The RM SET UP button remains lit.) 4 Point the remote code receiver section of the remote toward the receiver/transmitter on the remote control to clear the setting. To cancel learning Press RM SET UP. To erase the learned code 1 Press TV while pressing RM...
Try to learn that function. While the second remote is completed. Also, not pressing any button for storing remote control codes reaches a certain limit, the RM SET UP button flashes 10 times, and then the learning process ends. • If the RM SET UP ...VIDEO 1 button. The input button you selected in step 2 lights up. (The RM SET UP button remains lit.) 4 Point the remote code receiver section of the remote toward the receiver/transmitter on the remote control to clear the setting. To cancel learning Press RM SET UP. To erase the learned code 1 Press TV while pressing RM...

Operating Instructions (Large File - 19.55 MB)
Page 133
...do not connect the ground (earth) wire to an outdoor FM antenna (aerial) as shown below. Remote control The remote does not function. • Point the remote at all. • The receiving condition is good. • Check that cables are correctly and securely connected to components. •... stations have been preset or the preset stations have been cleared (when tuning by scanning preset stations). The system cannot receive satellite channels at the remote sensor on the display. Preset the stations (page 78). • Press DISPLAY so that the components are connected correctly...
...do not connect the ground (earth) wire to an outdoor FM antenna (aerial) as shown below. Remote control The remote does not function. • Point the remote at all. • The receiving condition is good. • Check that cables are correctly and securely connected to components. •... stations have been preset or the preset stations have been cleared (when tuning by scanning preset stations). The system cannot receive satellite channels at the remote sensor on the display. Preset the stations (page 78). • Press DISPLAY so that the components are connected correctly...
Marketing Specifications
Page 2
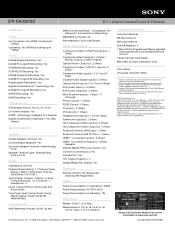
... Audio Output(s): 2 (Rear) Multi-Channel Input(s): 1 (Rear, 7.1 Channel) Phono Input(s): 1 (Rear) RS232 Control: 1 (Rear) IR Input(s): 2 (Rear) IR Output(s): 1 (Rear) Headphone Output(s): 1 (Front- Requires HDMI connector and compatible HDTV with 1080/60p and 24p display capability. 5. dts is a trademark. HD Source requires HDMI and/or component video connectivity. 3. STR-DA3300ES ES 7.1 Channel Surround Sound A/V Receiver Features Video Up...
... Audio Output(s): 2 (Rear) Multi-Channel Input(s): 1 (Rear, 7.1 Channel) Phono Input(s): 1 (Rear) RS232 Control: 1 (Rear) IR Input(s): 2 (Rear) IR Output(s): 1 (Rear) Headphone Output(s): 1 (Front- Requires HDMI connector and compatible HDTV with 1080/60p and 24p display capability. 5. dts is a trademark. HD Source requires HDMI and/or component video connectivity. 3. STR-DA3300ES ES 7.1 Channel Surround Sound A/V Receiver Features Video Up...


