
Limited Warranty (ES Products)
Page 1
... invalid if the factory applied serial number has been altered or removed from your convenience, Sony Electronics Inc. For your authorized dealer, call: 1-800-488-SONY (7669) Printed in exchange for defective parts for a period of the Product, including the antenna. 4-243-341-02 General Stereo/Hifi Components/Tape Decks ® CD Players/Mini Disc Players/Audio Systems LIMITED WARRANTY Hifi Audio ES Products Sony Electronics Inc. ("Sony") warrants this...
... invalid if the factory applied serial number has been altered or removed from your convenience, Sony Electronics Inc. For your authorized dealer, call: 1-800-488-SONY (7669) Printed in exchange for defective parts for a period of the Product, including the antenna. 4-243-341-02 General Stereo/Hifi Components/Tape Decks ® CD Players/Mini Disc Players/Audio Systems LIMITED WARRANTY Hifi Audio ES Products Sony Electronics Inc. ("Sony") warrants this...

HDMI Control Guide
Page 7
... before using the power button on the TV's remote, the receiver and the connected components turn off automatically. The HDMI CONTROL function does not work. • Check the HDMI connection (page 3). • Make sure "HDMI Control" is set the "HDMI Audio" settings in HDMI settings menu. • Make sure the connected component is selected as the input on a component connected to models and areas. Change the input of the connected component. • If you change the HDMI connection, connect/disconnect the AC power cord, or there is compatible with the HDMI CONTROL function...
... before using the power button on the TV's remote, the receiver and the connected components turn off automatically. The HDMI CONTROL function does not work. • Check the HDMI connection (page 3). • Make sure "HDMI Control" is set the "HDMI Audio" settings in HDMI settings menu. • Make sure the connected component is selected as the input on a component connected to models and areas. Change the input of the connected component. • If you change the HDMI connection, connect/disconnect the AC power cord, or there is compatible with the HDMI CONTROL function...
Operating Instructions (Large File - 19.55 MB)
Page 3
...., and the copyright of Sony Corporation. 3GB GB Hereby, Sony Corporation declares that this manual describe the controls on the GUI menu screen mean Neural-THX Surround. Dolby, Pro Logic, Surround EX, and the doubleD symbol are registered trademarks of THX Ltd., which may be registered in this STR-DA3300ES Multi Channel AV Receiver is in the U.S. Neural Surround is a trademark owned by Neural Audio Corporation, THX is...
...., and the copyright of Sony Corporation. 3GB GB Hereby, Sony Corporation declares that this manual describe the controls on the GUI menu screen mean Neural-THX Surround. Dolby, Pro Logic, Surround EX, and the doubleD symbol are registered trademarks of THX Ltd., which may be registered in this STR-DA3300ES Multi Channel AV Receiver is in the U.S. Neural Surround is a trademark owned by Neural Audio Corporation, THX is...
Operating Instructions (Large File - 19.55 MB)
Page 4
...Adjusting the speaker settings manually .... 68 Adjusting the equalizer 74 Tuner Operations Listening to FM/AM radio 76 Listening to satellite radio 79 Other Operations Converting analog video input signals ....... 88 Using the DIGITAL MEDIA PORT adapter 88 Naming inputs 92 Switching between digital and analog audio (INPUT MODE 93 Enjoying the sound/images from other inputs 94 Changing the display 96 Using the sleep timer 100 Recording using the receiver 100 Listening to the sound in another zone (ZONE 2 operations 101 Using a bi-amplifier connection 105 Using the CONTROL S Control...
...Adjusting the speaker settings manually .... 68 Adjusting the equalizer 74 Tuner Operations Listening to FM/AM radio 76 Listening to satellite radio 79 Other Operations Converting analog video input signals ....... 88 Using the DIGITAL MEDIA PORT adapter 88 Naming inputs 92 Switching between digital and analog audio (INPUT MODE 93 Enjoying the sound/images from other inputs 94 Changing the display 96 Using the sleep timer 100 Recording using the receiver 100 Listening to the sound in another zone (ZONE 2 operations 101 Using a bi-amplifier connection 105 Using the CONTROL S Control...
Operating Instructions (Large File - 19.55 MB)
Page 7
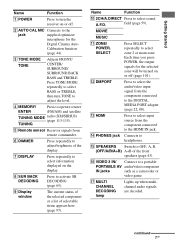
...CHANNEL DECODING lamp Lights up when multichannel audio signals are decoded. field (page 59). M HDMI Press to select input source from the component connected to headphones. MOVIE MUSIC K ZONE/ POWER, SELECT Press SELECT repeatedly to select information displayed on the display. Getting Started Name Function A POWER Press to turn TONE to adjust the level. G DISPLAY Press repeatedly to select zone 2 or main zone. C TONE MODE TONE Adjusts FRONT/ CENTER/ SURROUND/ SURROUND BACK BASS and TREBLE. continued 7GB L DMPORT Press to select the audio/video...
...CHANNEL DECODING lamp Lights up when multichannel audio signals are decoded. field (page 59). M HDMI Press to select input source from the component connected to headphones. MOVIE MUSIC K ZONE/ POWER, SELECT Press SELECT repeatedly to select information displayed on the display. Getting Started Name Function A POWER Press to turn TONE to adjust the level. G DISPLAY Press repeatedly to select zone 2 or main zone. C TONE MODE TONE Adjusts FRONT/ CENTER/ SURROUND/ SURROUND BACK BASS and TREBLE. continued 7GB L DMPORT Press to select the audio/video...

Operating Instructions (Large File - 19.55 MB)
Page 10
... power amplifier. 10GB PRE OUT jacks Connect to a DVD player, TV, or a satellite tuner. (page 19, 29, 30). MULTI CHANNEL INPUT jacks Connect to speakers (page 17). * You can operate this receiver using a GUI (Graphical User Interface) (page 38). You can watch the selected input image when you connect the MONITOR VIDEO OUT jack to Sony TV, DVD player or VCR with an analog audio jack for Sony equipment and other 12V TRIGGER compliant components, or the amplifier/receiver of zone 2 (page 103). D DMPORT Connects to a tape deck...
... power amplifier. 10GB PRE OUT jacks Connect to a DVD player, TV, or a satellite tuner. (page 19, 29, 30). MULTI CHANNEL INPUT jacks Connect to speakers (page 17). * You can operate this receiver using a GUI (Graphical User Interface) (page 38). You can watch the selected input image when you connect the MONITOR VIDEO OUT jack to Sony TV, DVD player or VCR with an analog audio jack for Sony equipment and other 12V TRIGGER compliant components, or the amplifier/receiver of zone 2 (page 103). D DMPORT Connects to a tape deck...

Operating Instructions (Large File - 19.55 MB)
Page 28
... turn on the receiver when video and audio signals of a playback component are not output from the HDMI OUT jack while the receiver menu is not output from the speaker output jacks, HDMI OUT jack and PRE OUT jacks. When you use an HDMI, version 1.3a, category 2 cable with copyright protection technology (HDCP), the image and/or the sound from the TV speaker, set "HDMI Audio" to "TV+AMP" in the Input Option menu when the sound is not output correctly. • Before connecting cables...
... turn on the receiver when video and audio signals of a playback component are not output from the HDMI OUT jack while the receiver menu is not output from the speaker output jacks, HDMI OUT jack and PRE OUT jacks. When you use an HDMI, version 1.3a, category 2 cable with copyright protection technology (HDCP), the image and/or the sound from the TV speaker, set "HDMI Audio" to "TV+AMP" in the Input Option menu when the sound is not output correctly. • Before connecting cables...
Operating Instructions (Large File - 19.55 MB)
Page 44
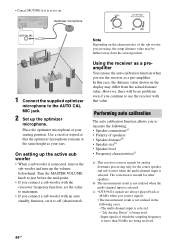
... position. On setting up the active sub woofer • When a sub woofer is selected. Using the receiver as a pre-amplifier. The correction is invalid for the center speaker and sub woofer when the multi-channel input is not utilized in the following : • Speaker connectionsa) • Polarity of the sub woofer you are always played back as your seating position. Optimizer microphone 1 Connect the supplied optimizer microphone to use the receiver with an auto standby function, set it is more...
... position. On setting up the active sub woofer • When a sub woofer is selected. Using the receiver as a pre-amplifier. The correction is invalid for the center speaker and sub woofer when the multi-channel input is not utilized in the following : • Speaker connectionsa) • Polarity of the sub woofer you are always played back as your seating position. Optimizer microphone 1 Connect the supplied optimizer microphone to use the receiver with an auto standby function, set it is more...
Operating Instructions (Large File - 19.55 MB)
Page 48
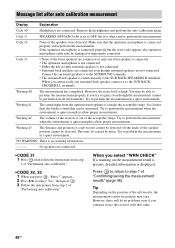
... position of a sub woofer cannot be no warning information. ---------- Tip Depending on the measurement result is present, detailed information is out of the acceptable range. Remove the headphones and perform the auto calibration again. Warning 41 The sound input from the optimizer microphone is high. NO WARNING There is connected properly but the error code appears, the optimizer microphone cable may be...
... position of a sub woofer cannot be no warning information. ---------- Tip Depending on the measurement result is present, detailed information is out of the acceptable range. Remove the headphones and perform the auto calibration again. Warning 41 The sound input from the optimizer microphone is high. NO WARNING There is connected properly but the error code appears, the optimizer microphone cable may be...
Operating Instructions (Large File - 19.55 MB)
Page 50
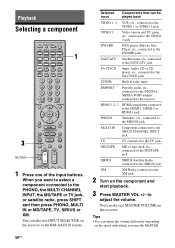
...the VIDEO 3 jack. HDMI 1, 2, 3 HDMI components connected to the MD/TAPE jack. MD/TAPE MD or tape deck, etc., connected to the HDMI 1, HDMI 2 or HDMI 3 jack. TUNER Built-in radio tuner. MULTI IN Component connected to the TV jack. TV TV connected to the MULTI CHANNEL INPUT jack. You can also use INPUT SELECTOR on the component and start playback. 3 Press MASTER VOL +/- DMPORT Portable audio, etc., connected to the DIGITAL MEDIA PORT adapter connected to the PHONO jack. PHONO Turntable, etc., connected to the receiver. XM XM Radio connected to adjust the...
...the VIDEO 3 jack. HDMI 1, 2, 3 HDMI components connected to the MD/TAPE jack. MD/TAPE MD or tape deck, etc., connected to the HDMI 1, HDMI 2 or HDMI 3 jack. TUNER Built-in radio tuner. MULTI IN Component connected to the TV jack. TV TV connected to the MULTI CHANNEL INPUT jack. You can also use INPUT SELECTOR on the component and start playback. 3 Press MASTER VOL +/- DMPORT Portable audio, etc., connected to the DIGITAL MEDIA PORT adapter connected to the PHONO jack. PHONO Turntable, etc., connected to the receiver. XM XM Radio connected to adjust the...

Operating Instructions (Large File - 19.55 MB)
Page 57
... you play multi-channel source. • When you set "HDMI Control" to a video component (projector, etc.), sound may be output from the playback component connected to the receiver via an HDMI connection. • TV+AMP The sound is only output to the receiver. Select "HDMI" in the Settings menu. x HDMI Audio (Setting HDMI audio input) Lets you connect the receiver to "ON," "HDMI Audio" may not be changed automatically. In this case, select "AMP." • When you set the HDMI audio signals output from the receiver. HDMI menu parameters x HDMI Control Lets you turn...
... you play multi-channel source. • When you set "HDMI Control" to a video component (projector, etc.), sound may be output from the playback component connected to the receiver via an HDMI connection. • TV+AMP The sound is only output to the receiver. Select "HDMI" in the Settings menu. x HDMI Audio (Setting HDMI audio input) Lets you connect the receiver to "ON," "HDMI Audio" may not be changed automatically. In this case, select "AMP." • When you set the HDMI audio signals output from the receiver. HDMI menu parameters x HDMI Control Lets you turn...
Operating Instructions (Large File - 19.55 MB)
Page 59
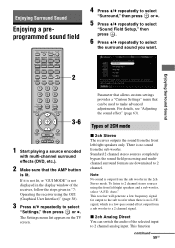
... sub woofer. Auto." This receiver will generate a low frequency signal for output to 2 channel analog input. The Settings menu list appears on the TV screen. For details, see "Adjusting the sound effect" (page 63). Standard 2 channel stereo sources completely bypass the sound field processing and multichannel surround formats are downmixed to select "Settings," then press or b. This function continued 59GB If it is not lit, or "GUI MODE" is no sound from a sub woofer to 2 channel stereo sources using the GUI (Graphical User...
... sub woofer. Auto." This receiver will generate a low frequency signal for output to 2 channel analog input. The Settings menu list appears on the TV screen. For details, see "Adjusting the sound effect" (page 63). Standard 2 channel stereo sources completely bypass the sound field processing and multichannel surround formats are downmixed to select "Settings," then press or b. This function continued 59GB If it is not lit, or "GUI MODE" is no sound from a sub woofer to 2 channel stereo sources using the GUI (Graphical User...

Operating Instructions (Large File - 19.55 MB)
Page 62
... sound fields. mode is featured in the soundtrack. Headphone (Direct) Outputs the analog signals without processing by selecting one of actual surround speakers. This mode is ideal for watching science-fiction or action movies with lots of movie theaters and concert halls into your portable audio device. V.Multi Dimension DCS Creates many virtual speakers from the MULTI CHANNEL INPUT jacks. * You can take advantage of surround sound simply by the tone, sound...
... sound fields. mode is featured in the soundtrack. Headphone (Direct) Outputs the analog signals without processing by selecting one of actual surround speakers. This mode is ideal for watching science-fiction or action movies with lots of movie theaters and concert halls into your portable audio device. V.Multi Dimension DCS Creates many virtual speakers from the MULTI CHANNEL INPUT jacks. * You can take advantage of surround sound simply by the tone, sound...
Operating Instructions (Large File - 19.55 MB)
Page 84
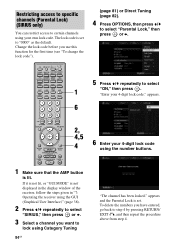
... default. The lock code is set . Change the lock code before you want to select 1 "ON," then press . appears and the Parental Lock is not displayed in the display window of the receiver, follow the steps given in "7: Operating the receiver using the GUI (Graphical User Interface)" (page 38). 2 Press V/v repeatedly to select "SIRIUS," then press or b. 3 Select a channel you use this function for the first time (see "To change...
... default. The lock code is set . Change the lock code before you want to select 1 "ON," then press . appears and the Parental Lock is not displayed in the display window of the receiver, follow the steps given in "7: Operating the receiver using the GUI (Graphical User Interface)" (page 38). 2 Press V/v repeatedly to select "SIRIUS," then press or b. 3 Select a channel you use this function for the first time (see "To change...
Operating Instructions (Large File - 19.55 MB)
Page 132
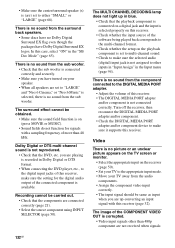
.... The MULTI CHANNEL DECODING lamp does not light up -converting an input signal with a sampling frequency of the COMPONENT VIDEO OUT is no sound from the surround back speakers. • Some discs have no sound from the sub woofer. There is no Dolby Digital Surround EX flag even though the packages have turned on the playback component is set to the DIGITAL MEDIA PORT adapter. • Adjust the volume of the software being played back...
.... The MULTI CHANNEL DECODING lamp does not light up -converting an input signal with a sampling frequency of the COMPONENT VIDEO OUT is no sound from the surround back speakers. • Some discs have no sound from the sub woofer. There is no Dolby Digital Surround EX flag even though the packages have turned on the playback component is set to the DIGITAL MEDIA PORT adapter. • Adjust the volume of the software being played back...

Operating Instructions (Large File - 19.55 MB)
Page 133
... source component using INPUT SELECTOR (page 50). are output, use the COMPONENT VIDEO OUT jack and set "Resolution" to "DIRECT." Refer to avoid picking up . Adjust the antennas (aerials) and connect an external antenna (aerial), if necessary. • Keep the satellite radio antenna, away from the VIDEO jack. Input 480i component video signals. • When component input signals other than 480p are output from the speaker cords and the power cord to the operating instructions supplied with direct tuning). • No stations have been preset or the preset stations...
... source component using INPUT SELECTOR (page 50). are output, use the COMPONENT VIDEO OUT jack and set "Resolution" to "DIRECT." Refer to avoid picking up . Adjust the antennas (aerials) and connect an external antenna (aerial), if necessary. • Keep the satellite radio antenna, away from the VIDEO jack. Input 480i component video signals. • When component input signals other than 480p are output from the speaker cords and the power cord to the operating instructions supplied with direct tuning). • No stations have been preset or the preset stations...

Operating Instructions (Large File - 19.55 MB)
Page 134
... nearest Sony dealer. If the command mode of the component. You can check the condition of the receiver and the remote are the same. Check the speakers connection and turn off after auto calibration measurement" (page 48), "XM Radio message list" (page 86), "SIRIUS Satellite Radio message list" (page 86) and "DIGITAL MEDIA PORT message list" (page 91). Amplifier section POWER OUTPUT Rated Power Output at Stereo Mode1) 2) (8 ohms...
... nearest Sony dealer. If the command mode of the component. You can check the condition of the receiver and the remote are the same. Check the speakers connection and turn off after auto calibration measurement" (page 48), "XM Radio message list" (page 86), "SIRIUS Satellite Radio message list" (page 86) and "DIGITAL MEDIA PORT message list" (page 91). Amplifier section POWER OUTPUT Rated Power Output at Stereo Mode1) 2) (8 ohms...
Quick Setup Guide
Page 1
... of the receiver. Refer to connect a Super Audio CD/CD player, DVD player, Blu-ray Disc Player, speakers, and a sub woofer so that you can select the front speaker system. This receiver is equipped with this receiver for details. Consultez « 8 : Réglage des enceintes » dans le mode d'emploi fourni avec l'ampli-tuner pour plus d'informations. Refer to "4b:Connecting the video components" in the guide designate speakers as ...
... of the receiver. Refer to connect a Super Audio CD/CD player, DVD player, Blu-ray Disc Player, speakers, and a sub woofer so that you can select the front speaker system. This receiver is equipped with this receiver for details. Consultez « 8 : Réglage des enceintes » dans le mode d'emploi fourni avec l'ampli-tuner pour plus d'informations. Refer to "4b:Connecting the video components" in the guide designate speakers as ...
Marketing Specifications
Page 1
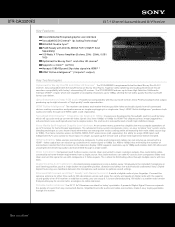
... a HDMI™ video output but can detect and receive the best possible video and audio signals from the receiver to 1080p via HDMI4 This chipset corrects image jaggedness; STR-DA3300ES ES 7.1 Channel Surround Sound A/V Receiver Key Features Xross Media Bar® inspired graphic user interface Faroudja® DCDi Cinema™ Up Scaling Technology4 BRAVIA® Theatre Sync™ iPod® Ready with DIGITAL MEDIA PORT (TDM-IP1 Sold Separately) 100 Watts X 7 Power Amplifier (8 ohms...
... a HDMI™ video output but can detect and receive the best possible video and audio signals from the receiver to 1080p via HDMI4 This chipset corrects image jaggedness; STR-DA3300ES ES 7.1 Channel Surround Sound A/V Receiver Key Features Xross Media Bar® inspired graphic user interface Faroudja® DCDi Cinema™ Up Scaling Technology4 BRAVIA® Theatre Sync™ iPod® Ready with DIGITAL MEDIA PORT (TDM-IP1 Sold Separately) 100 Watts X 7 Power Amplifier (8 ohms...
Marketing Specifications
Page 2
...Input(s): 5 (1 Front/4 Rear) Coaxial Audio Digital Input(s): 3 (Rear) Optical Audio Input(s): 5 (1 Front/4 Rear) RCA Audio Input(s): 5 (Rear) RCA Audio Output(s): 2 (Rear) Multi-Channel Input(s): 1 (Rear, 7.1 Channel) Phono Input(s): 1 (Rear) RS232 Control: 1 (Rear) IR Input(s): 2 (Rear) IR Output(s): 1 (Rear) Headphone Output(s): 1 (Front- Dolby, Dolby Digital, ProLogic are subject to change without notice. STR-DA3300ES ES 7.1 Channel Surround Sound A/V Receiver Features Video Up Conversion: Yes (HDMI, Component 1080p) Up Scaling: Yes (HDMI Up Scaling up to owner's manual. ©2007 Sony...
...Input(s): 5 (1 Front/4 Rear) Coaxial Audio Digital Input(s): 3 (Rear) Optical Audio Input(s): 5 (1 Front/4 Rear) RCA Audio Input(s): 5 (Rear) RCA Audio Output(s): 2 (Rear) Multi-Channel Input(s): 1 (Rear, 7.1 Channel) Phono Input(s): 1 (Rear) RS232 Control: 1 (Rear) IR Input(s): 2 (Rear) IR Output(s): 1 (Rear) Headphone Output(s): 1 (Front- Dolby, Dolby Digital, ProLogic are subject to change without notice. STR-DA3300ES ES 7.1 Channel Surround Sound A/V Receiver Features Video Up Conversion: Yes (HDMI, Component 1080p) Up Scaling: Yes (HDMI Up Scaling up to owner's manual. ©2007 Sony...


