
HDMI Control Guide
Page 5
... the TV screen. 5 Press V/v repeatedly to select "Settings." 6 Press or b to enable receiver operation. 4 Press SHIFT and then MENU. Refer to "3: Connecting the monitor" on the operating instructions. 2 Turn on the receiver and the TV. 3 Press AMP to enter the menu. 5GB To set HDMI CONTROL 2 4... 10Press or b to enter the menu. 11Press V/v repeatedly to select "ON." 12Press to this receiver appears on the TV screen. Note The location, label of this receiver. The menu list of the remote will vary according to models and areas. 1 Connect a TV monitor to decide. HDMI CONTROL function ...
... the TV screen. 5 Press V/v repeatedly to select "Settings." 6 Press or b to enable receiver operation. 4 Press SHIFT and then MENU. Refer to "3: Connecting the monitor" on the operating instructions. 2 Turn on the receiver and the TV. 3 Press AMP to enter the menu. 5GB To set HDMI CONTROL 2 4... 10Press or b to enter the menu. 11Press V/v repeatedly to select "ON." 12Press to this receiver appears on the TV screen. Note The location, label of this receiver. The menu list of the remote will vary according to models and areas. 1 Connect a TV monitor to decide. HDMI CONTROL function ...

HDMI Control Guide
Page 7
You can also use this troubleshooting guide to the sound from the TV speaker and receiver. - TV AV ?/1 Press TV, then press AV ?/1. For details, see the operating instructions of the connected components. • The location, label of "Preparing for HDMI CONTROL function" (page.... • Make sure the connected component is selected as the input on before using the HDMI CONTROL function, use the receiver's remote to turn off automatically. continued 7GB Turning off the receiver with the HDMI CONTROL function. • Check the HDMI CONTROL settings on a component connected to the...
You can also use this troubleshooting guide to the sound from the TV speaker and receiver. - TV AV ?/1 Press TV, then press AV ?/1. For details, see the operating instructions of the connected components. • The location, label of "Preparing for HDMI CONTROL function" (page.... • Make sure the connected component is selected as the input on before using the HDMI CONTROL function, use the receiver's remote to turn off automatically. continued 7GB Turning off the receiver with the HDMI CONTROL function. • Check the HDMI CONTROL settings on a component connected to the...
Operating Instructions (Large File - 19.55 MB)
Page 3
... MORISAWA & COMPANY LTD., and the copyright of the font also belongs to use the controls on the supplied remote. This receiver incorporates Dolby* Digital and Pro Logic Surround and the DTS** Digital Surround System. * Manufactured under license from ... dog logo are for model STR-DA3300ES. This receiver incorporates High-Definition Multimedia Interface (HDMI™) technology. This product using Neural Surround, THX Technologies is a trademark of Sony Corporation. 3GB GB Hereby, Sony Corporation declares that this STR-DA3300ES Multi Channel AV Receiver is in compliance with the ...
... MORISAWA & COMPANY LTD., and the copyright of the font also belongs to use the controls on the supplied remote. This receiver incorporates Dolby* Digital and Pro Logic Surround and the DTS** Digital Surround System. * Manufactured under license from ... dog logo are for model STR-DA3300ES. This receiver incorporates High-Definition Multimedia Interface (HDMI™) technology. This product using Neural Surround, THX Technologies is a trademark of Sony Corporation. 3GB GB Hereby, Sony Corporation declares that this STR-DA3300ES Multi Channel AV Receiver is in compliance with the ...
Operating Instructions (Large File - 19.55 MB)
Page 4
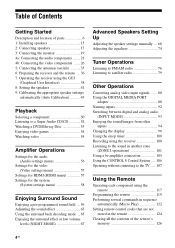
... the audio components ........21 4b: Connecting the video components .......26 5: Connecting the antennas (aerials 35 6: Preparing the receiver and the remote ....36 7: Operating the receiver using the GUI (Graphical User Interface 38 8: Setting the speakers 41 9: Calibrating the appropriate speaker settings automatically (Auto ... MODE 93 Enjoying the sound/images from other inputs 94 Changing the display 96 Using the sleep timer 100 Recording using the receiver 100 Listening to the sound in another zone (ZONE 2 operations 101 Using a bi-amplifier connection 105 Using the CONTROL ...
... the audio components ........21 4b: Connecting the video components .......26 5: Connecting the antennas (aerials 35 6: Preparing the receiver and the remote ....36 7: Operating the receiver using the GUI (Graphical User Interface 38 8: Setting the speakers 41 9: Calibrating the appropriate speaker settings automatically (Auto ... MODE 93 Enjoying the sound/images from other inputs 94 Changing the display 96 Using the sleep timer 100 Recording using the receiver 100 Listening to the sound in another zone (ZONE 2 operations 101 Using a bi-amplifier connection 105 Using the CONTROL ...

Operating Instructions (Large File - 19.55 MB)
Page 6
Getting Started Description and location of the POWER button Off The receiver is turned off . 6GB Status of parts Front panel To remove the cover Press PUSH. Press POWER to turn the receiver on using the remote. On/Standby Press ?/1 on the remote to the standby mode. When you press POWER on or set it out of reach from children. You cannot turn the receiver on the receiver, the receiver will be turned off (initial setting). When you remove the cover, keep it to turn the receiver on .
Getting Started Description and location of the POWER button Off The receiver is turned off . 6GB Status of parts Front panel To remove the cover Press PUSH. Press POWER to turn the receiver on using the remote. On/Standby Press ?/1 on the remote to the standby mode. When you press POWER on or set it out of reach from children. You cannot turn the receiver on the receiver, the receiver will be turned off (initial setting). When you remove the cover, keep it to turn the receiver on .
Operating Instructions (Large File - 19.55 MB)
Page 7
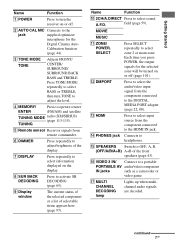
... field (page 59). P VIDEO 3 IN/ Connect to activate SB DECODING (page 65). H SUR BACK DECODING Press to a portable PORTABLE AV audio/video component IN jacks such as a camcorder or video game. Name Function J 2CH/A.DIRECT Press to the DIGITAL MEDIA PORT adapter (page... Press TONE MODE repeatedly to select BASS or TREBLE, then turn the receiver on or off . F DIMMER Press repeatedly to the HDMI IN jack. M HDMI Press to select input source from remote commander. Q MULTI CHANNEL DECODING lamp Lights up when multichannel audio signals are decoded. Getting Started...
... field (page 59). P VIDEO 3 IN/ Connect to activate SB DECODING (page 65). H SUR BACK DECODING Press to a portable PORTABLE AV audio/video component IN jacks such as a camcorder or video game. Name Function J 2CH/A.DIRECT Press to the DIGITAL MEDIA PORT adapter (page... Press TONE MODE repeatedly to select BASS or TREBLE, then turn the receiver on or off . F DIMMER Press repeatedly to the HDMI IN jack. M HDMI Press to select input source from remote commander. Q MULTI CHANNEL DECODING lamp Lights up when multichannel audio signals are decoded. Getting Started...

Operating Instructions (Large File - 19.55 MB)
Page 10
...player or VCR with CONTROL S jack (page 106). MULTI CHANNEL INPUT jacks Connect to a Super Audio CD player or DVD player with an analog audio jack for Sony equipment and other 12V TRIGGER compliant components, or the amplifier/receiver of other external components CTRL S IN/ OUT jacks ... You can operate this receiver using a GUI (Graphical User Interface) (page 38). VIDEO IN/ OUT* jacks AUDIO OUT jacks VIDEO OUT jack Connect to a Sony DIGITAL MEDIA PORT adapter (page 22). E Control jack for 7.1 channel or 5.1 channel sound (page 21, 24). IR REMOTE Connect an IR IN/OUT...
...player or VCR with CONTROL S jack (page 106). MULTI CHANNEL INPUT jacks Connect to a Super Audio CD player or DVD player with an analog audio jack for Sony equipment and other 12V TRIGGER compliant components, or the amplifier/receiver of other external components CTRL S IN/ OUT jacks ... You can operate this receiver using a GUI (Graphical User Interface) (page 38). VIDEO IN/ OUT* jacks AUDIO OUT jacks VIDEO OUT jack Connect to a Sony DIGITAL MEDIA PORT adapter (page 22). E Control jack for 7.1 channel or 5.1 channel sound (page 21, 24). IR REMOTE Connect an IR IN/OUT...
Operating Instructions (Large File - 19.55 MB)
Page 11
...use the supplied remote RM-AAL011 to operate the receiver and to control the Sony audio/video components that the remote is assigned to operate (page 119). Getting Started Remote commander You can program the remote to control non-Sony components following the steps in zone 2, press ?/1 and AV ?/1 (A) at... the same time, it will turn on or off . B ?/1 (on . If ZONE 2 is selected, only the main receiver is assigned to operate ...
...use the supplied remote RM-AAL011 to operate the receiver and to control the Sony audio/video components that the remote is assigned to operate (page 119). Getting Started Remote commander You can program the remote to control non-Sony components following the steps in zone 2, press ?/1 and AV ?/1 (A) at... the same time, it will turn on or off . B ?/1 (on . If ZONE 2 is selected, only the main receiver is assigned to operate ...

Operating Instructions (Large File - 19.55 MB)
Page 13
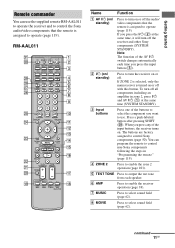
...channel numbers of the VCR, satellite tuner, CD player or MD deck. - Press to activate the buttons with pink printing. It changes the remote... (H, PRESET+). wk SHIFT Press to light up the remote. return to skip a disc when using a multi-disc changer. track numbers over 10 of the Digital... CATV terminal. wj A.F.D. ea RM SET UP Press to set up the button. Use as an example only. V DISC SKIP Press to continuous playback, etc. Press to activate the sleep timer function and the duration which the receiver...
...channel numbers of the VCR, satellite tuner, CD player or MD deck. - Press to activate the buttons with pink printing. It changes the remote... (H, PRESET+). wk SHIFT Press to light up the remote. return to skip a disc when using a multi-disc changer. track numbers over 10 of the Digital... CATV terminal. wj A.F.D. ea RM SET UP Press to set up the button. Use as an example only. V DISC SKIP Press to continuous playback, etc. Press to activate the sleep timer function and the duration which the receiver...

Operating Instructions (Large File - 19.55 MB)
Page 14
... used to the DIGITAL MEDIA PORT adapter (page 88). Name A ?/1 (on the TV screen. Press to switch the display mode of the receiver with simple operations using this remote. E OPTIONS Press to display the menu in the display window. L DISPLAY Press to activate the sleep timer function and the duration which the...
... used to the DIGITAL MEDIA PORT adapter (page 88). Name A ?/1 (on the TV screen. Press to switch the display mode of the receiver with simple operations using this remote. E OPTIONS Press to display the menu in the display window. L DISPLAY Press to activate the sleep timer function and the duration which the...

Operating Instructions (Large File - 19.55 MB)
Page 36
...the plug and the rear panel even when the power cord (mains lead) is not malfunction. 36GB After "MEMORY CLEARING..." appears. 6: Preparing the receiver and the remote Connecting the AC power cord (mains lead) Connect the supplied AC power cord (mains lead) to the AC IN terminal on the... receiver. 3 Release the TONE MODE and DMPORT after a few seconds. The cord is supposed be used to return settings you have made to their factory defaults. 1,2 2,3...
...the plug and the rear panel even when the power cord (mains lead) is not malfunction. 36GB After "MEMORY CLEARING..." appears. 6: Preparing the receiver and the remote Connecting the AC power cord (mains lead) Connect the supplied AC power cord (mains lead) to the AC IN terminal on the... receiver. 3 Release the TONE MODE and DMPORT after a few seconds. The cord is supposed be used to return settings you have made to their factory defaults. 1,2 2,3...

Operating Instructions (Large File - 19.55 MB)
Page 37
...mode (AV SYSTEM 1 or AV SYSTEM 2) of the RM-AAL011 remote 1 1 About the command mode The receiver and the remote use the remote to "AV2," "COMMAND MODE [AV2]" appears on the display. Tip When the remote no longer operates the receiver, ...replace all the batteries with old ones. • Do not mix manganese batteries and other Sony component respond to the same remote...
...mode (AV SYSTEM 1 or AV SYSTEM 2) of the RM-AAL011 remote 1 1 About the command mode The receiver and the remote use the remote to "AV2," "COMMAND MODE [AV2]" appears on the display. Tip When the remote no longer operates the receiver, ...replace all the batteries with old ones. • Do not mix manganese batteries and other Sony component respond to the same remote...
Operating Instructions (Large File - 19.55 MB)
Page 38
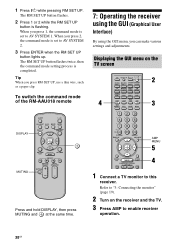
When you press 2, the command mode is set to AV SYSTEM 1. To switch the command mode of the RM-AAU018 remote 7: Operating the receiver using the GUI (Graphical User Interface) By using the GUI menu, you press RM SET UP, use a thin wire, such as a paper clip. When you ...press 1, the command mode is set to AV SYSTEM 2. 3 Press ENTER when the RM SET UP...
When you press 2, the command mode is set to AV SYSTEM 1. To switch the command mode of the RM-AAU018 remote 7: Operating the receiver using the GUI (Graphical User Interface) By using the GUI menu, you press RM SET UP, use a thin wire, such as a paper clip. When you ...press 1, the command mode is set to AV SYSTEM 2. 3 Press ENTER when the RM SET UP...

Operating Instructions (Large File - 19.55 MB)
Page 46
...the auto calibration type, then press b. appears on or off are connected properly. appears on the TV screen. Set the position of distance use the receiver. When the measurement ends, a beep sounds and the measurement result appears on the TV screen. 3 Press B/b repeatedly to select "Yes," then ...of the phase, "Out Phase" is (are saved. 46GB When "Save auto calibration (auto speaker setup) results?" For details on the remote when "Please Press ENTER." Note When the speaker(s) is displayed on the TV screen even though the speakers are deactivated during the measurement. &#...
...the auto calibration type, then press b. appears on or off are connected properly. appears on the TV screen. Set the position of distance use the receiver. When the measurement ends, a beep sounds and the measurement result appears on the TV screen. 3 Press B/b repeatedly to select "Yes," then ...of the phase, "Out Phase" is (are saved. 46GB When "Save auto calibration (auto speaker setup) results?" For details on the remote when "Please Press ENTER." Note When the speaker(s) is displayed on the TV screen even though the speakers are deactivated during the measurement. &#...
Operating Instructions (Large File - 19.55 MB)
Page 50
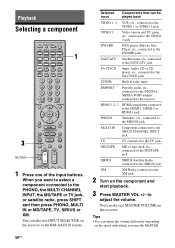
...MULTI IN or MD/TAPE, TV, SIRIUS or XM. DMPORT Portable audio, etc., connected to the DIGITAL MEDIA PORT adapter connected to the MD/TAPE jack. MD/TAPE MD or tape deck, etc., connected to the receiver. You can adjust the volume differently depending on the receiver or the RM-AAU018 remote...., connected to the MULTI CHANNEL INPUT jack. HDMI 1, 2, 3 HDMI components connected to the SAT/CATV jack. SAT/CATV Satellite tuner, etc., connected to the HDMI 1, HDMI 2 or HDMI 3 jack. SIRIUS SIRIUS Satellite Radio connected to the XM jack. 2 Turn on the receiver. XM XM Radio ...
...MULTI IN or MD/TAPE, TV, SIRIUS or XM. DMPORT Portable audio, etc., connected to the DIGITAL MEDIA PORT adapter connected to the MD/TAPE jack. MD/TAPE MD or tape deck, etc., connected to the receiver. You can adjust the volume differently depending on the receiver or the RM-AAU018 remote...., connected to the MULTI CHANNEL INPUT jack. HDMI 1, 2, 3 HDMI components connected to the SAT/CATV jack. SAT/CATV Satellite tuner, etc., connected to the HDMI 1, HDMI 2 or HDMI 3 jack. SIRIUS SIRIUS Satellite Radio connected to the XM jack. 2 Turn on the receiver. XM XM Radio ...

Operating Instructions (Large File - 19.55 MB)
Page 51
... the volume up or down quickly: press and hold the MASTER VOL +/- To turn the knob quickly. Even if you turn off the receiver, the muting function works when you turn down the volume level. 51GB Playback VOLUME knob. To avoid damaging your speakers Before you turn the... receiver on the remote again or turn MASTER VOLUME clockwise to turn off the receiver, be sure to raise the volume. To make a fine adjustment: press the button and release it immediately....
... the volume up or down quickly: press and hold the MASTER VOL +/- To turn the knob quickly. Even if you turn off the receiver, the muting function works when you turn down the volume level. 51GB Playback VOLUME knob. To avoid damaging your speakers Before you turn the... receiver on the remote again or turn MASTER VOLUME clockwise to turn off the receiver, be sure to raise the volume. To make a fine adjustment: press the button and release it immediately....

Operating Instructions (Large File - 19.55 MB)
Page 88
...MEDIA PORT adapter The DIGITAL MEDIA PORT adapter is an optional product. Available DIGITAL MEDIA PORT adapters vary in the Video settings menu. 88GB Sony offers the following DIGITAL MEDIA PORT adapters: • TDM-BT1 Bluetooth™ Wireless Audio Adapter • TDM-NW1 DIGITAL MEDIA PORT Adapter...adapter other than the DIGITAL MEDIA PORT adapter. • Before disconnecting the DIGITAL MEDIA PORT adapter, make sure to turn the receiver off using the remote. • Do not connect or disconnect the DIGITAL MEDIA PORT adapter to convert the resolution of analog video input signals. Each...
...MEDIA PORT adapter The DIGITAL MEDIA PORT adapter is an optional product. Available DIGITAL MEDIA PORT adapters vary in the Video settings menu. 88GB Sony offers the following DIGITAL MEDIA PORT adapters: • TDM-BT1 Bluetooth™ Wireless Audio Adapter • TDM-NW1 DIGITAL MEDIA PORT Adapter...adapter other than the DIGITAL MEDIA PORT adapter. • Before disconnecting the DIGITAL MEDIA PORT adapter, make sure to turn the receiver off using the remote. • Do not connect or disconnect the DIGITAL MEDIA PORT adapter to convert the resolution of analog video input signals. Each...

Operating Instructions (Large File - 19.55 MB)
Page 91
...is pressed. ** Fast-backward/forward while pressing and holding the m/M button. Go backward/forward Press m/M.** * When a TDM-iP1 is connected, the receiver enters pause mode when x is setting up. Option parameters in party mode "Guest." No Track* No track was found . Warning* Check the ...item was found . Skip to the previous album Press B•. Connecting* Connecting to the adapter. To resume play mode buttons on the remote of the Press >. To Do the following Play Press H. Party Mode* The unit is currently in the play modes x Repeat Mode ...
...is pressed. ** Fast-backward/forward while pressing and holding the m/M button. Go backward/forward Press m/M.** * When a TDM-iP1 is connected, the receiver enters pause mode when x is setting up. Option parameters in party mode "Guest." No Track* No track was found . Warning* Check the ...item was found . Skip to the previous album Press B•. Connecting* Connecting to the adapter. To resume play mode buttons on the remote of the Press >. To Do the following Play Press H. Party Mode* The unit is currently in the play modes x Repeat Mode ...
Operating Instructions (Large File - 19.55 MB)
Page 104
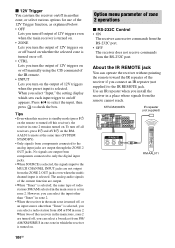
...on/off appears. STR-DA3300ES IR repeater (not supplied) RM-AAL011 104GB Option menu parameter of the receiver if you connect an IR repeater (not supplied) to the IR REMOTE jack. To ...MULTI CHANNEL INPUT jacks are not output from the ZONE 2 OUT jacks even when the multichannel input is selected, you can select a radio station from AM or FM in zone 2. Use an IR repeater when you install the receiver...off manually using the CIS command of the IR remote. • INPUT Lets you turn off all receivers, press ?/1 and AV ?/1 on the RMAAL011 remote at the same time (SYSTEM STANDBY). •...
...on/off appears. STR-DA3300ES IR repeater (not supplied) RM-AAL011 104GB Option menu parameter of the receiver if you connect an IR repeater (not supplied) to the IR REMOTE jack. To ...MULTI CHANNEL INPUT jacks are not output from the ZONE 2 OUT jacks even when the multichannel input is selected, you can select a radio station from AM or FM in zone 2. Use an IR repeater when you install the receiver...off manually using the CIS command of the IR remote. • INPUT Lets you turn off all receivers, press ?/1 and AV ?/1 on the RMAAL011 remote at the same time (SYSTEM STANDBY). •...

Operating Instructions (Large File - 19.55 MB)
Page 106
... is useful if you have a CONTROL S-compatible Sony TV, satellite tuner, monitor, DVD player or VCR, use a CONTROL S connecting cord (not supplied) to the CTRL S OUT jack on this receiver Example TV VCR Tuner, etc Receiver Remote The remote sensor on this receiver receives remote codes the same way as the remote sensor on the CONTROL S IN component. Refer...
... is useful if you have a CONTROL S-compatible Sony TV, satellite tuner, monitor, DVD player or VCR, use a CONTROL S connecting cord (not supplied) to the CTRL S OUT jack on this receiver Example TV VCR Tuner, etc Receiver Remote The remote sensor on this receiver receives remote codes the same way as the remote sensor on the CONTROL S IN component. Refer...


