Revision History
Page 6
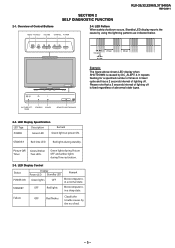
KLV-26,32,32/H/S,37 S400A RM-GA011 SECTION 2 SELF DIAGNOSTIC FUNCTION 2-1. It repeats flashing for a specified number of times in 0.3sec/ cycle and has a 2 seconds interval of abnormal ...: LED Green lights at power ON. Timer Green/Amber : Two LEDs Green lights during Picture OFF and amber lights during standby. of Control Buttons MENU TV/VIDEO VOLUME CHANNEL POWER 2-4. Overview of red. - 5 -
KLV-26,32,32/H/S,37 S400A RM-GA011 SECTION 2 SELF DIAGNOSTIC FUNCTION 2-1. It repeats flashing for a specified number of times in 0.3sec/ cycle and has a 2 seconds interval of abnormal ...: LED Green lights at power ON. Timer Green/Amber : Two LEDs Green lights during Picture OFF and amber lights during standby. of Control Buttons MENU TV/VIDEO VOLUME CHANNEL POWER 2-4. Overview of red. - 5 -
Revision History
Page 22
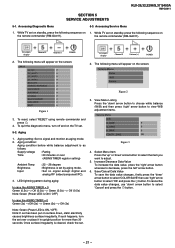
SECTION 5 SERVICE ADJUSTMENTS KLV-26,32,32/H/S,37 S400A RM-GA011 5-1. While TV set on standby, press the following menu will appear on...button to view W/B adjustment items. Service Menu W/B R_DRIVE 0 G_DRIVE 0 B_DRIVE 0 COLOR _SAVE OK Figure 3 4. While TV set on standby, press the following menu will appear on surface down ' arrow button to select 'Cancel' and press the ...Note: If set by aging mode. : Set no signal and monitor as follows: Supply voltage : Rating Time : 20 minutes or over or place it in upright position for more than 30 seconds. Accessing Service ...
SECTION 5 SERVICE ADJUSTMENTS KLV-26,32,32/H/S,37 S400A RM-GA011 5-1. While TV set on standby, press the following menu will appear on...button to view W/B adjustment items. Service Menu W/B R_DRIVE 0 G_DRIVE 0 B_DRIVE 0 COLOR _SAVE OK Figure 3 4. While TV set on standby, press the following menu will appear on surface down ' arrow button to select 'Cancel' and press the ...Note: If set by aging mode. : Set no signal and monitor as follows: Supply voltage : Rating Time : 20 minutes or over or place it in upright position for more than 30 seconds. Accessing Service ...
Revision History
Page 23
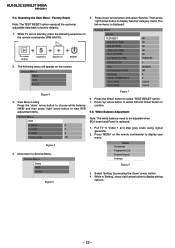
Factory Reset Note: The TEST RESET option resets all the customer adjustable data back to select 'TEST RESET' option. 7. While TV set on standby, press the following menu will appear on the remote commander (RM-GA011). Press 'down ' arrow button. 4. Press the '...balance need to display 'Service' category items. The below menu is replaced. 1. MENU Favourites Programme List External Inputs Settings Figure 8 3. KLV-26,32,32/H/S,37 S400A RM-GA011 5-4. Then press 'right' arrow button to be adjusted when BG1 board and Panel is displayed: Service Menu Service TEST RESET WHITE...
Factory Reset Note: The TEST RESET option resets all the customer adjustable data back to select 'TEST RESET' option. 7. While TV set on standby, press the following menu will appear on the remote commander (RM-GA011). Press 'down ' arrow button. 4. Press the '...balance need to display 'Service' category items. The below menu is replaced. 1. MENU Favourites Programme List External Inputs Settings Figure 8 3. KLV-26,32,32/H/S,37 S400A RM-GA011 5-4. Then press 'right' arrow button to be adjusted when BG1 board and Panel is displayed: Service Menu Service TEST RESET WHITE...
Revision History
Page 39
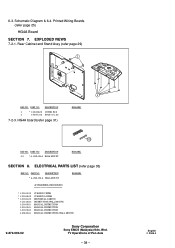
... page 31) REMARK 103 REF NO. DESCRIPTION 103 * A-1548-456-A HG4A MOUNT REMARK SECTION 8. ELECTRICAL PARTS LIST (refer page 35) REF NO. TV Operations of Pan Asia - 38 - Rear Cabinet and Stand Assy (refer page 29) 2 4 REF NO. Bhd. English 2008.4 PART NO...LOWER INDIVIDUAL CARTON INSTRUCTION (WALL MOUNT) MANUAL, INSTRUCTION MANUAL, INSTRUCTION MANUAL, INSTRUCTION MANUAL, INSTRUCTION (WALL MOUNT) 9-872-993-02 Sony Corporation Sony EMCS (Malaysia) Sdn. DESCRIPTION 2 * 3-106-086-01 COVER, ECS 4 3-700-532-01 FOOT (15 x 20) 7-2-3. 6-3. PART NO. Schematic Diagram...
... page 31) REMARK 103 REF NO. DESCRIPTION 103 * A-1548-456-A HG4A MOUNT REMARK SECTION 8. ELECTRICAL PARTS LIST (refer page 35) REF NO. TV Operations of Pan Asia - 38 - Rear Cabinet and Stand Assy (refer page 29) 2 4 REF NO. Bhd. English 2008.4 PART NO...LOWER INDIVIDUAL CARTON INSTRUCTION (WALL MOUNT) MANUAL, INSTRUCTION MANUAL, INSTRUCTION MANUAL, INSTRUCTION MANUAL, INSTRUCTION (WALL MOUNT) 9-872-993-02 Sony Corporation Sony EMCS (Malaysia) Sdn. DESCRIPTION 2 * 3-106-086-01 COVER, ECS 4 3-700-532-01 FOOT (15 x 20) 7-2-3. 6-3. PART NO. Schematic Diagram...
Revision History
Page 40
KLV-40S400A KLV-37S400A KLV-32S400A KLV-26S400A © 2008 Sony Corporation LCD Colour TV Operating Instructions 3-293-038-11(1) 3-293-038-11(1)
KLV-40S400A KLV-37S400A KLV-32S400A KLV-26S400A © 2008 Sony Corporation LCD Colour TV Operating Instructions 3-293-038-11(1) 3-293-038-11(1)

Revision History
Page 41
Trademark information • HDMI, the HDMI logo and High-Definition Multimedia Interface are trademarks or registered trademarks of HDMI Licensing LLC. • "BRAVIA" and are of Sony Corporation. 2 GB The illustrations used in this manual thoroughly and retain it for choosing this Sony product. Before operating the TV, please read this manual are trademarks of the KLV-32S400A unless otherwise stated. Introduction Thank you for future reference.
Trademark information • HDMI, the HDMI logo and High-Definition Multimedia Interface are trademarks or registered trademarks of HDMI Licensing LLC. • "BRAVIA" and are of Sony Corporation. 2 GB The illustrations used in this manual thoroughly and retain it for choosing this Sony product. Before operating the TV, please read this manual are trademarks of the KLV-32S400A unless otherwise stated. Introduction Thank you for future reference.
Revision History
Page 42
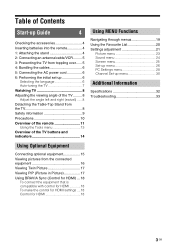
... Performing the initial set-up 6 Selecting the language 6 Auto-tuning the TV 7 Watching TV 8 Adjusting the viewing angle of the TV ......... 8 Adjust the angle left and right (swivel) ......8 Detaching the Table-Top Stand from the TV 8 Safety information 9 Precautions 10 Overview of the remote 11 Using the ...23 Sound menu 24 Screen menu 25 Set-up menu 26 PC Settings menu 28 Channel Set-up menu 30 32 Additional Information Specifications 32 Troubleshooting 33 Connecting optional equipment 15 Viewing pictures from the connected equipment 16 Viewing Twin Picture 17 Viewing PIP (...
... Performing the initial set-up 6 Selecting the language 6 Auto-tuning the TV 7 Watching TV 8 Adjusting the viewing angle of the TV ......... 8 Adjust the angle left and right (swivel) ......8 Detaching the Table-Top Stand from the TV 8 Safety information 9 Precautions 10 Overview of the remote 11 Using the ...23 Sound menu 24 Screen menu 25 Set-up menu 26 PC Settings menu 28 Channel Set-up menu 30 32 Additional Information Specifications 32 Troubleshooting 33 Connecting optional equipment 15 Viewing pictures from the connected equipment 16 Viewing Twin Picture 17 Viewing PIP (...
Revision History
Page 43
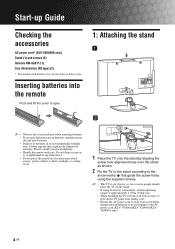
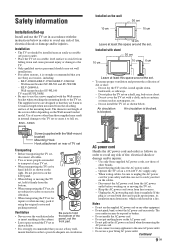
... the stand according to the arrow marks that guide the screw holes using the supplied screws. ~ • This TV is very heavy, so two or more people should place the TV on the stand. • If using an electric screwdriver, set the tightening torque at approximately 1.5N·m (15kgf·...;cm). • When installing the TV onto the wall, follow step 1 to prevent the TV panel from falling over. • Ensure the AC power cord is away from screw holes during stand installation to avoid damage...
... the stand according to the arrow marks that guide the screw holes using the supplied screws. ~ • This TV is very heavy, so two or more people should place the TV on the stand. • If using an electric screwdriver, set the tightening torque at approximately 1.5N·m (15kgf·...;cm). • When installing the TV onto the wall, follow step 1 to prevent the TV panel from falling over. • Ensure the AC power cord is away from screw holes during stand installation to avoid damage...
Revision History
Page 44
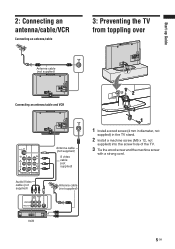
Antenna cable (not supplied) VCR 5 GB Start-up Guide 2: Connecting an antenna/cable/VCR Connecting an antenna/cable 3: Preventing the TV from toppling over 8 Antenna cable (not supplied) 8 Connecting an antenna/cable and VCR Audio/Video cable (not supplied) 8 8 Antenna cable (not supplied) S video cable (not supplied) 1 Install a wood screw (4 mm in diameter, not supplied) in the TV stand. 2 Install a machine screw (M5 x 12, not supplied) into the screw hole of the TV. 3 Tie the wood screw and the machine screw with a strong cord.
Antenna cable (not supplied) VCR 5 GB Start-up Guide 2: Connecting an antenna/cable/VCR Connecting an antenna/cable 3: Preventing the TV from toppling over 8 Antenna cable (not supplied) 8 Connecting an antenna/cable and VCR Audio/Video cable (not supplied) 8 8 Antenna cable (not supplied) S video cable (not supplied) 1 Install a wood screw (4 mm in diameter, not supplied) in the TV stand. 2 Install a machine screw (M5 x 12, not supplied) into the screw hole of the TV. 3 Tie the wood screw and the machine screw with a strong cord.
Revision History
Page 45
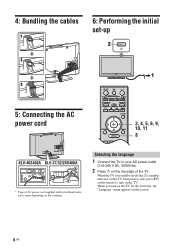
... the initial set-up , 1 5: Connecting the AC power cord BRAVIA Sync SYNC MENU THEATRE AUDIO 3, 4, 5, 6, 9, RETURN TOOLS 10, 11 8 KLV-40S400A KLV-37/32/26S400A * Type of the TV. Selecting the language 1 Connect the TV to turn on the TV for the first time, the "Language" menu appears on the screen. 6 GB When the... TV is in standby mode (the 1 (standby) indicator on the TV front panel is red), press "/1 on the remote to your AC power outlet (110-240 V AC, 50/60 Hz). 2 Press 1 on the top edge of ...
... the initial set-up , 1 5: Connecting the AC power cord BRAVIA Sync SYNC MENU THEATRE AUDIO 3, 4, 5, 6, 9, RETURN TOOLS 10, 11 8 KLV-40S400A KLV-37/32/26S400A * Type of the TV. Selecting the language 1 Connect the TV to turn on the TV for the first time, the "Language" menu appears on the screen. 6 GB When the... TV is in standby mode (the 1 (standby) indicator on the TV front panel is red), press "/1 on the remote to your AC power outlet (110-240 V AC, 50/60 Hz). 2 Press 1 on the top edge of ...
Revision History
Page 46
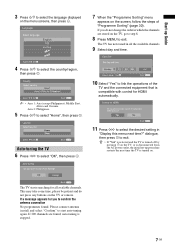
... that is compatible with control for compatible HDMI devices? dialogue, then press to select the desired setting in "Display this menu next time?" The TV starts searching for you to select the country/region, then press . ~ • Area 1: Asia (except Philippines), Middle East, Africa and ...Oceania. Please connect antenna (aerial) and select "Confirm" to exit. The TV has now tuned in which the channels are found . If a message appears for all the available channels. 9 Select day and time. 4 Press F/f to...
... that is compatible with control for compatible HDMI devices? dialogue, then press to select the desired setting in "Display this menu next time?" The TV starts searching for you to select the country/region, then press . ~ • Area 1: Asia (except Philippines), Middle East, Africa and ...Oceania. Please connect antenna (aerial) and select "Confirm" to exit. The TV has now tuned in which the channels are found . If a message appears for all the available channels. 9 Select day and time. 4 Press F/f to...
Revision History
Page 47
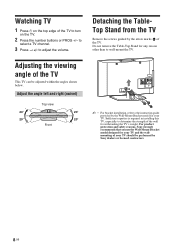
... model for any reason other than to turn on the TV. 2 Press the number buttons or PROG +/- to select a TV channel. 3 Press 2 +/- For product protection and safety reasons, Sony strongly recommends that you use the Wall-Mount Bracket model designed for withstanding the TV's weight. Do not remove the Table-Top Stand for your...
... model for any reason other than to turn on the TV. 2 Press the number buttons or PROG +/- to select a TV channel. 3 Press 2 +/- For product protection and safety reasons, Sony strongly recommends that you use the Wall-Mount Bracket model designed for withstanding the TV's weight. Do not remove the Table-Top Stand for your...
Revision History
Page 48
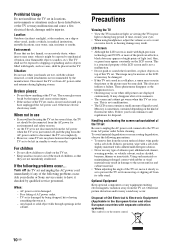
... power outlet. • Place the TV set on the LCD panel. • When lifting or moving the TV set, hold it firmly from the bottom. • When transporting the TV set, do not subject it to jolts or excessive vibration. • When transporting the TV set in accordance with the instructions below... The diameter and length of fire, electrical shock or damage and/or injuries. Do not place the TV set on rear of TV set Transporting • Before transporting the TV set . Use only Sony supplied AC power cords, not those supplied may be sure to unplug the AC power cord for repairs...
... power outlet. • Place the TV set on the LCD panel. • When lifting or moving the TV set, hold it firmly from the bottom. • When transporting the TV set, do not subject it to jolts or excessive vibration. • When transporting the TV set in accordance with the instructions below... The diameter and length of fire, electrical shock or damage and/or injuries. Do not place the TV set on rear of TV set Transporting • Before transporting the TV set . Use only Sony supplied AC power cords, not those supplied may be sure to unplug the AC power cord for repairs...
Revision History
Page 49
... countries with separate collection systems) This symbol is not a malfunction. • Do not push or scratch the front filter, or place objects on top of the LCD screen and is on the LCD screen. where insects may result. Disconnect the TV set to prevent the TV set . TV set . Mercury is... immediately if any type of the TV set, move it checked by the impact and cause serious injury. • If the surface of AC power outlet. - Ask your dealer or Sony service centre to work correctly. LCD Screen • Although the LCD screen is sometimes contained depending on ...
... countries with separate collection systems) This symbol is not a malfunction. • Do not push or scratch the front filter, or place objects on top of the LCD screen and is on the LCD screen. where insects may result. Disconnect the TV set to prevent the TV set . TV set . Mercury is... immediately if any type of the TV set, move it checked by the impact and cause serious injury. • If the surface of AC power outlet. - Ask your dealer or Sony service centre to work correctly. LCD Screen • Although the LCD screen is sometimes contained depending on ...
Revision History
Page 50
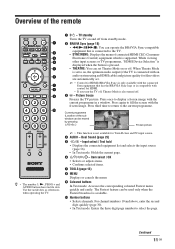
...the Fastext broadcast is not available for HDMI (BRAVIA Sync) is only available with the connected Sony equipment that has the BRAVIA Sync logo or is compatible with the frozen image. Picture freeze Freezes the TV picture. Dual Sound (page 25) 5 / - Item select / OK • Selects or adjusts items...on and off . 3 - Overview of connected HDMI CEC (Consumer Electronics Control) equipment which is supported. TV standby Turns the TV on , the optimum audio output (if the TV is connected with an audio system using an HDMI cable) and picture quality for HDMI. • If you turn the...
...the Fastext broadcast is not available for HDMI (BRAVIA Sync) is only available with the connected Sony equipment that has the BRAVIA Sync logo or is compatible with the frozen image. Picture freeze Freezes the TV picture. Dual Sound (page 25) 5 / - Item select / OK • Selects or adjusts items...on and off . 3 - Overview of connected HDMI CEC (Consumer Electronics Control) equipment which is supported. TV standby Turns the TV on , the optimum audio output (if the TV is connected with an audio system using an HDMI cable) and picture quality for HDMI. • If you turn the...

Revision History
Page 51
... centre portion of any displayed menu. The left and right edges of the picture may be either English, Persian or French depending on the TV without sound, press this button. wa w; Favourite list Displays the Favourite list that you want to the previous screen of the picture. qf...display clock information. Full Stretches the 4:3 picture horizontally, to select the desired wide mode. Text In Text mode: Displays Text broadcast: Text t Text over the TV picture (mix mode) t No Text (exit the Text service). ~ • Text language displays can be cut off. ~ • You cannot select "...
... centre portion of any displayed menu. The left and right edges of the picture may be either English, Persian or French depending on the TV without sound, press this button. wa w; Favourite list Displays the Favourite list that you want to the previous screen of the picture. qf...display clock information. Full Stretches the 4:3 picture horizontally, to select the desired wide mode. Text In Text mode: Displays Text broadcast: Text t Text over the TV picture (mix mode) t No Text (exit the Text service). ~ • Text language displays can be cut off. ~ • You cannot select "...
Revision History
Page 52
... input) only] Displays the menu screen to operate the connected HDMI-compatible equipment. 13 GB Sleep Timer (except PC input mode) See page 28. Viewing TV programme Options Description Picture Mode See page 23. MPEG Noise Reduction (except PC input mode) See page 23. MPEG Noise Reduction See page 23. Add...
... input) only] Displays the menu screen to operate the connected HDMI-compatible equipment. 13 GB Sleep Timer (except PC input mode) See page 28. Viewing TV programme Options Description Picture Mode See page 23. MPEG Noise Reduction (except PC input mode) See page 23. MPEG Noise Reduction See page 23. Add...
Revision History
Page 53
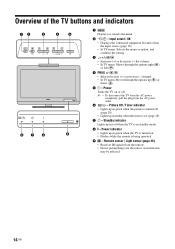
... remote is turned on or off (page 28). • Lights up in green when the picture is turned off . ~ • To disconnect the TV from the AC power completely, pull the plug from the remote. • Do not put anything over the sensor, as its function may be affected... (page 28) • Receives IR signals from the AC power outlet. 6 / - Standby indicator Lights up in amber when the timer is in green when the TV is being operated. 9 - Power indicator • Lights up ( ) or down ( ). 5 1 - Input select / OK • Displays the connected equipment list and selects the input ...
... remote is turned on or off (page 28). • Lights up in green when the picture is turned off . ~ • To disconnect the TV from the AC power completely, pull the plug from the remote. • Do not put anything over the sensor, as its function may be affected... (page 28) • Receives IR signals from the AC power outlet. 6 / - Standby indicator Lights up in amber when the timer is in green when the TV is being operated. 9 - Power indicator • Lights up ( ) or down ( ). 5 1 - Input select / OK • Displays the connected equipment list and selects the input ...
Revision History
Page 54
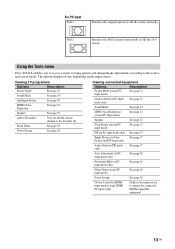
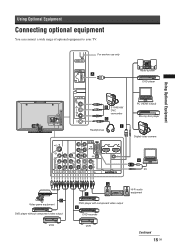
For service use only Audio system DVD player S VHS/Hi8/ DVC camcorder PC (HDMI output) Blu-ray disc player Headphones Digital video camera Using Optional Equipment PC Video game equipment DVD player without component video output VCR Hi-Fi audio equipment DVD player with component video output DVD recorder VCR Continued 15 GB Using Optional Equipment Connecting optional equipment You can connect a wide range of optional equipment to your TV.
For service use only Audio system DVD player S VHS/Hi8/ DVC camcorder PC (HDMI output) Blu-ray disc player Headphones Digital video camera Using Optional Equipment PC Video game equipment DVD player without component video output VCR Hi-Fi audio equipment DVD player with component video output DVD recorder VCR Continued 15 GB Using Optional Equipment Connecting optional equipment You can connect a wide range of optional equipment to your TV.
Revision History
Page 55
... the "Video Labels" under the "AV Set-up this communication. To avoid picture noise, do not connect the camcorder to record the image from the TV. Connect to the video output jack to the video jack 1 and the S video jack 1 at the same time. If you connect the equipment that input... the connected equipment Turn on the connected equipment, then press / to use only an HDMI cable that bears the HDMI logo (recommended Sony HDMI cable). • When connecting an audio system with HDMI jack, be sure to also connect to the audio output jacks (refer G in page 15) to listen to set...
... the "Video Labels" under the "AV Set-up this communication. To avoid picture noise, do not connect the camcorder to record the image from the TV. Connect to the video output jack to the video jack 1 and the S video jack 1 at the same time. If you connect the equipment that input... the connected equipment Turn on the connected equipment, then press / to use only an HDMI cable that bears the HDMI logo (recommended Sony HDMI cable). • When connecting an audio system with HDMI jack, be sure to also connect to the audio output jacks (refer G in page 15) to listen to set...


