
Operating Instructions
Page 3
As an ENERGY STAR® Partner, Sony Corporation has determined that face the screen with opaque drapery. TruSurround technology is recommended to use spot lighting directed down from the ceiling or to cover the windows that this case, please .... Installing ❑ To prevent internal heat buildup, do not expose the screen to direct illumination or direct sunlight. under license from a cold to a warm location, or if the room temperature changes suddenly, the picture may be using the LCD Projection TV for several days, disconnect the power by pulling the plug itself. It...
As an ENERGY STAR® Partner, Sony Corporation has determined that face the screen with opaque drapery. TruSurround technology is recommended to use spot lighting directed down from the ceiling or to cover the windows that this case, please .... Installing ❑ To prevent internal heat buildup, do not expose the screen to direct illumination or direct sunlight. under license from a cold to a warm location, or if the room temperature changes suddenly, the picture may be using the LCD Projection TV for several days, disconnect the power by pulling the plug itself. It...
Operating Instructions
Page 5
... specific model of time, it is operating, unplug the TV and consult your dealer or service technician. If the picture becomes dark after using the LCD Projection TV for a long period of LCD Projection TV. If you clean the screen surface in the back or bottom are provided for long ...periods of the LCD Projection TV. To remove dust from overheating, these may be necessary to...
... specific model of time, it is operating, unplug the TV and consult your dealer or service technician. If the picture becomes dark after using the LCD Projection TV for a long period of LCD Projection TV. If you clean the screen surface in the back or bottom are provided for long ...periods of the LCD Projection TV. To remove dust from overheating, these may be necessary to...
Operating Instructions
Page 7
... will appear on your viewing position. Sit at least 10 cm (4 inches) from behind the screen. You might hear the noise from eye fatigue. Watch your LCD projection TV, and within 60° of the vertical viewing area, and 130° of light (red, blue, or...safe operating condition, and to drop it . Projection lamp ❑ Your LCD projection TV uses a projection lamp as the original parts. When the projection lamp wears out after using the LCD projection TV for KF-60WE610 away from your footing while installing the LCD Projection TV. Installation ❑ If direct sunlight or ...
... will appear on your viewing position. Sit at least 10 cm (4 inches) from behind the screen. You might hear the noise from eye fatigue. Watch your LCD projection TV, and within 60° of the vertical viewing area, and 130° of light (red, blue, or...safe operating condition, and to drop it . Projection lamp ❑ Your LCD projection TV uses a projection lamp as the original parts. When the projection lamp wears out after using the LCD projection TV for KF-60WE610 away from your footing while installing the LCD Projection TV. Installation ❑ If direct sunlight or ...
Operating Instructions
Page 8
...Sony LCD Projection TV Presenting the Sony LCD Projection TV 9 Using This Manual 10 Enjoying Your LCD Projection TV 11 Replacing the Lamp 13 Installing and Connecting the LCD Projection TV Contents 17 Inserting Batteries into the Remote Control ..........17 Carrying Your LCD Projection TV 18 To Prevent the LCD Projection TV from Falling Down 19 When Installing Your LCD Projection TV... Stick Home 60 Viewing Still Images 62 Playing Movies 63 Memory Stick Home Menu Options 65 Using the Menus Overview 68 Using the Video Menu 69 Using the Audio Menu 72 Using the Screen Menu 74 Using...
...Sony LCD Projection TV Presenting the Sony LCD Projection TV 9 Using This Manual 10 Enjoying Your LCD Projection TV 11 Replacing the Lamp 13 Installing and Connecting the LCD Projection TV Contents 17 Inserting Batteries into the Remote Control ..........17 Carrying Your LCD Projection TV 18 To Prevent the LCD Projection TV from Falling Down 19 When Installing Your LCD Projection TV... Stick Home 60 Viewing Still Images 62 Playing Movies 63 Memory Stick Home Menu Options 65 Using the Menus Overview 68 Using the Video Menu 69 Using the Audio Menu 72 Using the Screen Menu 74 Using...
Operating Instructions
Page 9
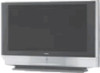
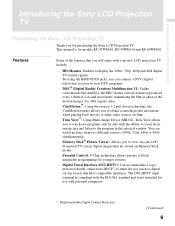
...second in the selected window. By using the HD/DVD IN jacks, you can watch two programs side by side with your LCD Projection TV screen digital images that are stored on Memory Stick media. ❑ Parental Control: V-Chip technology allows parents to the program in real ... to block unsuitable programming for use with personal computers. * High-bandwidth Digital Content Protection (Continued) 9 Introducing the Sony LCD Projection TV Introducing the Sony LCD Projection TV Presenting the Sony LCD Projection TV Thank you for models KF-42WE610, KF-50WE610 and KF-60WE610.
...second in the selected window. By using the HD/DVD IN jacks, you can watch two programs side by side with your LCD Projection TV screen digital images that are stored on Memory Stick media. ❑ Parental Control: V-Chip technology allows parents to the program in real ... to block unsuitable programming for use with personal computers. * High-bandwidth Digital Content Protection (Continued) 9 Introducing the Sony LCD Projection TV Introducing the Sony LCD Projection TV Presenting the Sony LCD Projection TV Thank you for models KF-42WE610, KF-50WE610 and KF-60WE610.
Operating Instructions
Page 10
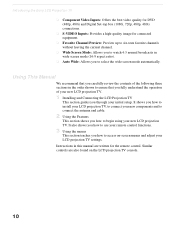
...to connect the antenna and cable. 2 Using the Features This section shows you through your LCD projection TV settings. Instructions in this manual are also found on -screen menus and adjust your initial setup. Using This Manual We recommend that you carefully review the contents... leaving the current channel. ❑ Wide Screen Mode: Allows you to watch 4:3 normal broadcasts in wide screen mode (16:9 aspect ratio). ❑ Auto Wide: Allows you how to access on the LCD projection TV console. 10 Introducing the Sony LCD Projection TV ❑ Component Video Inputs: Offers the ...
...to connect the antenna and cable. 2 Using the Features This section shows you through your LCD projection TV settings. Instructions in this manual are also found on -screen menus and adjust your initial setup. Using This Manual We recommend that you carefully review the contents... leaving the current channel. ❑ Wide Screen Mode: Allows you to watch 4:3 normal broadcasts in wide screen mode (16:9 aspect ratio). ❑ Auto Wide: Allows you how to access on the LCD projection TV console. 10 Introducing the Sony LCD Projection TV ❑ Component Video Inputs: Offers the ...
Operating Instructions
Page 11
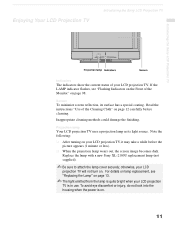
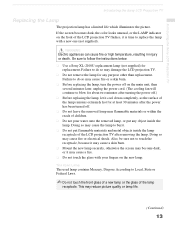
... appears (1 minute or less). ❑ When the projection lamp wears out, the screen image becomes dark. Read the instructions "Use of the Cleaning Cloth" on . Projection lamp Your LCD projection TV uses a projection lamp as its surface has a special coating. To ...98. Screen To minimize screen reflection, its light source. For details on lamp replacement, see "Flashing Indicators on the Front of the Monitor" on . 11 Enjoying Your LCD Projection TV Introducing the Sony LCD Projection TV Introducing the Sony LCD Projection TV Projection lamp Indicators Screen Indicators The...
... appears (1 minute or less). ❑ When the projection lamp wears out, the screen image becomes dark. Read the instructions "Use of the Cleaning Cloth" on . Projection lamp Your LCD projection TV uses a projection lamp as its surface has a special coating. To ...98. Screen To minimize screen reflection, its light source. For details on lamp replacement, see "Flashing Indicators on the Front of the Monitor" on . 11 Enjoying Your LCD Projection TV Introducing the Sony LCD Projection TV Introducing the Sony LCD Projection TV Projection lamp Indicators Screen Indicators The...
Operating Instructions
Page 12
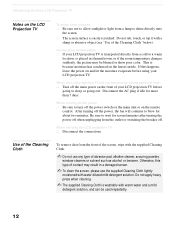
... the main unit or on the remote control. Introducing the Sony LCD Projection TV Notes on the LCD Projection TV To enjoy clear pictures ❑ Be sure not to allow sunlight or light from a cold to a warm location, is placed in a damaged screen. ✍ To clean the screen, please use any type of abrasive pad, alkaline cleaner...
... the main unit or on the remote control. Introducing the Sony LCD Projection TV Notes on the LCD Projection TV To enjoy clear pictures ❑ Be sure not to allow sunlight or light from a cold to a warm location, is placed in a damaged screen. ✍ To clean the screen, please use any type of abrasive pad, alkaline cleaner...
Operating Instructions
Page 13
... not to burst. ❑ Do not put any purpose other than replacement. Introducing the Sony LCD Projection TV Introducing the Sony LCD Projection TV Replacing the Lamp The projection lamp has a limited life which illuminates the picture. Doing so may cause the lamp to... touch the receptacle, because it may cause a skin burn. ❑ Mount the new lamp securely, otherwise the screen may damage the LCD projection TV...
... not to burst. ❑ Do not put any purpose other than replacement. Introducing the Sony LCD Projection TV Introducing the Sony LCD Projection TV Replacing the Lamp The projection lamp has a limited life which illuminates the picture. Doing so may cause the lamp to... touch the receptacle, because it may cause a skin burn. ❑ Mount the new lamp securely, otherwise the screen may damage the LCD projection TV...
Operating Instructions
Page 37
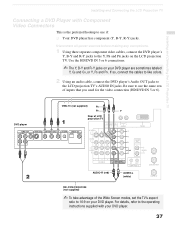
..., connect the DVD player's Audio OUT jacks to use the same row of the Wide Screen modes, set the TV's aspect ratio to 16:9 on the LCD projection TV. DVD player VMC-10 (not supplied) PB PR Y Rear of LCD projection TV AUDIO-R (red) AUDIO-L (white) RK-C310/C320/C330 (not supplied) ✍ To take advantage of...
..., connect the DVD player's Audio OUT jacks to use the same row of the Wide Screen modes, set the TV's aspect ratio to 16:9 on the LCD projection TV. DVD player VMC-10 (not supplied) PB PR Y Rear of LCD projection TV AUDIO-R (red) AUDIO-L (white) RK-C310/C320/C330 (not supplied) ✍ To take advantage of...
Operating Instructions
Page 38
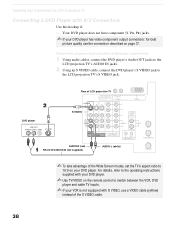
... DVD player has video component output connectors: for best picture quality use a VIDEO cable (yellow) instead of the Wide Screen modes, set the TV's aspect ratio to 16:9 on your DVD player. Rear of LCD projection TV DVD player S VIDEO AUDIO-R (red) RK-C310/C320/C330 (not supplied) AUDIO-L (white) ✍ To take advantage of...
... DVD player has video component output connectors: for best picture quality use a VIDEO cable (yellow) instead of the Wide Screen modes, set the TV's aspect ratio to 16:9 on your DVD player. Rear of LCD projection TV DVD player S VIDEO AUDIO-R (red) RK-C310/C320/C330 (not supplied) AUDIO-L (white) ✍ To take advantage of...
Operating Instructions
Page 43
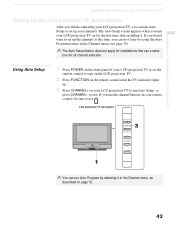
... . 3 Press CHANNEL+ on your LCD projection TV to run Auto Setup, or press CHANNEL- Installing and Connecting the LCD Projection TV Installing and Connecting the LCD Projection TV Setting Up the LCD projection TV Automatically After you finish connecting your LCD projection TV, you can run Auto Setup to set...you turn on the LCD projection TV. 2 Press FUNCTION on the remote control until the TV indicator lights up your channels. The Auto Setup screen appears when you use the channel buttons on for all channel selection. LCD projection TV front panel CHANNEL VOLUME TV/VIDEO ✍ You can...
... . 3 Press CHANNEL+ on your LCD projection TV to run Auto Setup, or press CHANNEL- Installing and Connecting the LCD Projection TV Installing and Connecting the LCD Projection TV Setting Up the LCD projection TV Automatically After you finish connecting your LCD projection TV, you can run Auto Setup to set...you turn on the LCD projection TV. 2 Press FUNCTION on the remote control until the TV indicator lights up your channels. The Auto Setup screen appears when you use the channel buttons on for all channel selection. LCD projection TV front panel CHANNEL VOLUME TV/VIDEO ✍ You can...

Operating Instructions
Page 44
...Press repeatedly to step through the wide screen modes: Wide Zoom, Normal, Full and Zoom. Using the Features Using the Remote Control The following table describes the buttons on the remote control that you want to operate. The LCD projection TV alternates between two channels. Press again ...to turn on -screen cursor. Description Press to restore the picture. When the menu is displayed, move the on and off ...
...Press repeatedly to step through the wide screen modes: Wide Zoom, Normal, Full and Zoom. Using the Features Using the Remote Control The following table describes the buttons on the remote control that you want to operate. The LCD projection TV alternates between two channels. Press again ...to turn on -screen cursor. Description Press to restore the picture. When the menu is displayed, move the on and off ...
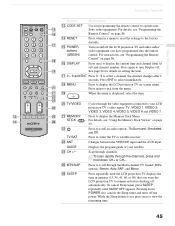
Operating Instructions
Page 45
... RESET Press when in minutes (15, 30, 45, 60, or 90) that you have programmed into the remote control. qh DISPLAY Press once to the factory defaults. qj 0 - 9 and ENT Press 0 - 9 to display the LCD projection TV on-screen menu. qk MENU Press to select a channel, the ...channel changes after 2 seconds. w; Press repeatedly until SLEEP OFF appears. To cancel Sleep timer, press SLEEP repeatedly until the LCD projection TV displays the time in a menu to reset the settings ...
... RESET Press when in minutes (15, 30, 45, 60, or 90) that you have programmed into the remote control. qh DISPLAY Press once to the factory defaults. qj 0 - 9 and ENT Press 0 - 9 to display the LCD projection TV on-screen menu. qk MENU Press to select a channel, the ...channel changes after 2 seconds. w; Press repeatedly until SLEEP OFF appears. To cancel Sleep timer, press SLEEP repeatedly until the LCD projection TV displays the time in a menu to reset the settings ...
Operating Instructions
Page 46
... JUMP Press to mute the sound. Buttons for direct channel selection. Using the Features Watching the TV Many TV features can press ENT for immediate selection. 5 CH +/- The LCD projection TV will appear on the screen. If a video input indication (e.g., VIDEO 1, VIDEO 2) appears on and off. "MUTING"... and forth between the VHF/UHF input and the AUX input. 3 POWER Turn the LCD projection TV on the screen, press TV/VIDEO or CH +/ - down information that appears on the LCD projection TV's screen (see "Using the Freeze Function" on your remote control. Press 0-9 to select a channel...
... JUMP Press to mute the sound. Buttons for direct channel selection. Using the Features Watching the TV Many TV features can press ENT for immediate selection. 5 CH +/- The LCD projection TV will appear on the screen. If a video input indication (e.g., VIDEO 1, VIDEO 2) appears on and off. "MUTING"... and forth between the VHF/UHF input and the AUX input. 3 POWER Turn the LCD projection TV on the screen, press TV/VIDEO or CH +/ - down information that appears on the LCD projection TV's screen (see "Using the Freeze Function" on your remote control. Press 0-9 to select a channel...

Operating Instructions
Page 49
... or v to highlight the channel you can display the Favorite Channels. Press to select. ✍ When the remote control function is set to other than TV function, you want to watch. z To assign Channel Labels (e.g., ABC, HBO, MTV, etc.) to channel numbers, as a Favorite Channel. 6 To ...However, you want to highlight the channel you cannot select the channel by using the Channel Menu, see page 77). 49 The program of the screen. z For details on using V or v. The Favorite Channel options appear. Press to exit the Menu. A preview of the highlighted channel appears...
... or v to highlight the channel you can display the Favorite Channels. Press to select. ✍ When the remote control function is set to other than TV function, you want to watch. z To assign Channel Labels (e.g., ABC, HBO, MTV, etc.) to channel numbers, as a Favorite Channel. 6 To ...However, you want to highlight the channel you cannot select the channel by using the Channel Menu, see page 77). 49 The program of the screen. z For details on using V or v. The Favorite Channel options appear. Press to exit the Menu. A preview of the highlighted channel appears...
Operating Instructions
Page 50
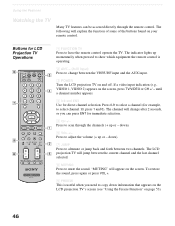
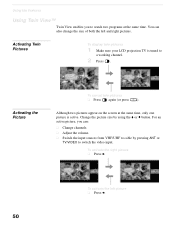
...To activate the right picture ❑ Press b. To activate the left and right pictures. Activating Twin Pictures To display twin pictures 1 Make sure your LCD projection TV is active. For an active picture, you to watch two programs at the same time, only one picture is tuned to a working channel. 2 Press ...sources from VHF/UHF to cable by using the V or v button. Although two pictures appear on the screen at the same time. Change the picture size by pressing ANT or TV/VIDEO to switch the video input. Using the Features Using Twin View™ Twin View enables you can also...
...To activate the right picture ❑ Press b. To activate the left and right pictures. Activating Twin Pictures To display twin pictures 1 Make sure your LCD projection TV is active. For an active picture, you to watch two programs at the same time, only one picture is tuned to a working channel. 2 Press ...sources from VHF/UHF to cable by using the V or v button. Although two pictures appear on the screen at the same time. Change the picture size by pressing ANT or TV/VIDEO to switch the video input. Using the Features Using Twin View™ Twin View enables you can also...

Operating Instructions
Page 52
... right picture (if not already activated). 2 Press V to enlarge the picture and v to reduce the picture. The next time you adjust the twin screen sizes, the LCD projection TV memorizes the change the size of the left and right pictures. To enlarge the right picture (reduce the left picture (if not already activated...
... right picture (if not already activated). 2 Press V to enlarge the picture and v to reduce the picture. The next time you adjust the twin screen sizes, the LCD projection TV memorizes the change the size of the left and right pictures. To enlarge the right picture (reduce the left picture (if not already activated...
Operating Instructions
Page 54
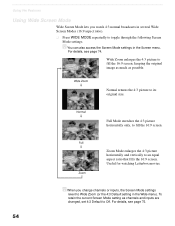
.... For details, see page 74. Full Mode stretches the 4:3 picture horizontally only, to an equal aspect ratio that fills the 16:9 screen. For details, see page 75. Normal returns the 4:3 picture to Wide Zoom (or the 4:3 Default setting in the Wide menu). Useful for ...movies. 54 z When you watch 4:3 normal broadcasts in several Wide Screen Modes (16:9 aspect ratio). ❑ Press WIDE MODE repeatedly to Off. Using the Features Using Wide Screen Mode Wide Screen Mode lets you change channels or inputs, the Screen Mode settings revert to its original size. Wide Zoom enlarges the ...
.... For details, see page 74. Full Mode stretches the 4:3 picture horizontally only, to an equal aspect ratio that fills the 16:9 screen. For details, see page 75. Normal returns the 4:3 picture to Wide Zoom (or the 4:3 Default setting in the Wide menu). Useful for ...movies. 54 z When you watch 4:3 normal broadcasts in several Wide Screen Modes (16:9 aspect ratio). ❑ Press WIDE MODE repeatedly to Off. Using the Features Using Wide Screen Mode Wide Screen Mode lets you change channels or inputs, the Screen Mode settings revert to its original size. Wide Zoom enlarges the ...

Operating Instructions
Page 60
... When you select a still image or movie from the Memory Stick Home (see "Memory Stick Home Menu Options" on page 65. on page 60. Still Image Index Menu Memory Stick Home Slide Show Options Filter : Still Select Folder Digi. To go back to select a slider. 3 Press... m. access additional options 2 Press . Mode Full Screen Slide Show Protect Rotate Startup Delete Close Still Image Index Menu 60 Move : Back : No : 123/1234 Size : 1024x768 Select : File : 100MSDCF/SJP0001.JPG Date : MAY/31/2003 1:08PM...
... When you select a still image or movie from the Memory Stick Home (see "Memory Stick Home Menu Options" on page 65. on page 60. Still Image Index Menu Memory Stick Home Slide Show Options Filter : Still Select Folder Digi. To go back to select a slider. 3 Press... m. access additional options 2 Press . Mode Full Screen Slide Show Protect Rotate Startup Delete Close Still Image Index Menu 60 Move : Back : No : 123/1234 Size : 1024x768 Select : File : 100MSDCF/SJP0001.JPG Date : MAY/31/2003 1:08PM...


