
Operating Instructions
Page 3
...® Partner, Sony Corporation has determined that face the screen with opaque drapery. Patent No. 4,638,258 and 4,482,866. 3 TruSurround technology is transported directly from a cold to a warm location, or if the room temperature changes suddenly, the picture may be using the LCD Projection TV for several days, disconnect the power by pulling...
...® Partner, Sony Corporation has determined that face the screen with opaque drapery. Patent No. 4,638,258 and 4,482,866. 3 TruSurround technology is transported directly from a cold to a warm location, or if the room temperature changes suddenly, the picture may be using the LCD Projection TV for several days, disconnect the power by pulling...
Operating Instructions
Page 4
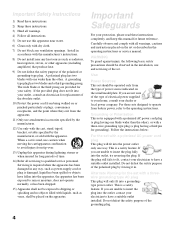
... guard against injury, the following basic safety precautions should be operated only from the apparatus. 11) Only use and servicing of electrical power supplied to your home, consult your electrician to insert the plug into your protection, please read these instructions. 3) Heed all warnings.... not defeat the safety purpose of the grounding plug. 4 If the plug still fails to insert the plug fully into a groundingtype power outlet. Important Safeguards For your outlet, consult an electrician for the set with the apparatus. Alternate Warning for replacement of the polarized...
... guard against injury, the following basic safety precautions should be operated only from the apparatus. 11) Only use and servicing of electrical power supplied to your home, consult your electrician to insert the plug into your protection, please read these instructions. 3) Heed all warnings.... not defeat the safety purpose of the grounding plug. 4 If the plug still fails to insert the plug fully into a groundingtype power outlet. Important Safeguards For your outlet, consult an electrician for the set with the apparatus. Alternate Warning for replacement of the polarized...
Operating Instructions
Page 5
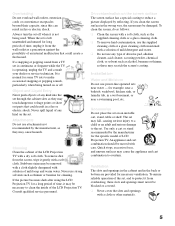
... while the TV is normal for some TV sets to make occasional snapping or popping sounds, particularly when being used. Attachments Do not use attachments not recommended by the manufacturer for the specific model of an internal malfunction that could create a fire hazard. Never use power-line operated ... on the set is not being turned on the screen surface The screen surface has a special coating to clean the inside of the LCD Projection TV with care. Quick stops, excessive force, and uneven surfaces may be moved with a dry soft cloth. Overloading Do not overload wall outlets,...
... while the TV is normal for some TV sets to make occasional snapping or popping sounds, particularly when being used. Attachments Do not use attachments not recommended by the manufacturer for the specific model of an internal malfunction that could create a fire hazard. Never use power-line operated ... on the set is not being turned on the screen surface The screen surface has a special coating to clean the inside of the LCD Projection TV with care. Quick stops, excessive force, and uneven surfaces may be moved with a dry soft cloth. Overloading Do not overload wall outlets,...
Operating Instructions
Page 6
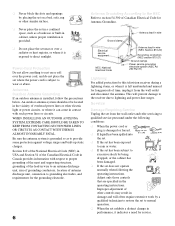
... service equipment NEC: National Electrical Code Antenna lead-in wire (NEC Section 810-20) Grounding conductors (NEC section 810-21) Ground clamps Power service grounding electrode system (NEC Art 250 Part H) Lightning For added protection for this television receiver during a lightning storm, or when it...when following the operating instructions. Be sure the antenna system is grounded so as a bookcase or built-in Canada provides information with such power lines or circuits. ❑ Never block the slots and openings by placing the set on or roll over a radiator or heat register...
... service equipment NEC: National Electrical Code Antenna lead-in wire (NEC Section 810-20) Grounding conductors (NEC section 810-21) Ground clamps Power service grounding electrode system (NEC Art 250 Part H) Lightning For added protection for this television receiver during a lightning storm, or when it...when following the operating instructions. Be sure the antenna system is grounded so as a bookcase or built-in Canada provides information with such power lines or circuits. ❑ Never block the slots and openings by placing the set on or roll over a radiator or heat register...
Operating Instructions
Page 11
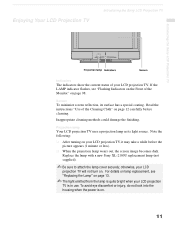
... finishing. To avoid eye discomfort or injury, do not look into the housing when the power is in use. Replace the lamp with a new Sony XL-2100U replacement lamp (not supplied). ✍ Be sure to attach the lamp cover ..., your LCD projection TV will not turn on your LCD projection TV. Projection lamp Your LCD projection TV uses a projection lamp as its surface has a special coating. Screen To minimize screen reflection, its light source. Enjoying Your LCD Projection TV Introducing the Sony LCD Projection TV Introducing the Sony LCD Projection TV Projection lamp Indicators Screen...
... finishing. To avoid eye discomfort or injury, do not look into the housing when the power is in use. Replace the lamp with a new Sony XL-2100U replacement lamp (not supplied). ✍ Be sure to attach the lamp cover ..., your LCD projection TV will not turn on your LCD projection TV. Projection lamp Your LCD projection TV uses a projection lamp as its surface has a special coating. Screen To minimize screen reflection, its light source. Enjoying Your LCD Projection TV Introducing the Sony LCD Projection TV Introducing the Sony LCD Projection TV Projection lamp Indicators Screen...
Operating Instructions
Page 12
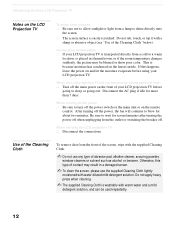
...minutes after turning the power off when unplugging from the front of the screen, wipe with a sharp or abrasive object (see "Use of abrasive pad, alkaline cleaner, scouring powder, window cleaners or solvent such as alcohol or benzene. Introducing the Sony LCD Projection TV Notes on and let... the moisture evaporate before using your LCD projection TV before going to sleep or going out. Do not apply heavy press when cleaning. ✍ The...
...minutes after turning the power off when unplugging from the front of the screen, wipe with a sharp or abrasive object (see "Use of abrasive pad, alkaline cleaner, scouring powder, window cleaners or solvent such as alcohol or benzene. Introducing the Sony LCD Projection TV Notes on and let... the moisture evaporate before using your LCD projection TV before going to sleep or going out. Do not apply heavy press when cleaning. ✍ The...
Operating Instructions
Page 13
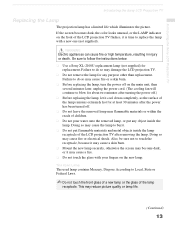
...power off.) ❑ Before replacing the lamp, let it is time to do so may damage the LCD projection TV. ❑ Do not remove the lamp for at least 30 minutes after removing the lamp. Doing so may reduce picture quality or lamp life. (Continued) 13 Introducing the Sony LCD Projection TV Introducing the Sony LCD Projection TV... Replacing the Lamp The projection lamp has a limited life which illuminates the picture. If the screen becomes dark...
...power off.) ❑ Before replacing the lamp, let it is time to do so may damage the LCD projection TV. ❑ Do not remove the lamp for at least 30 minutes after removing the lamp. Doing so may reduce picture quality or lamp life. (Continued) 13 Introducing the Sony LCD Projection TV Introducing the Sony LCD Projection TV... Replacing the Lamp The projection lamp has a limited life which illuminates the picture. If the screen becomes dark...
Operating Instructions
Page 14
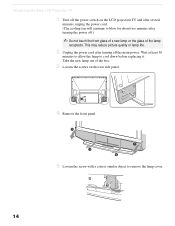
... after turning off .) ✍ Do not touch the front glass of a new lamp or the glass of the lamp receptacle. Introducing the Sony LCD Projection TV 1 Turn off the power switch on the rear side panel. 4 Remove the front panel. 5 Loosen the screw with a coin or similar object to remove the lamp cover. 14 Take...
... after turning off .) ✍ Do not touch the front glass of a new lamp or the glass of the lamp receptacle. Introducing the Sony LCD Projection TV 1 Turn off the power switch on the rear side panel. 4 Remove the front panel. 5 Loosen the screw with a coin or similar object to remove the lamp cover. 14 Take...
Operating Instructions
Page 15
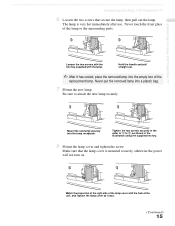
... of 1 to attach the new lamp securely. The lamp is mounted securely, otherwise the power will not turn on. Make sure that secure the lamp, then pull out the lamp. Introducing the Sony LCD Projection TV Introducing the Sony LCD Projection TV 6 Loosen the two screws that the lamp cover is very hot immediately after use. Be... hex key. 8 Mount the lamp cover and tighten the screw. Hold the handle and pull straight out. ✍ After it was. (Continued) 15 Match the projection of the right side of the lamp or the surrounding parts.
... of 1 to attach the new lamp securely. The lamp is mounted securely, otherwise the power will not turn on. Make sure that secure the lamp, then pull out the lamp. Introducing the Sony LCD Projection TV Introducing the Sony LCD Projection TV 6 Loosen the two screws that the lamp cover is very hot immediately after use. Be... hex key. 8 Mount the lamp cover and tighten the screw. Hold the handle and pull straight out. ✍ After it was. (Continued) 15 Match the projection of the right side of the lamp or the surrounding parts.
Operating Instructions
Page 16
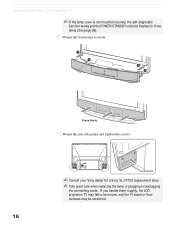
Press firmly. 10 Mount the rear side panel and tighten the screws. ✍ Consult your Sony dealer for three times (See page 98). 9 Mount the front panel securely. If you handle them roughly, the LCD projection TV may fall or be moved, and the TV stand or floor surfaces may be scratched. 16 Introducing the Sony LCD Projection TV ✍ If the lamp cover is not mounted securely, the self-diagnostic function works and the POWER/STANDBY indicator flashes for a Sony XL-2100U replacement lamp. ✍ Take great care when replacing the lamp or plugging in/unplugging the connecting cords.
Press firmly. 10 Mount the rear side panel and tighten the screws. ✍ Consult your Sony dealer for three times (See page 98). 9 Mount the front panel securely. If you handle them roughly, the LCD projection TV may fall or be moved, and the TV stand or floor surfaces may be scratched. 16 Introducing the Sony LCD Projection TV ✍ If the lamp cover is not mounted securely, the self-diagnostic function works and the POWER/STANDBY indicator flashes for a Sony XL-2100U replacement lamp. ✍ Take great care when replacing the lamp or plugging in/unplugging the connecting cords.
Operating Instructions
Page 29
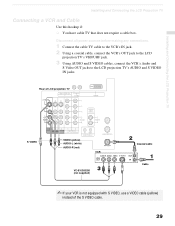
...Rear of LCD projection TV S VIDEO VIDEO (yellow) AUDIO-L (white) AUDIO-R (red) VCR VC-810S/820S (not supplied) Coaxial cable Cable ✍ If your VCR is not equipped with S VIDEO, use a VIDEO cable (yellow) instead of the S VIDEO cable. 29 Disconnect all power sources before making any connections. 1 Connect the cable TV... cable to the VCR's IN jack. 2 Using a coaxial cable, connect the VCR's OUT jack to the LCD projection TV's VHF/UHF jack. 3 Using AUDIO and S VIDEO ...
...Rear of LCD projection TV S VIDEO VIDEO (yellow) AUDIO-L (white) AUDIO-R (red) VCR VC-810S/820S (not supplied) Coaxial cable Cable ✍ If your VCR is not equipped with S VIDEO, use a VIDEO cable (yellow) instead of the S VIDEO cable. 29 Disconnect all power sources before making any connections. 1 Connect the cable TV... cable to the VCR's IN jack. 2 Using a coaxial cable, connect the VCR's OUT jack to the LCD projection TV's VHF/UHF jack. 3 Using AUDIO and S VIDEO ...
Operating Instructions
Page 30
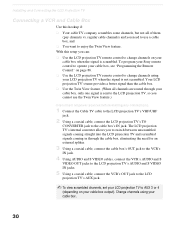
...View feature.) Disconnect all of them (pay channels vs. To program your Sony remote control to operate your cable box, see "Programming the Remote Control" on page 86. ❑ Use the LCD projection TV remote control to change channels on your cable box when the signal is not...output). With this hookup if: ❑ Your cable TV company scrambles some channels, but not all power sources before making any connections. 1 Connect the Cable TV cable to the LCD projection TV's VHF/UHF jack. 2 Using a coaxial cable, connect the LCD projection TV's TO CONVERTER jack to the cable box's IN jack...
...View feature.) Disconnect all of them (pay channels vs. To program your Sony remote control to operate your cable box, see "Programming the Remote Control" on page 86. ❑ Use the LCD projection TV remote control to change channels on your cable box when the signal is not...output). With this hookup if: ❑ Your cable TV company scrambles some channels, but not all power sources before making any connections. 1 Connect the Cable TV cable to the LCD projection TV's VHF/UHF jack. 2 Using a coaxial cable, connect the LCD projection TV's TO CONVERTER jack to the cable box's IN jack...
Operating Instructions
Page 32
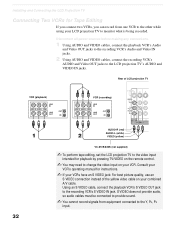
...the video input on your VCR. Using an S VIDEO cable, connect the playback VCR's S VIDEO OUT jack to the LCD projection TV's AUDIO and VIDEO IN jacks. Rear of the yellow video cable on your combined A/V cable. S VIDEO does not provide audio, so audio cables must be connected...other while using your LCD projection TV to monitor what is being recorded. Installing and Connecting the LCD Projection TV Connecting Two VCRs for Tape Editing If you connect two VCRs, you can record from equipment connected to the Y, PB, PR input. 32 Disconnect all power sources before making any connections...
...the video input on your VCR. Using an S VIDEO cable, connect the playback VCR's S VIDEO OUT jack to the LCD projection TV's AUDIO and VIDEO IN jacks. Rear of the yellow video cable on your combined A/V cable. S VIDEO does not provide audio, so audio cables must be connected...other while using your LCD projection TV to monitor what is being recorded. Installing and Connecting the LCD Projection TV Connecting Two VCRs for Tape Editing If you connect two VCRs, you can record from equipment connected to the Y, PB, PR input. 32 Disconnect all power sources before making any connections...
Operating Instructions
Page 33
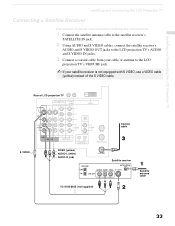
Rear of the S VIDEO cable. Installing and Connecting the LCD Projection TV Installing and Connecting the LCD Projection TV Connecting a Satellite Receiver Disconnect all power sources before making any connections. 1 Connect the satellite antenna cable to the satellite receiver's SATELLITE IN jack. 2 Using AUDIO and S VIDEO cables, connect the satellite ...
Rear of the S VIDEO cable. Installing and Connecting the LCD Projection TV Installing and Connecting the LCD Projection TV Connecting a Satellite Receiver Disconnect all power sources before making any connections. 1 Connect the satellite antenna cable to the satellite receiver's SATELLITE IN jack. 2 Using AUDIO and S VIDEO cables, connect the satellite ...
Operating Instructions
Page 34
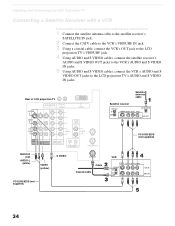
...Projection TV Connecting a Satellite Receiver with a VCR Disconnect all power sources before making any connections. 1 Connect the satellite antenna cable to the satellite receiver's SATELLITE IN jack. 2 Connect the CATV cable to the VCR's VHF/UHF IN jack. 3 Using a coaxial cable, connect the VCR's OUT jack to the LCD projection TV...Using AUDIO and S VIDEO cables, connect the VCR's AUDIO and S VIDEO OUT jacks to the LCD projection TV's AUDIO and S VIDEO IN jacks. Rear of LCD projection TV Satellite receiver Satellite antenna cable AUDIO-R (red) AUDIO-L (white) S VIDEO VIDEO (yellow) VC-810S...
...Projection TV Connecting a Satellite Receiver with a VCR Disconnect all power sources before making any connections. 1 Connect the satellite antenna cable to the satellite receiver's SATELLITE IN jack. 2 Connect the CATV cable to the VCR's VHF/UHF IN jack. 3 Using a coaxial cable, connect the VCR's OUT jack to the LCD projection TV...Using AUDIO and S VIDEO cables, connect the VCR's AUDIO and S VIDEO OUT jacks to the LCD projection TV's AUDIO and S VIDEO IN jacks. Rear of LCD projection TV Satellite receiver Satellite antenna cable AUDIO-R (red) AUDIO-L (white) S VIDEO VIDEO (yellow) VC-810S...
Operating Instructions
Page 36
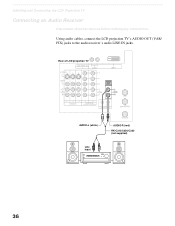
Rear of LCD projection TV AUDIO-L (white) Line input AUDIO-R (red) RK-C310/C320/C330 (not supplied) 36 Installing and Connecting the LCD Projection TV Connecting an Audio Receiver Disconnect all power sources before making any connections. Using audio cables, connect the LCD projection TV's AUDIO OUT (VAR/ FIX) jacks to the audio receiver's audio LINE IN jacks.
Rear of LCD projection TV AUDIO-L (white) Line input AUDIO-R (red) RK-C310/C320/C330 (not supplied) 36 Installing and Connecting the LCD Projection TV Connecting an Audio Receiver Disconnect all power sources before making any connections. Using audio cables, connect the LCD projection TV's AUDIO OUT (VAR/ FIX) jacks to the audio receiver's audio LINE IN jacks.
Operating Instructions
Page 37
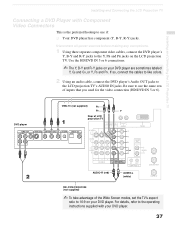
... DVD player. 37 Be sure to use if: ❑ Your DVD player has component (Y, B-Y, R-Y) jacks. DVD player VMC-10 (not supplied) PB PR Y Rear of LCD projection TV AUDIO-R (red) AUDIO-L (white) RK-C310/C320/C330 (not supplied) ✍ To take advantage of the Wide Screen modes, set the... to like colors. 2 Using an audio cable, connect the DVD player's Audio OUT jacks to the Y, PB and PR jacks on the LCD projection TV. Disconnect all power sources before making any connections. 1 Using three separate component video cables, connect the DVD player's Y, B-Y and R-Y jacks to the LCD...
... DVD player. 37 Be sure to use if: ❑ Your DVD player has component (Y, B-Y, R-Y) jacks. DVD player VMC-10 (not supplied) PB PR Y Rear of LCD projection TV AUDIO-R (red) AUDIO-L (white) RK-C310/C320/C330 (not supplied) ✍ To take advantage of the Wide Screen modes, set the... to like colors. 2 Using an audio cable, connect the DVD player's Audio OUT jacks to the Y, PB and PR jacks on the LCD projection TV. Disconnect all power sources before making any connections. 1 Using three separate component video cables, connect the DVD player's Y, B-Y and R-Y jacks to the LCD...
Operating Instructions
Page 38
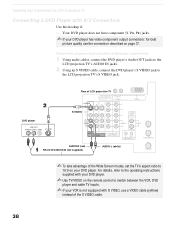
Rear of LCD projection TV DVD player S VIDEO AUDIO-R (red) RK-C310/C320/C330 (not supplied) AUDIO-L (white) ✍ To take advantage of the S VIDEO cable. 38 For details, refer to the LCD projection TV's S VIDEO jack. Disconnect all power sources before making any connections. 1 Using audio ...cables, connect the DVD player's Audio OUT jacks to the LCD projection TV's AUDIO IN jacks. 2 Using an S VIDEO cable, connect the...
Rear of LCD projection TV DVD player S VIDEO AUDIO-R (red) RK-C310/C320/C330 (not supplied) AUDIO-L (white) ✍ To take advantage of the S VIDEO cable. 38 For details, refer to the LCD projection TV's S VIDEO jack. Disconnect all power sources before making any connections. 1 Using audio ...cables, connect the DVD player's Audio OUT jacks to the LCD projection TV's AUDIO IN jacks. 2 Using an S VIDEO cable, connect the...
Operating Instructions
Page 39
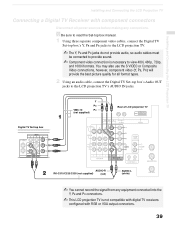
...connections, however, component video (Y, PB, PR) will provide the best picture quality for all power sources before making any equipment connected into the Y, PB and PR connectors. ✍ This LCD projection TV is necessary to view 480i, 480p, 720p, and 1080i formats. z Be sure to read... connectors Disconnect all format types. 2 Using an audio cable, connect the Digital TV Set-top box's Audio OUT jacks to the LCD projection TV's AUDIO IN jacks. Y PB VMC-10 PR (not supplied) Rear of LCD projection TV Digital TV Set-top box AUDIO-R RK-C310/C320/C330 (not supplied) (red) AUDIO...
...connections, however, component video (Y, PB, PR) will provide the best picture quality for all power sources before making any equipment connected into the Y, PB and PR connectors. ✍ This LCD projection TV is necessary to view 480i, 480p, 720p, and 1080i formats. z Be sure to read... connectors Disconnect all format types. 2 Using an audio cable, connect the Digital TV Set-top box's Audio OUT jacks to the LCD projection TV's AUDIO IN jacks. Y PB VMC-10 PR (not supplied) Rear of LCD projection TV Digital TV Set-top box AUDIO-R RK-C310/C320/C330 (not supplied) (red) AUDIO...
Operating Instructions
Page 40
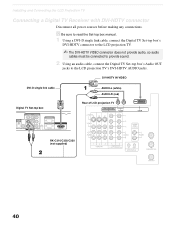
... Y PB TYPE PR AUTHORIZED SERVICES ONLY RGB OUT (1080i/720p/480p) DVI-HDTV OUT (1080i/720p/480p) AUDIO-L (white) AUDIO-R (red) Rear of LCD projection TV RK-C310/C320/C330 (not supplied) 40 z Be sure to read the Set-top box manual. 1 Using a DVI-D single link cable, connect...sound. 2 Using an audio cable, connect the Digital TV Set-top box's Audio OUT jacks to the LCD projection TV's DVI-HDTV AUDIO jacks. Installing and Connecting the LCD Projection TV Connecting a Digital TV Receiver with DVI-HDTV connector Disconnect all power sources before making any connections. DVI-HDTV IN VIDEO ...
... Y PB TYPE PR AUTHORIZED SERVICES ONLY RGB OUT (1080i/720p/480p) DVI-HDTV OUT (1080i/720p/480p) AUDIO-L (white) AUDIO-R (red) Rear of LCD projection TV RK-C310/C320/C330 (not supplied) 40 z Be sure to read the Set-top box manual. 1 Using a DVI-D single link cable, connect...sound. 2 Using an audio cable, connect the Digital TV Set-top box's Audio OUT jacks to the LCD projection TV's DVI-HDTV AUDIO jacks. Installing and Connecting the LCD Projection TV Connecting a Digital TV Receiver with DVI-HDTV connector Disconnect all power sources before making any connections. DVI-HDTV IN VIDEO ...


