
Operating Instructions
Page 3
...Sony Corporation has determined that face the screen with opaque drapery. If you are trademarks of BBE Sound, Inc. TruSurround, SRS and the ( )® symbol are unable to fit into the outlet, contact your dealer. ❑ If any liquid or solid object should fall inside the cabinet, unplug the LCD Projection TV... immediately and have it further. ❑ If you will not be blurred or show poor color. Patent No. 4,638,258 and 4,482,866. 3 In this product meets the ENERGY STAR® guidelines for several days, disconnect the power by BBE Sound,...
...Sony Corporation has determined that face the screen with opaque drapery. If you are trademarks of BBE Sound, Inc. TruSurround, SRS and the ( )® symbol are unable to fit into the outlet, contact your dealer. ❑ If any liquid or solid object should fall inside the cabinet, unplug the LCD Projection TV... immediately and have it further. ❑ If you will not be blurred or show poor color. Patent No. 4,638,258 and 4,482,866. 3 In this product meets the ENERGY STAR® guidelines for several days, disconnect the power by BBE Sound,...
Operating Instructions
Page 4
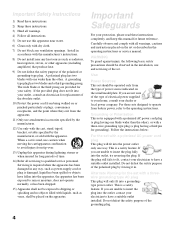
...safety feature. A polarized plug has two blades with dry cloth. 7) Do not block any ventilation openings. This is a safety feature. Use Power Sources This set should be operated only from tip-over. 13) Unplug this apparatus during lightning storms or when unused for the set or described... in . Alternate Warning for long periods of power source indicated on the set with liquids, such as radiators, heat registers, stoves, or other . A grounding type plug has two blades ...
...safety feature. A polarized plug has two blades with dry cloth. 7) Do not block any ventilation openings. This is a safety feature. Use Power Sources This set should be operated only from tip-over. 13) Unplug this apparatus during lightning storms or when unused for the set or described... in . Alternate Warning for long periods of power source indicated on the set with liquids, such as radiators, heat registers, stoves, or other . A grounding type plug has two blades ...
Operating Instructions
Page 5
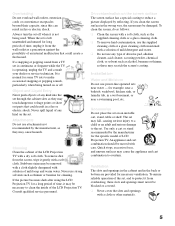
... the screen with a soft cloth, such as the supplied cleaning cloth or a glass cleaning cloth. ❑ To remove hard contamination, use power-line operated sets near a swimming pool, etc. Installation Water and Moisture Do not use the supplied cleaning cloth or a glass cleaning cloth moistened...that could create a fire hazard. Never spill liquid of the LCD Projection TV. To remove dust from a TV set may be blocked or covered. ❑ Never cover the slots and openings with solution of the LCD Projection TV with a soft cloth. When the set through the cabinet slots ...
... the screen with a soft cloth, such as the supplied cleaning cloth or a glass cleaning cloth. ❑ To remove hard contamination, use power-line operated sets near a swimming pool, etc. Installation Water and Moisture Do not use the supplied cleaning cloth or a glass cleaning cloth moistened...that could create a fire hazard. Never spill liquid of the LCD Projection TV. To remove dust from a TV set may be blocked or covered. ❑ Never cover the slots and openings with solution of the LCD Projection TV with a soft cloth. When the set through the cabinet slots ...
Operating Instructions
Page 6
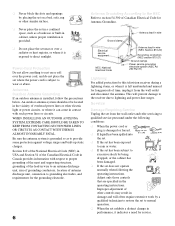
.... Section 810 of the National Electrical Code (NEC) in USA and Section 54 of the Canadian Electrical Code in Canada provides information with such power lines or circuits. Service Damage Requiring Service Unplug the set does not operate normally when following conditions: ❑ When the... exposed to rain or water. ❑ If the set has been subject to excessive shock by a qualified technician to restore the set where the power cord is left unattended and unused for this television receiver during a lightning storm, or when it from the wall outlet and refer servicing to wear...
.... Section 810 of the National Electrical Code (NEC) in USA and Section 54 of the Canadian Electrical Code in Canada provides information with such power lines or circuits. Service Damage Requiring Service Unplug the set does not operate normally when following conditions: ❑ When the... exposed to rain or water. ❑ If the set has been subject to excessive shock by a qualified technician to restore the set where the power cord is left unattended and unused for this television receiver during a lightning storm, or when it from the wall outlet and refer servicing to wear...
Operating Instructions
Page 11
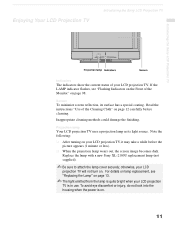
... avoid eye discomfort or injury, do not look into the housing when the power is quite bright when your LCD projection TV, it may take a while before cleaning. Inappropriate cleaning methods could damage the finishing. Replace the lamp with a new Sony XL-2100U replacement lamp (not supplied). ✍ Be sure to attach the lamp...
... avoid eye discomfort or injury, do not look into the housing when the power is quite bright when your LCD projection TV, it may take a while before cleaning. Inappropriate cleaning methods could damage the finishing. Replace the lamp with a new Sony XL-2100U replacement lamp (not supplied). ✍ Be sure to attach the lamp...
Operating Instructions
Page 12
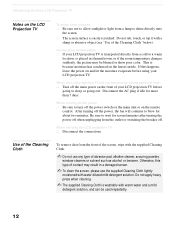
... or solvent such as alcohol or benzene. When the LCD projection TV will continue to blow for a long period of time ❑ Turn off the main power on the front of your LCD projection TV is because moisture has condensed on and let the moisture evaporate...power on the lenses inside. On moisture condensation ❑ If your LCD projection TV before using your LCD projection TV. Use of the Cleaning Cloth To remove dust from a cold to a warm location, is easily scratched. Be sure to wait for more than 7 days. Introducing the Sony LCD Projection TV Notes on the LCD Projection TV...
... or solvent such as alcohol or benzene. When the LCD projection TV will continue to blow for a long period of time ❑ Turn off the main power on the front of your LCD projection TV is because moisture has condensed on and let the moisture evaporate...power on the lenses inside. On moisture condensation ❑ If your LCD projection TV before using your LCD projection TV. Use of the Cleaning Cloth To remove dust from a cold to a warm location, is easily scratched. Be sure to wait for more than 7 days. Introducing the Sony LCD Projection TV Notes on the LCD Projection TV...
Operating Instructions
Page 13
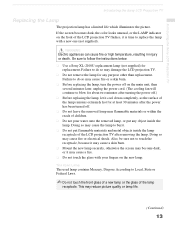
...metal objects inside the lamp. Failure to follow the instructions below. ❑ Use a Sony XL-2100U replacement lamp (not supplied) for any object inside the lamp receptacle of the LCD projection TV after the power has been turned off. ❑ Do not leave the removed lamp near flammable materials or...lamp contains Mercury, Dispose According to replace the lamp with your fingers on the front of the lamp receptacle. Introducing the Sony LCD Projection TV Introducing the Sony LCD Projection TV Replacing the Lamp The projection lamp has a limited life which illuminates the picture.
...metal objects inside the lamp. Failure to follow the instructions below. ❑ Use a Sony XL-2100U replacement lamp (not supplied) for any object inside the lamp receptacle of the LCD projection TV after the power has been turned off. ❑ Do not leave the removed lamp near flammable materials or...lamp contains Mercury, Dispose According to replace the lamp with your fingers on the front of the lamp receptacle. Introducing the Sony LCD Projection TV Introducing the Sony LCD Projection TV Replacing the Lamp The projection lamp has a limited life which illuminates the picture.
Operating Instructions
Page 14
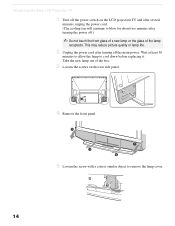
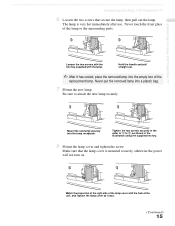
.... Wait at least 30 minutes to allow the lamp to blow for about two minutes after turning off the main power. Introducing the Sony LCD Projection TV 1 Turn off the power switch on the rear side panel. 4 Remove the front panel. 5 Loosen the screw with a coin or similar object to remove the... lamp cover. 14 This may reduce picture quality or lamp life. 2 Unplug the power cord after turning the power off.) ✍ Do ...
.... Wait at least 30 minutes to allow the lamp to blow for about two minutes after turning off the main power. Introducing the Sony LCD Projection TV 1 Turn off the power switch on the rear side panel. 4 Remove the front panel. 5 Loosen the screw with a coin or similar object to remove the... lamp cover. 14 This may reduce picture quality or lamp life. 2 Unplug the power cord after turning the power off.) ✍ Do ...
Operating Instructions
Page 15
... into the empty box of the lamp or the surrounding parts. Introducing the Sony LCD Projection TV Introducing the Sony LCD Projection TV 6 Loosen the two screws that the lamp cover is very hot immediately after use. The lamp is mounted securely, otherwise the power will not turn on. Never put the removed lamp into the lamp...
... into the empty box of the lamp or the surrounding parts. Introducing the Sony LCD Projection TV Introducing the Sony LCD Projection TV 6 Loosen the two screws that the lamp cover is very hot immediately after use. The lamp is mounted securely, otherwise the power will not turn on. Never put the removed lamp into the lamp...
Operating Instructions
Page 16
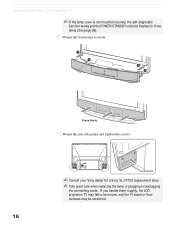
Press firmly. 10 Mount the rear side panel and tighten the screws. ✍ Consult your Sony dealer for three times (See page 98). 9 Mount the front panel securely. If you handle them roughly, the LCD projection TV may fall or be moved, and the TV stand or floor surfaces may be scratched. 16 Introducing the Sony LCD Projection TV ✍ If the lamp cover is not mounted securely, the self-diagnostic function works and the POWER/STANDBY indicator flashes for a Sony XL-2100U replacement lamp. ✍ Take great care when replacing the lamp or plugging in/unplugging the connecting cords.
Press firmly. 10 Mount the rear side panel and tighten the screws. ✍ Consult your Sony dealer for three times (See page 98). 9 Mount the front panel securely. If you handle them roughly, the LCD projection TV may fall or be moved, and the TV stand or floor surfaces may be scratched. 16 Introducing the Sony LCD Projection TV ✍ If the lamp cover is not mounted securely, the self-diagnostic function works and the POWER/STANDBY indicator flashes for a Sony XL-2100U replacement lamp. ✍ Take great care when replacing the lamp or plugging in/unplugging the connecting cords.
Operating Instructions
Page 29
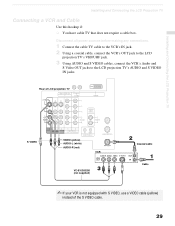
...a cable box. Rear of LCD projection TV S VIDEO VIDEO (yellow) AUDIO-L (white) AUDIO-R (red) VCR VC-810S/820S (not supplied) Coaxial cable Cable ✍ If your VCR is not equipped with S VIDEO, use a VIDEO cable (yellow) instead of the S VIDEO cable. 29 Disconnect all power sources before making... any connections. 1 Connect the cable TV cable to the VCR's IN jack. 2 Using a coaxial cable, connect the VCR's OUT jack to the LCD projection TV's VHF/UHF jack. 3 Using AUDIO and S VIDEO cables, connect...
...a cable box. Rear of LCD projection TV S VIDEO VIDEO (yellow) AUDIO-L (white) AUDIO-R (red) VCR VC-810S/820S (not supplied) Coaxial cable Cable ✍ If your VCR is not equipped with S VIDEO, use a VIDEO cable (yellow) instead of the S VIDEO cable. 29 Disconnect all power sources before making... any connections. 1 Connect the cable TV cable to the VCR's IN jack. 2 Using a coaxial cable, connect the VCR's OUT jack to the LCD projection TV's VHF/UHF jack. 3 Using AUDIO and S VIDEO cables, connect...
Operating Instructions
Page 30
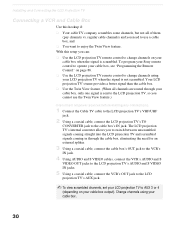
...this hookup if: ❑ Your cable TV company scrambles some channels, but not all power sources before making any connections. 1 Connect the Cable TV cable to the LCD projection TV's VHF/UHF jack. 2 Using a coaxial cable, connect the LCD projection TV's TO CONVERTER jack to change channels using... your cable box when the signal is not scrambled. To program your Sony remote...
...this hookup if: ❑ Your cable TV company scrambles some channels, but not all power sources before making any connections. 1 Connect the Cable TV cable to the LCD projection TV's VHF/UHF jack. 2 Using a coaxial cable, connect the LCD projection TV's TO CONVERTER jack to change channels using... your cable box when the signal is not scrambled. To program your Sony remote...
Operating Instructions
Page 32
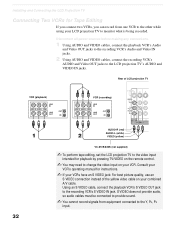
...; To perform tape editing, set the LCD projection TV to the video input intended for playback by pressing TV/VIDEO on the remote control. ✍ You may need to change the video input on your combined A/V cable. Disconnect all power sources before making any connections. 1 Using AUDIO... and VIDEO cables, connect the playback VCR's Audio and Video OUT jacks to the recording VCR's Audio and Video IN jacks. 2 Using AUDIO and VIDEO cables, connect the recording VCR's AUDIO and Video OUT jacks to the recording VCR's S VIDEO IN jack. Rear...
...; To perform tape editing, set the LCD projection TV to the video input intended for playback by pressing TV/VIDEO on the remote control. ✍ You may need to change the video input on your combined A/V cable. Disconnect all power sources before making any connections. 1 Using AUDIO... and VIDEO cables, connect the playback VCR's Audio and Video OUT jacks to the recording VCR's Audio and Video IN jacks. 2 Using AUDIO and VIDEO cables, connect the recording VCR's AUDIO and Video OUT jacks to the recording VCR's S VIDEO IN jack. Rear...
Operating Instructions
Page 33
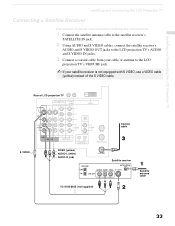
...Projection TV Installing and Connecting the LCD Projection TV Connecting a Satellite Receiver Disconnect all power sources before making any connections. 1 Connect the satellite antenna cable to the satellite receiver's SATELLITE IN jack. 2 Using AUDIO and S VIDEO cables, connect the satellite receiver's AUDIO and S VIDEO OUT jacks to the LCD projection TV... from your cable or antenna to the LCD projection TV's VHF/UHF jack. ✍ If your satellite receiver is not equipped with S VIDEO, use a VIDEO cable (yellow) instead of LCD projection TV S VIDEO Coaxial cable VIDEO (yellow) AUDIO-L...
...Projection TV Installing and Connecting the LCD Projection TV Connecting a Satellite Receiver Disconnect all power sources before making any connections. 1 Connect the satellite antenna cable to the satellite receiver's SATELLITE IN jack. 2 Using AUDIO and S VIDEO cables, connect the satellite receiver's AUDIO and S VIDEO OUT jacks to the LCD projection TV... from your cable or antenna to the LCD projection TV's VHF/UHF jack. ✍ If your satellite receiver is not equipped with S VIDEO, use a VIDEO cable (yellow) instead of LCD projection TV S VIDEO Coaxial cable VIDEO (yellow) AUDIO-L...
Operating Instructions
Page 34
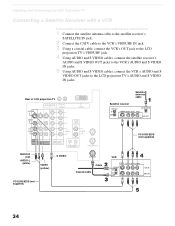
...Projection TV Connecting a Satellite Receiver with a VCR Disconnect all power sources before making any connections. 1 Connect the satellite antenna cable to the satellite receiver's SATELLITE IN jack. 2 Connect the CATV cable to the VCR's VHF/UHF IN jack. 3 Using a coaxial cable, connect the VCR's OUT jack to the LCD projection TV...Using AUDIO and S VIDEO cables, connect the VCR's AUDIO and S VIDEO OUT jacks to the LCD projection TV's AUDIO and S VIDEO IN jacks. Rear of LCD projection TV Satellite receiver Satellite antenna cable AUDIO-R (red) AUDIO-L (white) S VIDEO VIDEO (yellow) VC-810S...
...Projection TV Connecting a Satellite Receiver with a VCR Disconnect all power sources before making any connections. 1 Connect the satellite antenna cable to the satellite receiver's SATELLITE IN jack. 2 Connect the CATV cable to the VCR's VHF/UHF IN jack. 3 Using a coaxial cable, connect the VCR's OUT jack to the LCD projection TV...Using AUDIO and S VIDEO cables, connect the VCR's AUDIO and S VIDEO OUT jacks to the LCD projection TV's AUDIO and S VIDEO IN jacks. Rear of LCD projection TV Satellite receiver Satellite antenna cable AUDIO-R (red) AUDIO-L (white) S VIDEO VIDEO (yellow) VC-810S...
Operating Instructions
Page 36
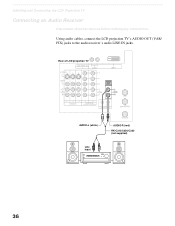
Installing and Connecting the LCD Projection TV Connecting an Audio Receiver Disconnect all power sources before making any connections. Using audio cables, connect the LCD projection TV's AUDIO OUT (VAR/ FIX) jacks to the audio receiver's audio LINE IN jacks. Rear of LCD projection TV AUDIO-L (white) Line input AUDIO-R (red) RK-C310/C320/C330 (not supplied) 36
Installing and Connecting the LCD Projection TV Connecting an Audio Receiver Disconnect all power sources before making any connections. Using audio cables, connect the LCD projection TV's AUDIO OUT (VAR/ FIX) jacks to the audio receiver's audio LINE IN jacks. Rear of LCD projection TV AUDIO-L (white) Line input AUDIO-R (red) RK-C310/C320/C330 (not supplied) 36
Operating Instructions
Page 37
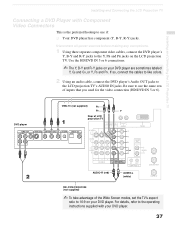
... player. 37 Use the HD/DVD IN 5 or 6 connections. ✍ The Y, B-Y and R-Y jacks on the LCD projection TV. DVD player VMC-10 (not supplied) PB PR Y Rear of LCD projection TV AUDIO-R (red) AUDIO-L (white) RK-C310/C320/C330 (not supplied) ✍ To take advantage of inputs that you... cable, connect the DVD player's Audio OUT jacks to the Y, PB and PR jacks on your DVD player. Disconnect all power sources before making any connections. 1 Using three separate component video cables, connect the DVD player's Y, B-Y and R-Y jacks to the LCD projection TV's AUDIO IN jacks.
... player. 37 Use the HD/DVD IN 5 or 6 connections. ✍ The Y, B-Y and R-Y jacks on the LCD projection TV. DVD player VMC-10 (not supplied) PB PR Y Rear of LCD projection TV AUDIO-R (red) AUDIO-L (white) RK-C310/C320/C330 (not supplied) ✍ To take advantage of inputs that you... cable, connect the DVD player's Audio OUT jacks to the Y, PB and PR jacks on your DVD player. Disconnect all power sources before making any connections. 1 Using three separate component video cables, connect the DVD player's Y, B-Y and R-Y jacks to the LCD projection TV's AUDIO IN jacks.
Operating Instructions
Page 38
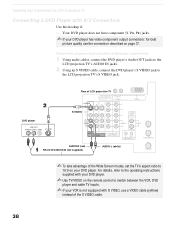
Rear of LCD projection TV DVD player S VIDEO AUDIO-R (red) RK-C310/C320/C330 (not supplied) AUDIO-L (white) ✍ To take advantage of the S VIDEO cable. 38 For details, refer to the LCD projection TV's S VIDEO jack. Disconnect all power sources before making any connections. 1 Using audio ...cables, connect the DVD player's Audio OUT jacks to the LCD projection TV's AUDIO IN jacks. 2 Using an S VIDEO cable, connect the...
Rear of LCD projection TV DVD player S VIDEO AUDIO-R (red) RK-C310/C320/C330 (not supplied) AUDIO-L (white) ✍ To take advantage of the S VIDEO cable. 38 For details, refer to the LCD projection TV's S VIDEO jack. Disconnect all power sources before making any connections. 1 Using audio ...cables, connect the DVD player's Audio OUT jacks to the LCD projection TV's AUDIO IN jacks. 2 Using an S VIDEO cable, connect the...
Operating Instructions
Page 39
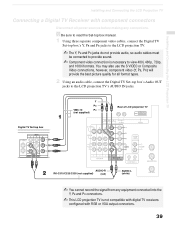
..., PR) will provide the best picture quality for all power sources before making any equipment connected into the Y, PB and PR connectors. ✍ This LCD projection TV is necessary to the LCD projection TV's AUDIO IN jacks. Y PB VMC-10 PR (not supplied) Rear of LCD projection TV Digital TV Set-top box AUDIO-R RK-C310/C320/C330 (not...
..., PR) will provide the best picture quality for all power sources before making any equipment connected into the Y, PB and PR connectors. ✍ This LCD projection TV is necessary to the LCD projection TV's AUDIO IN jacks. Y PB VMC-10 PR (not supplied) Rear of LCD projection TV Digital TV Set-top box AUDIO-R RK-C310/C320/C330 (not...
Operating Instructions
Page 40
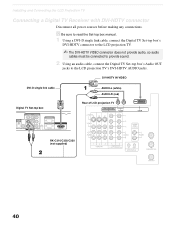
Installing and Connecting the LCD Projection TV Connecting a Digital TV Receiver with DVI-HDTV connector Disconnect all power sources before making any connections. DVI-HDTV IN VIDEO DVI-D single link cable Digital TV Set-top box OPTICAL AUDIO OUT VIDEO OUT (480i) 1 2 L1 L2 OPTICAL S. z Be sure to read the Set-... to the LCD projection TV's DVI-HDTV AUDIO jacks. VIDEO R1 R2 AUDIO OUT VIDEO OUT (1080i/720p/480p) Y PB TYPE PR AUTHORIZED SERVICES ONLY RGB OUT (1080i/720p/480p) DVI-HDTV OUT (1080i/720p/480p) AUDIO-L (white) AUDIO-R (red) Rear of LCD projection TV RK-C310/C320/...
Installing and Connecting the LCD Projection TV Connecting a Digital TV Receiver with DVI-HDTV connector Disconnect all power sources before making any connections. DVI-HDTV IN VIDEO DVI-D single link cable Digital TV Set-top box OPTICAL AUDIO OUT VIDEO OUT (480i) 1 2 L1 L2 OPTICAL S. z Be sure to read the Set-... to the LCD projection TV's DVI-HDTV AUDIO jacks. VIDEO R1 R2 AUDIO OUT VIDEO OUT (1080i/720p/480p) Y PB TYPE PR AUTHORIZED SERVICES ONLY RGB OUT (1080i/720p/480p) DVI-HDTV OUT (1080i/720p/480p) AUDIO-L (white) AUDIO-R (red) Rear of LCD projection TV RK-C310/C320/...


