Operating Instructions
Page 4
... Safety Instructions 1) Read these instructions. 2) Keep these instructions completely, and keep this apparatus near any way, such as power-supply cord or plug is used, use caution when moving the cart/apparatus combination to avoid injury from the apparatus. 11) ... or grounding-type plug. A grounding type plug has two blades and a third grounding prong. Do not defeat the safety purpose of electrical power supplied to your home, consult your outlet, consult an electrician for your electrician to dripping or splashing and no objects filled with the manufacturer's instructions...
... Safety Instructions 1) Read these instructions. 2) Keep these instructions completely, and keep this apparatus near any way, such as power-supply cord or plug is used, use caution when moving the cart/apparatus combination to avoid injury from the apparatus. 11) ... or grounding-type plug. A grounding type plug has two blades and a third grounding prong. Do not defeat the safety purpose of electrical power supplied to your home, consult your outlet, consult an electrician for your electrician to dripping or splashing and no objects filled with the manufacturer's instructions...
Operating Instructions
Page 5
... or a glass cleaning cloth. ❑ To remove hard contamination, use the supplied cleaning cloth or a glass cleaning cloth moistened with a solution of mild detergent and water. ❑ Do not use power-line operated sets near water - Accessories Do not place the set . It ... and cart combination to make occasional snapping or popping sounds, particularly when being used. If the picture becomes dark after using the LCD Projection TV for necessary ventilation. Consult qualified service personnel. If you clean the screen surface in a wet basement, or near a bathtub, washbowl...
... or a glass cleaning cloth. ❑ To remove hard contamination, use the supplied cleaning cloth or a glass cleaning cloth moistened with a solution of mild detergent and water. ❑ Do not use power-line operated sets near water - Accessories Do not place the set . It ... and cart combination to make occasional snapping or popping sounds, particularly when being used. If the picture becomes dark after using the LCD Projection TV for necessary ventilation. Consult qualified service personnel. If you clean the screen surface in a wet basement, or near a bathtub, washbowl...
Operating Instructions
Page 11
... injury, do not look into the housing when the power is in use. Inappropriate cleaning methods could damage the finishing. Replace the lamp with a new Sony XL-2100U replacement lamp (not supplied). ✍ Be sure to attach the lamp cover securely; Projection lamp Your LCD projection TV uses a projection lamp as its surface has a special coating. Note...
... injury, do not look into the housing when the power is in use. Inappropriate cleaning methods could damage the finishing. Replace the lamp with a new Sony XL-2100U replacement lamp (not supplied). ✍ Be sure to attach the lamp cover securely; Projection lamp Your LCD projection TV uses a projection lamp as its surface has a special coating. Note...
Operating Instructions
Page 12
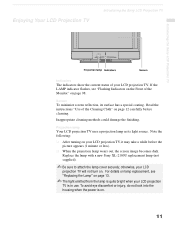
...; Be sure to turn off . Otherwise, this happens, leave the power on and let the moisture evaporate before going to sleep or going out. Do not apply heavy press when cleaning. ✍ The supplied Cleaning Cloth is placed in a humid room, or if the room temperature changes suddenly, the... front of the screen, wipe with a sharp or abrasive object (see "Use of contact may be used repeatedly. 12 Introducing the Sony LCD Projection TV Notes on the LCD Projection TV To enjoy clear pictures ❑ Be sure not to allow sunlight or light from a lamp to shine directly onto the screen. ...
...; Be sure to turn off . Otherwise, this happens, leave the power on and let the moisture evaporate before going to sleep or going out. Do not apply heavy press when cleaning. ✍ The supplied Cleaning Cloth is placed in a humid room, or if the room temperature changes suddenly, the... front of the screen, wipe with a sharp or abrasive object (see "Use of contact may be used repeatedly. 12 Introducing the Sony LCD Projection TV Notes on the LCD Projection TV To enjoy clear pictures ❑ Be sure not to allow sunlight or light from a lamp to shine directly onto the screen. ...
Operating Instructions
Page 13
... on the front of the LCD projection TV after the power has been turned off. ❑ Do not leave the removed lamp near flammable materials or within the reach of the lamp receptacle. Be sure to follow the instructions below. ❑ Use a Sony XL-2100U replacement lamp (not supplied) for any object inside the lamp...
... on the front of the LCD projection TV after the power has been turned off. ❑ Do not leave the removed lamp near flammable materials or within the reach of the lamp receptacle. Be sure to follow the instructions below. ❑ Use a Sony XL-2100U replacement lamp (not supplied) for any object inside the lamp...
Operating Instructions
Page 15
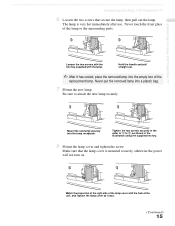
... lamp cover and tighten the screw. The lamp is mounted securely, otherwise the power will not turn on. Loosen the two screws with the hex key supplied with the hole of the lamp cover with the lamp. Match the projection of the right side of the unit, and replace the lamp cover as... the lamp. Never put the removed lamp into the lamp receptacle. Mount the new lamp securely into a plastic bag. 7 Mount the new lamp. Introducing the Sony LCD Projection TV Introducing the Sony LCD Projection TV 6 Loosen the two screws that the lamp cover is very hot immediately after use.
... lamp cover and tighten the screw. The lamp is mounted securely, otherwise the power will not turn on. Loosen the two screws with the hex key supplied with the hole of the lamp cover with the lamp. Match the projection of the right side of the unit, and replace the lamp cover as... the lamp. Never put the removed lamp into the lamp receptacle. Mount the new lamp securely into a plastic bag. 7 Mount the new lamp. Introducing the Sony LCD Projection TV Introducing the Sony LCD Projection TV 6 Loosen the two screws that the lamp cover is very hot immediately after use.
Operating Instructions
Page 29
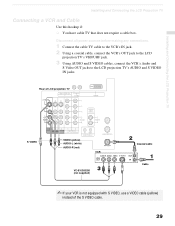
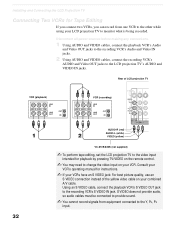
Rear of LCD projection TV S VIDEO VIDEO (yellow) AUDIO-L (white) AUDIO-R (red) VCR VC-810S/820S (not supplied) Coaxial cable Cable ✍ If your VCR is not equipped with S VIDEO, use a VIDEO cable (yellow) instead of the S VIDEO cable. 29 Installing and Connecting the LCD Projection TV Installing and Connecting the LCD Projection TV... Connecting a VCR and Cable Use this hookup if: ❑ You have cable TV that does not require a cable box. Disconnect all power sources before making any connections. 1 Connect the cable TV ...
Rear of LCD projection TV S VIDEO VIDEO (yellow) AUDIO-L (white) AUDIO-R (red) VCR VC-810S/820S (not supplied) Coaxial cable Cable ✍ If your VCR is not equipped with S VIDEO, use a VIDEO cable (yellow) instead of the S VIDEO cable. 29 Installing and Connecting the LCD Projection TV Installing and Connecting the LCD Projection TV... Connecting a VCR and Cable Use this hookup if: ❑ You have cable TV that does not require a cable box. Disconnect all power sources before making any connections. 1 Connect the cable TV ...
Operating Instructions
Page 32
Rear of the yellow video cable on your VCR. S VIDEO does not provide audio, so audio cables must be connected to provide sound. ✍ You cannot record signals from one VCR to the other while using your LCD projection TV to monitor what is being recorded. Using an S VIDEO cable,... VIDEO (yellow) VC-810S/820S (not supplied) ✍ To perform tape editing, set the LCD projection TV to the video input intended for Tape Editing If you connect two VCRs, you can record from equipment connected to the Y, PB, PR input. 32 Disconnect all power sources before making any connections. 1 Using ...
Rear of the yellow video cable on your VCR. S VIDEO does not provide audio, so audio cables must be connected to provide sound. ✍ You cannot record signals from one VCR to the other while using your LCD projection TV to monitor what is being recorded. Using an S VIDEO cable,... VIDEO (yellow) VC-810S/820S (not supplied) ✍ To perform tape editing, set the LCD projection TV to the video input intended for Tape Editing If you connect two VCRs, you can record from equipment connected to the Y, PB, PR input. 32 Disconnect all power sources before making any connections. 1 Using ...
Operating Instructions
Page 33
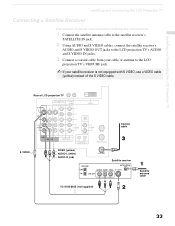
Rear of the S VIDEO cable. Installing and Connecting the LCD Projection TV Installing and Connecting the LCD Projection TV Connecting a Satellite Receiver Disconnect all power sources before making any connections. 1 Connect the satellite antenna cable to the satellite receiver's SATELLITE IN...antenna to the LCD projection TV's VHF/UHF jack. ✍ If your satellite receiver is not equipped with S VIDEO, use a VIDEO cable (yellow) instead of LCD projection TV S VIDEO Coaxial cable VIDEO (yellow) AUDIO-L (white) AUDIO-R (red) VC-810S/820S (not supplied) Satellite receiver Satellite ...
Rear of the S VIDEO cable. Installing and Connecting the LCD Projection TV Installing and Connecting the LCD Projection TV Connecting a Satellite Receiver Disconnect all power sources before making any connections. 1 Connect the satellite antenna cable to the satellite receiver's SATELLITE IN...antenna to the LCD projection TV's VHF/UHF jack. ✍ If your satellite receiver is not equipped with S VIDEO, use a VIDEO cable (yellow) instead of LCD projection TV S VIDEO Coaxial cable VIDEO (yellow) AUDIO-L (white) AUDIO-R (red) VC-810S/820S (not supplied) Satellite receiver Satellite ...
Operating Instructions
Page 34
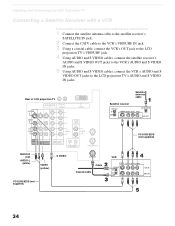
Rear of LCD projection TV Satellite receiver Satellite antenna cable AUDIO-R (red) AUDIO-L (white) S VIDEO VIDEO (yellow) VC-810S/820S (not supplied) Cable Coaxial cable VCR VC-810S/820S (not supplied) 34 Installing and Connecting the LCD Projection TV Connecting a Satellite Receiver with a VCR Disconnect all power sources before making any connections. 1 Connect the satellite antenna cable to the...
Rear of LCD projection TV Satellite receiver Satellite antenna cable AUDIO-R (red) AUDIO-L (white) S VIDEO VIDEO (yellow) VC-810S/820S (not supplied) Cable Coaxial cable VCR VC-810S/820S (not supplied) 34 Installing and Connecting the LCD Projection TV Connecting a Satellite Receiver with a VCR Disconnect all power sources before making any connections. 1 Connect the satellite antenna cable to the...
Operating Instructions
Page 36
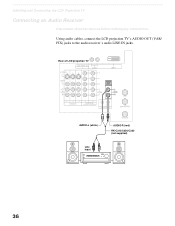
Using audio cables, connect the LCD projection TV's AUDIO OUT (VAR/ FIX) jacks to the audio receiver's audio LINE IN jacks. Installing and Connecting the LCD Projection TV Connecting an Audio Receiver Disconnect all power sources before making any connections. Rear of LCD projection TV AUDIO-L (white) Line input AUDIO-R (red) RK-C310/C320/C330 (not supplied) 36
Using audio cables, connect the LCD projection TV's AUDIO OUT (VAR/ FIX) jacks to the audio receiver's audio LINE IN jacks. Installing and Connecting the LCD Projection TV Connecting an Audio Receiver Disconnect all power sources before making any connections. Rear of LCD projection TV AUDIO-L (white) Line input AUDIO-R (red) RK-C310/C320/C330 (not supplied) 36
Operating Instructions
Page 37
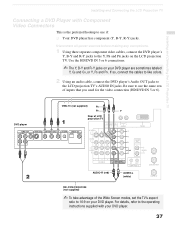
... supplied) PB PR Y Rear of LCD projection TV AUDIO-R (red) AUDIO-L (white) RK-C310/C320/C330 (not supplied) ✍ To take advantage of inputs that you used for the video connection (HD/DVD IN 5 or 6). Installing and Connecting the LCD Projection TV Installing and Connecting the LCD Projection TV Connecting a DVD Player with your DVD player. 37 Disconnect all power...
... supplied) PB PR Y Rear of LCD projection TV AUDIO-R (red) AUDIO-L (white) RK-C310/C320/C330 (not supplied) ✍ To take advantage of inputs that you used for the video connection (HD/DVD IN 5 or 6). Installing and Connecting the LCD Projection TV Installing and Connecting the LCD Projection TV Connecting a DVD Player with your DVD player. 37 Disconnect all power...
Operating Instructions
Page 38
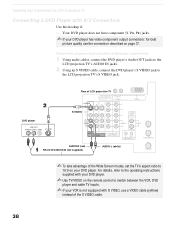
Disconnect all power sources before making any connections. 1 Using audio cables, connect the DVD player's Audio OUT jacks to the LCD projection TV's AUDIO IN jacks. 2 Using an S VIDEO cable, connect the DVD player's S VIDEO jack to 16:9 on your DVD player has video component output ... equipped with A/V Connectors Use this hookup if: ❑ Your DVD player does not have component (Y, PB, PR) jacks. ✍ If your DVD player. Rear of LCD projection TV DVD player S VIDEO AUDIO-R (red) RK-C310/C320/C330 (not supplied) AUDIO-L (white) ✍ To take advantage of the S VIDEO cable. 38
Disconnect all power sources before making any connections. 1 Using audio cables, connect the DVD player's Audio OUT jacks to the LCD projection TV's AUDIO IN jacks. 2 Using an S VIDEO cable, connect the DVD player's S VIDEO jack to 16:9 on your DVD player has video component output ... equipped with A/V Connectors Use this hookup if: ❑ Your DVD player does not have component (Y, PB, PR) jacks. ✍ If your DVD player. Rear of LCD projection TV DVD player S VIDEO AUDIO-R (red) RK-C310/C320/C330 (not supplied) AUDIO-L (white) ✍ To take advantage of the S VIDEO cable. 38
Operating Instructions
Page 39
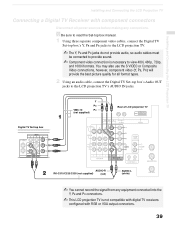
...for all power sources before making any equipment connected into the Y, PB and PR connectors. ✍ This LCD projection TV is necessary to the LCD projection TV's AUDIO IN jacks. Installing and Connecting the LCD Projection TV Installing and Connecting the LCD Projection TV Connecting a Digital TV Receiver with ... an audio cable, connect the Digital TV Set-top box's Audio OUT jacks to view 480i, 480p, 720p, and 1080i formats. Y PB VMC-10 PR (not supplied) Rear of LCD projection TV Digital TV Set-top box AUDIO-R RK-C310/C320/C330 (not supplied) (red) AUDIO-L (white) &#...
...for all power sources before making any equipment connected into the Y, PB and PR connectors. ✍ This LCD projection TV is necessary to the LCD projection TV's AUDIO IN jacks. Installing and Connecting the LCD Projection TV Installing and Connecting the LCD Projection TV Connecting a Digital TV Receiver with ... an audio cable, connect the Digital TV Set-top box's Audio OUT jacks to view 480i, 480p, 720p, and 1080i formats. Y PB VMC-10 PR (not supplied) Rear of LCD projection TV Digital TV Set-top box AUDIO-R RK-C310/C320/C330 (not supplied) (red) AUDIO-L (white) &#...
Operating Instructions
Page 40
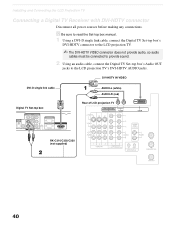
...provide audio, so audio cables must be connected to provide sound. 2 Using an audio cable, connect the Digital TV Set-top box's Audio OUT jacks to the LCD projection TV's DVI-HDTV AUDIO jacks. VIDEO R1 R2 AUDIO OUT VIDEO OUT (1080i/720p/480p) Y PB TYPE PR ... DVI-HDTV OUT (1080i/720p/480p) AUDIO-L (white) AUDIO-R (red) Rear of LCD projection TV RK-C310/C320/C330 (not supplied) 40 Installing and Connecting the LCD Projection TV Connecting a Digital TV Receiver with DVI-HDTV connector Disconnect all power sources before making any connections. DVI-HDTV IN VIDEO DVI-D single link cable...
...provide audio, so audio cables must be connected to provide sound. 2 Using an audio cable, connect the Digital TV Set-top box's Audio OUT jacks to the LCD projection TV's DVI-HDTV AUDIO jacks. VIDEO R1 R2 AUDIO OUT VIDEO OUT (1080i/720p/480p) Y PB TYPE PR ... DVI-HDTV OUT (1080i/720p/480p) AUDIO-L (white) AUDIO-R (red) Rear of LCD projection TV RK-C310/C320/C330 (not supplied) 40 Installing and Connecting the LCD Projection TV Connecting a Digital TV Receiver with DVI-HDTV connector Disconnect all power sources before making any connections. DVI-HDTV IN VIDEO DVI-D single link cable...
The Sony Guide to Home Theater
Page 11
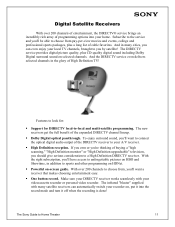
...selected channels in addition to sports and other programming on HDNet. ƒ Powerful on-screen guide. The new receivers get the full benefit of the ...Definition DIRECTV receiver. With the right subscription, you by satellite! The Sony Guide to -local and multi-satellite programming. With over 200 channels ...makes choosing entertainment easy. ƒ One button record. The infrared "blaster" supplied with your home. And in many satellite receivers can even enjoy your recorder on...you can automatically switch your local TV channels, brought to you 'll have access to unforgettable pictures...
...selected channels in addition to sports and other programming on HDNet. ƒ Powerful on-screen guide. The new receivers get the full benefit of the ...Definition DIRECTV receiver. With the right subscription, you by satellite! The Sony Guide to -local and multi-satellite programming. With over 200 channels ...makes choosing entertainment easy. ƒ One button record. The infrared "blaster" supplied with your home. And in many satellite receivers can even enjoy your recorder on...you can automatically switch your local TV channels, brought to you 'll have access to unforgettable pictures...


