
Operating Instructions
Page 3
...Sony Corporation has determined that face the screen with opaque drapery. under license from SRS Labs, Inc. Never pull on page 4. ENERGY STAR® is desirable to install the LCD Projection TV in a place subject to excessive dust or mechanical vibration. ❑ Avoid operating the LCD Projection TV at temperature below 41°F (5°C). ❑ If the LCD Projection TV...not expose the screen to direct illumination or direct sunlight. BBE and BBE Symbol are unable to insert the plug fully into the wall outlet only one way. Safety ❑ Operate the LCD Projection TV only on 120...
...Sony Corporation has determined that face the screen with opaque drapery. under license from SRS Labs, Inc. Never pull on page 4. ENERGY STAR® is desirable to install the LCD Projection TV in a place subject to excessive dust or mechanical vibration. ❑ Avoid operating the LCD Projection TV at temperature below 41°F (5°C). ❑ If the LCD Projection TV...not expose the screen to direct illumination or direct sunlight. BBE and BBE Symbol are unable to insert the plug fully into the wall outlet only one way. Safety ❑ Operate the LCD Projection TV only on 120...
Operating Instructions
Page 5
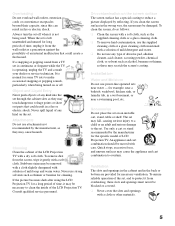
... of an internal malfunction that could create a fire hazard. Cleaning Clean the cabinet of LCD Projection TV. To remove dust from a TV set . If you clean the screen surface in the wrong way, the screen may be necessary to clean the inside of the set, and to reduce a picture ... turn the set through the cabinet slots as thinner or benzine for the specific model of the LCD Projection TV with care. Consult qualified service personnel. If the picture becomes dark after using the LCD Projection TV for example, near a bathtub, washbowl, kitchen sink, or laundry tub, in a fire or...
... of an internal malfunction that could create a fire hazard. Cleaning Clean the cabinet of LCD Projection TV. To remove dust from a TV set . If you clean the screen surface in the wrong way, the screen may be necessary to clean the inside of the set, and to reduce a picture ... turn the set through the cabinet slots as thinner or benzine for the specific model of the LCD Projection TV with care. Consult qualified service personnel. If the picture becomes dark after using the LCD Projection TV for example, near a bathtub, washbowl, kitchen sink, or laundry tub, in a fire or...
Operating Instructions
Page 7
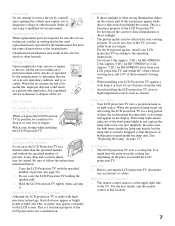
...number of the LCD panel and is a structural property of persons, it . When the projection lamp wears out after using the LCD projection TV for KF-60WE610 away from the wall. ❑ Avoid installing the LCD projection TV close to the TV, you place the LCD Projection TV in position,... screen to direct illumination or direct sunlight. ❑ The picture quality may be sure the service technician certifies in a picture tube implosion. Carry the LCD Projection TV in the specified manner If you install the LCD projection TV. Carrying ❑ Before carrying the LCD projection TV...
...number of the LCD panel and is a structural property of persons, it . When the projection lamp wears out after using the LCD projection TV for KF-60WE610 away from the wall. ❑ Avoid installing the LCD projection TV close to the TV, you place the LCD Projection TV in position,... screen to direct illumination or direct sunlight. ❑ The picture quality may be sure the service technician certifies in a picture tube implosion. Carry the LCD Projection TV in the specified manner If you install the LCD projection TV. Carrying ❑ Before carrying the LCD projection TV...
Operating Instructions
Page 8
... Stick Index 58 Using the Memory Stick Home 60 Viewing Still Images 62 Playing Movies 63 Memory Stick Home Menu Options 65 Using the Menus Overview 68 Using the Video Menu 69 Using the Audio Menu 72 Using the Screen Menu 74 Using the Channel Menu 76 Using the... Parent Menu 78 Using the Setup Menu 82 Other Information Programming the Remote Control 86 Operating Other Components with Your LCD Projection TV Remote Control 88 Notes on Using Memory Stick, Memory Stick PRO Media 90 Notes on Using Memory Stick Duo 91 Contacting Sony...
... Stick Index 58 Using the Memory Stick Home 60 Viewing Still Images 62 Playing Movies 63 Memory Stick Home Menu Options 65 Using the Menus Overview 68 Using the Video Menu 69 Using the Audio Menu 72 Using the Screen Menu 74 Using the Channel Menu 76 Using the... Parent Menu 78 Using the Setup Menu 82 Other Information Programming the Remote Control 86 Operating Other Components with Your LCD Projection TV Remote Control 88 Notes on Using Memory Stick, Memory Stick PRO Media 90 Notes on Using Memory Stick Duo 91 Contacting Sony...
Operating Instructions
Page 9
.... ❑ Twin View™: Using Multi-Image Driver (MID-X), Twin View allows you to view on your new LCD projection TV include: ❑ HD-Monitor: Enables to the program in the selected window. By using the HD/DVD IN jacks... Sony LCD Projection TV Introducing the Sony LCD Projection TV Presenting the Sony LCD Projection TV Thank you will enjoy with your LCD Projection TV screen digital images that are stored on one picture and listen to display the 1080i, 720p, 480p and 480i digital TV format signals. This manual is not intended for models KF-42WE610, KF-50WE610 and KF-60WE610....
.... ❑ Twin View™: Using Multi-Image Driver (MID-X), Twin View allows you to view on your new LCD projection TV include: ❑ HD-Monitor: Enables to the program in the selected window. By using the HD/DVD IN jacks... Sony LCD Projection TV Introducing the Sony LCD Projection TV Presenting the Sony LCD Projection TV Thank you will enjoy with your LCD Projection TV screen digital images that are stored on one picture and listen to display the 1080i, 720p, 480p and 480i digital TV format signals. This manual is not intended for models KF-42WE610, KF-50WE610 and KF-60WE610....
Operating Instructions
Page 10
...screen menus and adjust your initial setup. Using This Manual We recommend that you carefully review the contents of the following three sections in the order shown to ensure that you fully understand the operation of your new LCD projection TV. 1 Installing and Connecting the LCD Projection TV... the antenna and cable. 2 Using the Features This section shows you through your LCD projection TV settings. It also shows you how to access on the LCD projection TV console. 10 Introducing the Sony LCD Projection TV ❑ Component Video Inputs: Offers the best video quality for DVD (480p, ...
...screen menus and adjust your initial setup. Using This Manual We recommend that you carefully review the contents of the following three sections in the order shown to ensure that you fully understand the operation of your new LCD projection TV. 1 Installing and Connecting the LCD Projection TV... the antenna and cable. 2 Using the Features This section shows you through your LCD projection TV settings. It also shows you how to access on the LCD projection TV console. 10 Introducing the Sony LCD Projection TV ❑ Component Video Inputs: Offers the best video quality for DVD (480p, ...
Operating Instructions
Page 11
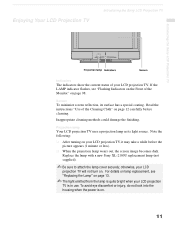
... look into the housing when the power is in use. For details on lamp replacement, see "Flashing Indicators on the Front of your LCD projection TV will not turn on. otherwise, your LCD projection TV. Enjoying Your LCD Projection TV Introducing the Sony LCD Projection TV Introducing the Sony LCD Projection TV Projection lamp Indicators Screen Indicators The indicators show the current status of the Monitor" on page 98...
... look into the housing when the power is in use. For details on lamp replacement, see "Flashing Indicators on the Front of your LCD projection TV will not turn on. otherwise, your LCD projection TV. Enjoying Your LCD Projection TV Introducing the Sony LCD Projection TV Introducing the Sony LCD Projection TV Projection lamp Indicators Screen Indicators The indicators show the current status of the Monitor" on page 98...
Operating Instructions
Page 12
... supplied Cleaning Cloth is washable with water diluted mild detergent solution. When carrying the LCD projection TV ❑ Disconnect the connections. Introducing the Sony LCD Projection TV Notes on the LCD Projection TV To enjoy clear pictures ❑ Be sure not to allow sunlight or light from...On moisture condensation ❑ If your LCD projection TV. Be sure to wait for about two minutes. Use of your LCD projection TV before using your LCD projection TV is easily scratched. This is placed in a damaged screen. ✍ To clean the screen, please use any type of abrasive...
... supplied Cleaning Cloth is washable with water diluted mild detergent solution. When carrying the LCD projection TV ❑ Disconnect the connections. Introducing the Sony LCD Projection TV Notes on the LCD Projection TV To enjoy clear pictures ❑ Be sure not to allow sunlight or light from...On moisture condensation ❑ If your LCD projection TV. Be sure to wait for about two minutes. Use of your LCD projection TV before using your LCD projection TV is easily scratched. This is placed in a damaged screen. ✍ To clean the screen, please use any type of abrasive...
Operating Instructions
Page 13
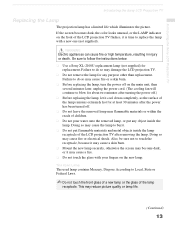
... become dark, or it may cause the lamp to blow for replacement. If the screen becomes dark, the color looks unusual, or the LAMP indicator on the front of the LCD projection TV flashes, it cool down completely, as the surface of the lamp receptacle. The Used Lamp The used lamp contains ... later, unplug the power cord. (The cooling fan will continue to burst. ❑ Do not put any purpose other than replacement. Introducing the Sony LCD Projection TV Introducing the Sony LCD Projection TV Replacing the Lamp The projection lamp has a limited life which illuminates the picture.
... become dark, or it may cause the lamp to blow for replacement. If the screen becomes dark, the color looks unusual, or the LAMP indicator on the front of the LCD projection TV flashes, it cool down completely, as the surface of the lamp receptacle. The Used Lamp The used lamp contains ... later, unplug the power cord. (The cooling fan will continue to burst. ❑ Do not put any purpose other than replacement. Introducing the Sony LCD Projection TV Introducing the Sony LCD Projection TV Replacing the Lamp The projection lamp has a limited life which illuminates the picture.
Operating Instructions
Page 37
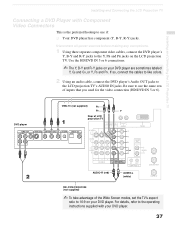
... OUT jacks to the Y, PB and PR jacks on the LCD projection TV. DVD player VMC-10 (not supplied) PB PR Y Rear of LCD projection TV AUDIO-R (red) AUDIO-L (white) RK-C310/C320/C330 (not supplied) ✍ To take advantage of the Wide Screen modes, set the TV's aspect ratio to use the same row of inputs that you...
... OUT jacks to the Y, PB and PR jacks on the LCD projection TV. DVD player VMC-10 (not supplied) PB PR Y Rear of LCD projection TV AUDIO-R (red) AUDIO-L (white) RK-C310/C320/C330 (not supplied) ✍ To take advantage of the Wide Screen modes, set the TV's aspect ratio to use the same row of inputs that you...
Operating Instructions
Page 38
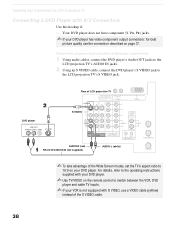
...with A/V Connectors Use this hookup if: ❑ Your DVD player does not have component (Y, PB, PR) jacks. ✍ If your DVD player. Rear of LCD projection TV DVD player S VIDEO AUDIO-R (red) RK-C310/C320/C330 (not supplied) AUDIO-L (white) ✍ To take advantage of the S VIDEO cable...best picture quality use a VIDEO cable (yellow) instead of the Wide Screen modes, set the TV's aspect ratio to 16:9 on page 37. For details, refer to the operating instructions supplied with your DVD player. ✍ Use TV/VIDEO on the remote control to the LCD projection TV's S VIDEO jack.
...with A/V Connectors Use this hookup if: ❑ Your DVD player does not have component (Y, PB, PR) jacks. ✍ If your DVD player. Rear of LCD projection TV DVD player S VIDEO AUDIO-R (red) RK-C310/C320/C330 (not supplied) AUDIO-L (white) ✍ To take advantage of the S VIDEO cable...best picture quality use a VIDEO cable (yellow) instead of the Wide Screen modes, set the TV's aspect ratio to 16:9 on page 37. For details, refer to the operating instructions supplied with your DVD player. ✍ Use TV/VIDEO on the remote control to the LCD projection TV's S VIDEO jack.
Operating Instructions
Page 43
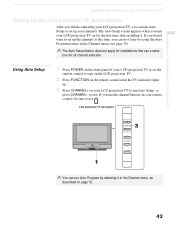
... channels. If you turn on the LCD projection TV. 2 Press FUNCTION on for all channel selection. LCD projection TV front panel CHANNEL VOLUME TV/VIDEO ✍ You can run Auto Setup to set up . 3 Press CHANNEL+ on page 76. 43 to run Auto Setup, or press CHANNEL- The Auto Setup screen appears when you use the channel buttons...
... channels. If you turn on the LCD projection TV. 2 Press FUNCTION on for all channel selection. LCD projection TV front panel CHANNEL VOLUME TV/VIDEO ✍ You can run Auto Setup to set up . 3 Press CHANNEL+ on page 76. 43 to run Auto Setup, or press CHANNEL- The Auto Setup screen appears when you use the channel buttons...

Operating Instructions
Page 44
qa FREEZE qs VOL +/- The LCD projection TV alternates between two channels. Adjusts the volume. 44 Press to restore the sound. For details, see "Selecting Video Options" on page 54. Also available in the Video menu. For details, see "Using Wide Screen Mode" on page 69. Press to ...page 49. X: Pause x: Stop m: Rewind B: Play M: Fast-Forward z: Record by pressing z and B Turns on -screen cursor. Press to restore the picture. Select the equipment (TV, SAT/CABLE, VCR/DVD) that was selected. Freezes the window picture. When the menu is displayed, move the on /off...
qa FREEZE qs VOL +/- The LCD projection TV alternates between two channels. Adjusts the volume. 44 Press to restore the sound. For details, see "Selecting Video Options" on page 54. Also available in the Video menu. For details, see "Using Wide Screen Mode" on page 69. Press to ...page 49. X: Pause x: Stop m: Rewind B: Play M: Fast-Forward z: Record by pressing z and B Turns on -screen cursor. Press to restore the picture. Select the equipment (TV, SAT/CABLE, VCR/DVD) that was selected. Freezes the window picture. When the menu is displayed, move the on /off...
Operating Instructions
Page 45
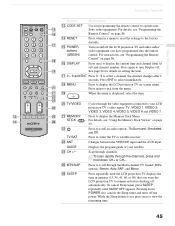
.../DVD SAT/ CABLE TV FUNCTION TV/VIDEO FREEZE /TV/SAT ANT VOL GUIDE CH CODE SET RESET SLEEP MTS/SAP TV RM-Y913 Using the Features Button Description qd CODE SET Use for details on setting the time. For instructions, see "Using the Memory Stick Viewer" on -screen menu. qk MENU...the Sleep feature is displayed, select the item. qf RESET Press when in minutes (15, 30, 45, 60, or 90) that you want the LCD projection TV to turn Display off the LCD projection TV and other audio/ video equipment you have programmed into the remote control. Press again to remain on before shutting ...
.../DVD SAT/ CABLE TV FUNCTION TV/VIDEO FREEZE /TV/SAT ANT VOL GUIDE CH CODE SET RESET SLEEP MTS/SAP TV RM-Y913 Using the Features Button Description qd CODE SET Use for details on setting the time. For instructions, see "Using the Memory Stick Viewer" on -screen menu. qk MENU...the Sleep feature is displayed, select the item. qf RESET Press when in minutes (15, 30, 45, 60, or 90) that you want the LCD projection TV to turn Display off the LCD projection TV and other audio/ video equipment you have programmed into the remote control. Press again to remain on before shutting ...
Operating Instructions
Page 46
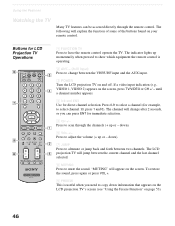
... the remote control. Press to copy down information that appears on the LCD projection TV's screen (see "Using the Freeze Function" on page 53). 46 until a channel number appears. 4 0-9 and ENT Use for LCD Projection TV Operations VCR/ MUTING DVD SAT/ CABLE POWER MODE PICTURE WIDE DISPLAY JUMP... ENT MENU VCR/DVD SAT/ CABLE TV FUNCTION TV/VIDEO FREEZE /TV/SAT ANT VOL GUIDE CH CODE SET RESET SLEEP MTS/SAP TV RM-Y913 1 FUNCTION TV Press to select channel 10, press 1 and 0). The LCD projection TV will appear on the screen, press TV/VIDEO or CH +/ - The following...
... the remote control. Press to copy down information that appears on the LCD projection TV's screen (see "Using the Freeze Function" on page 53). 46 until a channel number appears. 4 0-9 and ENT Use for LCD Projection TV Operations VCR/ MUTING DVD SAT/ CABLE POWER MODE PICTURE WIDE DISPLAY JUMP... ENT MENU VCR/DVD SAT/ CABLE TV FUNCTION TV/VIDEO FREEZE /TV/SAT ANT VOL GUIDE CH CODE SET RESET SLEEP MTS/SAP TV RM-Y913 1 FUNCTION TV Press to select channel 10, press 1 and 0). The LCD projection TV will appear on the screen, press TV/VIDEO or CH +/ - The following...
Operating Instructions
Page 50
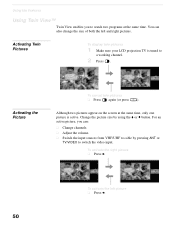
To activate the right picture ❑ Press b. Although two pictures appear on the screen at the same time, only one picture is tuned to watch two programs at the same time. To activate the left and right pictures. For ... enables you can also change the size of both the left picture ❑ Press B. 50 Activating Twin Pictures To display twin pictures 1 Make sure your LCD projection TV is active. You can : ❑ Change channels. ❑ Adjust the volume. ❑ Switch the input sources from VHF/UHF to switch the video input...
To activate the right picture ❑ Press b. Although two pictures appear on the screen at the same time, only one picture is tuned to watch two programs at the same time. To activate the left and right pictures. For ... enables you can also change the size of both the left picture ❑ Press B. 50 Activating Twin Pictures To display twin pictures 1 Make sure your LCD projection TV is active. You can : ❑ Change channels. ❑ Adjust the volume. ❑ Switch the input sources from VHF/UHF to switch the video input...

Operating Instructions
Page 52
... v to reduce the picture. ✍ When you use the Twin View function, the memorized sizes appear. 52 The next time you adjust the twin screen sizes, the LCD projection TV memorizes the change the size of the left ) 1 Press b to activate the right picture (if not already activated). 2 Press V to enlarge the picture and...
... v to reduce the picture. ✍ When you use the Twin View function, the memorized sizes appear. 52 The next time you adjust the twin screen sizes, the LCD projection TV memorizes the change the size of the left ) 1 Press b to activate the right picture (if not already activated). 2 Press V to enlarge the picture and...
Operating Instructions
Page 68
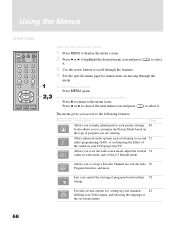
... audio options such as listening to second 72 audio programming (SAP), or customizing the Effect of the on-screen menus. 68 Allows you to set the wide screen mode, adjust the vertical 74 center in wide mode, and set up your channels, 82 labeling your picture... SAT/ CABLE POWER MODE PICTURE WIDE DISPLAY JUMP FAVORITES ENT MENU VCR/DVD SAT/ CABLE TV FUNCTION Opening and choosing a menu 1 Press MENU to display the menu screen. 2 Press B or b to highlight the desired menu icon and press it . Provides several options for instructions on your LCD projection TV.
... audio options such as listening to second 72 audio programming (SAP), or customizing the Effect of the on-screen menus. 68 Allows you to set the wide screen mode, adjust the vertical 74 center in wide mode, and set up your channels, 82 labeling your picture... SAT/ CABLE POWER MODE PICTURE WIDE DISPLAY JUMP FAVORITES ENT MENU VCR/DVD SAT/ CABLE TV FUNCTION Opening and choosing a menu 1 Press MENU to display the menu screen. 2 Press B or b to highlight the desired menu icon and press it . Provides several options for instructions on your LCD projection TV.
Operating Instructions
Page 72
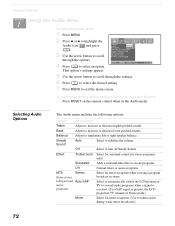
... select the desired setting. 7 Press MENU to exit the menu screen. Off Select to increase or decrease lower-pitched sounds. Select to automatically switch the LCD projection TV to second audio programs when a signal is received. (If no SAP signal is present, the LCD projection TV remains in Stereo mode.) Mono Select for stereo reception when viewing...
... select the desired setting. 7 Press MENU to exit the menu screen. Off Select to increase or decrease lower-pitched sounds. Select to automatically switch the LCD projection TV to second audio programs when a signal is received. (If no SAP signal is present, the LCD projection TV remains in Stereo mode.) Mono Select for stereo reception when viewing...
Operating Instructions
Page 75
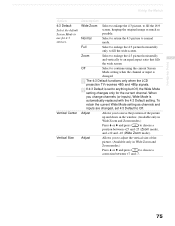
... Default setting. Full Select to enlarge the 4:3 picture horizontally only, to an equal aspect ratio that fills the wide screen. z The 4:3 Default functions only when the LCD projection TV receives 480i and 480p signals. When you change channels (or inputs), Wide Mode is set 4:3 Default to Off. ...Select to return the 4:3 picture to use for the current channel. Using the Menus Using the Menus Option 4:3 Default Select the default Screen Mode to normal mode. Vertical Center Vertical Size Description Wide Zoom Select to enlarge the 4:3 picture, to anything but Off, the ...
... Default setting. Full Select to enlarge the 4:3 picture horizontally only, to an equal aspect ratio that fills the wide screen. z The 4:3 Default functions only when the LCD projection TV receives 480i and 480p signals. When you change channels (or inputs), Wide Mode is set 4:3 Default to Off. ...Select to return the 4:3 picture to use for the current channel. Using the Menus Using the Menus Option 4:3 Default Select the default Screen Mode to normal mode. Vertical Center Vertical Size Description Wide Zoom Select to enlarge the 4:3 picture, to anything but Off, the ...


