Operating Instructions
Page 2
... Sony Computer Entertainment Inc. TruSurround XT technology is a joint program of programming and signal provided by the U.S. Picture/Sound, Light Sensor, Power Savings) can radiate radio frequency energy and, if not installed and used with this polarized AC plug with other WALL-MOUNT BRACKETS may not cause harmful interference, and (2) this TV (i.e. Depending upon your cable service provider. Model Name Serial No. Declaration of Energy. SU-WL500 Use with an extension cord...
... Sony Computer Entertainment Inc. TruSurround XT technology is a joint program of programming and signal provided by the U.S. Picture/Sound, Light Sensor, Power Savings) can radiate radio frequency energy and, if not installed and used with this polarized AC plug with other WALL-MOUNT BRACKETS may not cause harmful interference, and (2) this TV (i.e. Depending upon your cable service provider. Model Name Serial No. Declaration of Energy. SU-WL500 Use with an extension cord...
Operating Instructions
Page 3
... Started Setting Up Your TV 6 Locating Inputs and Outputs 7 Connecting Other Equipment 9 Bundling the Connecting Cables 10 Securing the TV 10 Inserting Batteries into the Remote Control 11 Initial Setup 11 Operating the TV Remote Control Button Description 12 TV Controls and Indicators 14 Using Features Using BRAVIA® Sync™ with Control for HDMI 15 Favorites 15 Wide Mode 16 Wide Mode with PC 17 Photo and Music 18 Energy Saving Switch 19 Presence Sensor 19 Using the...
... Started Setting Up Your TV 6 Locating Inputs and Outputs 7 Connecting Other Equipment 9 Bundling the Connecting Cables 10 Securing the TV 10 Inserting Batteries into the Remote Control 11 Initial Setup 11 Operating the TV Remote Control Button Description 12 TV Controls and Indicators 14 Using Features Using BRAVIA® Sync™ with Control for HDMI 15 Favorites 15 Wide Mode 16 Wide Mode with PC 17 Photo and Music 18 Energy Saving Switch 19 Presence Sensor 19 Using the...
Operating Instructions
Page 4
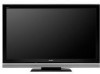
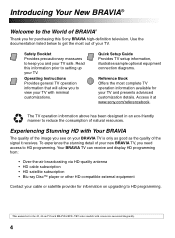
Read this Sony BRAVIA high-definition television. Access it receives. Operating Instructions Provides general TV operation information that will allow you to view your TV. Quick Setup Guide Provides TV setup information, illustrates sample optional equipment connection diagrams. Reference Book Offers the most out of your TV with Your BRAVIA The quality of the image you see on upgrading to HD programming. Your BRAVIA TV can receive and display HD programming from: • Over-the-air broadcasting via...
Read this Sony BRAVIA high-definition television. Access it receives. Operating Instructions Provides general TV operation information that will allow you to view your TV. Quick Setup Guide Provides TV setup information, illustrates sample optional equipment connection diagrams. Reference Book Offers the most out of your TV with Your BRAVIA The quality of the image you see on upgrading to HD programming. Your BRAVIA TV can receive and display HD programming from: • Over-the-air broadcasting via...

Operating Instructions
Page 5
... the Quick Setup Guide, enclosed separately, for connecting other Sony equipment supporting the Control for HDMI function (page 15). ➢ Motionflow: Enhances the smoothness of picture movement to reduce the blur. ➢ Favorites: Your favorite channels and inputs are at www.sony.com/referencebook. 5 TV Feature Highlights Your new BRAVIA High Definition LCD TV will see black bars on the sides. Detects the amount of light in your BRAVIA TV set...
... the Quick Setup Guide, enclosed separately, for connecting other Sony equipment supporting the Control for HDMI function (page 15). ➢ Motionflow: Enhances the smoothness of picture movement to reduce the blur. ➢ Favorites: Your favorite channels and inputs are at www.sony.com/referencebook. 5 TV Feature Highlights Your new BRAVIA High Definition LCD TV will see black bars on the sides. Detects the amount of light in your BRAVIA TV set...
Operating Instructions
Page 6
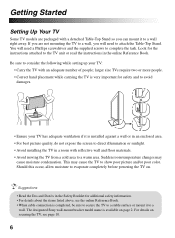
... mount it to a wall right away. For details on securing the TV, see the online Reference Book. • When cable connection is installed against a wall or in an enclosed area. • For best picture quality, do not expose the screen to direct illumination or sunlight. • Avoid installing the TV in a room with a detached Table-Top Stand so you will need to evaporate completely before powering the TV...
... mount it to a wall right away. For details on securing the TV, see the online Reference Book. • When cable connection is installed against a wall or in an enclosed area. • For best picture quality, do not expose the screen to direct illumination or sunlight. • Avoid installing the TV in a room with a detached Table-Top Stand so you will need to evaporate completely before powering the TV...
Operating Instructions
Page 7
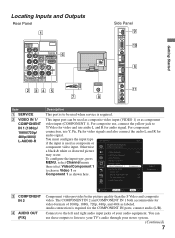
...input is used when service is required for video formats of your stereo system. (Continued) 7 For component connection, use Y, PB, PR for video signals and also connect the audio L and R for HDMI On Device List Device Auto Power Off Off Video 1 Component 1 Lock TV Auto Power On Off Signal Diagnostics Setup 3 COMPONENT IN 2 4 AUDIO OUT (FIX) Change RETURN Back MENU Exit Component video provides better picture quality than the S Video and composite video. Screen Channel USB Auto Program Manage Channels Manage Inputs Video/Component 1 Component 1 Control for audio...
...input is used when service is required for video formats of your stereo system. (Continued) 7 For component connection, use Y, PB, PR for video signals and also connect the audio L and R for HDMI On Device List Device Auto Power Off Off Video 1 Component 1 Lock TV Auto Power On Off Signal Diagnostics Setup 3 COMPONENT IN 2 4 AUDIO OUT (FIX) Change RETURN Back MENU Exit Component video provides better picture quality than the S Video and composite video. Screen Channel USB Auto Program Manage Channels Manage Inputs Video/Component 1 Component 1 Control for audio...
Operating Instructions
Page 8
...; Cable types to use an adapter (not supplied). The S VIDEO does not provide sound; Be sure to refer to the Quick Setup Guide for connection To view 480p, 720p, 1080i, and 1080p formats, an HDMI or Component video (YPBPR) is PCM optical OUT (OPTICAL) compatible. 7 AC IN Connects the supplied AC power cord. 8 CABLE/ ANTENNA RF input that has S VIDEO which provides better picture quality than composite video. HDMI supports enhanced, or high-definition video, plus digital audio. Can also be necessary to the S VIDEO output...
...; Cable types to use an adapter (not supplied). The S VIDEO does not provide sound; Be sure to refer to the Quick Setup Guide for connection To view 480p, 720p, 1080i, and 1080p formats, an HDMI or Component video (YPBPR) is PCM optical OUT (OPTICAL) compatible. 7 AC IN Connects the supplied AC power cord. 8 CABLE/ ANTENNA RF input that has S VIDEO which provides better picture quality than composite video. HDMI supports enhanced, or high-definition video, plus digital audio. Can also be necessary to the S VIDEO output...
Operating Instructions
Page 9
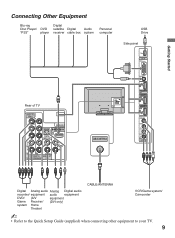
... receiver cable box system Personal computer USB Drive Side panel PC IN RGB Rear of TV VIDEO IN VIDEO Y SERVICE PB IN (OPTICAL) PR 1 DIGITAL AUDIO OUT L AUDIO R 1 2 AUDIO COMPONENT IN AUDIO OUT (1080p/1080i/720p/480p/480i) (FIX) L AUDIO R CABLE/ANTENNA AUDIO 2 IN IN 3 IN 4 S VIDEO VIDEO L (MONO) AUDIO R 2 VIDEO IN CABLE/ANTENNA Digital Analog audio Analog Digital audio recorder/ equipment audio equipment DVD/ (A/V equipment Game Receiver/ (DVI only) system Home Theater) VCR/Game system/ Camcorder ~ • Refer to the Quick Setup Guide (supplied) when connecting...
... receiver cable box system Personal computer USB Drive Side panel PC IN RGB Rear of TV VIDEO IN VIDEO Y SERVICE PB IN (OPTICAL) PR 1 DIGITAL AUDIO OUT L AUDIO R 1 2 AUDIO COMPONENT IN AUDIO OUT (1080p/1080i/720p/480p/480i) (FIX) L AUDIO R CABLE/ANTENNA AUDIO 2 IN IN 3 IN 4 S VIDEO VIDEO L (MONO) AUDIO R 2 VIDEO IN CABLE/ANTENNA Digital Analog audio Analog Digital audio recorder/ equipment audio equipment DVD/ (A/V equipment Game Receiver/ (DVI only) system Home Theater) VCR/Game system/ Camcorder ~ • Refer to the Quick Setup Guide (supplied) when connecting...

Operating Instructions
Page 11
... remote control. "Retail" optimizes the picture for the screen display. Follow the help text provided on -screen display text. 2 Select HOME or Retail mode. 3 Connect cable or antenna, then select OK to run Auto Program. • When prompted to select HOME or Retail, be available. 4 Auto Program will scan for available channels from the signal source directly connected to the TV's CABLE/ANTENNA input and may not be sure to Setup menu then select Clock/Timers and adjust Current Time...
... remote control. "Retail" optimizes the picture for the screen display. Follow the help text provided on -screen display text. 2 Select HOME or Retail mode. 3 Connect cable or antenna, then select OK to run Auto Program. • When prompted to select HOME or Retail, be available. 4 Auto Program will scan for available channels from the signal source directly connected to the TV's CABLE/ANTENNA input and may not be sure to Setup menu then select Clock/Timers and adjust Current Time...
Operating Instructions
Page 12
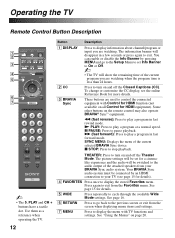
... Favorites menu. Your BRAVIA Sync audio system must be switched to set for HDMI equipment). m (fast reverse): Press to stop playback. Button Description 1 DISPLAY 2 CC 3 BRAVIA Sync Press to pause playback. SYNC MENU: Displays the menu of the current program you are watching when the program time is less than 24 hours. x STOP: Press to play a program in fast forward mode. Operating the TV Remote Control Button Description 1 2 3 DISPLAY CC POWER 4 5 WIDE INPUT 6 7 TOOLS ~ • The 5, PLAY...
... Favorites menu. Your BRAVIA Sync audio system must be switched to set for HDMI equipment). m (fast reverse): Press to stop playback. Button Description 1 DISPLAY 2 CC 3 BRAVIA Sync Press to pause playback. SYNC MENU: Displays the menu of the current program you are watching when the program time is less than 24 hours. x STOP: Press to play a program in fast forward mode. Operating the TV Remote Control Button Description 1 2 3 DISPLAY CC POWER 4 5 WIDE INPUT 6 7 TOOLS ~ • The 5, PLAY...
Operating Instructions
Page 13
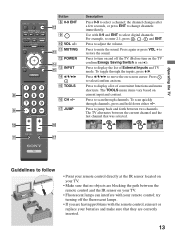
... ENT to display a list of External Inputs and TV mode. Press to select digital channels. Press to display the list of convenient functions and menu shortcuts. Press to turn on the TV confirm Energy Saving Switch is on your TV. • Fluorescent lamps can interfere with the remote control, reinsert or replace your batteries and make sure that no objects are correctly inserted. 13 Press to adjust the volume. JUMP...
... ENT to display a list of External Inputs and TV mode. Press to select digital channels. Press to display the list of convenient functions and menu shortcuts. Press to turn on the TV confirm Energy Saving Switch is on your TV. • Fluorescent lamps can interfere with the remote control, reinsert or replace your batteries and make sure that no objects are correctly inserted. 13 Press to adjust the volume. JUMP...
Operating Instructions
Page 14
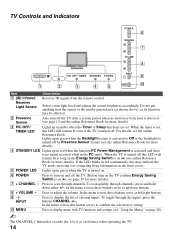
... TV is turned on. 6 POWER Press to Off or the backlight its function may indicate the TV needs servicing (see page 19 and the online Reference Book for more details). 4 STANDBY LED Lights up in the PC input . In the menu screen, these buttons serve as a reference when operating the TV. 14 Press to adjust the volume. TV Controls and Indicators POWER 6 CHANNEL 7 VOLUME 8 PIC OFF / TIMER STANDBY POWER INPUT 9 1 2 3 4 5 MENU 0 Item Description 1 (IR) Infrared Receives IR signals from the remote control...
... TV is turned on. 6 POWER Press to Off or the backlight its function may indicate the TV needs servicing (see page 19 and the online Reference Book for more details). 4 STANDBY LED Lights up in the PC input . In the menu screen, these buttons serve as a reference when operating the TV. 14 Press to adjust the volume. TV Controls and Indicators POWER 6 CHANNEL 7 VOLUME 8 PIC OFF / TIMER STANDBY POWER INPUT 9 1 2 3 4 5 MENU 0 Item Description 1 (IR) Infrared Receives IR signals from the remote control...
Operating Instructions
Page 15
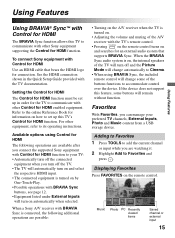
...-Play. • Possible operations with BRAVIA Sync buttons, see page 12. • Equipment listed under External Inputs will remain without function. When a Sony A/V receiver with BRAVIA Sync is connected, the following operations are watching it. 2 Highlight Add to its operating instructions. Displaying Favorites Press FAVORITES on and searches for HDMI enabled equipment. To connect Sony equipment with Control for HDMI Use an HDMI cable that supports BRAVIA Sync. Available options using BRAVIA Sync, the included remote control will automatically turn...
...-Play. • Possible operations with BRAVIA Sync buttons, see page 12. • Equipment listed under External Inputs will remain without function. When a Sony A/V receiver with BRAVIA Sync is connected, the following operations are watching it. 2 Highlight Add to its operating instructions. Displaying Favorites Press FAVORITES on and searches for HDMI enabled equipment. To connect Sony equipment with Control for HDMI Use an HDMI cable that supports BRAVIA Sync. Available options using BRAVIA Sync, the included remote control will automatically turn...
Operating Instructions
Page 16
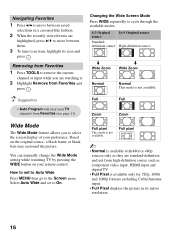
... Full • Auto Program will clear your remote control. You can manually change the Wide Mode setting while watching TV by pressing the WIDE button on the original source, a black frame or black bars may surround the picture. Full pixel This mode is available only for 720p, 1080i and 1080p formats excluding Cable/Antenna input. • Full Pixel displays the picture in a carousel-like fashion. 2 When the recently viewed items are watching...
... Full • Auto Program will clear your remote control. You can manually change the Wide Mode setting while watching TV by pressing the WIDE button on the original source, a black frame or black bars may surround the picture. Full pixel This mode is available only for 720p, 1080i and 1080p formats excluding Cable/Antenna input. • Full Pixel displays the picture in a carousel-like fashion. 2 When the recently viewed items are watching...
Operating Instructions
Page 17
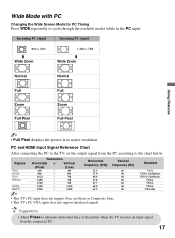
... input does not support Sync on Green or Composite Sync. • This TV's PC VGA input does not support interlaced signals. Standard VGA VESA Guidelines VESA Guidelines VESA VESA VESA CEA-861 • Adjust Phase to cycle through the available modes while in its native resolution. Wide Mode with PC Changing the Wide Screen Mode for PC Timing Press WIDE repeatedly to eliminate horizontal lines of the picture when the TV receives an input signal...
... input does not support Sync on Green or Composite Sync. • This TV's PC VGA input does not support interlaced signals. Standard VGA VESA Guidelines VESA Guidelines VESA VESA VESA CEA-861 • Adjust Phase to cycle through the available modes while in its native resolution. Wide Mode with PC Changing the Wide Screen Mode for PC Timing Press WIDE repeatedly to eliminate horizontal lines of the picture when the TV receives an input signal...
Operating Instructions
Page 19
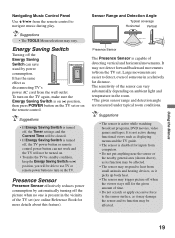
... programs, DVD movies, video games and tapes. Presence Sensor Presence Sensor effectively reduces power consumption by power consumption. Using the Menus 19 The sensitivity of the sensor can not work and the TV will not be turned on. • To make sure the Energy Saving Switch is on (z) position, then press POWER button on the TV set or on ambient light and temperature in the vicinity of the TV set (see online...
... programs, DVD movies, video games and tapes. Presence Sensor Presence Sensor effectively reduces power consumption by power consumption. Using the Menus 19 The sensitivity of the sensor can not work and the TV will not be turned on. • To make sure the Energy Saving Switch is on (z) position, then press POWER button on the TV set or on ambient light and temperature in the vicinity of the TV set (see online...
Operating Instructions
Page 20
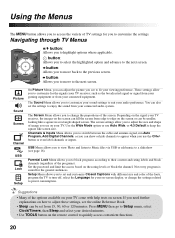
... the screen can adjust the picture you to customize your connected audio system. such as the broadcasted signal or signal from your gaming equipment or from your sound settings to highlight options where applicable. The Sound Menu allows you see page 18). Press MENU then go to quickly access convenient functions. 20 Set the password and limit the access based on the remote control to Setup menu, select Clock/Timers, then Sleep and select your viewing...
... the screen can adjust the picture you to customize your connected audio system. such as the broadcasted signal or signal from your gaming equipment or from your sound settings to highlight options where applicable. The Sound Menu allows you see page 18). Press MENU then go to quickly access convenient functions. 20 Set the password and limit the access based on the remote control to Setup menu, select Clock/Timers, then Sleep and select your viewing...
Operating Instructions
Page 21
... resolving problems. Read the online Reference Book at home, check to see if the TV is no picture from the power source before contacting Sony. Troubleshooting Many problems with the remote control's operation. • To reset the TV to factory default settings: ❑ Turn on Return settings to factory defaults. Gently dust the TV with warm water. Stubborn stains can be low. Press and hold down the V button on the remote, press the POWER button on...
... resolving problems. Read the online Reference Book at home, check to see if the TV is no picture from the power source before contacting Sony. Troubleshooting Many problems with the remote control's operation. • To reset the TV to factory default settings: ❑ Turn on Return settings to factory defaults. Gently dust the TV with warm water. Stubborn stains can be low. Press and hold down the V button on the remote, press the POWER button on...
Operating Instructions
Page 22
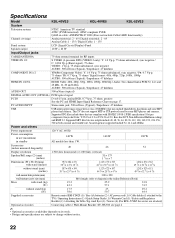
... KDL-40VE5 KDL-46VE5 KDL-52VE5 Television system Channel coverage Panel system Speaker output Input/Output jacks NTSC: American TV standard ATSC (8VSB terrestrial): ATSC compliant 8VSB QAM on page 17. Power and others Power requirement Power consumption in use (maximum) in standby 120 V AC, 60 Hz 140 W All models less than 1 W. 160 W 180 W Screen size (inches measured diagonally) Display resolution Speaker/Full range (2) (mm) (inches) Dimensions (W × H × D)(mm) with stand (inches) without stand (mm) (inches) wall-mount hole pattern (mm) wall-mount screw size...
... KDL-40VE5 KDL-46VE5 KDL-52VE5 Television system Channel coverage Panel system Speaker output Input/Output jacks NTSC: American TV standard ATSC (8VSB terrestrial): ATSC compliant 8VSB QAM on page 17. Power and others Power requirement Power consumption in use (maximum) in standby 120 V AC, 60 Hz 140 W All models less than 1 W. 160 W 180 W Screen size (inches measured diagonally) Display resolution Speaker/Full range (2) (mm) (inches) Dimensions (W × H × D)(mm) with stand (inches) without stand (mm) (inches) wall-mount hole pattern (mm) wall-mount screw size...
Operating Instructions
Page 23
... H HDMI IN jack, described 8 I Infrared Receiver (IR) 14 INPUT button 13, 14 J JUMP button 13 M MENU button 12, 14 MUTING button 13 P PC IN 8 PIC OFF/TIMER LED 14 POWER button 13, 14 POWER LED 14 Presence Sensor 14, 19 R RETURN button 12 S STANDBY LED 14 T Troubleshooting 21 U USB 8 V VIDEO/AUDIO (L/R) jacks, described 7, 8 VOL +/- button 13, 14 W WIDE button 12 Other Information 23 Index 0-9 buttons 13 A AUDIO OUT 7 AUDIO OUT jack, described 7 Auto Program 11 B BRAVIA Sync buttons 12 C CABLE/ANTENNA input, described 8 CC button...
... H HDMI IN jack, described 8 I Infrared Receiver (IR) 14 INPUT button 13, 14 J JUMP button 13 M MENU button 12, 14 MUTING button 13 P PC IN 8 PIC OFF/TIMER LED 14 POWER button 13, 14 POWER LED 14 Presence Sensor 14, 19 R RETURN button 12 S STANDBY LED 14 T Troubleshooting 21 U USB 8 V VIDEO/AUDIO (L/R) jacks, described 7, 8 VOL +/- button 13, 14 W WIDE button 12 Other Information 23 Index 0-9 buttons 13 A AUDIO OUT 7 AUDIO OUT jack, described 7 Auto Program 11 B BRAVIA Sync buttons 12 C CABLE/ANTENNA input, described 8 CC button...


